

This page is designed to cover basic strategy for Crypt of the NecroDancer. COTND is a roguelike dungeon crawler with randomly generated levels and permanent death when your character screws up. It also happens to be a rhythm game. This is... a bit of an unusual mixture, to say the least!  Everything in the gameplay works off of the music playing in the background. Your character can take one action per beat under normal circumstances: move, attack, use an item, cast a spell, etc. The enemies also act in patterns based on the music's tempo. Some of them will act every beat, others attack every other beat, and so on. The key to COTND is learning the monster patterns and acting accordingly in response. This becomes more and more difficult as the tempos of the songs speed up and the enemy patterns increase in complexity. When played well COTND looks like an elegant dance, the player's character effortlessly maneuvering through a sea of opponents to strike them down while remaining untouched. When played poorly, well, you die in a real hurry, and it's not particularly pretty.
Make no mistake about it: this is a difficult game, and it requies a great deal of practice to be effective. Beating the game with the default character (Cadence) is not easy at all, and the other characters only add more restrictions from there. This short little guide is intended to explain some basic tactics that I've found helpful. Unfortunately I've found few resources for COTND online, only the game's Wiki page and a whole bunch of YouTube/Twitch videos of expert players. This is a game that definitely works better in visual form than on the written page. Still, I wanted to type up my impressions while they were fresh in my mind. This guide is intended for Cadence on All Zones Mode, the default gameplay type. Once the player masters the basics, it's much easier to head off with other characters or get into speedrunning or do whatever else.
The first skill to learn is how to stay on the beat. COTND remains a rhythm game at its heart, and like Dance Dance Revolution or Guitar Hero, it's imperative to keep a steady tempo. If anything it's even more important in this game, since everything happens one beat at a time. Like many of the old dungeon crawlers, COTND is also a tile-based game. Your character moves one tile at a time, and can take one action per beat of the music. The basic principle is no different than the roguelike games from the 1980s. However, unlike those games, the "turns" in COTND tend to move much faster, since they advance with each pulse of the music. Later levels speed up the tempo quite a bit, forcing the player into multiple actions per second. The result is a strange mixture of turn-based and real-time gameplay, with the music driving the action along.
There are two major reasons why the player needs to stay on the beat. The first is that the monsters all move on the beat themselves, and trying to move out of time with the music results in some strange gameplay situations. COTND will attempt to "catch up" if your character starts moving in some strange funky way, and I've seen weird stuff like enemies moving faster than they should to try and re-sync with the beat in these circumstances. Remember, this is a pattern-based game, and if you can't keep the steady pulse of the music going, it's very hard to respond correctly. The monsters are all dancing, and the player must be able to perform the correct counter-dance. That's simply not possible if he or she can't remain on the beat.
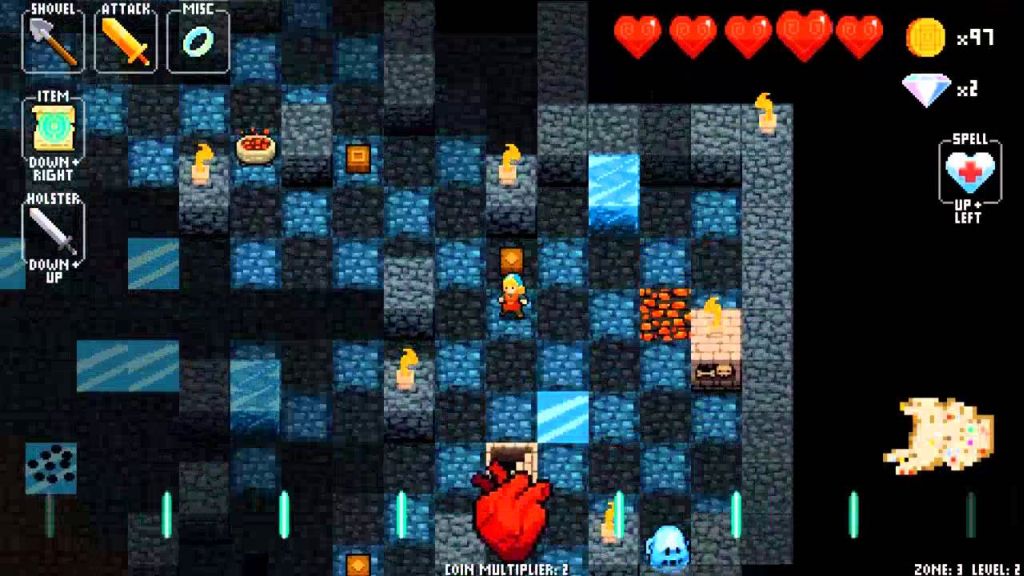
The other reason why it's necessary to stay on the beat comes in the form of income. This game uses a coin multiplier that works off of a simple combo system. Killing a monster at the start of a run drops the base gold for that class of opponent. It also increases the coin multiplier to two - that's double the gold for all future kills so long as the player remains on the beat. After killing five enemies in a row, the coin multiplier goes up to three, the maximum in normal gameplay. Think about that: you're earning TRIPLE income so long as you can keep moving along with the beat of the song. The extra gold makes a huge difference in purchasing items from stores, and those items are the biggest difference between an early death and a long run. Very, very few people are good enough to complete the game with nothing but the starting dagger - I'm certainly not one of them! Trust me, you want that extra money to buy more goodies. There are also quite a few items that grant bonus effects so long as the coin multiplier remains in effect. They lose their usefulness if the player can't remain on the beat. Fortunately, sticking with the music isn't all that difficult to do with a little practice. Everyone has sung along with a favorite song at some point in their life, and learning to tap out a steady beat can be practiced with any music at all. If you have no prior music training, try to get in the habit of tapping out a steady pulse and practice moving that way in the game. Trust me, it's a lot easier to do this with your fingers than with your feet in DDR!
After you can generally move through the levels while staying on the beat, the next great task to learn is memorizing the movement of the monsters. All of them have patterns, and the key to the game is knowing them inside and out. I don't mean it in the sense of "yeah I know the skeletons attack right after they raise their hands", I mean intuitively committing their movement to memory on a subconcious level. If you have to think about what the enemies are going to do, it's already too late. Conscious thought shouldn't be part of the process. In the later stages of the game, the tempo moves too fast for much thought and the floors throw masses of enemies against you all at once. Success lies in knowing what to do without even thinking about it - seriously, after a month of practice, my fingers would be moving practically of their own accord. Skeleton, do this. Bat, do that. Ghost, move this way. You get the idea. (DDR functions the same way at the highest levels of play, by the way. The songs move so fast that there's no time to consciously process what's going on. You train yourself to move automatically as the patterns appear on the screen.)
I could stop the guide right here, because those are the main skills in COTND: move on the beat and memorize the enemy patterns. But that wouldn't be very helpful, so let's look at some of the strategic elements of a successful Cadence All Zones run.

There are a couple different things that I've found to be critical in building Cadence for a succesful All Zones clear. The first and most important of these is securing an improved weapon. Before getting into that, let's back up and discuss monster actions in a bit more detail. Monsters generally move in one of three different patterns. The first is a predetermined pattern that isn't affected by the actions of the player. The best example would be the Blue Slimes at the start of the game: they move up and down between two tiles every other beat. The counter-pattern is pretty simple: attack from the sides. There are lots of different enemies that have some variation on this, and it's important to know where they will be moving next. The second grop would be monsters that chase after your character. These foes will follow after you, and can be pulled into tactical locations where they will be easier to defeat. I find that the chasing monsters are typically the ones that die first in large mobs - kite them back and take them out wherever you have space. The third and smallest group would be monsters that run away from your character. There aren't many of these enemies, and for the most part they aren't too dangerous. Most often it's a monster that you'll want to kill for a nice reward. Together, these three groups are the basic movement patterns, and pretty much every opponent uses them in one form or another.
Cadence begins the game with a normal dagger, which can attack one tile in front of her for one damage. Attacking and movement are the same thing in COTND. To attack with the dagger, simply move into the tile you wish to attack. This works very well against the Green Slimes, but you'll quickly find yourself in a pinch against the Gold Slimes (which move in a four tile circle) and many of the red ghosts that appear out of the air behind you. Moving next to these foes doesn't work - your character takes a hit every time that she tries! This is because your character is out of sync with their particular movement pattern. No matter how much you move Cadence, 50% of the time she'll be unable to damage a Gold Slime with the dagger. This is where most new players run into problems, and I was certainly one of them. The solution: you must waste a beat somehow, to sync up your movement with the monster in question. It's possible to do this by standing in place without moving for a beat, but that ends the coin multiplier and is not recommended. Normally, the answer is to spend one turn digging into a wall with your shovel; this wastes the beat while standing in place and synchronizes Cadence's movement with the enemy in question. Do this correctly, and all of a sudden that Gold Slime can be hit easily for no damage. Killing a beat like this is a very important skill to learn, in particular recognizing when it's needed to inflict a successful attack without taking damage. Without dropping beats occasionally, the dagger can't function properly as a weapon.


OK, back to the issue of weapons after that diversion. I find the single most important thing to secure in an All Zones run is a weapon with two-tile range. There are three weapons that do this: the spear, the longsword, and the rapier. All of them are excellent and have led to many a great run for me. The spear is the most basic, it hits from one or two tiles away and can be thrown if desired (hint: you normally don't want to throw the spear and leave yourself unable to attack). The longsword functions the same way except it can hit more than one enemy at a time and can't be thrown. The rapier is more unique; it functions normally from one tile away, but enemies that are two tiles away will take double damage and cause Cadence to dash one tile forward while attacking. Trust me, that dash can get you in a lot of trouble! With some practice though, the rapier becomes an incredibly fun weapon to use, dashing from one monster to the next in a flowing dance of death. Bows are even better weapons, hitting from 1-3 tiles range, although I rarely seem to find them on my runs. As for the weapons that attack on the diagonal, the broadswords and whips and flails, I generally try to avoid them. They confuse me as much as they help me with their diagonal attack pattern. I'm sure that they're perfectly playable in their own right, but speaking from personal experience, give me a longsword any day.
Why are the range two weapons so good? Well, it goes back to the monster discussion above. With the dagger or any other one-tile weapon, your character can get "wrong footed" and need to waste a beat by digging into the wall to attack successfully. This isn't always easy to do and also forces the player to recognize the situation quickly. However, with the weapons that can hit from two tiles away, you will almost never find yourself in this situation! Since Cadence can hit that Gold Slime from either one tile *OR* two tiles distance, it can always be attacked without fear. These weapons drop the difficulty level of COTND significantly; I found that all of my best runs were situations where I'd found a good range two weapon almost immediately. Better offense translates into better defense as well, just as it does in FTL. Securing a strong weapon ASAP is the first and most important aspect of building your character.
In addition to the weapon class, most of the attack options in COTND also come with a weapon material. There are six different materials, each with their own properties. First of all, every weapon always has a default material which deals normal damage and has no other special abilities. This is normally displayed by a gray icon graphic on the screen, and these weapons function the way you would expect for their individual classes. The next weapon material is Titanium, which causes most weapons to deal 2 damage instead of 1 damage per attack. These show up with a white icon graphic (and can be a little tough to distinguish from the default weapon material at times). Titanium weapons are excellent at killing monsters and make for great choices. I've had many a victorious run with a Titanium rapier or longsword.
Then there are the more esoteric weapon materials that pop up. Gold weapons cause slightly more money to drop when defeating enemies, and have the unusual property of dealing 999 damage on the beat after the player picks up gold. Since nothing in this game has more than 8 health, that's a little bit of an overkill there! I've never had much success trying to play around this extra ability (COTND moves too fast to set things up), and I consider the Gold weapons to be a slightly better version of the default type. Not too special unless playing for a high score. Then there are Glass weapons, distinguished by their green color, which deal 4 damage per attack... until the player takes damage, at which time they shatter. A broken Glass weapon functions identically to a normal dagger. Unless you're playing as Aria, I don't recommend the Glass weapons. There are also Obsidian weapons, probably my favorite weapon material in the game, which stand out for their purple color and their unusual property. Obsidian weapons deal damage based on your coin multiplier. When it's one, they deal one damage. When it's three, you deal three damage per attack, enough to one-shot nearly all non-boss monsters. The Obsidian weapons therefore place a huge premium on moving with the beat. If you can manage this, they are amazing weapons to use.
There's one more weapon class, which deserves to go in its own character building section.

After securing a strong weapon, there's one other component of character construction that goes into a long and successful run. It's not armor, or torchlight vision, or better footgear, although all of them certainly help. In my experience, the other cruical thing to secure in COTND is some form of lifesteal. Until you become very, very, VERY good at this game, you're going to be taking hits throughout the course of an All Zones run. Barring a lot of good luck, there aren't enough recovery items (apples, cheese, etc.) to keep refilling your health as Cadence takes damage. Having some form of lifesteal on hand was the critical difference in my runs between stalling out and dying early on, versus making it deep into the game.
There are several different kinds of gear that provide lifesteal in COTND. The first and most obvious choice comes in the form of the Blood weapons. These are another weapon material that add a lifesteal property to the base weapons: 1/2 of a heart restored after every 10 monster kills. That might not sound like a lot, but think how much better it is compared to getting nothing back! Don't forget that you can also smash things like the mushrooms in Zone 2 and the flame pots in Zone 3, which also count towards that life restoration. A typical floor seems to have roughly 25-30 monsters on it, and as long as the player isn't speedrunning, that's enough to get some notable health back. The Blood weapons therefore make excellent choices for a long and successful run, especially if there are no other sources of lifesteal available. Of course this does mean forgoing the extra damage of Titanium or Obsidian weapons, but damage isn't as critical in COTND as it might seem, and it can also be grabbed in other item slots. Neither of the endgame bosses at the conclusion of Zone 4 will take any damage from your weapon anyway (one is invulnerable and the other requires a special weapon to take damage). I've found that 2 damage seems to be the sweet spot, with 1 being a little low and 3 or more damage being somewhat overkill. Nice to have, not necessary. Since this is a randomly generated game, of course, you'll rarely have too many choices on available weapons. In practice, any range two weapon that rolls Titanium / Obsidian / Blood makes for a great option.


There are a select few other pieces of gear that restore health aside from the Blood weapons. My personal favorite is the Crown of Thorns, an item that fits in the helmet slot. Your character will take half a heart of damage upon putting this on, but it provides lifesteal equal to a Blood weapon while equipped. (If you also have a Blood weapon, the lifesteal will stack and you heal back half a heart for every 5 monster kills.) The initial damage penalty is completely trivial; as I mentioned above, a single floor will serve up at least two dozen monsters. I've grabbed this thing at the beginning of runs and healed back that initial penalty twenty times over. The Crown of Thorns has extremely high priority for me - get this if at all possible!
There are no other direct forms of lifesteal in the game. The Ring of Regeneration heals back one heart at the beginning of each floor, and it's another excellent choice, if not quite so good as the Blood weapons and Crown of Thorns. There is also a Heal spell available, which functions similarly to normal lifesteal. It restores half a heart, and can be cast without penalty after defeating 15 monsters. (If you try to cast it sooner, it costs life instead!) The Heal spell is therefore 50% less efficient compared to the direct lifesteal forms, and casting the spell also takes a beat of action to use, as opposed to the normal lifesteal (which happens automatically). However, since there are literally no other healing options available in COTND aside from the consumables, the Heal spell still grades out highly. This is not a forgiving game. You need to secure one of these lifesteal options or get really good at dodging monster attacks.
With a good weapon and some lifesteal on hand, there's one more important ingredient to a successful run: adding more overall health. Cadence begins the game with only three hearts, and that doesn't allow much room for error. You will die in two or three hits, and there are some endgame opponents that can do three damage in a single blow. Getting more armor helps, of course, but getting more total hearts can often be even better. (There are some enemy attacks that ignore armor.) I place a very high priority on securing additional heart containers whenever possible. Full containers are better than empty one, but snap up both types immediately. Additional hearts can be found in stores, sometimes they appear inside boxes and crates, and best of all are the blue colored shrines hidden in cracks in the walls. This shrine type will always sell a health recovery consumable and more heart containers. Most of the other shrines aren't particularly great, but I'm always bombing or digging at those cracks in the wall looking for the blue shrines and their health upgrades. Trust me, this game has a much wider margin for error when you have eight hearts compared to when you have only three of them!
Those are the most important aspects to upgrading Cadence for an All Zones run. I'll quickly go through some of the other equipment slots and discuss the best potential options. Let's start with the most basic: armor. This is the gear that protects your character when you get hit. The stronger the armor, the less damage taken, although all enemy attacks will deal at least half of a heart in damage. There's not too much to say here, stronger armor is always better to have. I'd say that the priority for armor is roughly "medium", not as high as securing a good weapon or finding lifesteal, but more important than a lot of other things. Walking around with no armor in Zone 4 borders on suicidal for all but the most expert of players.

Shovels allow your character to dig through dirt and (when upgraded) break down walls. The best of these is the Pickaxe, which will take down any wall through multiple turns of digging. Upgraded shovels can also open up the cracks that hide shrines without needing to use bombs. The Obsidian Shovel works well too, able to break through the higher levels of terrain if the player can keep the coin multiplier up. I rate the shovels with a fairly low priority, one of those things that's nice to have without being essential. Get the Pickaxe when it pops up, and leave the rest unless there's plenty of gold on hand.


Torches grant vision and allow your character to see further away, from +1 vision up to +3 vision. There's also a glass torch that provides vision of everything but breaks after taking damage (not too useful). Like armor, having a higher vision radius is always better on these runs. I recommend the +3 torch (Luminous Torch) or the Obsidian Torch, which also grants +3 vision with a full coin multiplier. Torches tend to be fairly cheap as purchases, and I'll often get one early in a run. Skip the Infernal Torch and Torch of Foresight, their secondary functions aren't that useful. They essentially function as a more expensive +1 vision torch. I find that I do noticeably better with the extra vision, and due in part to the cheap cost, I recommend emphasizing this part of the equipment. Do not grab the Ring of Shadows unless you like playing in the dark.

If you can't find the Crown of Thorns, I heavily recommend the Monocle for the helmet slot. The Monocle allows your character to see all of the items hidden on each floor, as well as spotting the invisible ghosts before they can attack your character from behind. This is much better than it sounds; there's normally too much stuff lying about to break open every crate with bombs. With the Monocle, you can see the item inside ahead of time and decide whether it's worth using one of your precious bombs. The Monocle also makes it much easier to spot hidden chests, and the visibility on ghosts can also be a real life saver. (I have died so many times when one of them popped out behind me in a narrow corridor.) Other stuff like the Helmet and Circlet can be decent, if nothing great. I personally don't like the Sunglasses that much because they make it harder to see. There are other ways to get more damage.

Footwear is very important as well in COTND, and the best option is clearly the Boots of Levitation. They allow your character to float above all traps and all hostile terrain; these things drop the difficulty of Zone 3 enormously. I heavily stress picking them up ASAP. There are two lesser boots that provide partial protection, with the Explorer's Boots (blue boots) protecting against fire / ooze and the Lead Boots (gray boots) protecting against ice and traps. While not as good as the flying boots, they both make navigating the hazards of the last two zones a lot easier. There's also a pair of boots that increase defense (Hargreaves) and a pair that add to damage (Boots of Strength). I generally prefer the boots that protect against stuff on the floor, since defense and damage can be picked up in other equipment slots. Still, they can be decent options too.


Finally, there are lots of different rings to choose between. I've already mentioned the Ring of Regeneration as an option to provide sustain, particularly useful if there's no lifesteal available. The Ring of Might adds one point of damage to your attack; the Ring of Courage also adds one point of damage and adds a charge attack, identical to the Rapier. (You can actually dash two tiles forward when pairing this with a Rapier, which is not always desirable.) The Ring of Protection adds yet another option for more defense. The Ring of Peace grants an extra heart container and makes fewer monsters appear; the Ring of War grants an extra point of damage and makes more monsters appear. There are lots of good choices here depending on what randomly turns up. (Don't take the Ring of Phasing though - it lets you walk through walls, and the ability to dig into walls is very important to preserve.)
Be aware that there are some items like the Glass Jaw and the Ring of Binding which instantly kill the player on the next hit. Apparently the developers liked to troll the people playing their game...
There are roughly 20 different kinds of monsters in COTND, and more than that if you could the various different pallette-swapped versions of the same basic monster type. All of them have their own individual movement patterns, and as mentioned earlier on this page, learning them is the key to success in this game. However, there are a couple of opponents that deserve to be singled out and mentioned individually. These are my least favorite enemies.

Red Bats are arguably the hardest non-boss monsters in the whole game. They can also appear starting in Zone 1-1 right from the start of the game, which goes back to the nasty sense of humor that the designers had. The bats that you're more likely to see are the Blue Bats, which move in a random direction every other beat of the music. Red Bats also move in a random direction, but they move EVERY beat instead of every other beat. That makes them extremely difficult to kill with a starting dagger that only hits enemies one tile away. You try to move next to them and they hit you in the process. Even with a range two weapon like a longsword, it can still be tough to defeat the Red Bats because they move so fast and move so unpredictably. The trick to beating these guys with a dagger is not moving next to them. You must move back and forth at a distance of two tiles, waiting for the Red Bat to move next to you. Of course, that two tile distance is constantly changing itself as the Red Bat wanders about randomly. This is very difficult to pull off in practice. It's also possible to sit two tiles away and start wasting beats by digging into a nearby wall, but that's not a consistent strategy either because the Red Bat can always wander away in another direction. Unfortunately there's no magic trick here. I heavily recommend trying to find a weapon with longer range since it makes defeating these jerks so much easier. If that's not the case, then try to keep dancing around at that two tile range and hope for the best. It's not easy.

Goblins are another monster type that cause massive confusion for new players. I couldn't figure out how to defeat these things when I started out, and I had to look up a strategy on YouTube to figure it out. The AI pattern for the Goblins is relatively simple: they will run away when you move towards them, and advance towards you when you turn away. It's a little like the ghosts in Zone 1, although much more dangerous. The Goblins also deal a lot of damage (the normal ones do 2 damage while the gray ones deal 3 damage!), and they have a nasty habit of sneaking up on you when occupied with other foes and slashing poor Cadence in the back. How do you fight an enemy that always runs when you get close? Unlike the Red Bats, there is a trick here: get the Goblins into chase mode by turning away, and when they start pursuing, begin digging into nearby walls with your shovel. They'll keep following right up until you turn and kill them. It takes some practice to get this habit down, but it absolutely does work. The Goblins are still tough opponents even afterwards, however, and they remain the most likely enemy in Zone 3 to hit me.

Most of the minibosses that guard the exit of each floor are relatively simple to defeat. The Minotaur chases you, the giant bats and the nightmares move every other beat, etc. Out of the various minibosses that the game can randomly throw out, the Red Dragons are by far the most dangerous. First of all, they wake up at a much further distance than the other minibosses. I swear that the Red Dragons will activate seemingly half the level away sometimes. They will often break down walls and start chasing you while Cadence is engaged with a swarm of other monsters - not good. The Red Dragons also have the most health of any miniboss, tied with several others at 6 hearts. That's six hits with the starting dagger, meaning the player must get in repeated attack after attack without taking damage. (The Red Dragon will kill you in one hit without any armor. Very fair.) Most dangerous, however, is their Fireball attack: the Red Dragons will breath fire in a horizontal line whenever they have a clean shot. This is identical to the Fireball spell that the player can cast, and it deals 2.5 hearts worth of damage. Armor does not reduce this damage, by the way. Note as well that the Fireball spell has ridiculous range, and Red Dragons can use it from as many as EIGHT tiles away. I've been in situations where I've glimpsed a Red Dragon way off on the other side of the screen, and suddenly I'm dead on the next beat from a fire breath that I had 0.3 seconds to anticipate coming. Again, very fair...
The Red Dragons are the toughest miniboss in the game. This makes it very strange that they will start spawning in Zone 1-2, and can appear on any other floor for the rest of the run. The Red Dragons are much harder than the Banshees and Nightmares that don't start appearing until Zone 2. They're also tougher than their Blue Dragon cousins that don't show up until Zone 3. The balance is wildly off here; I don't know why the developers made such a tough opponent appear so early in the game, before the player has time to collect much in the way of equipment. By the time that Ogres and Mommies appear in Zone 4, the player should have plenty of stuff on hand to fight them. Red Dragons have killed me more than every other type of miniboss put together. Anyway, there are ways to counter them. The easiest is to attack them from above or below, which removes the threat of the fire breath. Red Dragons move every other beat, so attack -> move, attack -> move, etc. The difficult part is finding enough room in the dungeons to set up this pattern. You need about 4-5 clear vertical tiles, and that's not always easy to find. Whenever I hear the boss sound effect plays, I always immediately assume that I'm fighting a Red Dragon and start looking for a cleared out vertical area to do the combat. It's safer to assume that you're fighting a Red Dragon every time and take precautions accordingly. If there's no space available, then be prepared to jump out of the way of the fire breath. The Red Dragon will always breathe fire if you're in a horizontal position, and will always pause for one beat afterwards. You can use this to run in a circle around them, although I'll caution that it's very dangerous. They deal 3 damage with their normal attack, and without armor or extra heart containers that's a one hit kill. Trust me, it's better to hit them from above or below. Upgraded weapons also help a ton to cut through their 6 HP faster. Do your best to set the terms of the engagement, and always be prepared to retreat to another area with more vertical space.


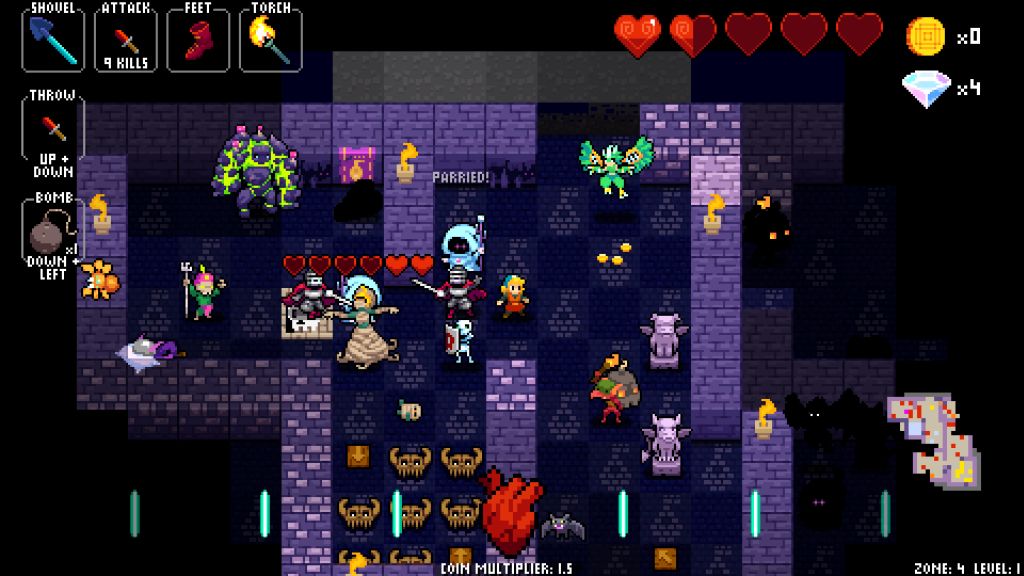
I don't want to say too much about the bosses, since practicing them is the best way to get better. (Thankfully COTND has a great boss practice mode available from the main lobby.) I generally find King Conga to be the easiest; the trick is to find a good spot where you can keep hitting the two conga lines on alternate beats. Right then left, then right then left, etc. The hardest part tends to be the other monsters in the room, not the two lines of zombies. Remember, the music pauses on the last quarter note of every other measure. Once you get used to pausing on the eighth beat and taking no action, it's a fairly easy boss fight. I find Coral Riff to be the second-easiest, and it's mostly a test of reflexes to hit the music instruments when they pop up out of the water. Remember that the instruments and Coral Riff itself will hit all eight tiles around them with their attacks. The boss is easy to hit with a range two weapon like a spear. (I have fared poorly in this battle without one of these weapons.) Deep Blues would the second hardest battle for me, mostly because it's hard to keep all of the chess piece movement patterns in mind at the same time. This boss fight has a relatively slow tempo though, and hugging the left side of the screen (roughly the a3 to b4 part of the board) to draw out the queen generally works well. Getting behind the pawn line helps too. When it's down to just the player and the king, move horizontally to the left or right and the king will move diagonally downward until he's right above you for an easy attack. This is again much easier with a range two weapon. Finally, I find Death Metal to be the hardest of the bosses, largely because of his huge health bar and starting shield. The shield will block damage from the front at the start of the battle, forcing you to attack from the sides. Once it's gone, Death Metal is much easier to hit. Make sure to avoid attacking him horizontally because he'll shoot a fireball spell in your direction. The random monsters the boss keeps spawning and the trapped floor tiles can make this a chaotic fight. Death Metal is another place where a weapon that deals additional damage helps a lot, cutting through that health bar more quickly and reducing the time that he spawns all those additional monsters.

Cadence fights two bosses at the end of Zone 4, one after the other. The first is Dead Ringer, and I found him to be more difficult than the final boss itself. Dead Ringer himself is invincible and can never be damaged in any way. The main focus in this battle is four bells spaced out around the boss room; Dead Ringer will hit them with his hammer, causing a miniboss from earlier in the game to pop out. (There are also two coffins in the top corners of the room that will spawn skeletons until defeated.) After all four bells have been rung, Dead Ringer will begin charging Cadence repeatedly. His charges have infinite range and ignore armor when they hit you. There's a warning of one beat before he charges, which means you get about half a second to see the attack coming and dodge. Dead Ringer can only be defeated by tricking him into charging into a gong at the top of the screen, which ends the battle. When thrown into this battle immediately, it's a confusing mess and I had terrible trouble dealing with it. Dead Ringer killed me many, many times before I figured this one out. The trick here is that Dead Ringer will chase after you if you walk into the same horizontal row or vertical column. This is a good thing - you want the boss slowly chasing after you instead of ringing the bells and releasing minibosses. At the start of the fight, cut to the right and Dead Ringer will usually start chasing after you. This gives the player time to go take out the skeleton-releasing coffins at the top of the screen. Try to keep Dead Ringer chasing after you while hitting the bells one at a time, defeating the minibosses as they come out. (You can also use bombs to destroy the bells without releasing the minibosses if you have extras.) When the last bell is rung, he'll begin those deadly charging attacks. Stand in the column in the exact middle of the screen, and walk upwards toward the gong. Dead Ringer will charge you sooner or later, and you can step out of the way to force him into the gong. The critical thing is to stay on that column in the middle of the chamber. That's how to bait his charge into the gong. Once I understood that, suddenly the battle became a hundred times easier. That said, there's a lot that can go wrong here, and remember that Dead Ringer's charge attack will ignore armor. Be prepared to eat recovery items if you have them.

Cadence's All Zones run ends with a cleverly designed battle against the Necrodancer himself. You control both Cadence and her father Dorian in this battle at the same time, which definitely takes some getting used to. Dorian is the dangerous one in this battle; most of the time, I have Cadence so decked out in equipment that she stands little chance of perishing. Dorian has a Ring of Might (+1 damage) and some basic armor, but he only has 4 hearts and there's no way to heal him. Try to keep him as safe as possible. Anyway, the first half of the battle has you hitting a series of switches with the two characters while the Necrodancer spawns random monsters to attack. I'm pretty bad at maneuvering the two characters to hit the switches, but fortunately there's no time limit here. If you can keep defeating the random enemies, you can take as long as you want to hit the switches. After hitting each pair of switches, part of the Necrodancer's stage will be destroyed until he finally begins attacking himself. At this point, Cadence must grab the Golden Lute since it's the only weapon that can damage the Necrodancer. (Fun tip: give Dorian whatever weapon Cadence was using previously when she picks up the lute! It's usually much better than whatever he has.) The Golden Lute has a weird attack pattern that hits every single tile around the user EXCEPT directly forward. It hits enemies two tiles straight forward, but not one tile straight forward. Hit the Necrodancer from the sides, behind, or from two tiles away to deal damage. He has two attacks: a freezing spell identical to the frost breath of a Blue Dragon, and a bomb spell that hits everything in a normal bomb blast radius. These attacks are both heavily telegraphed by the Necrodancer raising his hands and then standing in place for a few beats. The whole time the fight takes place, the Necrodancer will keep spawning more monsters, including minibosses at times. Try to hit the Necrodancer from above or below, much like with the Red Dragons, and concentrate on going after him, not the endless waves of enemies. Watch Dorian closely since he's more likely to die; I try to keep him next to Cadence because the movement is less confusing that way. Six hits will finally defeat the Necrodancer and end the game. (I found this boss fight to be easier than Dead Ringer; your mileage may vary.)
This should give you some tips on how to get started with Curse of the NecroDancer. Nothing substitutes for actually playing the game, however - get out there and start practicing! All Zones Mode is a very rewarding experience to complete, and it's an achievement worth celebrating. According to Steam stats, a little over six percent of the playerbase has successfully completed an All Zones run with Cadence. That's about one in fifteen players, and even accounting for the infamous "bought it on Steam and never played it" owners, that's not a lot of people. I'll finish this page by linking to successful All Zones clears with different characters on Livestream. I'd like to see how many different characters I can pull that off with. Thanks again for reading. Now go out there and start Necrodancing! 


