

78,688 gold, 548 monsters slain
I continued with my sequence of Knight characters in the aftermath of completing Normal difficulty. Unlike in the original Rogue Legacy, the character that beat the previous difficulty does not carry over into the next one, probably so that players can't stack up an unending number of Blessing of Life benefits from re-running the dungeon with the same character. My new Knight heir had the Dwarfism trait which shrinks your character model down to tiny size, back again from the first game. It came with +25% additional gold generation to offset the penalty of the miniscule sword. I had more souls to spend thanks to defeating Tubal, Jonah, and Cain which I used on another rank of Absolute Strength, now sitting at level 3 to match what I had in Unbroken Will. Interestingly, the player cannot access the scar challenges right after beating a difficulty because the Drift House remains shut; I have no idea why this is the case but that meant no testing other scars for now.
Elsewhere, I grabbed the Folded Rune to increase the Armor blocking cap from 35% to 39%. I had 23 of the 24 rune types by now which meant that I could begin finding a second tier of all of the various runes; they generally don't start to appear until entering NG+1 difficulty and I was hoping for a second copy of the most useful ones (lifesteal and stuff involving Armor) to drop quickly. The Blacksmith had nothing that I wanted for the moment since the only new additions on the last run had been a bunch of Leather +1 and Scholar +1 gear that was worse than what my Knights already had. The floodgates were about to open there with the start of a new difficulty level. With my remaining funds, I spent 51k out of 71k gold on two additional Gold Gain levels, reaching the current max of six upgrades there for +30% gold. Combined with the Dwarfism trait and my one Bounty Rune, that would mean 65% extra income for this upcoming character. What was left over went into some minimum Strength, Vitality, and Armor upgrades for a couple of extra points in each.

Defeating the game on Normal difficulty opens up the "Threads of Fate" and the chance to reach New Game Plus difficulty for the first time. The player is required to add additional "burdens" in order to try the next difficulty level which can be picked from a list of various options similar to the heat system in the game Hades. Players can choose standard options like more enemy health, more enemy damage, environmental hazards dealing more damage, and so on. I turned on the burden transforming normal Lamech into the more dangerous Lamech Prime boss refight and then put two points in Burden of Evolution (monsters have 20% chance to transform into the next tier up) and Burden of Adaptation (monsters have 6% chance to gain a commander buff) along with one point in Burden of Scale to make the dungeon 10% larger. This was significantly more burdens than needed, as the player only needs to pick two of them and I'd selected six, with my goal being to recreate the feeling of increasing the difficulty level from the original Rogue Legacy. I intend to limit myself to NG+2 with this Class Legacy series to cut down on re-running tedium and this will add more sting to the second and third playthroughs.

Knight #6: 52 Vitality, 53 Strength, 6 Dexterity, 77 Armor, 20 Intelligence
Jumping up to a new difficulty level isn't as drastic of a change in Rogue Legacy 2 as it was back in the original title. There were a bunch of monsters in the Citadel showing up in their tier 2 versions thanks to the additional burdens I'd chosen and everything had far more health and damage, however it wasn't THAT different overall. Then again, the first time that my Knight took a hit it dealt almost 100 damage and she had all of 640 starting HP so not exactly a lot of room for error. Using the teensie little sword on a Dwarfism character is always annoying since the Knight's sword swings are a major way of staying safe. I had to be more precise with my attacks since the sword's hit box was so small for this heir. I went into the Stygian Study first and made my way to the central room with the guaranteed Blessing of Life. The heirloom room next to it had a Demeter's Trial relic which I was able to grab and cleanse after finding more of the teleporter rooms. I cleared out the full Study without ever getting in too much danger while somewhat surprisingly not finding much of anything in terms of new equipment. One other place where I really noticed the increased difficulty level was the amount of gold dropping from enemies. My Knight had collected nearly 50k gold just from the Study alone which was a vast improvement over anything that I could have brought back in Normal difficulty.
I headed into the Dry Lake upon discovering the entrance only to find a Blessing of Life there and lose half my character's health which prompted a retreat back to the remaining Citadel and then Axis Mundi. The first relic that I decided to take was Achilles Shield: deal 10% more damage when above half HP. It's nothing amazing but helps a bit. There were enough tough commanders in Axis Mundi that I wasn't recovering too much HP though the Drowned Sword did show up in a treasure chest there, one of the best weapons in the game for any class running a Strength build. Later on, most of the rest of the Drowned set would drop in the other equipment slots which was going to force some hard tradeoffs in terms of picking the Ammonite set versus the Drowned set unity bonuses. I think that I preferred running the Ammonite set bonus largely because the Ammonite trinket has better stats on it than the Drowned trinket (plus the latter hadn't appeared yet).
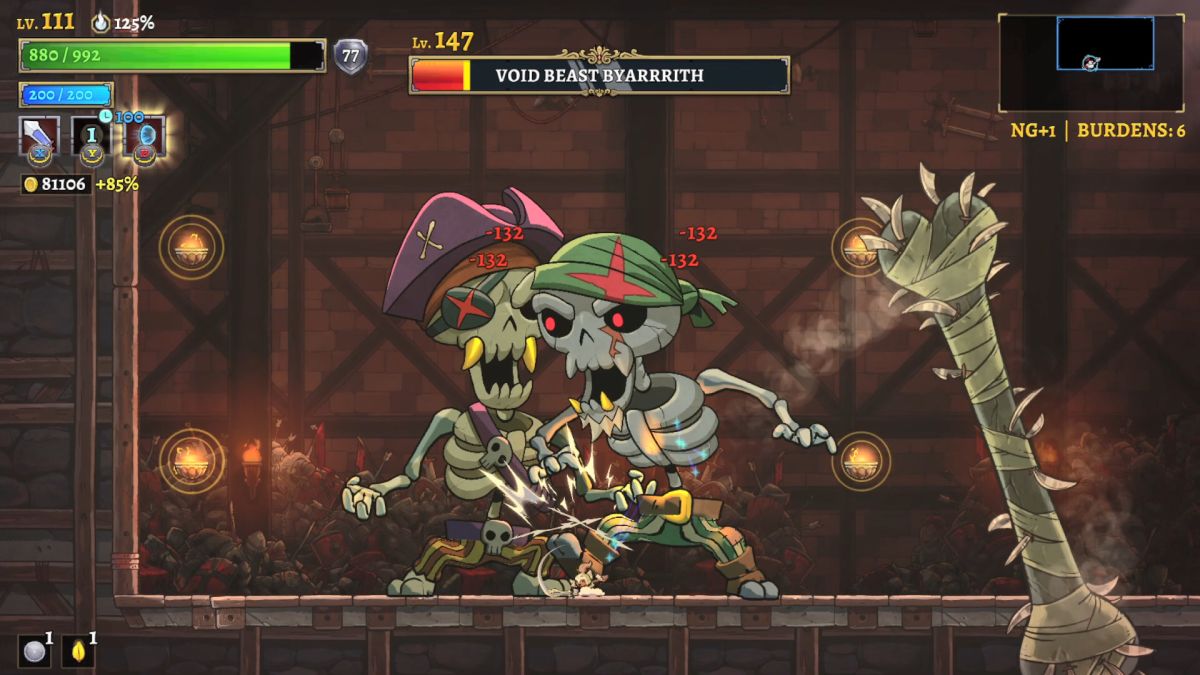
One thing that the player can do in the later difficulty levels is use the boss doors themselves for HP restoration; I had enough upgrades by now to restore 60% of health upon entering one of them. I fought in the Dry Lake until falling down under half HP and then teleported back to the Axis Mundi Void Beasts for the health refill. This boss fight went pretty well aside from one moment when my character found herself stuck in between the two monsters with the shield still on cooldown. The trickiest part was hitting the bosses with that little toothpick of a sword without walking into them and taking damage. Afterwards I returned to the Dry Lake and had a strong sequence of rooms, clearing the entire basement without needing to retreat again for more health. The chests down there dropped three pieces of the Leviathan set which would have been fantastic for an Intelligence-based class, not so much these Knights. I tried to head into the Sun Tower next only to run into a red portal fight with the two Blightborn Furcas minibosses. Normally they aren't too bad but I had great difficulty hitting their cursed spirits with the little sword on this Knight and took several hundred damage before defeating them. This prompted a retreat into the Kerguelen Plateau which may have been a mistake because the wolves in there were also unusually tough opponents thanks to the Dwarfism trait. The Knight's sword is the primary defense against their charging and it was a lot harder with this character. I was never able to rebuild health in the Plateau and hovered around 200-300 HP while clearing it out. While I was able to open the boss doors by finding the Lilly of the Valley relics, I was eventually killed by a double commander pair in the very last room. I probably should have simply fought Naamah to get the health refill upon opening the boss doors but I wanted to clear that last room, argh!
156,355 gold, 469 monsters slain
Back at the docks, I had 250 souls to spend which was exactly enough to purchase the fourth rank of Unbreakable Will. The previous Knight had found a decent number of runes however none of them were in the categories that I was using at the moment. There was nothing to purchase from the Enchantress sadly. Over at the Blacksmith, a whole bunch of Drowned gear had shown up and I bought the Drowned Sword for +5 Strength over the Crescent Sword. I also picked up the Crescent Helm +1 since it provided the greatest Vitality boost for the moment while keeping Ammonite gear in the other three slots for their unity set bonus. For the main upgrade tree, I spent 70k gold on acquiring the two new Gold Gain levels and then the rest went into a mixture of Vitality, Strength, and Armor upgrades as usual. The typical level in those categories was approaching 5000 gold apiece now as the inflation mechanic kept making everything more expensive.
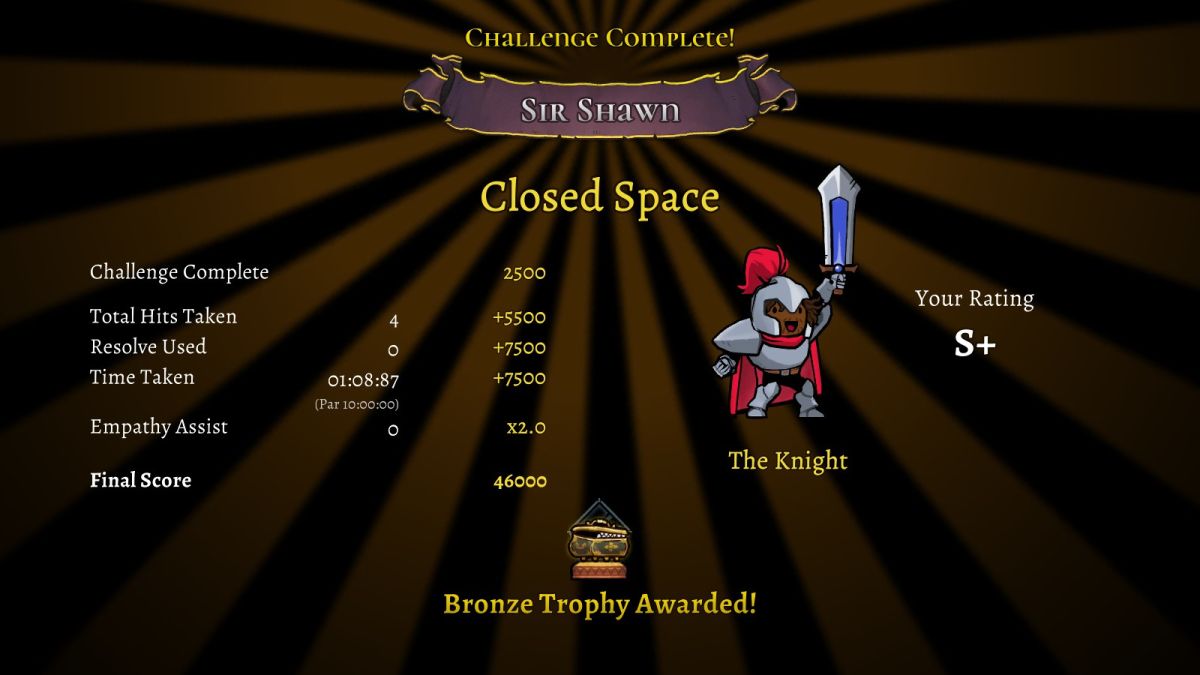
I also went ahead and fought the "Closed Space" scar challenge which pits the player against the mimic chest version of estuary Enoch. This opponent is made more difficult thanks to the presence of floor spikes on the ground and a very cramped chamber in which the boss fight takes place. When this scar challenge was first added to Early Access, I was completely stymied by the boss and couldn't figure out what to do. I've since learned that the trick is to stand in place and let the chest bounce above your character when it hops around, that and spin-kick off its head over and over again when it's tossing out the evil coins. This battle turns out to be pretty doable once learning that basic pattern. I won on the very first try with an S+ rating and then realized that I hadn't turned on the recording software and therefore only snapped the victory picture. I'll have to get some better footage of this later on down the road. The S+ rating was enough for a Bronze Trophy and 300 more souls which I'd spend on my next trip back to the town area.

Knight #7: 66 Vitality, 63 Strength, 6 Dexterity, 86 Armor, 20 Intelligence
This Knight also had no traits and I continued to be amazed at this long-running sequence. The Citadel had an annoying layout this time around with neither the entrance to the Study nor the Dry Lake near the starting point and I had to clear out most of it before finding another area. That made it harder to save this easier area for health recovery later. The dungeon offered me the chance to switch to both the Duelist Rapier and the Duelist roll talent - stop tempting me! Those weren't allowed by variant rule as discussed earlier. The Study had some tough rooms and I dropped as low as 100 HP at one point but rebuilt from there without retreating. There was a second Blessing of Life up there in addition to the guaranteed one which was appreciated. I had a chance to try out a relic that I don't normally use for this character: the Lotus Stem which blocks up to 2 attacks at a time at the cost of 150 mana per block, with mana flasks restoring charges. It's a useful relic both for clearing the dungeon and for stopping a couple of hits against bosses. It also works against the damage taken from Blessing of Life which is pretty awesome. Note that the Lotus Stem relic is useless for any class that doesn't have 150 mana which is a good portion of them; it simply does nothing in these cases while still costing resolve.
Axis Mundi was much like the Study, a place where I couldn't seem to replenish HP thanks to some tough segments with commanders. I cleared the whole place and couldn't get much higher than half health. The run started to hit its stride in the Plateau where for whatever reason I had better luck at avoiding damage. Perhaps the Lotus Stem made a difference or maybe I was simply doing better with the gameplay. I recovered enough health to head into the Dry Lake, cleared out some rooms there, then returned to the Plateau to take advantage of the 60% HP/MP restoration on entering the boss chamber. Estuary Naamah wasn't too difficult for a Knight character with good mobility and I avoided taking any hits until the very tail end of the battle when the Nightmares pegged my character a couple of times. I still came out of the fight with higher health than going into it, not bad.
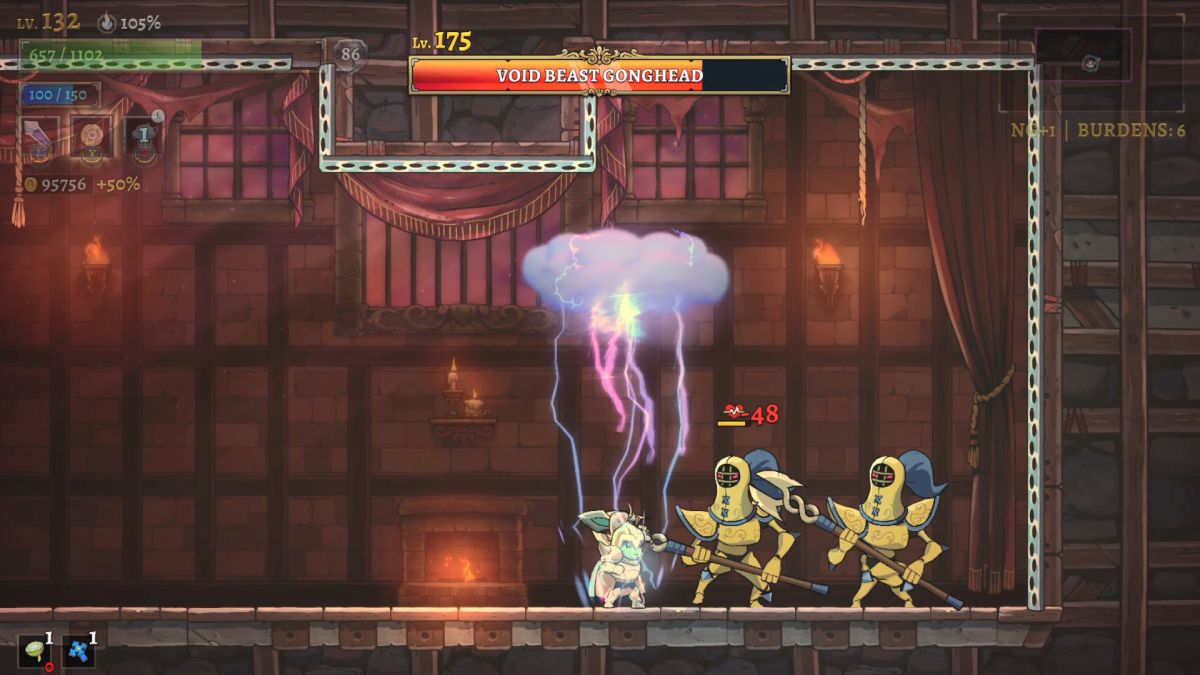
I took on the Gonghead Twins minibosses next and suffered only a single hit at the very start of the battle; both of them attack immediately when entering their little room and it's hard to react fast enough sometimes. The Lightning Storm spell was highly useful against these bosses for its temporary armor shred; hitting a monster applies Vulnerable status which causes all attacks to skill crit for the next few seconds. From there I headed into the Dry Lake and started the methodical process of exploring through every room. For no clear reason I had better luck here than in the Citadel and Axis Mundi, taking less damage and even increasing health over time thanks to lifesteal and meat/flask drops. The Lotus Petal was a major part of this success story as it cut down on a lot of incoming damage and allowed my Knight to claim another Blessing of Life without taking the 300+ damage penalty. Along the way, I knocked out both of the miniboss fights in the basement to unlock Tubal's boss door, taking some modest damage from both encounters without running into real danger. Eventually I found my Knight sitting around half health and teleported up to the Study to face estuary Enoch in what was really a way to heal back up to full. Enoch failed to hit my Knight at all in the first phase and had only marginally better luck in the second phase when I was tagged by the bouncing chest twice. This was another fight where it was incredibly easy to use the Lightning Storm to apply Vulnerable status; the mimic version of Enoch literally bounced above my Knight's head!
With another boss slain, I returned to the Dry Lake and completed the remaining rooms, the headed to the only remaining unfinished area in the Sun Tower. I took a nasty hit from a Massive version of a duckbill commander that did about 350 damage which nearly killed my Knight character, then slowly rebuilt HP for the rest of the tower. The most interesting drop was a second Soulsteal Rune, not as good as a Lifesteal Rune but still something worth using with the next character. This heir full cleared the entire dungeon by reaching the top of the Sun Tower and then was left with no choice aside from facing the remaining bosses. I went after Irad first and struggled during the (easier) first half of the battle, inexplicably flubbing a whole bunch of jumps for no reason. I actually did better during the second half of the boss fight after the third eye appeared. This was not the perfect result from Normal difficulty, sadly.

Then I went to face Lamech Prime which is the first of the boss refights only available in New Game Plus difficulty. Lamech Prime has more advanced versions of all of his attacks, such as his charge leaving behind projectiles on the ground and his sword slash hitting a much larger portion of the boss room. He proved to be easier than I remembered as I knocked out 70% of his lifebar before taking a single hit, then didn't manage to be quite so clean at the tail end of the battle. This was an easy victory though and winning allowed me to read the golden memories left behind by the slain estuary. This is where a lot of the game's secret lore is hidden and the player has to finish the game EIGHT times to read them all. (Even I found that to be pretty tedious.) The only remaining enemy in the dungeon was estuary Tubal who continues to be the toughest opponent for me. I did my best against him but ended up falling when he was right at the 1/3 health mark. I still need more practice against him to avoid some of the big telegraphed attacks.
199,568 gold, 603 monsters slain
I had 700 souls in my back pocket to spend which I sank into one additional level for Absolute Strength and Master Smith (for upcoming rune weight purchases). I had four ranks apiece in Absolute Strength and Unbreakable Will which were the main categories for Knights to upgrade. The only rune that I picked up at the Enchantress was the Soulsteal Rune from the previous run. Now that I had two of them, it was important to get Intelligence up to 25 so that each of the runes would provide 2 HP per monster kill, double the initial benefit. I could have dropped the Ammonite Cape in favor of something that had more Intelligence on it but that didn't seem worthwhile since I wanted to preserve the Ammonite set bonus. I was already sitting at 20 Intelligence and the levels were cheap so I simply purchased half a dozen of them (the game rounds down at exactly 25 Strength/Intelligence for lifesteal purposes). Then I saw that I wasn't too far off hitting 75 Strength for another point of health back on my Lifesteal Rune and sank a dozen upgrades into Strength to make it happen. From there, the remaining upgrades went into Vitality and Armor as usual; I spent a bit more heavily on Armor so that I could hit the nice round number of 100. This character was going to have much more sustain than previous Knights in the dungeon thanks to stacking up the power of those Lifesteal and Soulsteal runes.

Knight #8: 75 Vitality, 76 Strength, 6 Dexterity, 101 Armor, 26 Intelligence
This Knight was getting 7 HP per monster kill which was the expected big jump from the previous 4 HP per kill. I found the entrance to the Study quickly and went up there to clear it out. Amusingly the Lotus Stem was available as a relic choice again; I held off on taking it for now while remembering that it was there if I couldn't find a better option elsewhere. The highlight of this area was spin-kicking off a mage projectile to reach the secret room above the Gonghead Twins portal entrance. There's a hidden scar in there that I could try after this character's run was finished. From there I went into the Dry Lake and the extra lifesteal was enough that I could clear the whole place without needing to retreat for health recovery. That's usually a sign that the current difficulty level is drawing to a close since the whole dungeon no longer poses much of a challenge. There was one major equipment upgrade in the basement: the Ammonite Chest +1 which would allow me to retain the Ammonite unity while dropping the cape slot. Very nice.
I used the remainder of the Citadel and then Axis Mundi for some HP restoration since I was taking various Blessings of Life along the way. I also found two separate versions of the Gnawed Bone relic: eating meat drops while at full health increases max HP by 10%. I waited until my character was back to full health and then took the first Gnawed Bone relic, picking up two of the three stacks (for +85 HP apiece) while still in Axis Mundi and then picked up the third stack from breakables at the saved up teleporters. This prompted me to take the second Gnawed Bone down in the Dry Lake and once again I was able to use saved up breakables to land all three stacks immediately. This is yet another reason to save all those pots and barrels since you never know when they might come in handy. The double relics resulted in 6 x 85 = 510 additional HP on top of the extra health coming from the Blessings of Life. By the time that I'd cleared out the Sun Tower (finding a second Quenching Rune inside), my Knight was up to 2125 max HP which was more than double the starting value of 850 HP. That was an awful lot of additional health to provide a buffer against screwing up in the boss fights.

I left some of the Plateau unfinished for post-boss healing and headed off to face Tubal. I had a much better fight this time around but still couldn't avoid taking a fair number of hits; there's simply too much stuff flying around to avoid all damage, even with the Knight's shield to block some of it. This is the current hardest opponent for me as I seem to do worse here than against the final two bosses behind the Golden Doors. In any case, I defeated the estuary with about 960 HP remaining, not especially close to dying while still far from a clean fight. It was a good thing that I'd acquired all of that extra health since my original starting 850 HP would have been well short of enough to win this fight. Afterwards I cleaned up what remained of the Plateau without finding anything of interest and headed off to face the last pair of bosses.

I had torn right through Jonah in Normal difficulty and the same thing happened again here in New Game Plus. He only hit my Knight character twice and I feel as though I've gotten the rhythm of this boss fight down really well by now. It helped the Jonah avoided using his pizza attack (which he broke out only once) while sticking with his easier to dodge moves. This allowed me to face the Immortal King Cain with full HP and this time I played the battle much better, dodging most of Cain's attacks and using the shield block highly effectively. Cain has a lot of health to work through so it always takes some time to hack down the final boss. It's a good last test of the player's ability to read boss patterns and react accordingly; other non-Knight classes will likely have a much harder time without this much HP scaling from Vitality and overall ease of maneuverability. I polished off Cain with more than 1300 HP remaining for a fairly easy victory. Only three Knights needed for NG+1 difficulty, that was better than I'd been expecting and certainly worlds faster than in the original Rogue Legacy.
218,954 gold, 570 monsters slain
This time I had 600 souls to spend which was enough to buy the second upgrade in both Embroidered Investments and Runic Horizons. These would allow for equipment with the +2 affix and the third rune of each type to start appearing in the dungeon; there hadn't been any previous need since the Ammonite +2 gear doesn't start showing up until NG+2 difficulty anyway. I had no interest in Leather +2 or Scholar +2 equipment which would only clog up my inventory without ever being purchased. With about 40,000 ore and aether saved up in inventory, I converted 5000 of each into another 150 souls via Strange Transaction to take the fifth upgrade in Unbreakable Will. I actually wanted to run the new scar challenges that I had unlocked for potentially more souls but that's not an option immediately after finishing a difficulty level. I have no idea why this is the case and it continues to strike me as an oddity that the Drift House won't open outside the docks.

In the rune department, I equipped the second Quenching Rune at a cost of 30 additional rune weight. These things start to become really strong for non-Intelligence builds since they keep scaling as Vitality increases (each one restoring 2.5% of max HP from mana flasks) while the meat items remain stuck at 2x Intelligence for health recovery. Then I purchased my big prize in the Ammonite Chest +1 which freed up the cape slot for something better. I would have liked the Obsidian Cape here since it has Vitality on it but that hadn't dropped yet. I considered the Leviathan Cape for the big boost of 24 Intelligence but it was going to cost a bunch of equipment weight levels and I doubted I'd be using the item anyway as soon as I could turn up some more Drowned stuff for its own set bonus. Ultimately I stuck with the Ammonite Cape even though its stats were a bit subpar. On the main upgrade tree, about half of my accumulated gold went into another two Gold Gain levels at 91k cost along with an upgrade to Meditation Studies so that boss doors would recover 80% of HP/MP. Then I dumped what was left over into the usual mixture of Vitality, Strength, and Armor stats. The Armor upgrades in particular are incredibly expensive which is part of the reason why I favor getting additional free Armor from runes and the Ammonite equipment so highly.
This would be my last trip through the game and as a result I cranked up the burdens for NG+2 difficulty. This difficulty only requires 4 burdens but I chose to take 14 of them (!) to make things harder. I was taking max ranks in Burden of Evolution (50% chance for monsters to upgrade to the next tier) and Burden of Adaptation (15% chance for monsters to gain a commander buff) along with all three points in Burden of Scale to make the dungeon 30% larger. For my last burden, I also took the NG+2 option to face the prime version of the Axis Mundi Void Beasts. I wish that there was a way to face the other prime bosses somehow without having to play through the game another six times which wasn't going to happen for this variant. Hopefully this would make the gameplay resemble the old NG+2 experience from the original Rogue Legacy - I expected that having tier 3 monsters everywhere would make things noticeably harder.

Knight #9: 83 Vitality, 79 Strength, 6 Dexterity, 118 Armor, 26 Intelligence
Believe it or not, this Knight also had no traits. I swear that I wasn't rigging this and the non-Knight heirs kept rolling with various traits! What a weird coincidence.  I found double Blessings of Life in the first half dozen rooms of the Citadel which was awesome as it let me start farming up HP immediately with each monster kill. Or at least I thought this was a good idea: I kept running into rooms where monsters rolled the "Shield Banner" commander buff and made all of the other enemies nearby invincible. This made for some extremely dangerous situations as I was forced to kill one particular monster before anything else could be damaged in the room and I inevitably took some hits doing so. My Knight dropped all the way down to 40 HP at one point, yikes! I grabbed Freon's Reward relic to help out with HP recovery, it grants health equal to Intelligence every time that a treasure chest is opened. That was 26 HP per chest at the moment, not great for a Strength-based build but I needed all the help that I could get right now. I tried to clear out one room with several commander enemies and simply couldn't get it done without dying. Well that was the NG+2 experience back again from the old game! This was the first character in this variant challenge that failed to have a successful run and brought back a paltry amount of money.
21,616 gold, 76 monsters slain
Obviously there wasn't much gold to spend this time around so I picked up two Armor upgrades and that was it.

Knight #10: 83 Vitality, 79 Strength, 6 Dexterity, 123 Armor, 26 Intelligence
This Knight finally did a have a trait: Hero Complex, start with double HP but can't heal ever; picking up a meat or flask item would simply result in 0 HP. That was a truly horrible trait for my style of play and it meant that this poor fellow was doomed from the outset. I focused on clearing as much of the dungeon as I could but this poor Knight was inevitably worn down by the opposition. He only had 1800 HP which was less than I'd been able to get from stacking health back in NG+1 difficulty - not nearly enough of a tradeoff for being unable to heal. Keep in mind that I was killing 500-600 monsters on a typical full dungeon clear and getting 7 HP back apiece; that was roughly 4000 HP healed purely from lifesteal not even counting all the health recovered from meats and flasks and the occasional pizza. I actually found a ton of recovery items (including two pizzas!) which were sadly useless for this character. I did find one way to get some health back: taking the Hyperion's Ring relic and then dying since the revive apparently doesn't count as a form of healing. I managed to full clear the whole Study and I was proud of that given the difficulty of facing so many tier 3 monsters in each room. I also completed five or six rune challenges without finding anything that I'd want to equip. Better news was the Ammonite Trinket +1 dropping up in the Study which would make it easier to run that set bonus. Now I could get the Ammonite set bonus purely from the trinket slot and run Drowned stuff in the other four slots for the Strength adder. This was making the best of a bad situation.
76,224 gold, 158 monsters slain
The main thing that the previous Knight brought back was the Ammonite Trinket +1. I purchased it along with the Drowned Helm, Chest, and Cape which was enough to unlock the +15 Strength unity bonus for the Drowned set along with the Sword that I'd already been using. Fifteen points of Strength translated into 30 more points of damage per attack and also brought me very close to hitting the 100 Strength break point for additional lifesteal. I wound up just short at 99 Strength so that would have to wait for the next character. I didn't have enough gold left over for any other upgrades and I was still sitting on 0 souls for the moment. Speaking of which:
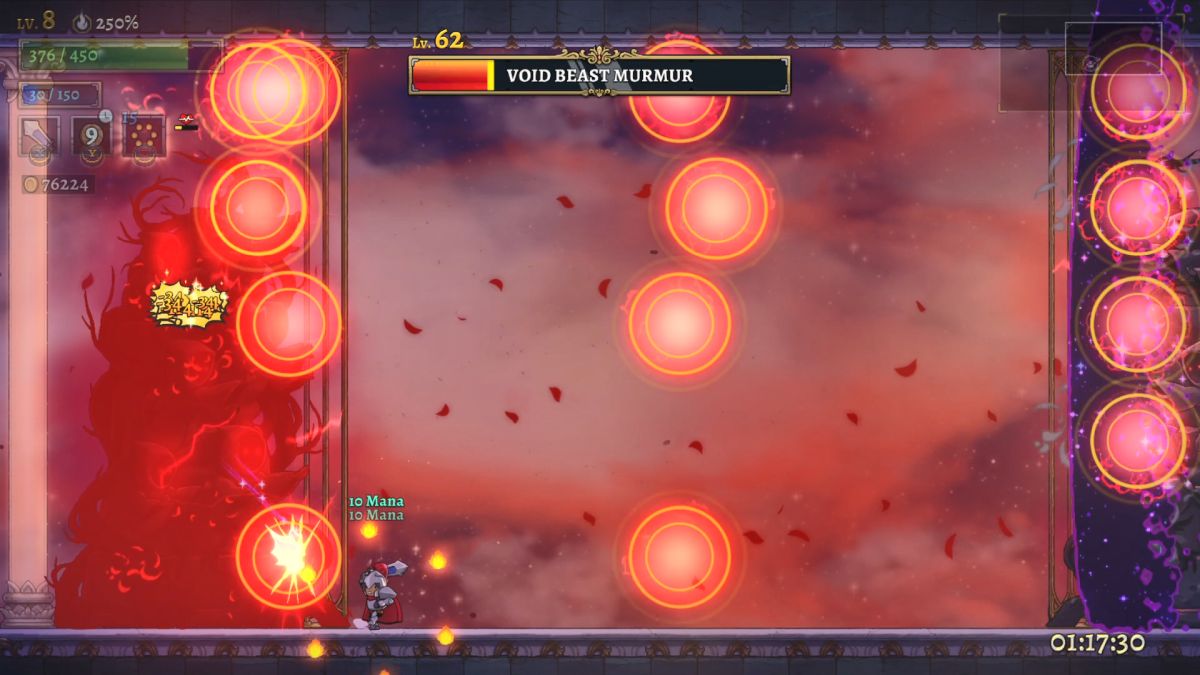
I used this Knight to attempt the "Spreading Poison" scar challenge which I had unlocked when I bounced into that hidden room above the Gonghead Twin minibosses. This is one of the toughest of the scar challenges as it starts the player out in a small room with not two but three of the Gonghead enemies. Avoiding three sets of their attacks is far from easy and that's not even the worst part of the challenge. Defeating them switches the player over to a new room with two versions of the Murmur miniboss on either side, both of them shooting their big waves of projectiles in opposite directions. The only consistent way that I've been able to complete this challenge is to burst down one of the two Murmurs as quickly as possible before they can overwhelm the room with their attacks. Then after one of the two Murmurs is gone, another Gonghead miniboss spawns in the same room for a final additional opponent. I was helped here by having the Flame Barrier spell on this Knight which was very good at pumping out additional damage at close range. Your stats are normalized in the scar challenges which means that Intelligence-based damage from spells actually matters in terms of contributing to offensive output. I was able to win by the skin of my teeth and received an "S" rating just short of the 45,000 points needed for a Bronze Trophy. I figured that I'd complete the challenge with another class to knock out those final 1000 points needed rather than keep re-running it for a more perfect result.

Knight #11: 79 Vitality, 99 Strength, 6 Dexterity, 115 Armor, 34 Intelligence
This Knight had the Paranoid trait which causes chests to toss out exploding potions when opened. That's not too bad and it granted +25% additional gold generation as a bonus. This heir also began the game with the Cosmic Insight relic: gain 100 mana when taking a hit, not something which was terribly useful for this setup. I found the entrance to the Study right away and headed up there, almost dying immediately thanks to a room that had double evil painting commanders. One of them had the Fury ability and it was moving incredibly fast while taking reduced damage. I played carefully afterwards and was able to rebuild health in the Study, including using the Murmur miniboss area as a place to gain back HP. There's always a bunch of breakables inside and I was able to make it through the whole room without taking any hits. I made it through about half of the Study before getting knocked down to 100 HP and forced to retreat into the Citadel. The more advanced biomes get really difficult under these extra burdens, there are so many tier 3 monsters and commanders everywhere that it makes for awfully tough going. I searched through the Citadel until finding Lamech's boss door which I saved for a health refill, then headed back to the Study on a mostly full lifebar. I made it to the guaranteed Blessing of Life, the first I'd seen in the dungeon, and continued exploring rooms as long as I had sufficient health. I wasn't getting as much gold as I expected because I was seeing tons and tons of equipment pop up in chests. There were many +2 items from the older sets (Leather and Scholar and Warden) that all had to be found at some point and added to the inventory. I did find a couple of Kin items for the first time though which might be worth equipping if I could work around unity set bonuses.
When my health dropped low enough, I fought Lamech to get the health refill on entering the boss doors. This went exactly as planned as I was able to defeat the non-prime version of Lamech without taking a hit. The first estuary was pretty easy in comparison to the random monsters that I was encountering in the dungeon. I decided to skip the Dry Lake as being too difficult for the moment and concentrated on Axis Mundi instead. The first half went reasonably well and I headed up into the Sun Tower where I couldn't get very far before taking too much damage and returning to the bridge. The second half of Axis Mundi proved to be tougher when it came to the monster mix and I wasn't able to do much to rebuild health. While I did clear everything and entered the Plateau, I wasn't able to make it far in there before dying while trying to finish a fairy chest challenge. This was a decent run and I found some more Ammonite +1 gear that I might decide to use afterwards for its unity bonus. What was really hurting me was terrible luck in finding the runes that I actually wanted to use; I still had only one copy of the Lifesteal, Bounty, and various Armor-benefiting runes. Just one more Lifesteal Rune and a little more Strength could take me from 7 HP per monster kill up to 12 HP per monster kill which would make a world of difference.
206,212 gold, 358 monsters slain
On this trip back to the docks, I briefly played as a Duelist so that I could get the final 1000 points needed for the "Spreading Poison" scar challenge that I had already completed with the last Knight. This gave me another 600 souls for completing the Bronze Trophy and I used them for a rank of Master Smith and Unbreakable Will to equip more runes and keep pumping Strength. There were actually no additional runes at the Enchantress that I wanted for the moment but surely they had to drop soon, right? The equipment space was where I made the most changes, purchasing the Ammonite Helmet +1 and Ammonite Cape +1 to go with the Ammonite Chest +1 and Ammonite Trinket +1 that I already had. This was enough for 50 points of Ammonite unity, granting another 60 points of Armor on top of the 30 Armor that the initial unity bonus provided. Armor is significantly more expensive to purchase on the main upgrade tree as compared with Vitality or Strength so getting a huge unity bonus from gear often seems like the best way to proceed. Since I was dropping the Drowned unity, this also allowed me to swap my weapon over to the Kin Sword for its higher base Strength value. I sank further upgrades into Strength until hitting the 100 mark for an additional point of lifesteal, then spent the rest on Vitality. My Armor had basically doubled in a stroke from roughly 100 to more than 200! Now if I could just find a few more Folded Runes to keep increasing the maximum percentage of incoming damage that that Armor would block.
I also went ahead and faced the "Automatons" scar challenge with this Knight which unlocks by finding the hidden scar inside a secret room in Tubal's workshop. This scar pits the player against a series of flying axes, daggers, shields, and hammers created by the underground estuary. The first half of the battle has several waves of the flying enemies attack the player, all of them tier 2 versions of the artificial creations. Then the second half of the encounter starts throwing the giant versions of those same monsters from the Onyx/Pearl Key miniboss fights against the player, all four of them at the same time rather than in separate pairs. The saving grace of this challenge is the large room in which it takes place which grants lots of space to maneuver. It's still a tough obstacle to overcome and the best solution that I've found is to focus on defeating one of the flying automatons as quickly as possible. I've had the best luck at eliminating the dagger first, then the shield, then the hammer, and last the axe. I was able to hit the S+ rating on my second try with only four hits taken; I have no idea how I'm going to fare with classes weaker than the Knight.

Knight #12: 88 Vitality, 101 Strength, 6 Dexterity, 205 Armor, 29 Intelligence
This Knight was up to 8 HP per monster kill which was slightly better while still well short of what I would have liked. I found a Blessing of Life early on in the Citadel and then a second in the Study, each of which increased max health by about 150 points. I had to spend some time healing up after taking both of them, clearing out the Citadel before I was back to full HP. The rest of the Study finally delivered a second Reinforced Rune which would provide 8% more Armor when adopted. I also found another Blessing of Life plus the one that's always guaranteed to appear in the Study for four total; I manipulated health to drop down to 4 HP and then entered estuary Enoch's boss doors to take advantage of the full health restore. Unfortunately I didn't fight particularly well against Enoch this time and took a number of hits that cost me about half my lifebar before the enemy was defeated. Not great, not terrible.
I thought that I would head into the Dry Lake next only to take 600 damage in the first room against double tier 3 blob fish commanders in a room with evil spirits flying down from the ceiling. Nope, not continuing onwards after that disaster; back to Axis Mundi it was. The bridge was much easier and I healed up a good bit... right up until finding two more Blessings of Life to bring the total to six for the run. I had to save the second one until clearing the whole bridge, took the 500 damage hit to drop down to near-death status, then entered the Axis Mundi boss room for the full health refill. I was up against the prime version of the Void Beasts this time which makes the fight considerably more difficult. The battle takes place on the deck of a ship and damaging the two main Void Beasts will cause additional smaller versions of the same skeletons to pop onto the screen. The additional creatures will show up each time either of the main Void Beasts take 1/3 of their lifebar in damage so six times total throughout the fight (at 2/3 HP and again at 1/3 HP and then again when each of them dies). It's therefore critically important to focus the player's attacks against one Void Beast at a time, kill the miniature skeletons that pop up, and then go back to whittling down the same original target. This will minimize how many opponents are on screen at once which otherwise can get badly out of hand. I played this battle pretty well and emerged victorious with more than half my lifebar remaining, better than I'd been expecting.
Rather than take on the Dry Lake, this time I went into the Sun Tower and began the arduous climb up to the top. There turned out to be two more Blessings of Life in there though I had to hold off on taking the damage since it was starting to get ridiculous. Killing monsters only granted 8 HP apiece while the Blessing of Life would deal 600 damage to my Knight. Fighting my way past so many tier 3 monsters wasn't easy either though I did make up all the way to the top eventually, finding a Folded Rune along the way for my troubles. I grabbed one of the Blessings of Life and then popped into estuary Irad's boss door for the free heal. I didn't do amazing against the big eyeball, winding up instead with an adequate performance that saw half a dozen or so hits taken before downing the boss. Then I traveled into the Plateau to restore health for a while before taking another shot at the basement. I was really feeling the increased size of the dungeon with the Burden of Scale turned up to the maximum +30% length. Each of the biomes went on and on and on with so many upgraded monsters and commander buffs everywhere. I had to be on top of my game just to preserve health while passing through these endless regions.

The Dry Lake was the main area left and I tackled it with a will. I was able to get into one of those grooves and mow through the enemies in one room after another. I was actually gaining health over time since I was taking so few hits. There were two more Blessings of Life down in the Dry Lake and I felt comfortable enough to grab both of them, increasing health even further above the original total. I continued to pick up more runes as well and found the third Quenching Rune; they were basically doing the work of my missing Lifesteal Runes by providing lots of health restoration on mana flasks. Eventually it was all cleared out with this character's total elapsed time approaching the two hour mark. From there I headed back into the Sun Tower where I grabbed the final Blessing of Life that I had skipped over, running my total HP up to 2450 - this Knight had started out with 980 HP! I think that I had eight or nine Blessings of Life in total; the bigger dungeon definitely creates more chances to find them, assuming that the player clears out every room.
I fought estuary Naamah next since it filled up my lifebar which had been sitting on 400/2450 HP after taking that last Blessing of Life. This Knight had the Wind Wall spell which I hadn't used much but it proved to be invaluable against Naamah, easily blocking her flying creatures whenever they came after me. Much easier to dispel them with the Wind Wall rather than trying to land the perfect shield block. She hit me only one time and this was one of my best fights ever against her. Now I went back and used my final 25 resolve on a Gnawed Bone relic that I'd seen earlier, followed by raiding the saved up breakables at every teleporter throughout the whole dungeon. I had back luck here, finding only 2 meats against about 9 mana flasks but that was still enough to raise max HP by 98 x 2 = 196 more health. I still had to clean up the two minibosses in the Dry Lake which was easily done; the Automatons scar challenge had given me plenty of practice against them. Oh and did I mention that there was one final Blessing of Life in the very last room that I explored in the Kerguelen Plateau? It ran my total health up to 2793 HP, very close to triple the starting value. I felt as though I had squeezed every possible resource out of this dungeon run and all that was left now was the final boss rush.
This had to be it - this had to be the winning run. I had so much health built up with this character and I was very confident that I could defeat Jonah and Cain with this Knight. Tubal was what worried me and of course I had to play the fight horribly, getting hit over and over again by his little flying creatures. I knew I was in bad shape right away and it only got worse from there as I wasn't able to recover. The boss was sitting at about 20% health remaining when I took a final hit and lost. This was *INCREDIBLY* frustrating; each one of these Knights took literal hours and hours to play only to have everything come down to a boss fight that lasted perhaps 60 seconds. I was devastated that I would have to do everything all over again to take another shot at Tubal.  For whatever reason, that guy is my nemesis and I just can't seem to get clean fights against him. What a bitter disappointment.
436,290 gold, 727 monsters slain

If there was anything to be salvaged from that fiasco, it was the massive gold total and new runes brought back. I had enough ore and aether to spend 7500 of each on another Strange Transaction at the Soul Shop, then bought additional ranks of Master Smith, Unbreakable Will, and Absolute Strength. I picked up additional levels of all three Armor-related runes at the Enchantress: the Reinforced Rune, Folded Rune, and Quenching Rune plus the nine (!) rune weight upgrades needed to wield them. This increased Armor to 220, added more health restoration from mana flasks (since I still hadn't turned up a second Lifesteal Rune), and most importantly increased Armor's blocking cap from 39% to 43%. There was nothing that I needed from the Blacksmith as I couldn't meaningfully improve my stats and nothing was going to be more useful than +90 Armor from the second tier of the Ammonite unity. I could have spent on more Gold Gain upgrades (with four of them unpurchased) but didn't think it was worth the cost. I was hoping to complete this variant challenge within the next character or two and investing 100k into gold generation didn't seem likely to pay for itself. Thus the money went into mostly Vitality and Strength in the hopes of making the next Knight stronger.

Knight #13: 106 Vitality, 113 Strength, 6 Dexterity, 229 Armor, 29 Intelligence
Believe it or not, this Knight also had no traits and came with no starting relics. I went into the Study early as usual and for a long stretch of time couldn't seem to get into a good groove, lots of dumb hits that kept my Knight on low health. Eventually I pulled it together at the tail end of the biome and started hitting on rune luck as well: the third Folded Rune to increase Armor blocking cap and then a Lifesteal Rune! Finally! Remember that the Enchantress starts with the first Lifesteal Rune already available for purchase so this was the only one that I'd found across this entire variant challenge. Continuing onwards, two total Blessings of Life were present in the Study for +300 max HP as the biome itself didn't pose any serious challenges. I went straight into the Dry Lake after finishing the Study and proved to be strong enough to clear it all the way through without any need for retreats. It appeared that I was hitting the point where the dungeon was no longer challenging my character and everything was starting to become rote. There were no Blessings of Life in the basement however I did find the third Reinforced Rune and then a Bounty Rune. Sheesh, where were these runes earlier?!  My inability to hit the runes that I actually wanted was one of the major setbacks for this Knight challenge.
Axis Mundi proved to be fairly easy and I was full HP by the time that I reached its eastern end. That allowed me to go back and pick up a Gnawed Bone relic that I'd seen in the Study and find the requisite three meat drops to gain an additional 350 max HP. I had been saving the breakable junk in the teleporter rooms as usual to pull that off. Axis Mundi also had two Blessings of Life that I was able to pick up and I found another one up in the Sun Tower. I dropped down to 200 HP at one point in the Tower and had to retreat for safety but easily rebuilt health in the Plateau. After exploring everything, I decided that I'd take Hector's Helm relic for my last slot: 20% additional damage when under half health. That seemed like the most useful thing for facing upcoming bosses.
This time I had one big advantage for the Tubal fight: the good old Fireball spell that the first heir has at the beginning of the game. The Fireball leaves a ticking burn effect on monsters after exploding which is exactly what I needed to cut through the shielding on the flying axes and daggers that Tubal creates throughout the fight. They pose the biggest danger since he keeps forging more of them throughout the battle and they always start out with the "Blocker" commander ability which prevents the first four instances of damage. The Fireball spell stripped away that protection and made it easy to kill them, leaving Tubal highly vulnerable to my Knight's attacks. I honestly crushed the battle this time around and won with 1800 HP remaining but of course I forgot to turn on the recording software ahead of time which prevented me from getting any screenshots. Ah well, I wasn't complaining.
As for the final two bosses, they both went amazingly well. I came very close to a perfect Jonah fight which I might have put up on YouTube. It was not to be though as he hit me with his spoons while down on the last embers of his lifebar. Despite that minor flub at the end, it was still a total butt-kicking performance that never put my Knight in any danger whatsoever. The Cain battle was almost as good, with my heir knocking him down to half health before taking any hits. The second half of the combat was a bit more sloppy while still being really good overall, just a handful of missed jumps and failure to get the shield up in time for the perfect block. I had almost 1500 HP remaining when the Immortal King fell to signal the end of the Knight Legacy sequence. I'm really glad that I didn't have to play any more of these characters - I definitely had the stats needed to finish things off and fortunately was able to execute properly.
493,200 gold, 777 monsters slain

That victory brought this variant to a successful conclusion. It took thirteen Knight characters in total to make it through the first three difficulty levels which was faster than I'd been expecting, especially considering all of those additional burdens that I turned on for NG+2 difficulty. Even the strongest classes like the Barbarian and Assassin took about 20 characters to finish NG+2 difficulty in the original Rogue Legacy though of course each individual heir takes much longer to play here in Rogue Legacy 2. This was essentially a tutorial run to test out the various settings and I was quite pleased with how NG+2 mimicked the original game after all those additional burdens. I definitely felt the added challenge from having so many tier 3 monsters and commander abilities everywhere so I'll look to maintain the same pattern with other classes in this series. The Knight sits near the pinnacle of the tier list for Rogue Legacy 2's classes and I anticipate having a lot more trouble with many of the other classes. I don't anticipate trying all of them but it should be fun experimenting with the different ways to build the different jobs, especially the spellcasting classes. That will be up next!
As always, thanks for reading and I hope this was entertaining content to explore. More to come soon with the more challenging Rogue Legacy 2 classes.


