After taking a break for a few months, I'm returning to the Class Legacy series for Rogue Legacy 2 by taking an extended excursion with the Barbarian class. This is once again the beefiest tank class in RL2 with the highest total health pool and the top physical damage dealt when swinging the Barbarian's slow (very slow) axe attack. The Barbarian is one of the strongest classes in the game and gets held back only by its poor mobility. Then again, if you have awesome HP and damage, how much speediness do you really need anyway? Let's start by taking a quick look at the stats for this class:
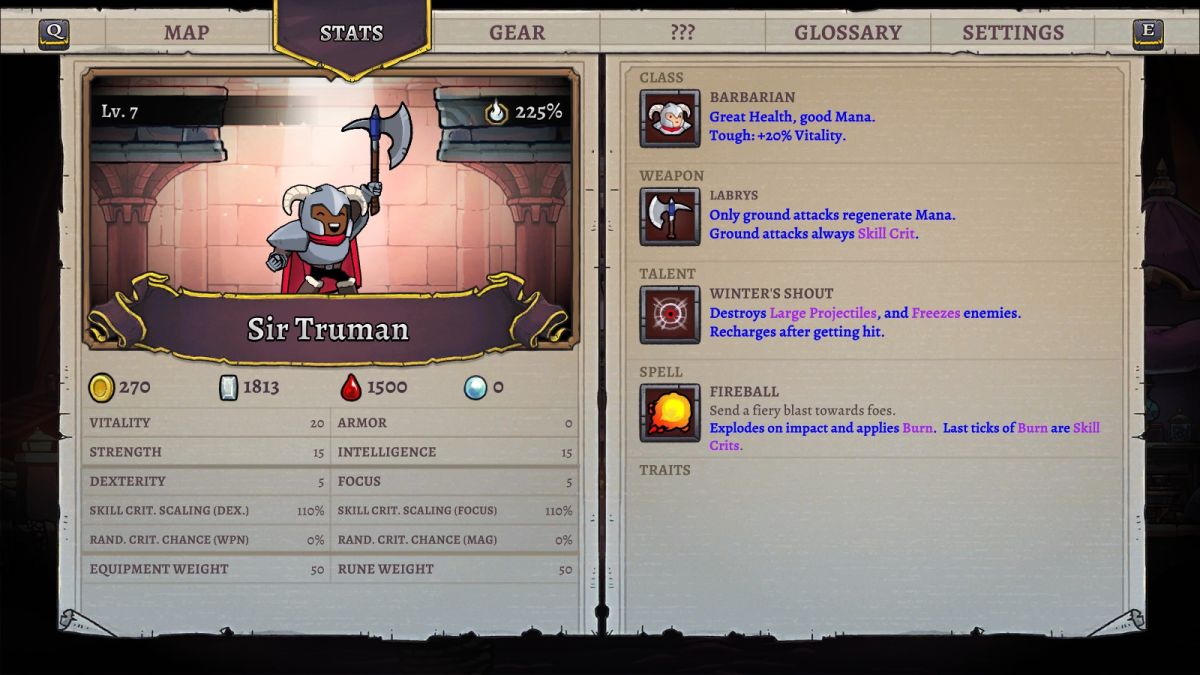
Health: Vitality * 12 + 100
Mana: 125
Weapon (Labrys) On Ground: Strength * 2.5 + Dexterity * 2.5 * Skill Crit Scaling (Dex)
Weapon (Labrys) In Air: Strength * 0.65
Class Talent: Winter's Shout
Class Passive: Tough (+20% Vitality)
Mastery Bonus: Vitality
The Barbarian class has the highest Vitality stat in the game, not only getting full scaling for each point of Vitality but an additional 20% on top of the base value by virtue of their Toughness class passive. In addition, they also get even more Vitality as their Mastery XP stat as well! This grants them noticeably more health than anyone else and makes it very important for the class to stack up Quenching Runes for percentage-based healing within the dungeon. Barbarians won't be investing levels into the Intelligence stat and meat drops absolutely will not be sufficient to keep them topped off on HP.
The class weapon is an axe officially named the "Labrys" which is an ancient Greek weapon often associated with the fabled minotaur. The Barbarian's basic auto attack has the highest damage of any normal weapon in the game: 2.5 * Strength damage plus an additional 2.5 * Dexterity and then the Dexterity crit scaling factor on top of that! In other words, these basic attacks always function as skill crits where both the Strength and Dexterity stats add to the overall damage. As someone who's played a lot of Barbarians dating back to the first Early Access build of RL2, I can attest that the axe swings have ridiculous damage output and a massive hit box that extends far above the Barbarian's character model. It will probably be worthwhile investing some gold into Dexterity levels once Strength starts getting very expensive since the normal axe swing has full scaling from both stats. There's just one drawback: the axe swing is glacially slow and locks the Barbarian in place for about half a second afterwards. This is a class that can plant and swing for crazy damage at the cost of leaving itself highly vulnerable thereafter. That's definitely going to cause some problems over the course of the Barbarian's journey.
Barbarians function completely differently in midair where their axe attack becomes a circular spinning wheel that hits everything around their character model. Unlike the standing swing, the midair axe attack has very low Strength scaling at only 0.65 damage per point and no Dexterity scaling at all. This makes it a pretty weak attack in practice although the Barbarian can potentially add more midair jumps with extra runes to keep the spinning slash ongoing longer. I've generally found that it's better to use the ground attack wherever possible though of course there are many situations where the player simply has no choice. The positioning of the midair spin can also be a bit tricky - you don't want to jump into the monsters themselves! - and takes some practice to get the hang of. Again, I've played a lot of Barbarians already so this is not a class that I'll be learning on the fly.

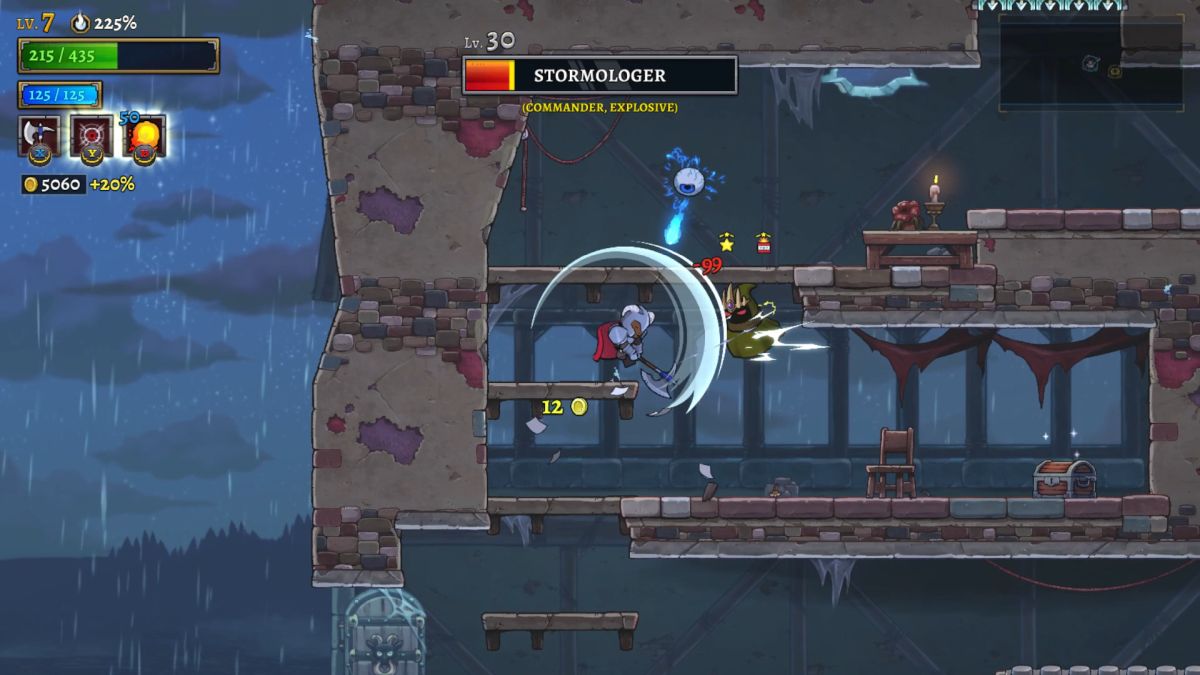
The class talent for the Barbarian is named Winter's Shout and essentially returns from the original Rogue Legacy. The shout will pop all enemy projectiles on the screen and also freezes all enemies for one second; it functions identically to the Frozen status condition that the Freeze Strike spell can inflict. This is an amazingly useful talent which is held back by a major restriction: the shout only comes off cooldown upon taking a hit from an enemy. Thus the Barbarian has to be careful about making use of this ability since it won't be available again without taking damage of some kind (or finding a mana flask after unlocking the Alchemy Lab on the "castle" upgrade tree). The shout is fantastic against many of the major bosses in RL2 and I'm hoping to make good use of it with additional practice.
Nothing stops Barbarians from casting spells but I won't be investing in Intelligence as a stat or expect to get much use out of them beyond the early game. One final note: part of this variant involves never paying to unlock the teleporters or make use of the Architect to lock down the dungeon. Every character starts with a completely fresh map and has to make their own path through it. This isn't as bad as it sounds since clearing the dungeon offers up the chance to find relics and Blessings of Life to increase overall max HP for the rest of that character's journey. I will always be trying to full-clear as much of the dungeon as possible throughout this series. I also won't be using the rooms that switch to alternate class weapons and talents since that would invalidate the purpose of testing out each class one at a time. We want to assess the power of each class, not swap everyone over to the best stuff and get past the bosses using only the strongest options. With that introduction out of the way, let's dive into this variant proper with the Barbarian class:
Barbarian #1: 20 Vitality, 15 Strength, 0 Armor, 5 Dexterity, 15 Intelligence
The Barbarian is one of the game's most basic classes so I only had to round up about 600 gold on the initial Knight before retiring him and beginning the game proper with an actual Barbarian. My first observation was to marvel, yet again, at the crazy damage from switching over to this class. The basic Knight auto attack deals 30 damage at the outset of Rogue Legacy 2 while the Barbarian axe swing dealt 51 damage! That was enough to one-shot most of the critters in the Citadel. On the other hand, repositioning the spinning axe attack in midair with no double jump or air dash wasn't exactly a walk in the park. By way of contrast, the airborn axe attack dealt all of 9 damage on each tick. Anyway, I didn't have much trouble clearing out the Citadel and took a couple of hits here and there that didn't cause any problems. I had the good fortune to find two different Blessings of Life along the way to boost maximum HP, then heal away the damage that they caused by completing the air dash heirloom at the conclusion of the Citadel. I still needed to pick up the Echo Kick heirloom at the entrance of Axis Mundi to continue onwards and therefore went ahead and fought Lamech since my Barbarian was at full health. The starting estuary hit only my character one time when I accidentally got stuck in the dashing animation, pretty good stuff. The Barbarian shout was excellent for popping Lamech's heat-seeking fireballs when he drops to half health.
Axis Mundi proved to be harder for this first character, no doubt as a result of lacking the double jump. It's pretty tough to make it through all of those open spaces with a Barbarian character that doesn't like fighting in the air while restricted to the single default jump. I took another Blessing of Life and made it to the finish of the bridge with roughly 100 HP remaining, then hopped back to the Citadel for the Aesop's Tome heirloom for my third health refill of the run. This heirloom was helpful in combat as well since I'd been unable to calm the Nightmare monsters up to this point. Next I headed into the Plateau with the goal of finding the double jump and came across it very quickly for a change. I delayed taking this heirloom until I needed another health restoration and wound up clearing most of the Plateau before finally grabbing it. I was able to unlock the door to Naamah's boss room and even find a useful piece of equipment in the Warden's Sword for some additional Strength after this character was finished. I'd also unlocked six runes already, unfortunately without finding anything particularly useful. I was able to full clear the whole Plateau and make decent progress into the Study where I had the tremendous luck to find the Ammonite Cape in a silver chest. That was the very best item for a Barbarian in the Cape slot which I'd be able to unlock immediately, excellent! Eventually I died roughly halfway through the Study without finding the void dash heirloom for another much-needed HP refill. What a great first character in this series.
296 monsters slain, 14022 gold, 978 ore, 1487 aether, 100 souls

This was going to be a busy trip back to town since I had collected so many resources on the first Barbarian character. I started out by heading to the Drift House and unlocking the scar challenges; there's a Barbarian-only scar named "Heavy Weapons" that I had been forced to skip with the other classes and now could attempt for this variant. Heavy Weapons is a timed scar that asks the player to break a bunch of targets as quickly as possible with higher tiers of trophies unlocking with faster completion times. This is one of the most basic scars and it's pretty easy to complete, with the trick being to use the Barbarian shout and deliberately take damage to boost the pace of completion. I'm not especially good at this scar and I still managed to finish it in 18.88 which was well under the 21:00 seconds needed for the Gold Trophy. Along with the souls from defeating Lamech, I had 400 souls to spend which I used on the first tier of Embroidered Investments and Runic Horizons, then one rank apiece of Unbreakable Will, Absolute Strength, and Master Smith. That was an awful lot of unlocks to have this soon at the Soul Shop.
Over at the Enchantress, I made sure to pick up the basic Vampire and Magnesis Runes to get some lifesteal going and aid in gold coin collection. The Blacksmith handed over the Warden Sword, Helmet, and Chest but I had to hold off on getting the Ammonite Cape for lack of available ore. Although I had to pick up six levels of equipment weight to wear the Warden stuff it was definitely worth it. Most of the rest of the accumulated money went into real stats as I made sure to hit the 26 Strength threshhold for the second point of lifesteal. There was no way to reach the Gold Gain upgrades yet which was probably for the best given how many things I was lacking with these early characters.

Barbarian #2: 38 Vitality, 27 Strength, 13 Armor, 5 Dexterity, 15 Intelligence
The top goal for this character was unlocking the void dash heirloom to complete the full set of mobility upgrades. This Barbarian had the Compulsive Hoarder trait which causes relics to appear as twin versions wherever possible. That turned out to be super useful when I was able to find a double Freon's Reward relic, using all 50 of my resolve to gain back HP equal to 2x Intelligence (30 HP) whenever she opened a treasure chest. I was trying to explore as much of the dungeon as possible so this was preferrable over relics that added more damage output. My Barbarian dropped down to double digit HP when clearing out an ugly "kill all monsters" fairy chest challenge in the Study, a situation where the room spawned with half a dozen active paintings that simultaneously swarmed her from every side. The double Freon's Reward relics were super useful for healing back up after taking that damage. The void dash heirloom played very hard to get and I had to full clear essentially the whole Study before finding it right next to Enoch's boss chamber. I was able to take two more Blessings of Life for extra HP before obtaining the heirloom and making use of that final opportunity to heal back up to full. This Barbarian already had 768 HP after those increases which was pretty insane for a Level 33 character.
With the void dash in hand, I took the time to defeat the two minibosses in the Study. Murmur is always easy and I typically use his sealed room for health restoration - there's almost always some meats/flasks somewhere in his long horizontal room. The Gonghead Twins were a bit easier than normal for the Barbarian class since their ghost projectiles were easily cleared with the spinning axe attack. I took a single hit for 50 or so damage in defeating the pair. From there I finished up with the rest of the Citadel and made my way across Axis Mundi to the halfway point and started climbing up the Sun Tower. The Barbarian did surprisingly well at handling the airborne challenges in there, probably because I finally had all of the mobility tools associated with collecting the various heirlooms. I was confident enough to take a Blessing of Life when it popped up and still made it all the way to the top with about 400 HP to spare.

The remainder of Axis Mundi was a helpful resource to replenish lost health and start working back to that huge Barbarian total. I took one more Blessing of Life on the bridge (which I probably shouldn't have done) to reach a maximum of 912 HP, utterly insane for the second character of the game. The double Freon's Rewards had my Barbarian close to full by the time that I reached the end which was more than sufficient to face the Void Beast bosses outside the gatehouse. I didn't worry too much about dodging their projectiles and simply hacked them to death with axe swings, taking a pair of hits that did minimal damage while easily downing both of them. My target was now defeating estuary Irad to unlock access to the Dry Lake; technically the player can go down there immediately but it's basically a death sentence without the Lantern heirloom obtained after defeating Irad. I fought in the Plateau long enough to max out on health once again and then prepared for the showdown at the top of the Sun Tower.
Estuary Irad is not a great opponent for the Barbarian since there are few opportunities to stand in place and swing away with the big axe. By contrast, this is a boss fight that prioritizes the ability to dodge incoming projectiles as the combat eventually turns into a bullet hell once Irad's third eye opens. I started out the battle and immediately started taking hits due to impatience, as I kept making the mistake of trying to get in one hit too many and then finding my Barbarian frozen in place due to the glacially slow swing animation. Things were going poorly as I was down to half health before Irad's third eye had even entered the combat. Then I benefited from a ridiculous stroke of luck: Rogue Legacy 2 suffered a crash to desktop right in the middle of the boss fight!  I think that's happened maybe one or two other times in hundreds of hours playing the game and the timing couldn't have been better. I rebooted the game which loaded from the last autosave, right before entering Irad's boss chamber. Given a second chance at the same fight, I played much more cautiously and was rewarded with a vastly better outcome. My Barbarian didn't take a single hit until the second half of the fight and then I was able to use the shout over and over again to open up opportunities to attack. The end result was a victory with several hundred health to spare, excellent! I had basically gotten a free practice round against Irad and fortunately I didn't waste this stroke of good fortune.

In the wake of that victory, I polished off the remainder of the Plateau (including taking one more ill-advised Blessing of Life) and then proceeded into the Dry Lake. This is the most difficult biome by a wide margin thanks to the more dangerous monster types and the poor visibility of the darkened basement. My Barbarian was greeted by a particularly tough entrance room which had a Cursed tier 3 eyeball commander which kept shooting out the little homing spirits from an inccessible portion of the room's architecture. I had to leave the Dry Lake and raid all of my saved up breakables at the teleporters, then returned to the basement and managed to keep clearing one room after another until everything was finished. It was tough going to be sure but the Barbarian class had enough health and damage to plow its way through. Full dungeon clear on the second character, much better than I'd been expecting. At that point I was walking back to pick up the Pearl/Onyx Keys to open up the miniboss rooms in the basement when I came across a red portal that I'd skipped earlier. I went inside and drew the toughest possible result, the one where a Blightborn Astarte spawns in the middle of a room with other monsters. Unfortunately I wasn't able to kill everything before finally falling, argh. I should have opened the miniboss rooms first and THEN entered the red portal!
612 monsters slain, 52410 gold, 8187 ore, 5906 aether, 300 souls

Back in town, I realized that I hadn't done the "Simple Start" scar on the last trip and knocked it out for purpose of completeness. This is the easiest scar in the game and I nailed a perfect score on the very first try; the Barbarian class is really good at some of these scars where the stats are all normalized and its innate tankiness + damage combo can cut loose. This gave me 400 souls to spend and I dropped 200 of them into Preferential Treatment so that I could ensure that a Barbarian would always appear on the heir select screen. I had brought back another half a dozen runes from this last character and the two that I wanted to pick up were Soulsteal and Quenching Runes. The Soulsteal Rune would be worth 2 HP per monster kill if I could boost Intelligence to 26 (the highest I would be taking it with this character) while the Quenching Rune would heal back 2.5% of max HP from every flask. That's a very big deal for Barbarians with their monster HP growth! Fortunately this only required three rune weight upgrades for the moment. I also had found the first Reinforcing Rune but that wasn't worth purchasing until I could achieve a higher base Armor amount.
For all of the success on that past run, it hadn't been too impressive in terms of equipment found. I still hadn't discovered anything at all in the Trinket slot aside from the Scholar item which certainly wasn't worth having. My two new additions from the Blacksmith this time around were the delayed Ammonite Cape from the original Barbarian and then an upgrade from the Warden Sword to the Crescent Sword worth +4 Strength. This required seven equipment weight upgrades and incentivized me to take another rank of Master Smith at the Soul Shop with my leftover souls. After all of those purchases, I had about 32k gold remaining and I dumped 20k of that into reaching the first two Gold Gain upgrades. This didn't leave a ton left over for real stats but I was still able to fill out the initial Strength and Vitality upgrades on the castle tree. At least I had gotten a lot of necessary stuff out of the way for future runs.

Barbarian #3: 44 Vitality, 37 Strength, 23 Armor, 5 Dexterity, 20 Intelligence
This Barbarian had no traits at all; I kind of wished that he had some kind of negative affliction for an increase to gold generation. On the other hand, base damage for the axe swing was up to 106 and that was a nice increase along with nearly double the Armor of the previous character. I had the chance to take a similar relic for this character: Body Buffet which causes defeated monsters to have 8% odds to drop a meat item. While obviously this does nothing against bosses, I didn't really need additional damage with the Barbarian class. What I needed was more sustain while running the dungeon so that I could keep taking the various Blessings of Life that popped up along the way. The massive Vitality on the Barbarian class means that they gain a ton of health from the Blessings of Life... but they also take a ton of damage each time as well! The Body Buffet relic was able to keep this Barbarian going in much the same fashion as the double Freon's Reward had done for the previous character. Having 3 HP per monster kill along with minor health restoration from the mana flasks helped in that regard as well.
As far as the dungeon went, I was able to find a second Blessing of Life along with the always-present one up in the Study where I typically start my characters. After clearing it out in routine fashion, I headed back to the Dry Lake again since that biome was certain to give me the most problems. The extra meat drops from Body Buffet were definitely noticeable and helped keep this Barbarian going. It wasn't exactly smooth sailing but I never had to retreat back into an earlier area for healing, plus I was even able to take another Blessing of Life along the way. The biggest find in this area was the second Lifesteal Rune, a very big deal indeed since I was still missing about half a dozen of the tier 1 runes. The second tier of runes can only appear in the Dry Lake on Normal difficulty and getting the crucial Lifesteal version at such an early point in time was a steal. This was a character class where I'd be stacking lots of Strength and needed the aforementioned sustain to keep healing up while taking damage from Blessings of Life.

The rest of the dungeon was pretty straightforward from that point on. I finished clearing out the rest of the Citadel and the first half of Axis Mundi, then proceeded up to the top of the Sun Tower. I didn't perform quite as well in the vertical biome this time around and was unsatisfied with the amount of damage that I found myself taking. Once I had health back close to full, I teleported over to estuary Enoch's boss door at the top of the Study for another boss fight. The mage portion of Enoch wasn't too bad although I think that I could have done a better job of dodging his fireballs. The mimic chest second half of the battle should be really easy for a Barbarian, with the giant hit box on the axe swing making it easy to tag the bouncing chest, however I screwed up pretty badly here and took a bunch of needless hits. All in all, my Barbarian defeated Enoch while taking about 500 damage in the process, blah. I could have done a lot better here and it would be a struggle to refill health again afterwards.
While I was finishing up in the Plateau, my Barbarian discovered the Warden Trinket which would actually be useful for once. Along with the Warden Helmet and Chest that my characters were already wearing, this would unlock the Warden set unit bonus of 10 Dexterity which would translate into another 25 points of damage on the grounded axe swing. That was worth having even if it was only temporary. Once the Plateau was finished, I still had to finish up with the two minibosses in the Dry Lake before being able to take on Tubal. Unfortunately I was cover-your-eyes awful against the dagger/hammer pair, taking one hit after another for no clear reason. The Barbarian struggles with these minibosses because the spinning axe jump also breaks the flimsy platforms and drops your character into the spiked pit below. I took more than 500 damage against these easy opponents before finally downing them. This forced me to raid all of the saved up breakables at the teleporters before facing the second axe/shield minibosses, which fortunately did go a lot better. However, I'd taken enough hits that I wouldn't quite be at full health when facing Tubal afterwards.
The plan for Tubal was the same as usual: prioritize killing his summoned minions whenever they showed up. Tubal himself doesn't do anything all that dangerous and it's the flying daggers/hammers/axes that cause most of the problems with this encounter. The Barbarian's spinning attack was very helpful here since the flying minions will die in a single hit whenever their invulnerability wears off. You can even kill them with the shout since it does deal a tiny amount of damage in addition to freezing its targets. I played this fight patiently and carefully, defeating three successive waves of minions as they were summoned. I was rewarded for my good showing with a fairly comforatable victory, 300 HP remaining when the evil blacksmith finally collapsed. With only a third of my health remaining and no healing items left to consume, I opted to take an intentional death with the Successor's Bargain relic over fighting a doomed struggle against Jonah and Cain. This resulted in 20k additional gold which felt very worthwhile; I'd have to come back and try to polish off the last two bosses with the next Barbarian.
561 monsters slain, 74977 gold, 8741 ore, 5915 aether, 200 souls
Back in town, there were no new scar challenges to take on since I'd forgotten to open some of them with the last character. I started out by paying 2500 ore/aether on the first Strange Transaction followed by purchasing a rank of both Unbreakable Will and Absolute Strength. The Enchantress was next where I purchased the first Folded Rune to increase the blocking cap to 39% followed by the second Lifesteal Rune, with the pair of them requiring five more rune weight levels. The Blacksmith had only the Warden Trinket to buy but that still required three equipment weight upgrades; not having the Mastery bonus from the Knight or Valkyrie class always hurts during these solo class challenges. Then it took another 30k gold to get the next two Gold Gain upgrades which left me with only 20k gold for actual stats, even after that massive haul from the last character. I split up those remaining funds between Vitality, Strength, and Armor as usual to get a bit stronger in each category. I was hoping that this would be the last Barbarian needed for Normal difficulty but we'd have to see what happened.

Barbarian #4: 48 Vitality, 40 Strength, 29 Armor, 17 Dexterity, 20 Intelligence
The only Barbarian character available had the Superfluid trait: 20% less health but can dash in any direction. I don't find the 360 degree dash to be very useful so this was pretty much a pure penalty, argh. This character also had the histrionic trait which causes all damage printout numbers to be enormous. I did the manual calculation and figured out that the ground attack with the axe was now doing about 157 damage per swing and that the Warden Trinket's Dexterity bonus had added about 30 damage all on its own, not bad. I was also pleased to be up to 5 HP per monster kill with 4 of them coming from the double Lifesteal runes (from topping 38 Strength) and then the last point coming from the single Soulsteal Rune. I also had the great luck to find Hyperion's Ring and four Blessings of Life in the Study alone; now I simply needed to keep stacking more and more max HP in preparation for the final bosses behind the Golden Doors.
Having a long run through the dungeon with the Superfluid trait was a real pain in the butt which became more and more annoying as time went on. I'm used to the dash sending all of the characters in Rogue Legacy 2 in a purely horizontal direction, straight to the left or right when pushing the dash button. With the Superfluid trait, however, your character will angle up or down if the directional pad is tilted even a tiny bit and I found my Barbarian constantly moving at a slight 10 to 15 degree angle. This kept throwing me off and causing my character to move into enemies or spikes unexpectedly. The fact that the game actually considers this a positive trait and assigns a health penalty is crazy to me - give me back the normal dash! Anyway, I did have some excellent equipment finds while clearing through the Dry Lake, picking up the Ammonite Chest and Trinket which would be enough to unlock the unity set bonus along with the Ammonite Cape that I was already wearing. I'd also been stuck using the Warden Helm for lack of anything better and found a major upgrade to the Crescent Helm in that slot for extra Vitality.

All told, I think that I was able to take about seven different Blessings of Life over the course of the full dungeon. Frustrating as it was spending more than an hour on a character with the Superfluid trait, eventually I did get everything cleared out with another 60k gold accumulated in pocket. It was time to pass through the Golden Doors and take on the final two bosses starting with Jonah. The good news was that Jonah was even easier than normal for a Barbarian character and I was able to pass this penultimate test with flying colors. Jonah is one of the rare opponents that doesn't have hit detection in Rogue Legacy 2 (i.e. your character can walk right through him without taking damage) which made it easy to set up for the big axe swings. Even better, Jonah mostly sticks to the ground rather than forcing the Barbarian to use the weaker airborn spinning slash. I basically wailed away on Jonah for a couple of minutes until draining his whole lifebar. I think he hit me twice over the course of the fight which was little enough damage to be healed away before facing the last boss.
As for Cain, I've gotten much better at this boss through repetition with more characters. The Barbarian also handles the final boss quite well overall since Cain is another opponent who stays on the ground where he can be smashed with the big axe swing. One minor thing that caught me off guard was Cain walking into my Barbarian a couple of times while I was using the main axe auto attack, I wasn't expecting to get stuck in the attack animation and I'll have to be more careful the next time around. Cain has enough flashy abilities that it's tough to avoid taking at least a few hits here and there, and we slowly wore down one another's HP over the course of the fight. I had exactly one situation where the Superfluid trait came in handy here, the ability to dash at weird angles through Cain's "Naamah" projectiles to pop them immediately. Of course, that was more than balanced out by the extra damage that I took from accidentally dashing at an angle and running into various enemy projectiles that otherwise I never would have hit. Anyway, Cain knocked my Barbarian down to zero health with about 10% of his own HP remaining... but I had Hyperion's Ring for the revive and easily finished off the battle from there:

I wouldn't have even needed the revive if it hadn't been for the 20% health penalty associated with the Superfluid trait, heh. Anyway, this was a pretty routine boss fight that lacked much in the way of drama. Or to put it another way, the real victory was achieved by stacking up so much additional HP by taking all of those Blessings of Life throughout the dungeon. That was my reward for full clearing everything along the way, with the finishing blows against the two final bosses just a matter of wrapping things up. It only took four Barbarians to clear Normal difficulty which was my best result to date in the class legacy series. We'll see if that speedy pace can continue when moving on to New Game Plus difficulty next.