
Wait, what's this? New Rogue Legacy content on the website?!  Yes, it's true. I always wanted to finish off one additional challenge for the game back when I was playing it routinely a few years ago, and eventually I found myself in the mood to try some more 2D platforming goodness again. This additional challenge came in the form of unlocking the secret Traitor class, something that was added in the final patch for Rogue Legacy. I had held off on applying that patch while doing the Class Legacy series because it watered down the difficulty a bit and I wanted to have a fair comparison between all nine of the game's classes. Thus it wasn't even possible for me to unlock the Traitor on any of those many character runs that I did, since I didn't have the patch in which the content was added. But I always intended to go back and take a look at the game's tenth and final class, and this was the opportunity to make it happen.
The process for unlocking the Traitor doesn't come through the normal purchasing system back in town. Instead, the player must find a series of hidden "obols" in secret shrines throughout the dungeon, the same shrines that normally give out things like Calypso's Compass and the dreaded Hedgehog's Curse. There are four of these obols and they unlock as a possible option after defeating each of the four main bosses in the game. In other words, after defeating Khidr, there's a chance for Khidr's Obol to appear as an option from the secret shrines. It's not guaranteed though, and the need to search for all of the obols makes the unlocking process for the Traitor class somewhat tedious. Furthermore, the obols can only be used by turning them into Charon at the entrance to the dungeon, which means that it's only possible to get one per character run, and your character must die to turn in that respective obol before the player can begin searching for the next one.
Now this may not matter much for your typical player of Rogue Legacy, who dies over and over again on a very short lifespan. Back when I used to watch people play this game on Livestream, the average player usually struggled to get out of the castle area and bring home more than 1000-2000 gold at a time. For someone who's played this game as much as me though, it was a real annoyance to only be able to pick up one obol at a time. I chose mostly Barbarian heirs for this non-variant search, with Paladins as a backup option, and with no restrictions in place it didn't take me long to clear the whole dungeon. I think my sixth character was able to accomplish the feat and bring home 30k gold in the process. I was also trying to defeat the bosses as fast as possible so that their obols would become available as options in the shrines. Khidr was first to fall, taking place on about my third or fourth character overall, and with the number of shrines I was finding on my lengthy runs, it didn't take too long to find Khidr's Obol and turn it in. That allowed my next heir to face the first challenge:

Finding the obols and handing them over to Charon grants the player the chance to do a series of refights against the four main bosses. The entrances to the boss rooms take on a ghostly greenish-blue tint and the player can enter to face one of four predetermined battles, each attuned to that particular boss. Your current character is replaced with an entirely different character that never changes in these boss refights, which means that it's not possible to level your way through them with superior stats. The four boss refights are creatively designed and none of them are easy. The one nice thing is that dying in these boss refights doesn't carry any penalty: the player is teleported right back to the entrance to the boss room, and can immediately retry the same battle as many times as desired. That's needed because all four of these fights are *HARD*. You're going to die. A lot.
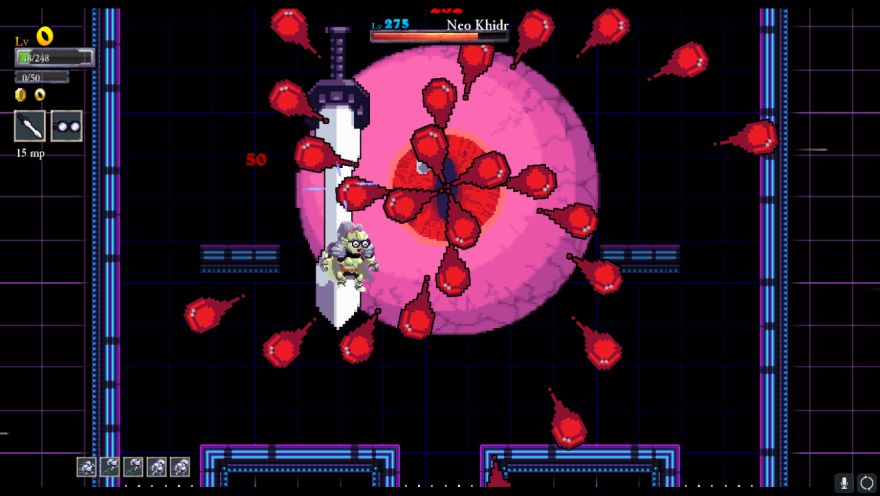
Neo Khidr is the first of the four boss refights, or at least the first one that I came across. I don't think there's any particular order in which the obols have to drop, I simply found Khidr's before the other three. The new Khidr battle is relatively unchanged from the standard boss encounter, although with actual spike pits in the corners rather than the pressure plate spikes in the normal boss room. Neo Khidr follows exactly the same pattern as normal Khidr, shooting out red projectile goo in one of four different patterns. The only difference is that he fires them a heck of a lot faster; normal Khidr gives the player about three seconds after each volley of projectiles before going into the next one, while Neo Khidr immediately shoots them again in endless volleys. I think the red goo is also slightly faster for this boss fight although I'm not certain of that. It certainly felt faster, let me tell you.
The player is given control of a Spellsword with the Blade Wall spell for this fight, and as mentioned before, this is a fixed choice that can't be changed. Think of these boss refights as little predetermined scenario challenges to be overcome separate from the rest of the game. This Spellsword has low physical damage and high magic damage, which makes the goal here pretty obvious: drop the huge Blade Wall spell onto Neo Khidr to do most of the damage while hitting the boss with your sword to get MP back. The theory is pretty simple, however the fight itself is anything but. This character can only take four hits before dying, with the fifth one spelling death. Each Blade Wall costs 30 MP and each swing with your sword will restore 10 MP. Therefore each spell requires three hits with the sword, and that's the biggest problem in this battle. It's not hard to drop the Blade Wall spell onto the unmoving giant eyeball, but there's very little time to get off those sword swings while needing to dodge the projectile swarm. To be honest, I've never been all that good at the Khidr fight either, and it's arguably my weakest of the four main bosses in Rogue Legacy. This was not going to be easy.
I played this out repeatedly trying to learn the patterns of the eyeball goo shots. The Spellsword comes with a triple jump and two air dashes, which is one more jump and one more air dash than I typically take on my characters. For some reason this Spellsword also has a Haste rune, and the faster speed was constantly screwing me up. When you need extreme precision in your movements, a character that moves faster than normal is not a good thing! It feel like someone was screwing with my mouse sensitivity, heh. I found that the spiraling patterns from Neo Khidr were easier for me to deal with: triple jump upwards and then air dash to the other side of the room. Khidr will do them in either a clockwise or counterclockwise direction, and you have about half a second to figure out the direction and move accordingly. The two non-spiral patterns that shot projectiles out in little chunks in every direction were harder for me to avoid. There were two of those patterns as well, and for whatever reason I could never quite figure them out.
I tried the fight about two dozen times and never managed to get Neo Khidr below 1/3 of its health. And then out of nowhere I defeated the boss on the next try:

Wow, that was unexpected. It might sound cool and all to have this big breakthrough where I suddenly managed to defeat a tough boss, but that's usually the exception and not the rule. More often, I will get close to winning several times before actually achieving the feat. (Back in Dance Dance Revolution days, I would typically get down to 1 "Great" before achieving the all "Perfect" run for the highest possible ranking.) There was also a lot of luck in terms of what patterns Neo Khidr was giving me. On this occasion, he was doing almost entirely one of the two spiral patterns and I was able to keep dodging at a higher rate than normal. Even so, I squeezed this out by the skin of my teeth, one hit away from death and with mana exhausted from the final Blade Wall spell. Whew, thank goodness this one was over.
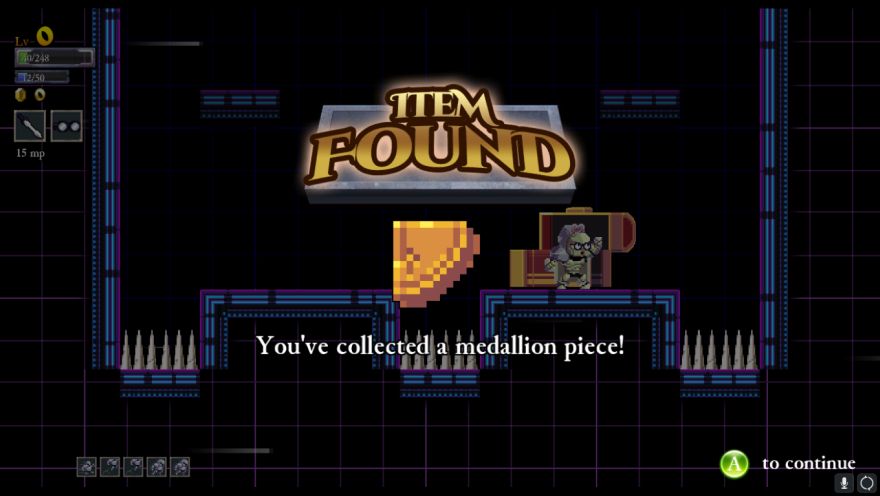
On defeat, each of the bosses drops a medallion piece. Collect all four of them to unlock a final boss refight, and if the player is able to win that battle, then the Traitor class itself finally unlocks. This is a difficult task and it's probably beyond the abilities of a good portion of the people playing this game. No amount of leveling or increasing stats will be able to get you past these boss refights, only practice and skill. I was determined to beat all of them as a test of expertise and as proof that I'd fully mastered Rogue Legacy. Neo Khidr was the first obstacle completed, and it wasn't very long before I found a second obol with my next heir, this one attuned to Alexander. That meant the second boss refight:

Alexander IV is generally considered to be the hardest of the boss refights. Like the standard Alexander, this boss will glide around the boss room spawning more and more of the flying skullheads as the encounter progresses. Unlike the standard Alexander fight, this time the player is put into a spike-lined pit with only a pair of platforms floating in midair and with little room to maneuever. There are actually two of these pits divided by a wall of spikes in between them. The player is given a Shinobi for this battle wearing the Dark Armor set, granting 4 HP and 4 MP per kill. This is highly significant here, since the room will quickly fill up with flying skullheads that fortunately can be killed in one hit apiece. In theory, it's possible to get a lot of health back by killing these things. In practice though, they swarm much too fast to be able to keep the spawning down. Between the spikes on the walls/floor/ceiling, the skullheads roaming about everywhere, and Alexander IV with his giant monster sprite and huge purple waves of death, the player has very little room to maneuver without getting hit.
This is compounded by the tiny pool of health that the player gets in this battle. The Shinobi is a frail class in Rogue Legacy, and this guy only gets 204 HP in total. The single most important aspect of this fight is working around this minimal health total, and making sure that when you take damage - which is unavoidable - it comes from sources that deal lower amounts of damage. Alexander IV itself has to be avoided at all cost: touching the big skull or its projectiles will deal 63 damage. This is harder than it sounds because Alexander's movement is so unpredictable, floating around in sweeping arcs that can go in any direction. The hit box for the top of the skull is also pretty weird and reaches a little further than it looks. The little skullheads are better than their master, but they still deal 34 damage per hit, and that adds up quickly as well. Since vampirism gives back 4 HP per skullhead killed, the player has to defeat 8.5 of them for each hit taken. It's not a sustainable rate. Best of all are the spikes that surround the arena, which deal 21 damage when hit. This is so much less damage that one of the keys to the fight is throwing your Shinobi into the spikes instead of getting hit by Alexander IV. It's a little bit counterintuitive but it does work. This whole battle essentially forces the player to make use of the invulnerability period (what the speedrunning community calls "I Frames") after getting hit. That's always an important concept to use in Rogue Legacy on the higher difficulty levels, but it's basically impossible to win here without intelligent usage of the few brief moments of invulnerability.
Another key aspect to the battle is making use of the Shinobi's shadow clone spell, which can be used indefinitely at only 5 MP cost. I found that the best way to do this was to put down a clone right at the starting platform on the left side of the arena, and then teleport back there from the right side of the room when things became too congested. There is a slight delay of about half a second between using the spell and actually teleporting back to the clone's position, and I took quite a few hits during that slight delay. Very annoying. The other tool that the Shinobi has is the replacement ability (the "log" move) that teleports the character a short distance forward. The room in which this battle is fought is too narrow to use this move too often, however it does let the player move from the left side to the right side through the spikes in the middle, and this is pretty much mandatory. When one side of the arena fills up, you need to escape to the other side to clear out some space, and even that doesn't always work. The whole place gets *SO* packed with enemies and projectiles that it's hard to put into words. I wish that I'd still been recording this stuff with Fraps for YouTube, it would have made for quite a video.
This was indeed a very, very difficult battle. On one afternoon, I sat and tried this fight over and over again for more than an hour without winning it. I don't know how many tries that entailed but it had to be over 50, many more than I needed for Neo Khidr. There's just so much randomness in this fight, between where the little skullheads moved and what Alexander IV chooses to do. I always wanted the boss to pause in place and shoot out the purple shots in one of the rare spots where I could attack against the frozen boss sprite. On the few occasions when that happened, I could rain down four or five hits in rapid succession. Other times, Alexander would spend long periods in the walls or down under the floor where there was nothing I could do, breeding more skullheads all the while. There's an unavoidable aspect of randomness to this boss fight: you need to play exceedingly well and also have the RNG factors line up correctly.
Unlike that first boss refight, this time I was able to work Alexander IV down close to death several times without emerging victorious. I knew that it was only a matter of time, and eventually I managed to push over the top. Now it might look like I had plenty of health there, but the 89 HP is only after every skullhead exploded at once and gave my Shinobi a bunch of health back. I think that I was sitting at 19 HP before the boss died, one hit away from destruction. This was a huge challenge and I was very glad that it was in the rear view mirror. 
The next obol to drop came from Ponce de Leon, which meant that these boss refights would continue taking place in the official order:

Yes, the boss names are mostly a series of puns for these refights.  The standard Ponce de Leon is probably the simplest of the four bosses, a flaming ball that chases your character around the room endlessly. Most of the danger in the Ponce fight normally comes from the spiked balls randomly bouncing around the chamber, which do not have fixed positions and can sometimes spawn in tricky locations. I've had more flawless victories over Ponce than all of the other bosses combined - it's just not that hard once you have the pattern down. For the refight here, Ponce de Freon has a simple gimmick: the flames that trail behind the boss last much, much longer. Against standard Ponce de Leon, you can keep looping around the room endlessly and the flames from the last circular pass will disappear before you make it back to the same spot again. That doesn't work in the refight, as the flames last about twice as long and will still be there on the next pass around the room. The designers deliberately extend this battle by giving you a Barbarian for your character, granting the player access to the Fah Ro Dus shout but at the cost of limiting your damage output. I ran the math here, and it takes about 65 hits against Ponce de Freon to down the boss. That's an awful lot of sword swings, and a lot of loops around the room.
So the answer to this boss refight is to follow the same standard strategy of circling around the room repeatedly, only the player must do so while avoiding a constant stream of flame projectiles left behind from the previous circuit. That's a tough challenge to pull off, and it's only possible because the Barbarian given to the player has four air jumps included on the runes (along with one air dash). The chamber itself is also significantly larger than the one used in the standard Ponce de Leon fight, which is necessary because the smaller room would simply be impossible for this encounter. As mentioned before, the player needs to hit Ponce de Freon about 65 times and your character takes 100 damage per hit with 495 HP in total, which means you can only get hit four times. Five hits kills you. The Barbarian shout is a godsend, however there's only enough MP to use it four times before running out, and that doesn't leave too many options. This boss refight turns into a long, extended platforming challenge of jumping and dashing around flames while slowly chipping away at the huge health total of Ponce.
I found that I could usually get a lot of good hits onto the boss on the first circular pass when there were no flames on the ground. After that it became a lot harder. The trickiest part was dropping down from the upper platforms to the ground as part of the circuit of the room, since that's when I had the least warning of what was below my character. I tried using the Barbarian shout on those occasions, but that only worked for the first four passes and I found that I needed more than a dozen of them to whittle down the boss health. That wasn't going to work. Over time, I simply had to get better at using the air jumps to descend more gracefully and fall between the flames that had been left behind. I also found that the battle was easier when Ponce de Freon paused to do his charges. This would freeze him in place for about two seconds, granting slightly more time for flames to disappear from the previous pass of the room and more time for my character to maneuver around them. When Ponce kept moving, there was less time to hit the boss and less time to dodge around the flames.

Overall, this was a test of endurance more than anything else. I worked Ponce de Freon down into the low part of his healthbar multiple times, getting close to the win without actually reaching it. Just keep circling the room, just keep circling the room... It was hard to resist the temptation to get in a few more hits, but avoiding danger always had to take priority throughout this long test. My performance could also be highly random from fight to fight. Sometimes I would circle the room five times perfectly without taking a hit, other times I would mess up the pattern and get hit three times before the first cycle was over. This was a situation where practice made perfect, and I definitely improved as I continued to make further attempts. I'd say that it took about an hour of trying the boss in total before I managed to win, finally, with my character one hit away from death. Since each attempt took significantly longer than it did against Alexander IV, I definitely needed fewer tries for this boss. I would say that Ponce de Freon was probably the second-toughest of the whole bunch though, after the flying skullhead of death.
This meant that the fourth and final obol would come from the fourth and final of the standard bosses:

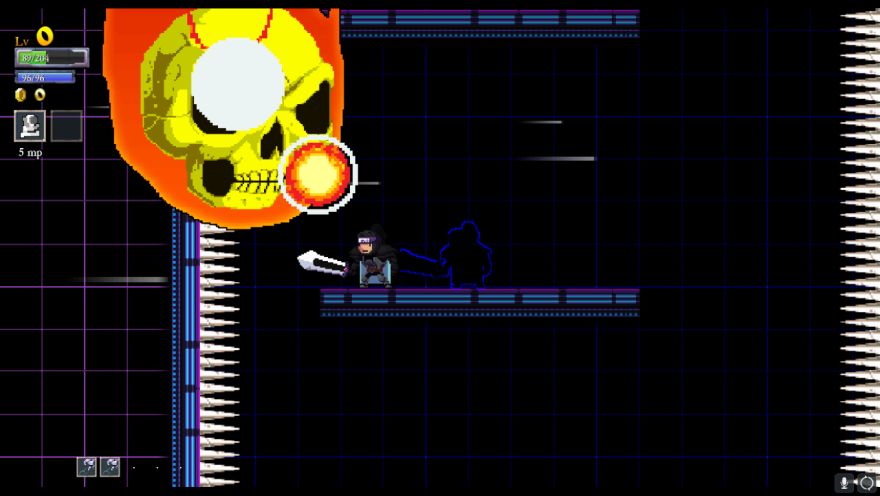
I've always tended to do pretty well against Herodotus in the normal boss fights. The Herodotus battle is less about flashy platforming and more of a test of tactical planning, asking the player to engage enemy targets selectively to minimize the number of blobs on screen at any one moment. For the boss refight, the player is put into a situation completely different from anything else in the game. The player gets a Dragon character to use in an arena full of empty space, with the sides wrapping around in every direction. Fly off the bottom side of the screen and you come out the top; fly off the right side of the screen and you come out on the left side. The four corners of the screen are all essentially one point, which is quite confusing to wrap your head around. Of course, this is the reason why the player gets a Dragon character, who has unlimited flight in all directions. The opponent is a pair of blob monsters, the normal green Herodotus and a red blob monster named Astrodus. The red blob moves faster than the green blob, and simple tactics dictates that it's better to go after Astrodus first while leaving Herodotus for second. The good news is that one hit will split each of the two blobs, and Dragons have a ranged attack to facilitate this. The bad news is that - as I found during my Dragon Legacy run - Dragons are incredibly frail characters in Rogue Legacy. Your character can get hit exactly twice, with the third hit killing you. That leaves almost no margin for error and there are an awful lot of those blobs to deal with.
This boss refight is all about careful tactical fighting. Firing off the Dragon breath willy-nilly will quickly split up the blobs and create a minefield of enemies to dodge. The blobs start moving faster and faster as they get smaller, making it harder and harder to avoid them. The tiniest version of the red blobs absolutely tear across the screen, and with the worldwrap at the edges they can come flying out of nowhere to smack your character. This boss refight has often been compared to the classic arcade game Asteroids, and I think it's an apt one. I found that it was best to stay in the center of the screen near the platform, where I had the most warning of incoming blobs. It was too hard to wrap my mind around blobs flying in from the other side of the screen if I ventured over to the edges, and I took a disproportionate amount of hits when I was forced to dodge away from the center of the screen. I also discovered that misfires of the Dragon breath could be a huge problem. If I missed the target (all too easy to do against the smallest and fastest version of the blobs), the fireballs often hit an unrelated blob and split it, creating more trouble that had to be avoided. I had to be careful in my dodging as well as accurate in my shooting.
The key was to engage only with Astrodus and leave the slower Herodotus alone. I would carefully work down the red blobs into smaller and smaller chunks, splitting them into the 1/16th tiny increments and finishing them off, then going to work on the next size up. It was difficult sometimes to tell which blobs were the smallest ones, since the camera is more zoomed out for this battle than it is during normal Rogue Legacy gameplay. Twice I finished off Astrodus completely and started in on Herodotus, but I was down to only 50 HP remaining and failed to kill all of the green blobs before taking a fatal hit. I found myself in the same situation a third time, with Astrodus gone and my Dragon one hit away from death, needing to work through all 16 of the Herodotus blobs without getting hit. This was an even slower process than the Ponce de Freon battle, and I had to calm my nerves repeatedly while playing, trying to relax and not succumb to the pressure. I did not want to have to go through this battle yet again! I narrowly dodged several attacks, slowly reducing the number of blobs. Down to the last eight... down to the last four... down to the last little bit. Finally it was over:
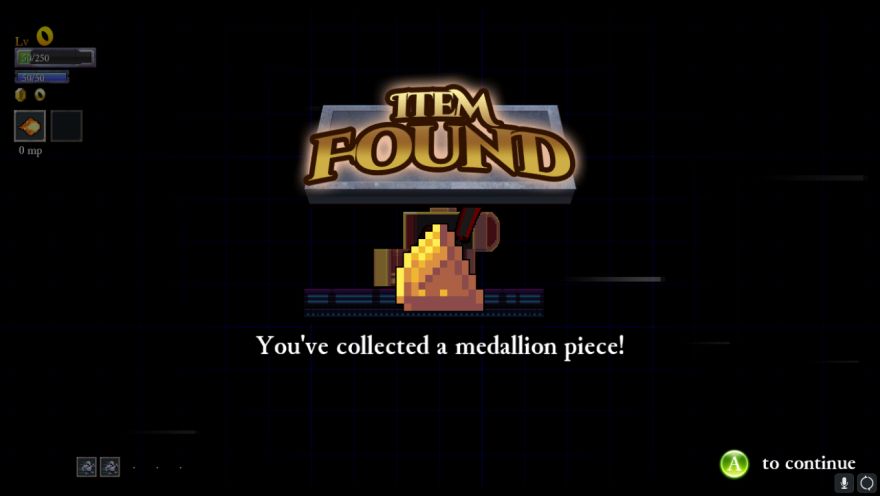
The blobs left nothing behind, no explosion like the other bosses, so I snapped a picture of the medallion inside the chest instead. This was the fourth and final medallion piece, and now I needed to find the Traitor's Obol to unlock the Johannes refight. Unfortunately, I searched high and low for the thing without finding it! I was in New Game Plus mode by now, the second difficulty level, and I searched through the full dungeon three times without finding it in a secret shrine. This was the worst part of the journey to unlock the Traitor class, the need to find these stupid obols by dumb luck. Did I screw something up here - did this all have to take place on the same difficulty level? That seemed unlikely but I was genuinely unsure if I was missing something. Finally the obol I was missing dropped on my fourth pass through the full NG+ dungeon, and I could finally finish the difficulty level and turn the thing in following my next death.
After turning it in, I realized that I had a new issue to surmount: where did I go to access the boss refight? The normal Johannes door at the entrance to the dungeon? As it turned out, once I turned in the last obol, I simply had to defeat any of the standard bosses and their boss door would be replaced by the ghostly green portal. When I beat Khidr on NG++ difficulty, suddenly I had my entrance to the Johannes boss refight. This would be the last one that I needed to complete:

For the final refight, the player is given a Traitor character and tasked with defeating two Johanneses with purple and red coloring. These enemies behave exactly the same as the Johannes boss fight, there simply happens to be two of them instead of one. That might sound bad, but fortunately this Traitor character has the Hypergonadism trait for extra knockback against the two opponents. I had found during my many character runs that Hypergonadism is an exceptionally good trait to have against Johannes, just as PAD trait is awesome again Herodotus to ignore the floor spikes. Johannes is most dangerous when right next to the player, and repeatedly knocking him backwards helps to keep the player safe. For this refight with two of the bosses in play, it was a lifesaver.
Tactically speaking, it was best to keep the two Brohannes off to the same side of the Traitor character. Having one on each side jumping around was a recipe for trouble, and I took more hits that way than at any other time. The Traitor character also has access to all three of the Johannes spells: the dagger flurry, the axe barrage, and the huge blade wall. I found the dagger flurry to be the most effective, not so much for damage but as another way to push the two Brohannes backwards when they came too close. With 300 MP to work with, I could use the daggers a full ten times before running out of mana, and that was a helpful way to get additional damage on the bosses at a safe distance. This refight was also quite generous on the health total with 700 HP, enough to take six hits without dying (the seventh one meant the end). All told, this was noticeably easier than the other boss refights and somewhat of an anti-climax after the brutal punishment of Alexander IV and Ponce de Freon. It only took me about a dozen attempts to emerge victorious:

Note the two Brohannes lying face down on the ground, heh. I had actually come one hit away from winning on a previous attempt, when I dodged into an axe by mistake right before dealing the final blow.  If it hadn't happened on this attempt, it would have sooner or later. Winning this final boss refight unlocked the Traitor character:
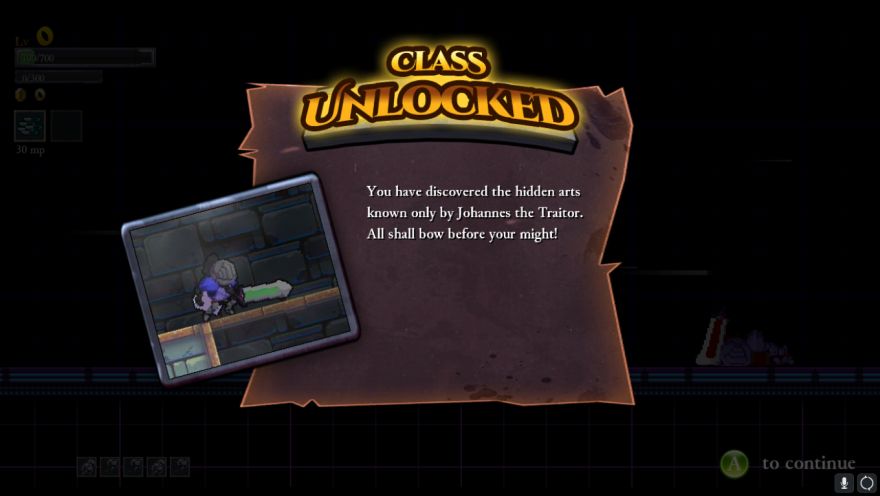
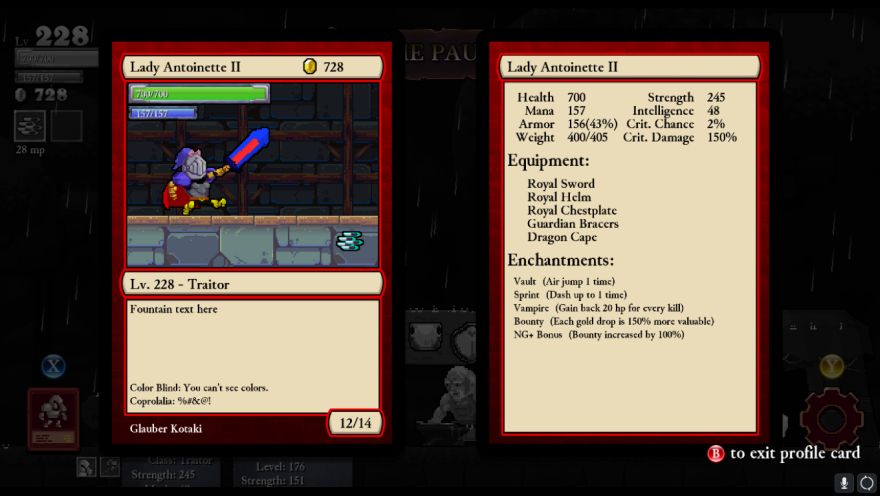
The Traitor class has a closed helmet as the distinctive visual element. I guess Johannes doesn't want to show his face to the world. Here's a quick look at the Traitor's stats:
Dagger Flurry Spell
Axe Barrage Spell
Blade Wall Spell
Health 70%
Mana: 70%
The Traitor class is best defined by the three spells that it carries at all times. When standing in place on the ground, the Traitor will use the dagger flurry spell (a name I made up), which tosses out five daggers that each do 0.75 * Intelligence damage. The daggers will go through walls and can all hit the same target, which will deal a massive amount of damage if the player has been pumping Magic Damage as a stat. When jumping in the air, the Traitor will use the axe barrage spell, tossing out five axes in random over-the-shoulder fashion. The axes each do damage equal to the Intelligence stat, but unfortunately are difficult to aim in practice. If there's an enemy right above your head, you can usually guarantee that they'll get hit by at least one axe; otherwise all bets are off. The blade wall is surprisingly useful since it lasts for a long time, about five seconds in total. It's hard to use though, since it only activates when casting a spell while dashing, and that can make the thing tricky to place with precision. Like the axes, the blade wall deals damage equal to the Intelligence stat, and it's great against charging enemies like the wolves. One other point worth mentioning is that the Traitor class has no penalty to Strength or Intelligence, both of them at the full 100% value. That's rare for a class in Rogue Legacy, and it speaks to the offensive nature of the Traitor class.
The biggest downside to this class is that the spells are too expensive to use on a frequent basis. They each cost 30 MP per casting, and even with some Siphon to restore MP on kills, that's just too high to use against each and every enemy. I also didn't unlock the Traitor class until the beginning of NG++ difficulty, and since I had been using Barbarians and Paladins for my characters up to this point, all of my stat upgrades were in Strength and Health, with nothing in Intelligence or Mana. This meant that the Traitor's spells were costly to use and did little more than tickle the fearsome monsters in NG++ difficulty. In practice, the Traitor was therefore a weaker version of the Paladin, with fewer HP and wacky spells instead of the highly useful shield. I think that the Traitor class would need to be built from the start of the game to be most effective, which of course is impossible due to how it unlocks. The Traitor needs to be built along the lines of the Spellsword, with a focus on both physical and magic damage to take best advantage of its spells, and it also needs a lot of mana so that it can cast without running out of MP. However, the fact of the matter is that offensive abilities are inherently weaker in Rogue Legacy than defensive ones. The sword is plenty to defeat monsters; what the player really needs is a way to make it through those ridiculously packed rooms without dying. The game's best classes, the Assassin and the Barbarian, have ways to do this in the smoke cloud and the shout. The classes that lack these kind of defensive abilities, even fun classes like the Spellsword, are just weaker and harder to use. This means that the Traitor grades out as a mid-tier class overall; I think I'd have the Traitor sixth, below the Assassin, Barbarian, Paladin, Shinobi, and Spellsword but ahead of the Archmage, Lich, and Miner. The Dragon is kind of its own thing and I don't quite know where to place it.

My character was a bit overleveled for the start of NG++ difficulty because I'd had to do several full clears of the New Game Plus dungeon looking for that last obol. As a result, I didn't have much trouble completing NG++ with the Traitor class, with my first character bringing home about 80k gold and the second one having a nice run that cleared out the whole thing on a 250k gold haul. It's definitely a fun class to use with great offensive capabilities, with the tradeoff of having nothing whatsoever to prevent damage from accumulating. In some areas full of enemies, there's nothing to do other than take hits and then use the invincibility grace period to clear out some space. I had also been playing lots of Barbarians with 150% of the base health total, and to drop down from 1500 HP to 700 HP was a bit of a painful shock. You can also see in the picture above how little damage those axes were doing to the ice mage since I had nothing in the Intelligence stat on this save file, and I only had enough MP to cast five spells before running out. Still, this was an entertaining class to use and a fun way to wrap up this pass through the third difficulty level. I even discovered what happens if you find a spell altar in the dungeon while playing as the Traitor class, which it turns out is absolutely nothing.
There's a unique message that displays when facing Johannes with the Traitor class:

I didn't know about this and was highly amused the first time that this appeared. Johannes himself was a breeze after having done the Brohannes fight repeatedly to unlock this class, and the Fountain proved to be no more difficult. I've mentioned a bunch of times that the last two bosses get easier on the higher difficulties because they don't scale up as much as the random monsters scattered thoroughout the dungeon, and that pattern held true once again. Defeating the last two bosses with the Traitor class would have unlocked a unique achievement if I'd been running the Steam version of the game, which I wasn't because this is the GOG version. For anyone who might care about that sort of thing, this is probably the hardest and most obscure achievement to unlock for Rogue Legacy.

So that's all for Rogue Legacy, the last challenge that I wanted to complete with this game. It's an outstanding game for something out of a small indie developer and I hope that they'll continue to make more games in the future. (The developer's name is Cellar Door Games for anyone who wants to keep track of them.) They have a new 2D brawler game called Full Metal Furies that came out at the beginning of 2018, which looks similar to Castle Crashers and I might take a closer look at. If it's anywhere close to Rogue Legacy, I'll definitely get my money's worth. 


