
Primrose continued her quest at the halfway point in the gameplay after completing the set of Chapter 2 stories. They had been straightforward for the most part although I knew that a large reason had been due to the assistance of the various NPCs that Primrose had been Alluring to her aid. Having the Knight Ardante and the Kindly Cleric with 8 star ratings made a big difference in defeating some of the bosses along the way. The relative help provided by the townspeople would continue to decrease as Primrose made it further into the gameplay, however for the moment their various abilities would continue to be crucial.

I used the interval between the Chapter 2 and 3 stories to explore some of the various side areas as usual. This screenshot was taken from the Tomb of Kings which holds one quest reward ("A Royal Secret" which grants the Royal Crest accessory = 600 HP when equipped) and typically proves to be one of the easiest areas to complete. None of the monsters that pop up in here hold particularly dangerous abilities for a solo character. This is also one of the regions where Caits can appear and I went fishing for the big experience payout from Bewildering Grace after defeating one of the elusive cats. Primrose wasn't able to hit the EXP x100 jackpot and had to settle for this double experience reward which was still worth a nice 2500 XP total. After finishing up with the Tomb of Kings, Primrose continued further to the west and reached Wellspring for the first time where she was able to complete the usual side stories for some additional money and a Magic Nut to boost her spellcasting. She had now visited all of the towns in the second ring and I decided to make the dangerous run out to one of the towns in the third ring.

The first town to visit in the remote outer ring is always Grandport due to the treasure trove of items that can be found there. It's a difficult location to reach, however, as the long walk always require facing three or four random encounters with deadly monsters and Octopath Traveler is a game where it's nearly impossible to run away from strong opponents. In preparation for the race to Grandport, I had Primrose travel back to Bolderfall and repeatedly try her hand at Alluring a 9 star Guard Captain NPC until the 5% dice roll succeeded. I wanted this guy on hand both to dish out additional damage and also to tank incoming blows for Primrose; her evasion wouldn't hold up nearly as well against the higher accuracy rating on these enemies. The Guard Captain did a great job in this regard as he jumped in front of several Meteor Storm attacks that would have hit Primrose for 1200 damage. On the offensive, his sword attacks hit for excellent damage and made it possible to defeat monsters that Primrose lacked the capacity to defeat on her own. She was still wiped out a couple of times and had her Encore passive triggered in multiple battles but eventually Primrose did fight clear to the safety of the town's gates.
Once in Grandport, Primrose was able to Purchase the usual items that I want for a solo game: the Protective Necklace (+80 physical/elemental defense), the Forbidden Shield, and no less than five different stat-boosting nuts. The Forbidden Shield was not equipped on Primrose but rather held in stash for special circumstances; I didn't want to take the massive hit to evasion from wearing the thing in normal situations. The top piece of gear for Primrose was instead the Ethereal Dancer Garb, the best chest armor in the game for an evasion build, which was a straight upgrade over the Silent Cape that she had been wearing. This became the new armor that Primrose wore the vast majority of the time.

That +166 evade came in handy against optional bosses like Manymaws who had difficulty hitting Primrose with its normal attack. One thing that an evasion setup highlights is the fact that different monster abilities have different accuracy ratings (even though these can never be seen in-game); Primrose dodged the basic attacks from Manymaws every time but she had poor luck at avoiding its Foul Odor ability which must have had much higher accuracy. She was assisted in this fight by a random Townsperson who had swords as their damage type and helped chip away at the boss. Manymaws doesn't have much in the way of health and perished without much trouble. The Behemoth in the Tomb of the Imperator was a different story though, as the creature kept breaking out its Hydration ability to heal itself and I wasn't sure that Primrose would have enough damage output to finish off the thing. This time I recruited the Kindly Cleric from Saintsbridge again because the Behemoth had a weakness to light element that his Lux Congerere ability could exploit. I had to set up a situation where the Kindly Cleric broke the monster followed by Primrose punching through with a Peacock Strut-boosted Moonlight Waltz to secure the kill:

She even won the optional boss fight without taking a single point of damage for the Untouched bonus, nice! The big creature evidently has low accuracy on its attacks since Primrose dodged them all. We had been stuck in a stalemate for a few turns, with Primrose dodging everything but not doing enough damage to get through the Hydration healing, until I was able to set up the shield break for the big Moonlight Waltz spell. The only other optional boss that Primrose faced during this sequence of dungeons was the Throne Guardian in the Hollow Throne. That's another area where the dungeon itself poses more of a challenge than the boss with the Throne Guardian having no attacks that could threaten Primrose. She used her dagger strikes to break its shield and kept hitting with Moonlight Waltz over and over again for damage until it was over.
With the various optional dungeons out of the way it was time to begin the Chapter 3 stories. I decided to begin with Olberic since he has one of the easiest tales in this group. For the dungeon leading up to the boss at the end, I thought about whether to equip an Antidote Stone to prevent poison or rely on Primrose's natural evasion to dodge the attacks that applied it. Ultimately I decided to cross my fingers and rely on her speediness so that I could equip an Elemental Augmentor to deal more damage on her spellcasts. This worked out fine in practice; Primrose was occasionally poisoned and had to cleanse it with items but not often enough for me to change her equipment setup. The low elemental attack value on the Soul Knife meant that I preferred running the Elemental Augmentor whenever there wasn't a greater need for some kind of defensive accessory.

The Lizardman Chief did require equipping a Conscious Stone to block its stunning attack as that was one status condition that I couldn't allow to hit Primrose. The minions of the reptilian boss were weak against ice element and that meant bringing along Primrose's favorite companion the Knight Ardante once again for this fight. His Glacies Claudere spell easily broke through their shielding and allowed the minions to be eliminated right away. The Lizardman Chief only gets one action per round and didn't fare particularly well at hitting Primrose, getting the occasional attack through and forcing some healing but mostly whiffing ineffectually. This boss has a lot of health at 51k total which dragged things out a bit and forced more rotations of skill usage. Moonlight Waltz was only dealing about 3000 damage when the Lizardman Chief was unbroken, double that after punching through its shields, so this was a somewhat tedious encounter.

I headed off to complete Tressa's Chapter 3 story next and this time the biggest threat came from the random monsters encountered within the Forgotten Grotto dungeon. These lightning elemental creatures were common opponents in this cave and their damage output continued to be massively higher than anything else. Readers may recall that Primrose's evasion setup made her strong against physical threats while leaving her vulnerable against elemental damage that couldn't be dodged. These battles against double elementals were a dire threat that could easily kill Primrose if I wasn't careful. She had to use Peacock Strut on the first round, eat a Healing Grape on the second round, then use a max boosted Moonlight Waltz on the third round of combat to destroy one of the two elementals. Then I could heal for a few turns while building up boost points, knock out the second elemental, then finally defeat whatever other monsters were present in the encounter. These fights still represented mortal peril though and anything going wrong (monsters striking first, the skeletons landing the terror status condition, etc.) could result in a game over, even with Encore passive ability's one-time resurrection. After some trial and error, I changed Primrose's equipment around slightly to increase her elemental defense which helped somewhat. Nevertheless, this dungeon largely had me scampering from one save spot to the next while getting wiped out frequently along the way.
After all that, the Venomtooth Tiger was significantly easier and less dangerous. Primrose equipped an Antidote Stone to block its poison and then relied on her evasion to dodge the attacks from this all-physical opponent. She was very good at dodging everything other than its Venom Fang ability which hit harder than the others and clearly had higher accuracy. I'd guess that she dodged Venom Fang about half the time and everything else more like 80% of the time. The tiger had a weakness to light element and that caused me to bring the Kindly Cleric NPC from Saintsbridge again to punch through those shields. Lux Congerere dealt about 3000 damage when it showed up and broke three shields at a time to serve as the only source of breaking in this fight. The Venomtooth Tiger was reminiscent of the Lizardman Chief for taking some time to defeat without being too dangerous.

I chose Ophilia's story for the following mission and found myself back in Saintsbridge again. This had been a frequent stop for Primrose thanks to recruiting the Knight Ardante and Kindly Cleric so many times for these bosses. The Rivira Woods proved to be another annoying dungeon thanks to the frequent presence of flying owl monsters which liked to use Lower Offense and debuff her physical/elemental attacks. Other enemies could silence Primrose or put her to sleep which meant a lot of extended random encounters where I had to keep countering the various status ailments that she found herself suffering under. I think that she was only wiped out a single time but it took some time and effort to fight these battles. As for Miguel at the conclusion, he had light element as a weakness for his first two vulnerablity sets (he changes them after a break) and then staffs as a weakness for his third vulnerabilities set. This meant that it was time to play the entrance music for the Kindly Cleric one more time for use in breaking those shields! Miguel presented some danger because he could deal an awful lot of damage if a bunch of his spears happened to punch through all at once. He actually killed Primrose in my first try at this battle thanks to a really unlucky RNG streak where Primrose suddenly forgot how to dodge. I suppose that's always a possibility when relying on evasion. Everything went much better in my second attempt but this was an opponent who had to be taken seriously while working through his HP total.

Miguel had been tricky enough that I decided to pause the Chapter 3 stories for a moment and seek out additional resources from another one of the towns in the third ring. My goal was to make it to Northreach at the very top of the map as there were some useful items to acquire should Primrose manage to survive the journey. I started out from Stillsnow where I ran into these Portly Penguins as a random encounter. There's nothing special about these enemies, I just don't remember ever seeing them before and was surprised that I could have played this much Octopath Traveler without that happening. It looks like they are an uncommon encounter and only appear in the Western Stillsnow Wilds, nowhere else in the game. Anyway, I brough along the 9 star Guard Captain from Bolderfall again and he was a major help in fighting up the icy mountainside until hitting Northreach. I don't think that Primrose could have made it on her own, maybe if she broke a bunch of soulstones that I was saving for boss situations.
Northreach held the Empowering Necklace for Purchase, an accessory that grants +1000 HP and which I would be wearing for most of the remainder of the game. Although Primrose wasn't quite as bad as Cyrus in terms of having a low maximum health total, she certainly was no Olberic or Alfyn and greatly benefited from having a higher HP pool. Her health was further increased by running the final Sir Miles side quest for a Large Nourishing Nut worth roughly 270 additional max HP and she was able to Purchase a Large Magic Nut for 35 additional elemental attack. I tend to skip over all of these side stories and stat-boosting nuts while writing the reports but they're extremely important to complete in terms of making the solo characters stronger. I also sent Primrose briefly into the Maw of the Ice Dragon dungeon so that she could pick up the Adamantine Hat. This helmet has the highest elemental defense in the game along with a boost of 88 points to elemental attack. I would switch between this and the Silent Bandana for its evasion bonus many times depending on what stat Primrose needed to emphasize.

Strengthened by those additional item pickups, I decided that the time was right for Primrose to undertake her own Chapter 3 story. This sees Primrose return to her home town of Noblecourt in search of the individual marked with the sign of the crow on their right arm. Primrose immediately witnesses a violent crime in the town square and can't believe how Noblecourt has fallen on rough times since her father was murdered and her noble house overthrown. Then she runs into a man named Simeon who was apparently someone that Primrose knew from childhood when he was a gardener of some kind on her family's estates. Their relationship was apparently even stronger than that, as Simeon keeps hinting that he's in love with Primrose and the game's narrative makes it clear that she feels the same way about him. Simeon even recites bad poetry like the lines above indicating how he's been searching for Primrose for the last decade. This is clunky, poor storytelling because we've never seen Simeon prior to this or heard his name referenced at any point in time. He simply drops into the story out of nowhere and we're told that Primrose is in love with him and has been since she was a child?!  This feels like a bad entry into a creative writing class, not something that made its way into a commercial product.
Simeon heads off to look after his own affairs and Primrose goes to visit the site of her father's grave. There she meets another man named Revello who was one of her father's retainers back when House Azelhart headed the city's governing council. Revello explains that Geoffrey Azelhart was murdered to clear the way for a group named the Obsidians to seize control of Noblecourt and they've been running the show ever since. The Obsidians seem to be a mafia group that use violence against anyone who doesn't follow their orders, though what their ultimate goal is supposed to be remains unclear. Revello has basically given up at the hopelessness of the situation but now pledges to fight back thanks to the arrival of Primrose. They travel to the Obsidian Manse dungeon (with Revello theoretically accompanying the party but doing nothing in gameplay terms) and eventually reach the figure controlling the city. This is revealed to be Albus, who had previously headed the City Watch before betraying and murdering Primrose's father. Albus isn't an ideologue, he simply thought that the Obsidians were likely to be the winning side and jumped ship for the promise of wealth and power. This gives Primrose her opportunity for revenge:

For all of his talk, Albus isn't too interesting as an opponent and usually winds up being one of the easiest of the Chapter 3 bosses. His gimmick is using various blindness attacks followed by something called Death to the Unseeing which is an instant kill move against anyone who can't see. Solo characters can easily block this by equipping a Bright Stone and Albus doesn't have too much else to fall back on in his kit. Primrose was able to dodge his melee attacks at a high success rate and this is another all-physical boss fight with no elemental damage to worry about. The one potentially dangerous moment takes place when Albus falls under half health and summons two Obsidian Officer minions to the battlefield. They don't come back after being defeated though and Primrose was able to pelt them with Night Ode area of effect spells for decent damage. Albus was yet another boss weak against light element which meant another showing for the Kindly Cleric who illuminated the room with Lux Congerere. This was pretty easy stuff and Primrose was able to finish the battle with one of the best lines in the whole game.
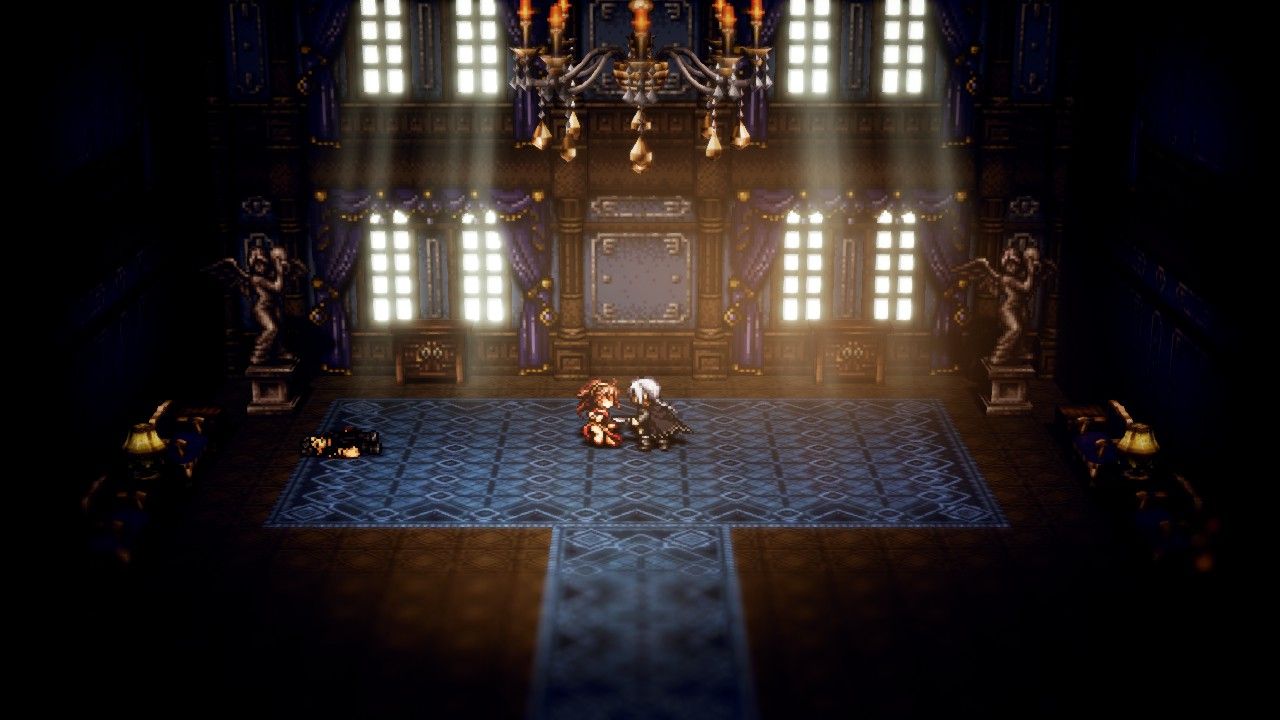
That marks the end of the right hand crow. But what about their overall leader, the man marked with the tatoo of the crow on his neck? Even if you haven't played Octopath Traveler or read my other solo reports and seen the boss of Primrose's Chapter 4 story, you can almost certainly guess where this is going. Simeon appears unexpectedly in the mansion, sidles up to Primrose, and brutally stabs her in the gut. It's another one of the most vicious moments in Octopath Traveler and, like seemingly everything else in Primrose's story, another example of violence directed towards women. As Primrose collapses bleeding onto the carpet, she can only ask "why?" and gets this response:

The narrative clearly intends this moment to be a grand dramatic reveal, Primrose's "true love" turning out to be the murderous villain she's been hunting the whole time, but it completely falls flat as a storytelling device. For starters, the writers did not take the time to establish Simeon as a character ahead of time, thus robbing this reveal of any meaning it might have had. Simeon does not appear in Primrose's introduction, does not appear in her Chapter 1 story, and does not appear in her Chaper 2 story. He literally parachutes into the story just before entering the Obsidian Manse and then gets revealed as the big baddie 10 minutes later. This is a stupid mistake that easily could have been rectified by placing him in Primrose's introduction and having her think about him or mention him during the Chapter 1 and Chapter 2 stories. Compare Simeon in Primrose's story to the role of Darius in Therion's story; Therion keeps thinking about Darius and having flashbacks about their relationship. This is why it's not surprising when Darius shows up again and becomes the ending opponent for Therion, it's the natural place for Therion's story to go in order for him to complete his character arc. By contrast, Simeon appears out of nowhere and has no connection to Primrose's first two chapters which makes for a dull antagonist.
Second, the supposed "romance" between Primrose and Simeon also appears out of the blue and is not remotely believable. Primrose had a girlhood crush on Simeon because he used to recite poetry to her outside in the gardens? I mean, OK, I can believe that... but Primrose has gone through a series of incredibly traumatic circumstances since that time which was a full decade earlier. She's an adult now, she shouldn't still be stuck in a world of childish fancies. I guess you could argue that Primrose's emotional development has been stunted by her trauma and she's still unhealthily stuck as an adolescent but I really don't think that's what the narrative is trying to say. The text strongly suggests that this is her "true love" which is just weird and creepy. Primrose was a child when Simeon was an adult - yeesh! That is not the stuff of healthy relationships. Also if she really cared about this guy maybe we could have heard about him at some point earlier? Maybe this is some part of Japanese culture that's not translating at all.
Furthermore and perhaps most damaging, Simeon's actions don't make any sense at all! OK so he's revealed as the head of the Obsidians, the group that Primrose is in the process of destroying on her quest of revenge, and he has this golden opportunity to get close to Primrose and stab her. So why doesn't Simeon simply kill her then?!? Simeon later states in Chapter 4 that he stabbed Primrose and left it up to fate as far as whether she lived or died, something that's completely crazy. Either kill your primary antagonist or give up your life of crime and join her if you actually love her. The only way I can interpret what takes place in the story is to go with the explanation that "Simeon is insane so his actions inherently don't make sense", and that actually does seem to be what the game is suggesting. Simeon is obsessed with the theatre and is acting out a delusional fantasy using Primrose as the starring character in a tragedy. Generally speaking though, it's considered to be lousy writing to make your villains insane so that their plans don't have to make sense to the audience. For another in-game comparison, Mattias at the end of Ophilia's story is as mad as a loon but his plan to revive the dark god Galdera does have some kind of internal consistency. Simeon simply engages in random self-defeating nonsense for no clear reason. Ironically, the story would make sense if this wasn't a video game and Primrose actually died here at the end of Chapter 3. The whole story would come full circle with Primrose betrayed and murdered by someone she trusted just as her father was, a very dark story but a logically consistent one. Instead we get a garbled mess that has never made any sense to me.
Can you tell that I hate Simeon as a character? He's the one figure that I would completely delete from this game if I could. Primrose deserved a better antagonist for her final chapter, sigh. 

Anyway, I thought that H'aanit's story looked to be the easiest of the remaining Chapter 3 options and returned to Stillsnow to tackle it next. The annoying part of this chapter is the need to get past another Provoke battle with H'aanit; at least it's not as bad as the pair of them in her Chapter 2 tale. The Whitewood dungeon attached to this story is quite linear and surprisingly small in nature. Aside from some of the random monsters silencing your characters it's pretty easy as well. The main challenge therefore comes from the Dragon boss at the end which can be a bit of a pain for solo characters. The most important tactic against this boss is equipping an Inferno Amulet to block the fire damage from the Dragon's breath attack. The amulet prevents 99% of the damage from fire element abilities and that was especially important for Primrose given her low elemental resistances. And no matter how many times I've seen it, the screenshot of the Dragon's fire breath still looks awesome.
With the fire breath neutralized, Primrose only had to worry about the physical attacks from the boss. This was a bigger danger than I had been expecting as Primrose didn't do a great job of avoiding these attacks. She had reasonable success at avoiding the basic attack from the Dragon but struggled against the Rending Claw which hit harder and evidently had a higher accuracy rating. Even with the Kindly Cleric NPC blocking some of those blows as pictured above, Rending Claw hit for about 1500 damage and the incoming attacks were outpacing Primrose's ability to recover with Healing Grapes. I was struggling with this fight until I hit on a solution: the Mole Dance ability! I had almost forgotten that Primrose had this ability which reduced physical damage by a third, cutting Rending Claw from 1500 damage down to 1000 damage per hit. This crossed over the invisible threshold to make Healing Grapes viable for sustaining health and Primrose was able to wear down the Dragon over a lengthy series of rounds. I'd have to remember Mole Dance as an option for the upcoming boss fights when I needed to reduce physical damage.

I continued onwards to Cyrus' Chapter 3 story and here the problem was the exact opposite: hard-hitting elemental damage from the random encounters. Yvon's Mansion is heavy on spellcasters for its monster mix and when they buffed up their elemental attack they could potentially hit for as much as 1000 damage as seen above. These fights were bad enough that they prompted me to change Primrose's equipment, dropping most of her evasion gear in favor of a more standard physical/elemental protection scheme. I even had her wear the Robe of the Flame which has the highest elemental defense rating in the whole game. There wasn't a lot of physical damage in this area and the alternate gear cut down on the damage from spells considerably. For the Yvon boss at the conclusion, I swapped back to most of the evasion stuff while equipping a Wind Amulet accessory to defend against Yvon's minions:

These Research Fellows cast a series of wind element spells and the Wind Amulet cuts their damage by 50%. While that wasn't as good as the 99% reduction that Primrose would later be able to enjoy from the Tempest Amulet, it still made a big difference in making the beginning of this boss fight more manageable. The start of this encounter is the most dangerous time since there are three different enemies to contend with. The Research Fellows don't come back again after being defeated and therefore eliminating them is always the first priority. Yvon himself hits hard but only gets one action per round and never increases this as the combat continues. Primrose didn't have too much trouble avoiding his Shatter Soul and Pulverize attacks, and if they did hit, oh well, there was always time to heal up in safety. Yvon is always weak to daggers and light element which was music to Primrose's ears as she brought along the Kindly Cleric for about the hundredth time. This was one of the easiest of the Chapter 3 bosses.
Unfortunately the last two remaining Chapter 3 bosses are the most difficult of the bunch and neither looked like they would be a simple task for Primrose. I thought it over and decided to tackle Therion's story first due to the fact that Gareth has the lowest HP of any Chapter 3 boss. I had reasonably good luck at pulling off Therion's latest collection of 3% odds steals and could get down to the business of running the Black Market dungeon. As a desert area, this is another place where there are a lot of poison attacks and once again Primrose dodged well enough that I felt comfortable skipping the normal Antidote Stone. Gareth proved to be one tough cookie, however:

I thought going into this fight that it might not be so bad assuming that Primrose was able to dodge Gareth's melee strikes. However, Gareth's accuracy proved to be better than I had hoped and he connected repeatedly with his Steal Life and Steal Magic attacks. The pictured Steal Magic ability was particularly bad as Gareth seemed to land it about 80% of the time. At least Primrose regenerated spirit points after each action which made it effectively impossible for her to run out of casting juice; she would always have enough SP to use whatever ability I chose. But Gareth was a real problem as he and his two Master Thief minions were easily producing enough damage to outpace the healing capacity of Healing Grapes. I had brought along the Knight Ardante to target the ice element weakness of the two minions and help absorb some of the incoming damage. I didn't want to kill off the minions because Gareth goes up to 3 actions/round once they disappear, however I couldn't control the actions of Primrose's Allured followers and it seemed inevitable that they would knock out the two minions pretty quickly no matter what.
With the help of the Knight Ardante, Primrose was able to eliminate the two minions in short order and then focus on Gareth. The battle was going reasonably well until Gareth pulled out his trump card and stole away Primrose's items to take away her healing. That's why I brought the Knight Ardante though, to hit that ice element weakness and break Gareth's shields to restore item usage once again. Except no, that didn't work, because Gareth locked out his ice weakness after his shields were broken for the first time. Ummm.... whoops. I didn't expect that to happen and Gareth lacked a daggers weakness to exploit. Without the ability to heal Primrose was defeated and I had to rethink the battle from the beginning.

Rather than leave the dungeon and recruit a different NPC follower, I decided to see if I could win using the Knight Ardante and slightly different tactics. I reasoned out that I had to save the Summoned follower and the first shield break until Primrose actually lost her items. Then the Knight Ardante could use Glacies Claudere, break Gareth to restore items, and I could race to defeat the boss before he stole the items a second time. This meant that the first part of the battle had to be done without an NPC ally and Primrose took some fierce punishment as a result. For the first time in the variant run I found myself having to drink Refreshing Jams, the exact same situation that several of my other solo characters have found themselves in. I had Primrose break some Wind Soulstones to drop Gareth down to a single shield remaining and apply as much extra damage as I could get. She cast Moonlight Waltz against Gareth when she had a full boost meter and otherwise relied on healing and using soulstones. Eventually Gareth stole her items, Primrose summoned the Knight Ardante who broke the boss to get her items back again (and wiped out the two minions), and then the damage race was on to finish things before losing the items again. Gareth moved VERY quickly to steal the items once more and actually did take them away only for Primrose to defeat him before her health could run out. Whew, what an ugly and tough battle. It cost about half a dozen Refreshing Jams to win this one and the combat wasn't pretty. At least Darius in Chapter 4 always has a weakness to daggers to exploit.

The only Chapter 3 story remaining at this point was Ophilia's tale. I had been saving this one for last because the bosses at the end heal themselves after every round of combat and that represented a huge problem for a character like Primrose who had low overall damage output. The need for as much raw damage as possible meant no more relying on 8 star NPCs, it was time to break out the big guns and recruit the highest possible 10 star rating on this old Townsperson in Bolderfall. Olberic had to Challenge a weaker 2 star NPC out of the way just so that Primrose could reach this guy and longtime readers may remember that this was the same individual that Olberic Challenged almost a hundred times while searching for a 2% drop on the Battle-tested Blade. At least the 10% Allure odds were much better and didn't require fighting a battle every single time to toss the dice.
Primrose successfully recruited the desired Townsperson after a dozen or so attempts and then it was back to Goldshore again to start the story sequence. The Seaside Grotto dungeon is similar to Yvon's Mansion in containing a lot of spellcasters and I again switched Primrose over to some equipment that had more elemental protection. She didn't have much trouble in this dungeon given that she was reaching the end of the Chapter 3 areas and had scaled up with lots of levels by this point. The bosses at the end of this story are unusual in dealing entirely elemental damage and so I went with the unorthodox equipment rig pictured above. Primrose sacrificed almost all of her evade to pump up elemental defense to 940 points (many of my other solo characters have maxed the stat at 999 for this fight) while still maintaining +1000 HP as always. This was the best that I could do to prepare for the bosses.

The dual bosses at the end of this story sequence are the Mystery Man and the Shady Figure. They both attack the party with various elemental spells while the Shady Figure uses Heal Wounds at the end of every round to restore 800 HP to each of them. This is a potential stumbling block for low-offense characters like Primrose as she had to average 800 damage per round per boss or else she would be stuck in place making no progress at all. A max boosted Night Ode with Peacock Strut in place only dealt 2800 damage to each opponent which was clearly not going to be sufficient on its own, not given the need to charge up those boost points and spend at least some rounds healing Primrose. My solution was to cut loose the 10 star Townsperson NPC and pray that his damage would be enough to get the job done with Primrose kicking in some help of her own. Remember that she had no control over what the Townsperson might do on his rounds, which could range from hitting one or both of the two bosses with three different abilities (basic attack, Level Slash, or Guillotine). The Townsperson was also limited to a mere 4 summons by virtue of having that 10 star rating which meant that this battle had to be won quickly before the NPC deserted for good.
I'd like to say that I had an elaborate master plan for this boss fight but in truth I was largely watching what the Townsperson was doing and improvising from there. I did my best to even out the damage across the two bosses; you don't want to leave just one of them alive since they will start buffing up and using the much more dangerous Arcane Blade ability. Sometimes that meant hitting both opponents with Night Ode or soulstones, other times hitting a single target with Moonlight Waltz when the Townsperson had been attacking the other target. I resummoned the Townsperson whenever he retreated from battle, prioritizing this even over healing Primrose. She wasn't in much damage for the moment since she had so much elemental protection against their spells. After some intense combat, both of the bosses were down into the red on health while the NPC Townsperson was down to Primrose's final summon. This was where I was the beneficiary of some lucky fight sequencing: a sword attack from the Townsperson broke the shields on the Shady Figure which allowed Primrose to hit with a Large Soulstone for 5700 damage followed by a Level Slash from the NPC that hit both targets and killed them simultaneously. I was not tracking their individual HP and this was quite fortunate that everything lined up perfectly on the first attempt. Very nice!
These last two boss fights were pretty tough and I was glad to have them out of the way. Primrose clearly needed to get stronger if she was going to overcome the final opponents in the Chapter 4 stories. Fortunately there was an upcoming series of equipment upgrades available in Chapter 4 which would make Primrose much deadlier to her enemies. I was looking forward to testing her abilities against these last remaining obstacles in the days ahead.


