
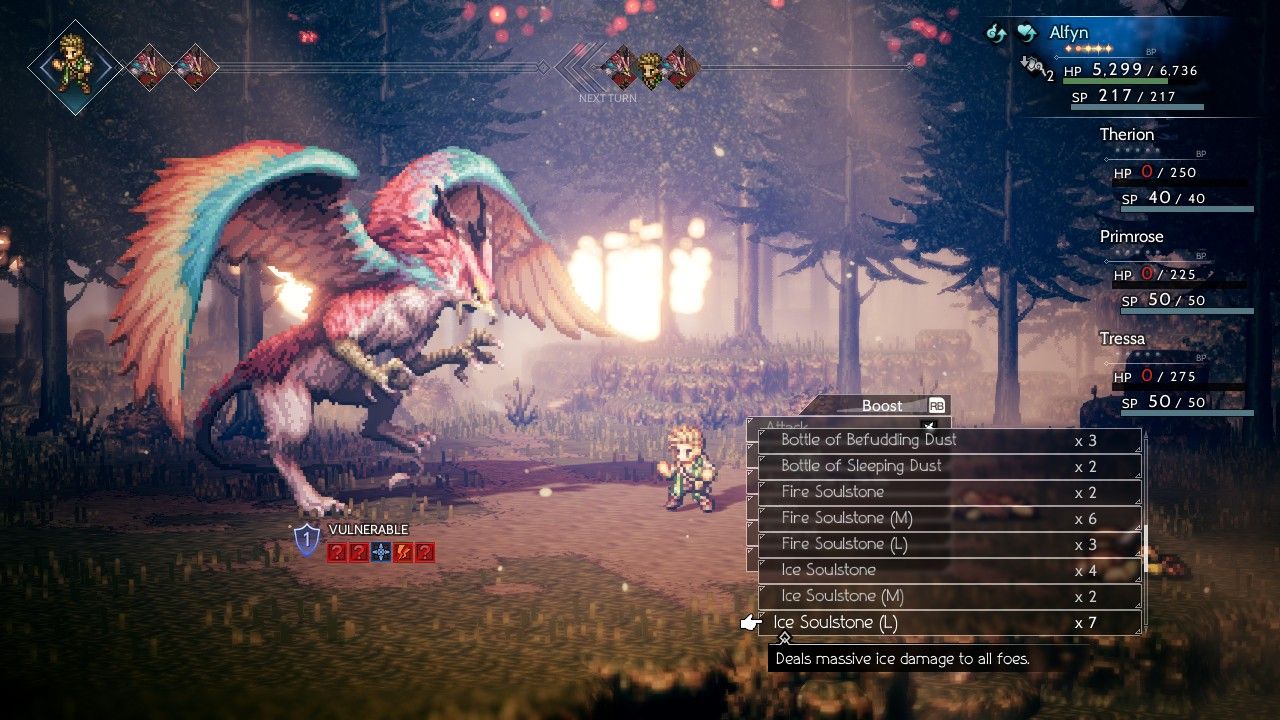
We were about to hit the final stages of Alfyn's journey, the struggle to defeat the Chapter 4 bosses at the end of each character's individual tale. And I knew that it would indeed be a struggle since there were several bosses that Alfyn wasn't particularly well equipped to handle. He might be able to heal for days on end but that would only help so much against some of the obstacles that were rapidly approaching on the horizon. In any case, I started out by taking Alfyn through a few more of the optional side dungeons that had useful items hidden inside. The most important of these was the Dragonsong Fane, home to the item with the game's highest physical defense in the helmet slot (the Crystal Helmet at 180 physical defense). I grabbed all of the other treasures inside and finished up with the "Kaisa Mother of Dragons" side quest which necessitating raising Olberic's level to 30 so that he could Challenge a hostile NPC. Afterwards, it was on to Riverford where Alfyn could purchase his final missing component:

He had previously bought Purifying Seeds (single-target ally), Purifying Dusts (multi-target allies), and Ruinous Seeds (single-target enemy) components from the vendors in Duskbarrow. The Ruinous Dusts (multi-target enemies) were the last of the "potent" components for Alfyn to find available for sale in a store, and although they tended to be less useful than focusing his concoctions on a single target, there were a few situations where breaking the shields of everything on screen at once would come in handy. I was limiting myself to around 50 of each kind of potent component for the moment due to the astronomical cost of these items. Picking up 30 of these Ruinous Dusts cost about 100,000 money as just one example. These things remained too pricey to use in random encounters and therefore Alfyn typically broke them out only when dealing with bosses.
The other side dungeon of note was the Maw of the Ice Dragon on the road to Northreach in the Frostlands:

The big treasure here was the Adamantine Hat, the best all-around item that can be equipped in the helmet slot. It has the highest elemental defense in the game (180) and pairs it with excellent physical defense (104) as well. Since all of the best physical defense helmets have no elemental defense on them at all, the Adamantine Hat is the general best choice for anything except the game's toughest physical damage-only bosses. The opponent lurking at the end of the Maw of the Ice Dragon was the Dreadwolf and its wolf minions. This was a pretty straightforward enemy who was notable only for breaking out a heavy 1700 damage Rampage move that caught me unaware and killed Alfyn on my first attempt. Whoops, that was sloppy. On my repeat try, I killed the two wolf minions with Last Stand and then hit the boss with Amputation for max damage. (The boss calls back the minions after they're eliminated at half health, that's why you see them pictured above.) All in all, nothing too difficult here.
The open-world nature of Octopath Traveler allows the player to take on the Chapter 4 bosses in any order, and I had to decide who I wanted to target first. The one that I wanted to defeat first if at all possible was Werner, the enemy lurking at the end of Olberic's tale. Werner is ideal for eliminating early on because his defeat opens up a lot of excellent equipment, most notably the amazing Battle-teste Shield. Unfortunately Werner is also one of the hardest of the Chapter 4 bosses to take down, packing extremely heavy physical damage together with some nasty status ailments. Still, I reasoned that if anyone could go toe-to-toe with Werner, it was someone like Alfyn who had endless healing and a massive life total. I made my way through the Lord's Manse dungeon, stacked as much physical defense as possible, and equipped the Conscious/Calming Stones to block Werner's unconsciousness and terror status ailments. Let's do this.

Werner proved to be just as tough as I'd been fearing and then some. His attacks on their own were bad enough, but the real problem was his continued use of the Oppression debuff: physical attack and physical defense down. Both sides of that were bad for Alfyn, who still needed to deal physical damage with his axe. The physical defense down portion was worse though due to the way that it greatly strengthened Werner's strikes. With Oppression in effect, Werner's normal attacks did about 750 damage and his "Boot to the Head" kick could do as much as the 1700 damage pictured above. Werner also liked to pull out a Double Strike attack that dealt 800 damage x 2 = 1600 damage in total. Tressa and Olberic had both been able to counter a physical defense debuff with one of their abilities, either the Mercenaries from Hired Help or Stout Wall. Alfyn had no such luck and took the full brunt of having his defense debuffed.
This worked out OK during the first half of the fight, when Werner was limited to 2 actions per turn. Even if Werner ended up getting three or four actions in a row, he wouldn't be able to drop Alfyn from full health down to zero before Alfyn would get another turn and could slip in some much-needed healing. However, after knocking Werner below 50% HP, this boss goes up to 3 actions per turn and that was a lot rougher. Inevitably the turn order would produce a situation where Alfyn went at the beginning of one turn followed by the end of another turn, with Werner acting five or six times in a row in between. I saw Alfyn lose all 6000 HP on one of those stretches and there was nothing I could do about it. What was the answer here - gain some more levels for a higher max HP total and try again later?

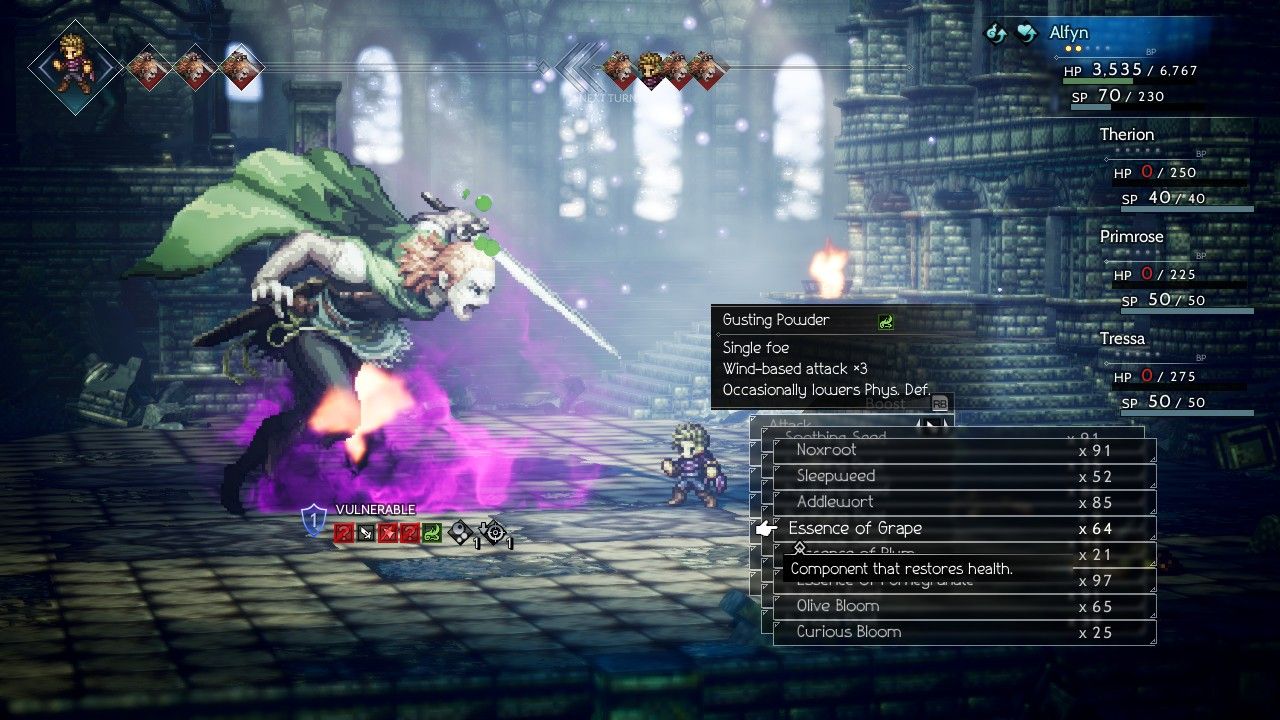
Fortunately it turned out that there was an answer here that I hadn't seen initially. The Curious Balm+ concoction formed from a Purifying Seed and a Curious Bloom has a unique property: it heals a single target for 3000 HP (actually 3900 HP for Alfyn thanks to Heightened Healing passive) and grants the physical attack evasion property. The next physical attack would be dodged with 100% accuracy as highlighted in the above image. That might seem like a small thing but it tilted the math of this engagement in Alfyn's favor. One of the attacks that would have otherwise hit Alfyn ended up not hitting him, allowing me to spend fewer rounds healing and transforming those certain death situations where Werner had six actions in a row into something just barely survivable. Although it had taken the whole game to save up 30 Curious Blooms, that was the whole reason for being so stingy up until now, so that these components would be ready when Alfyn really and truly needed them. I started using the Curious Balm+ concoctions whenever they seemed even remotely useful. Massive healing and damage prevention in a single action, what wasn't to like about that?
On the offensive side of things, Alfyn was slowed by the frequent debuffing of his physical attack from Oppression. This was countered by his own ability to debuff Werner's physical defense with his wind element Gusting Powders, attacking the wind element weakness on the boss. Werner would lock and unlock his weaknesses throughout the battle but there was always at least one of them that Alfyn could exploit, either axes or any one of three different elements (lightning, wind, light). I never tried to use Amputation without breaking the boss first, both because it was relatively easy to break Werner using Ruinous Seed concoctions and because I didn't trust Amputation to hit the target unless Werner had been broken first. The whole issue in this battle was surviving the damage onslaught coming from Werner, and the switch over to using Curious Balm+ concoctions was the key that unlocked this puzzle. Once I figured that out, I was able to win immediately afterwards. Cross off the first major challenge of the Chapter 4 collection of bosses.

With that huge obstacle out of the way, Alfyn could travel around the world and begin enjoying the spoils of victory. As I said above, there's a major reason to defeat Werner first if at all possible in the form of newly purchaseable items. The Battle-tested Shield was the biggest prize here, packing both the highest physical defense in the game on a shield and providing its incredible HP/SP regeneration on a turn-by-turn basis. This might not sound like that big of a deal, getting back 200 HP and 8 SP at the end of every round of combat, but it makes such an enormous difference in practice while playing a solo character. Constant minor health regen makes your character significantly harder to kill over the course of a long battle, and the minor nicks and scrapes from random encounters don't even register. I barely needed to heal Alfyn after picking up this new shield. Together with Alfyn's Inspiration passive, he was getting back a massive amount of SP every turn, enough that I could start using Last Stand with reckless abandon. I was using that move almost every turn afterwards, pausing occasionally to auto-attack for a bit and replenish the SP gauge. Oh, and Alfyn's Heightened Healing passive did kick in for the Battle-tested Shield, which meant that he gained back 260 HP and 10 SP each round, slightly better than any other character would have done. He genuinely felt like an unkillable tank after this, hitting every enemy on screen virtually every round and regenerating tons of HP/SP at the same time.
Other items that unlocked after defeating Werner included the Crystal Armor, the item with the highest physical defense in the game, and the Crystal Vest, which has the best total combination of physical and elemental defense at 205 points of each. Alfyn typically wore the Crystal Vest for general purpose use and switched over to the Crystal Armor only if he needed to max out his physical defense. I also picked up the Battle-tested Blade by Purchasing it from Erhardt in Wellspring, not because Alfyn could use it but because Olberic might need it for Challenge purposes. All of this was expensive and it cleaned out Alfyn's savings completely. I ended up having him run through the Refuge Ruins largely to build up more money, then went to the Grimsand Ruins and looted it for more treasure.

Redeye is the boss at the end of this area and this is probably the easiest of the Chapter 4 bosses in general. Redeye has a massive HP total at 108,000 but doesn't do anything particularly dangerous, only inflicting unconsciousness status which can easily be blocked by a Conscious Stone accessory. This boss doesn't hit anywhere near as hard as Werner, does not debuff the player's physical/elemental defense, and never goes up from 2 actions/turn to 3 actions/turn. The big gimmick here is the fact that the boss weak points shift at the end of every turn of combat, a trick which isn't especially difficult to plan around. I think that this boss originally had the ability to petrify characters and turn them into stone, which was then taken out of the game at some point (prior to the Steam version) because it could easily become impossible to defeat the game if the player had misplaced the herb-of-grace items from H'aanit's previous Chapter 3 story. Anyway, short of that petrification move this boss fight becomes a bit of a joke compared to the other Chapter 4 opponents. Alfyn made sure to keep his health up, broke the boss without any trouble, and delivered plenty of max damage Amputation strikes. I used a lot of Noxweed-based concoctions to hit Redeye's fire element weakness and therefore poison ticks made a major contribution to this fight.
If you make it to the secret endgame scenario, it's revealed that Redeye is the horribly transformed shape of Graham Crossford, the apothecary that healed Alfyn when he was a boy. It's a sad ending for this figure who tried his best to save his family and ended up failing in dramatic fashion. All eight of the stories in Octopath Traveler are connected to one another but the game makes it extremely hard to find out the details by locking them away in a difficult to access optional side quest. Solo Alfyn wouldn't be going there since he had no chance at all against Galdera but I thought the plot details were worth pointing out.

The other easy Chapter 4 boss is Lucia, the one waiting at the conclusion of Alfyn's story. I figured out the counterintuitive solution with Tressa: *DON'T* break the boss, make sure to defeat her while she's still in her least dangerous initial form. For Alfyn, this meant using Amputation at max boost and otherwise not hitting the boss to avoid breaking through her shields. She was weak to axes, which was good because it increased the damage dealt by Amputation, but also bad because it meant auto attacking was out. Don't want to break those shields, after all. So what was Alfyn to do on those rounds where he didn't need to heal while also not having a full boost meter? I suppose he could he have used Energizing Pomegranates to gain BP but that felt wasteful.
Instead, I had him use an otherwise useless Apothecary ability: Empoison! This skill poisons an opponent with 2 rounds of poison per boost point invested. Since each poison tick deals 1% of max HP when used aginst bosses, this is usually a thoroughly pointless ability. However, in the unique situation of wanting to deal damage without breaking the shields of the opponent, it was just what the doctor ordered. Alfyn kept those 840 damage poison ticks running for the whole battle, otherwise healing and breaking out Amputation whenever his boost meter was full. I used a dozen total Amputations (with ten hitting and two missing) over the course of this slow and steady and very safe fight. Easy stuff.

I had taken on Lucia not only because she's a simple boss to defeat, but also because the Ruins of Eld dungeon holds a Void Stone accessory that Alfyn would need against several of his upcoming opponents. That Void Stone was a necessary choice against Mattias at the end of Ophilia's Chapter 4 story, and for the other accessory slot I opted to take the Tempest Amulet. Both of these items reduce damage associated with their respective elements by 99%, dark element for the Void Stone and wind element for the Tempest Stone. I had guessed with previous characters that Mattias' Black Gale move was wind element in nature, and Alfyn confirmed that this was indeed true. These two amulets removed almost everything that Mattias could do in the battle, outside of his lightning element based "Black Thunder" attack that only shows up when he drops to very low health. It was comical watching this cult leader deal absolutely no damage at all with his various spells since Alfyn was protected against their respective elemental types.
Mattias summons a bunch of different minions over the course of the battle, Senior Cultists then Black Matters then Augmented Remnants. I had a rare chance here to use concoctions that built out of the Ruinous Dust component, the one that hit everything on the screen at once instead of targeting a single opponent. For example, the Gusting Cloud concoction hit all enemies for two ticks of wind element damage, thus breaking through the shields of these Black Matters faster. Alfyn killed each group of minions one at a time and then went to work on the boss himself. Mattias did basically nothing the whole fight and the passive healing from the Battle-tested Shield alone was practically sufficient to get through this challenge. I was surprised at just how easy this fight proved to be.

I was hoping that Simeon would end up being similar to Mattias in terms of challenge level, only to discover that this boss was a more serious opponent. Simeon is always somewhat annoying due to being a two phase boss fight, the only one in the game outside the secret ending scenario. There's no question about what accessories to bring against Simeon, as the Articulate Stone is mandatory to prevent being silenced and the Void Stone is almost as needed due to the many dark element spells used by the boss. For the first phase against Simeon's puppets, I had Alfyn concentrate on defeating the Dancer Marionette first and then go after the Father Marionette once the first target was finished. Both of these puppets gain an extra action per turn and become significantly more dangerous after they fall below half health. For example, the Father Marionette gains an attack that can inflict unconsciousness and I didn't have any protection for that on Alfyn. Later on, I realized that the safest tactic was never to attack the Father Marionette at all and simply defeat Simeon himself once the dancer puppet was gone. This was an easy and boring fight that largely served to waste time.

The second phase of this battle takes place against Simeon himself. It can largely be divided into two halves: before Simeon falls below half health, and after Simeon falls below half health. The first half of this phase was very easy for Alfyn, as Simeon's actions were almost entirely geared around useless dark element spells and weak physical attacks. The incoming damage was minimal and Alfyn barely even had to heal. If there was a problem here, it was the inability to break through Simeon's defenses: he starts the battle with all weaknesses locked aside from daggers, and that was a damage type that Alfyn couldn't access. I was forced to use Amputation against an unbroken target, which did decent (6000) damage output at the cost of missing roughly a quarter of the time. If the rest of the battle had gone like this, it would have been another slow and steady march to victory as Alfyn had done so many times before.
However, the rest of the battle did not proceed in this fashion. Once Simeon fell below half health, he increased his actions up to 3 per turn and started mixing in much more dangerous attacks. (I'm increasingly realizing that the bosses which get 3 actions/turn are the real danger. That extra action swings the math of each fight and makes them enormously more deadly.) Simeon had been using "Boiling Blood" to buff up his physical and elemental attack since the start of the fight, but that had been irrelevant so long as he was using only weak attacks and dark element spells that bounced off the Void Amulet. Now Simeon began pulling out his deadly "Act of Impulse" move, a physical attack that had a base damage of about 1500 (!) despite Alfyn having maxed out physical defense. When Boiling Blood was in effect, that damage went up by 50% to approximately 2200 per attack. And on top of that, Simeon could also debuff Alfyn's physical/elemental defense with another attack named Shredded Fortunes. Combine together Boiling Blood with Shredded Fortunes and Act of Impulse would deal 3000 damage each time that it showed up, which could happen repeatedly in the same turn. There was one point where Simeon ended up getting five actions in a row and he used Act of Impulse THREE TIMES to kill Alfyn from full health. Even dodging some of these attacks with Curious Balms wasn't enough to get the job done. Now what was I going to do?

I did have one more trick up my sleeve that I could play here, something that I'd been saving for just such a situation. The Bizarre Incense concoction (Ruinous Dust + Curious Bloom) hit all enemies on the screen with dark element damage three times, and more importantly, also nullified all status enhancements. That's the symbol with the little up arrow and an "X" next to it, one that I hadn't seen before while playing this game. In other words, this locked out Simeon from being able to buff up his physical/elemental attack with Boiling Blood. I wasn't able to stop Simeon from debuffing Alfyn's defenses with Shredded Fortunes, but I could at least stop the other half of the problem and limit Act of Impulse to "only" 2200 damage at a time. That was far from a solution to this problem but it was the best answer that I could muster.
The true killer here was Simeon's ability to stack up three actions for every one action of Alfyn's. I could heal Alfyn, or I could make sure to keep Bizarre Incense's nullification in place, or I could opt to attack Simeon. But it was really hard to keep all three of those things in play at the same time, not least with Simeon having no such restriction and getting to do everything at once. The random fluctuations in the turn order create pitfalls as well, points in time where Simeon sometimes would get five or even six actions in a row before I would get control of Alfyn back. No matter how well prepared I might have been, the game would sometimes throw out situations where I couldn't survive, no matter how good my planning might have been beforehand. At times like this I really missed the Active Time Battle (ATB) system of the classic Final Fantasies, which prevented this kind of unlucky clustering of actions from taking place.

If I couldn't keep all of those plates spinning in the air once Simeon gained his third action per turn, then I realized I'd have to set things up ahead of time while he still only had two actions each turn. I broke out my calculator and began tracking Simeon's health so that I'd know when he was about to fall under 50% HP remaining. Knowing how difficult it would be to maintain the Bizarre Incense status nullification, I stacked it up to the maximum duration of 9 turns BEFORE dropping Simeon under half health. This was exactly what I needed to have in place, as I couldn't quite keep up the pace of refreshing it and the timer slowly dropped over the course of the battle. Each Bizarre Incense gained me 3 more turns and I could use it maybe once every 4-5 turns, slowly losing that built-up advantage from earlier in the fight. I was also continuing to use the Curious Balm concoctions to simultaneously heal and dodge Simeon's incoming attacks, and it was very rewarding to sidestep one of those 2000 damage attacks. Despite all of my planning and best efforts, I still needed a lot of luck factors to line up correctly with Simeon not using the wrong attack at the wrong moment. What made this super annoying was needing to spend 10 minutes going through Simeon Phase 1 and then the first half of Simeon Phase 2 every time that I made an attempt at this. Maybe some people would have gotten around this with save states but I've always explained that I don't use them while playing. I used them as a backup when my SNES emulator used to crash a fair bit and I think once or twice with my Final Fantasy 5 solo Bard and that's about it.
Eventually, on about the fourth attempt after hitting on the Bizarre Incense/Curious Balm strategy, I was able to hold things together long enough to defeat Simeon once and for all. The Bizarre Incense protection was just on the verge of running out, it had dropped completely for a turn and I renewed it one last time to block an incoming Boiling Blood, then managed to land the final Amputation for the victory. What a tough, tough fight. The sad thing is that this fight would have been a total cinch if Simeon hadn't locked out all of his non-daggers weaknesses. He's actually weak to dark element so those Bizarre Incense concoctions could have been breaking his shields along with nullifying his buffs! Argh.

I was overjoyed to have Simeon out of the way and took a break before heading after the remaining Chapter 4 bosses. I decided to fulfill some of the side quests that unlock after finishing individual character storylines, and one of the new options was this "Back With Bale" quest. It's a simple quest that only asks the player to Inquire/Scrutinize Bishop Donovan in Goldshore and then head back to talk with Captain Bale in Wellspring. The one requirement is having finished both Olberic's and Ophilia's Chapter 4 storylines which seals this off until the lategame. The reward is the Captain's Badge accessory, a unique item that grants everyone in the party (not just the one equipping it) +50% additional experience. The online community for these RPGs always seems to be obsessed with grinding and therefore places a huge priority on this item and the Badge of Friendship accessory (which does the same thing for job points). While I didn't have too much use for the Captain's Badge, Alfyn was basically immortal against random encounters and didn't need to equip any specific accessories to keep himself alive. Might as well toss on the Captain's Bade for additional XP then, right? I'd been using the Mighty Belt for +50 physical attack for much of the game and this was more useful than that option.

The net result was XP payouts like the amount pictured here, 1700 experience from this random encounter in the Everhold Tunnels. Once your characters hit Level 70, the XP threshholds needed to keep going up in level start increasing at an astronomical rate and it's hard to get too much further without a serious dedication to grinding. Most of my characters have been finishing around Level 75 with Olberic a bit higher (Level 79) since he had Challenged every NPC in the whole world and had to do so many fights to get his Battle-tested Blade. Anyway, I looted the Everhold Tunnels of their treasures and fought the optional boss at its end. The Devourer of Dreams (great name by the way) had two attacks of note: a Horrible Claw attack that inflicted terror and an Eclipse spell that dealt about 3000 dark element damage. For future reference, I'll note that bringing Calming Stone and Void Amulet accessories should shut down this optional boss completely. Alfyn actually died once when I was caught off guard by Eclipse's damage and then won without trouble on his second attempt.

I had one other task to do before returning to the remaining boss gauntlet. Alfyn had chewed through most of his accumulated stock of Curious Bloom components by using up so many of them against Simeon. I'd started with more than 30 and fell down to about 15 after the battle. It seemed wise to spend a little time restocking them rather than find myself running out in the middle of a critical fight down the road. The one enemy that drops these things are bats, half a dozen different types of bats scattered in locations around the game. I fought this group of bats in the Sewers underneath Riverford for a bit, then went to the Caves of Rhiyo at the start of the game since bats were more common in the encounters down there and the drop rate was the same regardless of type. It didn't take too long to get back up to 30+ Curious Blooms which seemed like enough to be safe. Looking back at the components from the perspective of the end of the game, I hoarded them for Alfyn's whole quest and rarely ended up using anything aside from the Noxweeds and Essence of Grapes (both purchaseable in stores) and the Curious Blooms. That was certainly better than needing components and not having them, but it's too bad that all of those Sleepweeds and Addleworts and Olive Blooms never ended up doing much of anything. Oh well.

Now it was time to undertake one of the stories that I'd been most worried about, Alfyn's own Chapter 4 sequence. In plot terms, Alfyn travels to the small town of Orewell and runs into fellow apothecary Ogen once again. This time it turns out that Ogen is sick and determined to die out of a sense of guilt over failing to prevent his wife's death. Alfyn refuses to accept this and sets out to heal Ogen, gaining his confidence back along the way by reading a letter from his friend Zeph back in Clearbrook. This story sequence also contains the single most ridiculous plot element in any of the eight main stories: Alfyn doesn't know the recipe to cure Ogen's sickness, and travels BACK IN TIME into his own memory, where he can Inquire the curative mixture (as a child!) from the traveling Graham Crossford. It's completely absurd and I have no idea what the writers were thinking when they put this into the game. Again, I don't really care about the plot so I'm mostly just left shaking my head about the lunacy of the whole deal. 
The boss at the end of Alfyn's story is the Ogre Eagle, and while this is normally one of the easier Chapter 4 bosses, I was concerned that Alfyn might lack the offensive capacity to defeat it. The Ogre Eagle doesn't deal a whole lot in terms of damage, and what damage it does deal tends to be mostly wind element in nature, easily blocked by equipping a Tempest Stone accessory. That just leaves the relatively mild physical attacks from the boss and its status ailments/debuffs, which include a mixture of poison, darkness, and attack/defense debuffs. None of this would pose any issues for Alfyn at all, and indeed the first half of the battle was pretty much a joke. The problem is that once the boss falls under half health, it triggers a permanent condition known as "Toxic Rainbow" that reduces maximum HP (not current HP) by 8% each turn and puts a time limit on the rest of the battle. For a low-offense character like Alfyn, it was unclear to me if he could deal the 55,000 damage needed to win the battle before Toxic Rainbow brought the whole enterprise to an end.
I decided to work around this by tracking the HP for the Ogre Eagle and keeping an eye on when it was getting close to falling below half health. My first thought was to stack up the maximum duration of 9 turns of poison right before dropping the boss under half health, with those poison ticks each dealing about 1100 damge and effectively lowering how much more damage was needed to end the fight. This was a great idea right up until I realized that the Ogre Eagle is immune to poison. Well, uh, so much for that. Next up, I carefully worked the boss down to 56k health remaining and then waited until Alfyn's boost meter was completely full. I broke the Ogre Eagle with a Large Soulstone to get as much damage as possible, then used a max boosted Amputation for 9999 damage. This meant that there was about 40k health remaining on the Ogre Eagle and the damage race was on.

The good news was that this was near the end of the game and I could play fast and loose with Alfyn's items. I had brought a Bright Stone to block darkness status and didn't bother trying to stop poison; Alfyn would be healing with Refreshing Jams fast enough that any poison ticks would largely be irrelevant. (Fun side effect of your max HP dropping over the course of the fight: each poison tick dealt less damage!) I could also use the very rare Revitalizing Jams to get a full restoration of BP as well as HP and SP. Basically Alfyn was either attacking with a max boosted Amputation or using an item to get back HP/BP on every turn from this point forward. There wasn't enough time to waste rounds breaking the shields of the Ogre Eagle again, I had to hope that Amputation would remain accurate here. Fortunately it did. I also noticed that the Ogre Eagle really and truly doesn't deal much damage. Leaving aside Toxic Rainbow, with a Tempest Amulet in place the only attack that did any damage was its Double Rend that dealt roughly 600 damage in total. With many boss actions wasted on wind element attacks that did nothing, and with the Ogre Eagle getting only 2 actions per turn, the incoming damage was quite mild. I think Alfyn could have dropped as low as 1000 max HP and still been relatively safe here. Naturally Toxic Rainbow was lowering his max HP by less and less each round as the numbers involved grew smaller, since 8% of 6000 HP was a lot more than 8% of 2500 HP. In the end, Alfyn won this battle on his very first attempt with 2688 max HP remaining. This was one boss that ended up being a lot easier than I'd feared.

Completing Alfyn's storyline opened up another side quest that eventually produced the Memorial Axe, the axe with the highest physical attack in the game. (Why delivering a series of love letters between Zeph and Mercedes has the end result of handing over a deadly axe is an open question.) The Memorial Axe grants +400 physical attack and +150 speed in comparison to +380 physical attack and +140 critical on the Death Cleaver that Alfyn had been using for some time. I switched over to the Memorial Axe to see how it worked in practice, but eventually decided that the Death Cleaver was ultimately the better choice. This was largely due to the fact that speed seems to be mostly useless as a stat in Octopath Traveler, not altering the turn order or granting any more dodges as far as I could tell, while the extra critical chance on the Death Cleaver had a tangible effect. Every attack and every ability seemed to go critical 100% of the time while using the Death Cleaver whereas it only happened about 80% of the time with the Memorial Axe. This was more than enough for it to outperform the weapon with the slightly higher physical attack rating in terms of raw damage. (In big picture terms, the speed/accuracy/evade stats all seem to be pretty pointless in Octopath Traveler. Whatever they're supposed to be doing, they aren't having enough of an effect for me to be able to tell.)

With two bosses remaining, I went after Tressa's final opponent Esmeralda next. She's another mostly physical attacker who occasionally breaks out "blades" of different colors that deal heavy elemental damage. The Red Blade and Violet Blade seem to pop up the most often, and I therefore equipped Alfyn with the Inferno and Void Amulets to counter in the two accessory slots. For whatever reason, the Blue Blade attuned to ice just seems to appear less often. Esmeralda's most dangerous combination is Raven's Flight to debuff the player's physical defense followed by Five Strikes to hit, well, five times in succession. Each of those strikes will deal about 1000 damage if your character's physical defense has been debuffed, even with 999 physical defense coming into the fight. Even Alfyn had to be careful about surviving that despite his massive HP total. I did discover one crucial piece of information on this playthrough: Esmeralda always uses Five Strikes immediately after recovering from a break. Thus the player needs to be very careful about breaking her or else she'll simply kill you immediately upon recovering. My failure to realize this previously is likely why I had a lot of deaths here with earlier solo runs.
Fortunately Alfyn didn't have too much trouble with Esmeralda. He was helped here by easily being able to break this boss at all times: Esmeralda never locked any of her weaknesses and even though she shifted them at different times in the fight, wind element was always available as an option. While Esmeralda may have had 8 shields protecting her, that was pretty easy to smash through with Ruinous Seed concoctions that broke three shields at a time without needing to spend any boost points. Esmeralda's locking out of different abilities was useless here since she couldn't stop Alfyn's concoctions, and anything locked out would be removed on a break. This was also the first and only battle where Alfyn was able to get some use out of the pictured Midnight Powder, which hit three times for dak element damage and had the chance to shift Esmeralda to later in the turn order. Slowing effects never affect the current turn, only the next one in order, but that could be useful in terms of letting Alfyn act before the boss rather than following the boss. Esmeralda also kept putting these death timers on top of Alfyn's head, which turned out to be somewhat of a joke since he could easily break her (ending the death timer) long before it hit zero. Yes, please do that rather than hitting Alfyn five times, thanks! It took me a couple of test runs to get the timings down for this battle and then Alfyn sailed through without much trouble.
Alright, now for the real horror show, the last and final boss of the Chapter 4 stories: Darius.

From the moment that Gareth locked out Alfyn's concoctions in the deserts of Wellspring, I knew that this was going to be the biggest obstacle for Alfyn. He needed to use his items more than just about any other character in the game, and removing that ability had the potential to make this an unwinnable battle. Remember all of the obnoxious things that Gareth could do in addition to taking away items, like stealing away health and SP to make it impossible to use abilities? Darius can do all of that too, plus he can also steal away boost points, plus he hits about three times as hard and has triple the total HP. Great, just great. I found that Alfyn could take advantage of the axes weakness on Darius to get his items back after they were stolen at the very beginning of the fight. Hooray, maybe this fight would be possible after all! But then things immediately became much worse after Darius recovered from the first break: he locked out *ALL* of the weaknesses that Alfyn could target. No axes, no ice element, no wind element. Alfyn needed to use spears or daggers in order to break Darius, neither of which was available to him. Soon enough Darius stole his items and then he was trapped in that same Catch-22 situation again. He needed to break Darius to get his items back but that was impossible so long as his items were off limits. Once Alfyn found himself stuck in this situation, which inevitably happened in every battle, he was left without much in the way of answers.
I wasn't about to give up that quickly though. The biggest edge Alfyn had going for him was the Battle-tested Shield which restored 10 SP at the end of every round without needing to attack for Inspiration passive or wear the Dragon's Scarf that had taken down Gareth. I realized that I could manipulate the turn order to keep Alfyn alive in situations like these: use the Defend option to move Alfyn to the front of the order for the following turn, and take advantage of the SP restored by the Battle-hardened Shield to heal with First Aid. Pulling moves like this was enough to keep Alfyn alive for the time being. But I needed to make progress in terms of reducing Darius' health if I was ever going to win the fight, not simply survive.

Believe it or not, one of the best options for dealing damage turned out to be the much-maligned Empoison skill. Darius has about 99k total health which meant that each 1% poison tick would deal about 990 damage, more than Alfyn could do with an unboosted axe swing. In fact, a maxed out Empoison would do more damage than a maxed out Amputation when added up over the full 8 turns, and I made sure to keep that poison working away in the background. When the boost meter was maxed out and there was a chance to attack, Alfyn would use Amputation and hit for about 5000-6000 damage against the unbroken Darius. As long as Darius was limited to his initial 2 actions/turn, I could keep this going forever and slowly make progress.
Sadly, this wasn't an equilibrium that could last until winning. When Darius dropped below 50% HP he increased his actions to the dreaded 3 per round, and that tipped the math decisively in his favor. The extra damage was bad enough on its own, but Darius also increased his speed enough to keep Alfyn in permanent "Nighthawk" state with his physical defense debuffed. Previously I would largely focus on healing and defending while Nighthawk was in effect and then attacking when it had worn off but that unfortunately wasn't an option now. Even worse, Darius kept using Steal HP and he was sucking away more health than ever before in the process. In fact, he was actually healing faster than I could damage him! His boss health had gone into the yellow when he dropped below the 50% mark, and now it was moving back into the white as he surged up above the halfway mark again. It was hard enough just keeping Alfyn alive - it was maddening to watch the lifebar on Darius ticking upwards in the wrong direction.

I could keep the battle going for a surprisingly long time but the eventual outcome was never in doubt. Eventually the turn order was going to force a result where Alfyn had no SP to cast First Aid and no possibility of getting another round before he died. Just too many rounds of Steal SP used in a row choking the life out of Alfyn. He couldn't use any items, he couldn't use any abilities, and he couldn't use his concoctions. All against an enemy moving at triple his speed and leeching away health the whole time. It was an impossible state. If I could just break Darius, I was confident that I could win this battle. It was the inability to break the boss and get Alfyn's items back that made this task an impossible one. If only Alfyn could hit one of those weaknesses in some way...
Well folks, this was one opponent that Alfyn the solo Apothecary simply could not defeat. I thought about this from every possible angle and I just don't see how it's possible without being able to break the boss to restore item usage. I could end the character run here on a down note... or I could do something to allow him to hit those weaknesses on Darius and finally break the conniving enemy thief. And the latter option sounded like a lot more fun to me. So, it was time to try another option entirely:
Say hello then to Alfyn the Thief. Oh yes, we're not going to let Darius slink away with the victory, we're going to take this one small step to ensure that Alfyn could hit him in the one weakness that he never locks throughout the battle: daggers. I wouldn't use any Thief skills, active or passive, and wouldn't even attack with the dagger except when every other weakness was locked and it was the only way for Alfyn to break Darius. I just wanted to be able to break the boss and not get completely blocked when axes/ice/wind were all taken off the table. Alfyn cut a pretty snazzy figure in his new Thief outfit, certainly much sharper than his usual shabby Apothecary self. And I went ahead and Purchased the Battle-tested Dagger from Vanessa Hysel (of all people!) to make sure that Alfyn had a nice weapon to hold in that hand. If we were going to do this, I wanted to do it in style.

I already knew that I could get through the easier first half of the Darius battle so this was all going to be about managing the second half when he went up to 3 actions per turn. Alfyn's newfound ability to attack the daggers weakness on Darius was another game-changer, getting him out of that Catch-22 situation where he was permanently denied access to his items and concoctions. Now I could fall back on the tactics used by Tressa and Olberic: keep Darius at 1 shield remaining, wait for him to steal the items, and then instantly break that final shield to regain access immediately. With all of Alfyn's concoctions back at his disposal again, along with 30+ Refreshing Jams and close to a dozen Revitalizing Jams, Darius wasn't going to kill Alfyn again.
Or at least he was never going to kill Alfyn in a fair fight. There was one last challenge to be overcome here: when Darius drops below 25% HP he will use his "Call Comrade" ability which removes all of Therion's allies from the battlefield, leaving Therion alone to face the boss. This is disastrously bad for a solo game and results in an instant game over if Therion is already lying dead on the battlefield. When I was playing as Tressa, I had to revive Therion temporarily to get around this situation since I couldn't come up with another solution. For Alfyn, I tried to dodge this effect initially by using the physical evasion from a Curious Balm+ concoction. I didn't expect that to work, and no, it didn't: Darius used Call Comrade and Alfyn instantly lost the battle. Hmmm. Well, I thought that I had a solution to this one last problem:
Once again, I kept track of the health of Darius in a side spreadsheet and watched to see when he was getting close to 25% HP remaining. Darius does need to charge up the Call Comrade ability for one turn and that gave me a chance to block it from happening. I carefully lowered the health of Darius until he was right above 25% HP, the whole time needing to stalive alive during this extremely dangerous battle, and pushed him just under the threshhold with him sitting at exactly one shield remaining. Darius predictably gave the signal for an impending Call Comrade - that's the purple flames surrounding him in the picture above - and Alfyn calmly broke that last shield with a Gusting Powder concoction to ward off the move before it could trigger. No removal of Alfyn from the battlefield, no instant game over scenario. From that point it was a matter of continuing to hold Darius one shield away from being broken, always ready to regain stolen items as needed, while hitting him with Amputation attacks and healing with Alfyn's bazillion different options as needed. This was finally it, I had solved the last piece of this puzzle. Die you variant-wrecking jerk, die!

And that was the end of that.  What a royal pain in the butt Darius is for solo games, sheesh. He has so many things that are terrible for solo characters: taking away items (desperately needed for healing for most characters), stealing health, robbing SP to deny abilities, debuffing physical attack/defense, and then going up to the dreaded 3 actions/turn. I have a feeling that this won't be the last solo character that's going to need to resort to daggers usage to deal with this guy.

Overall Alfyn proved to be a more difficult solo character than I had been expecting. I thought that his healing and tanking abilities would carry him past his challenges, and while that largely was true, there were a number of places where his mediocre offensive output turned out to be a glaring weakness. My biggest disappointment was the uselessness of his damaging concoctions for anything other than shield breaking. I thought that those elemental powders would actually dish out real damage, but nope, apparently it ended up having to be axes alone for the whole game. Amputation was a real letdown in this respect due to its frequent inaccuracy, I could never really count on it unless the opponent was broken ahead of time. On the other hand, Last Stand performed far better than I expected and ended up being the mainstay of Alfyn's offense. He used this ability in basically every random encounter for the whole second half of the game, often using it multiple times per battle once he had the Battle-tested Shield for increased SP regeneration. I did not expect Last Stand to see anything like that kind of usage rate. And First Aid / Rehabilitation were both incredible for the whole run, the former healing as much as 5000 HP by the end of the game while Rehabilitation locked out any fear of most status ailments. I'm going to miss both of them very badly the next time that I do a solo game.
I'll take a break from Octopath Traveler for a couple of weeks and then come back fresh with a different character next time. There are several that I still want to try and hopefully they won't be too painful to play out to a conclusion. Until then, thanks as always for reading.


