

One of the core concepts of Humankind is the ability to change between different cultures at the start of each new era. This is one of the biggest selling points of the game as it allows players to pivot between different strategic focuses, playing as a peaceful builder nation in one era and then becoming a fearsome group of warriors in another. However, there's also the possibility of sticking with the same culture for the whole game, picking an initial starting empire for the Ancient era and then never changing into anything else. Humankind provides a bonus of +10% additional fame each time that an empire sticks with the same culture and this can keep stacking up to five times with each new age. The obvious tradeoff is that the empire in question isn't gaining any of the benefits of adopting a new culture: no new innate passive abilities, no new unique districts, and no additional unique units to use in combat. This sounded like a fun variant to try and I decided that I'd play a game where I never changed my culture to see what the gameplay was like.
I rolled another Small map on the second-highest ("Civilization") difficulty setting, this time picking a Pangaea map for some variety. I didn't take any screenshots of the brief Neolithic era as my tribespeople found themselves in a region that was very heavy on rivers. This time I had good luck finding food curiosities and hunting wild animals, quickly reaching five tribal units, unfortunately counterbalanced by having poor luck at finding the science curiosities. When I found myself with five tribes and only 2/10 science on Turn 8, I decided that it would make more sense to advance quickly into the Ancient era and get an early start at city building rather than wander around trying to achieve the Science star. I hadn't gone into this game with any particular culture in mind to play and if anything had been leaning towards the Zhou since their district-building passive ability felt very useful for a long game. However, when I saw this starting position I realized that my choice had to be the Harappans:
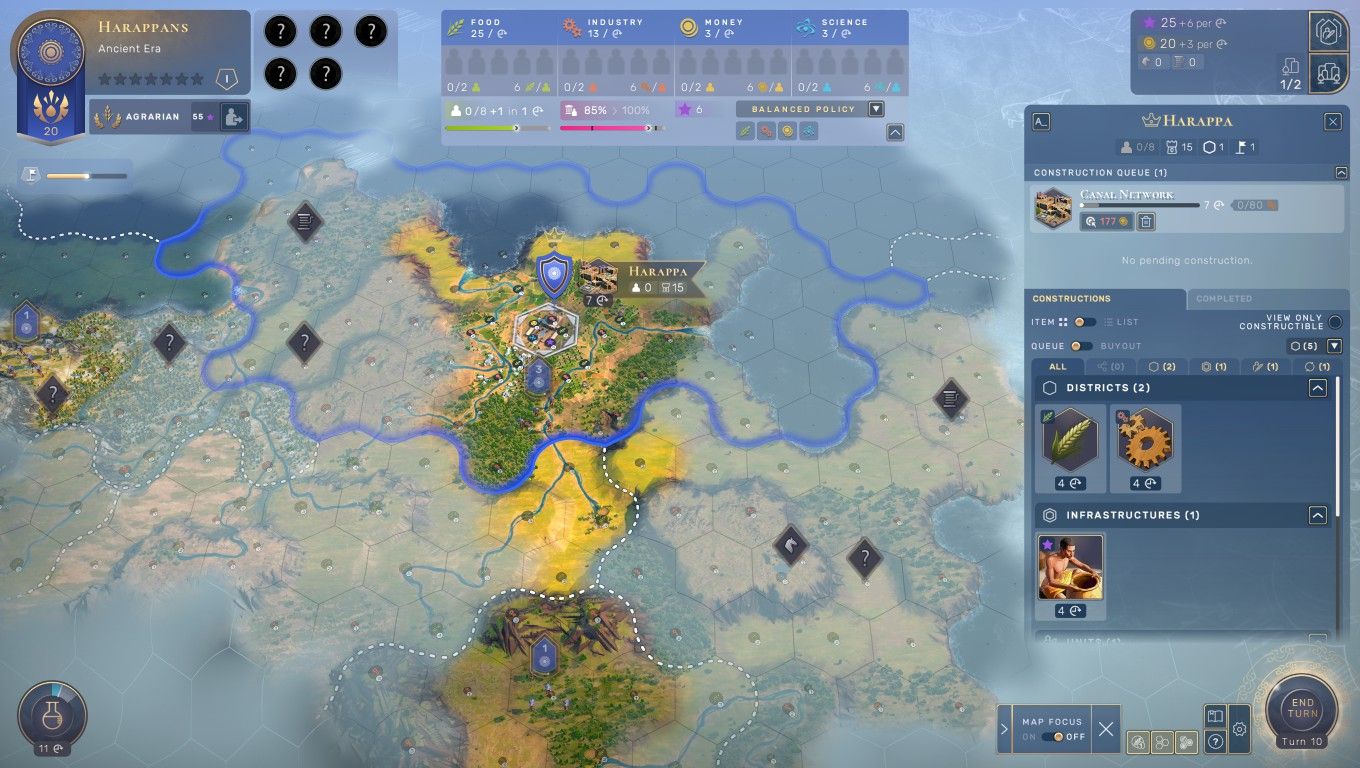
There were rivers galore here, rivers as far as the eye could see stretching into the interior of the continent. The Harappans were a perfect fit for this location as their innate ability grants them +1 food on any tile producing food (very similar to Egypt's production bonus) and +1 food on river tiles. This causes any river tile to have an effective yield of +2 food and that's a big deal in the early game. The Harappan unique district the Canal Network functions as a better version of a Farmers Quarter with +3 innate food (the default district has +1 food) and the tile on which it gets placed counts as a river, thus triggering the culture's unique bonus once again. The short version of the Harappans is that they are the premier "food" culture in the early game and that makes them one of the best choices to pick out of the gate. I found that the capital of Harappa was overflowing with food and grew like a weed in the early turns. It was production that was the sticking points here in a non-Egypt game and I found myself running lots of Industry specialists to help complete the crucial early infrastructure faster. It was exactly the reverse of my Egypt games where I run a lot of Farmer specialists because the Egyptians naturally have so much production.
I also wanted the chance to play as the Harappans because I rarely get the chance to use them in my games. The AI leaders love to snap up the Harappans as soon as possible and this was the first time that I'd been able to try them out. The Harappan unique unit is the Runner with +1 strength and +1 movement over the default scout unit that everyone else gets. They can be very dangerous in the extreme early game if the Harappans advance into the Ancient era quickly and then swarm a neighbor who still has 10 strength tribal units. That turned out not to be in the cards here because I found myself with plenty of space to spread out across the map:
Harappa was situated at the northeastern edge of the Pangaea continent with oceans to the north and the east. This was a great spot with plenty of safe backlines land free from AI aggression. Having five Runner units allowed me to explore the map in rapid fashion and make informed decisions about where I wanted to direct expansion first. It was slightly unfortunate that two of the three regions bordering Harappa were low quality areas, with the region directly west having mostly tundra tiles and several unrevealed strategic resources while the region to the south was high on food but with no resources at all. Harappa already had plenty of food - I didn't need the suggested 25 food / 2 production outpost! - so the initial expansion had to go to the southeast in a forested area that also picked up horses and a second copper resource. Although that spot wasn't great from a strategic standpoint it was necessary to keep the growth curve speeding along. My next few outposts and cities would head west into the disputed portion of the map.
I met two AI empires during these early turns of exploration. The closer of the two was Agamemnon who was piloting the Nubians with the black borders visible over at Kerma. More time spent playing Humankind has given me a better sense of the AI leader personalities and Agamemnon appears to be the Montezuma of this game. He's extremely aggressive and the player can expect to be getting invaded at some point any time that they find themselves next to Agamemnon. I had no desire to find myself pulled into an early conflict and did my best to stay out of the way of the Nubians during the early turns. The other leader further off to the west was Makeda who had the yellowish borders and had taken the Olmecs. I don't have as much of a sense of her personality but Makeda quickly turned into my best trading partner. She had rolled a bunch of different science-based luxuries and I was able to trade for several of them for pennies on the dollar, like getting lead (+1 beaker per Scientist specialist) for a mere 50 gold payout. My cities were high in food and running lots of Scientist specialists which made these trades a true bargain.

More broadly though, this map was pretty sparse when it came to luxuries. There were a couple of dyes resources (+5 industry per city) and then one sage resource over by the Nubians (+3 food on cities/outposts) and that was it. In other words, this continent was overflowing with rivers but a meager place indeed when it came to luxuries and their bonus effects. I placed my second city of Mohenjo-Daro in another fertile river valley where it would control one source of dyes and then could pick up the second source with an attached outpost. After that, uh, I guess I'd have to trade or conquer for more sources of additional stability. Most of these early turns were spent hustling around the map with Runner units to keep grabbing curiosities as they spawned in the wilderness. Although no individual curiosity provided that much of a benefit, the cumulative effect of landing two or three dozen of them did add up over time. I often had to keep the Runners grouped in packs of two or three to keep them from getting attacked by Agamemnon's units; only in the deep south could the Runners operate in isolation as pictured above.
I was fortunate that the Ancient era remained entirely peaceful for my Harappans. Makeda was far enough away that we didn't come into conflict while Agamemnon seemed to be preoccupied skirmishing with other AI empires off to his west. My expansion pace was steady as I used outposts to claim one region after another along the border with the Nubians while doing my best to look non-threatening. One powerful side effect of the Harappan emphasis on food is having additional influence to spend on expansion; each population point is worth 1 influence/turn (and potentially 2 influence/turn if stability in the city is over 90 which it usually is not in my games). More influence translates into more territories claimed and faster expansion. I was able to plant a third city named Lothal in the deep south and there was still room for a fourth city in the far southeast safely in my backlines. Now if I could just avoid getting attacked for a little while longer to tech upwards and consolidate this position!

Knowing when to transition into the next era can always be a bit tricky in Humankind and it felt especially weird for this variant. My Harappans wouldn't be changing their culture or picking up any additional abilities, only gaining the +10% multiplier to fame on future stars. I decided that the best moment would be after discovering 10 technologies and maxing out on the Science stars for this era; I was also getting close to finishing the Ancient portion of the tech tree and I needed to advance the era to be able to start researching the Classical technologies. The term that the game uses for sticking with the same culture in future eras is "transcendence" and thus the name of this particular variant was born. The AI does a good job at accumulating fame in the Ancient era and it was a tight race at the moment for the first place spot. Agamemnon was in the lead, I was in second, and Makeda was right behind me. Only the poor purple empire was uncompetitive and I don't know exactly what happened to them - not the position that they wanted to be in!

I had been doing a good job of keeping down the barbarians in my portion of the continent by having Runner units wandering around the map. There were three or four times when those units ransacked a barbarian encampment for additional gold before it could form into an independent city. However, a barbarian city did end up getting founded to the west of my capital city, right on the disputed border with Agamemnon. This turned out to be a good thing since his newly-acquired Persian culture likely would have claimed the spot for himself and I didn't have the military strength to push back. Instead, the barbarians held the region for about a dozen turns until I could put together a moderate stack and attempt to take it for myself.
What was noteworthy about the battle at Huaricanga is that I picked the Siege option instead of making an immediate assault. Humankind offers the chance for attackers to place a city under siege which will slowly wear down the defending levied units until eventually the city is captured without a fight. Of course, the defenders always have the chance to sally out of the city to attack the besiegers and the AI tends to be very aggressive about doing this. This neutral city allowed me to place it under siege (amusingly with three Runners, heh!) and I was able to accumulate two battering rams which then took part in the subsequent combat. The battering rams had very low combat strength but could batter down the fortifications on the combat screen to open them up for movement. The rams could also tank a few hits which was great - better them than my actual units. I had emphasized Standing Army technology at the bottom of the tech tree to unlock iron resources and swordsmen units which were enough to win this battle and capture the barbarian city.
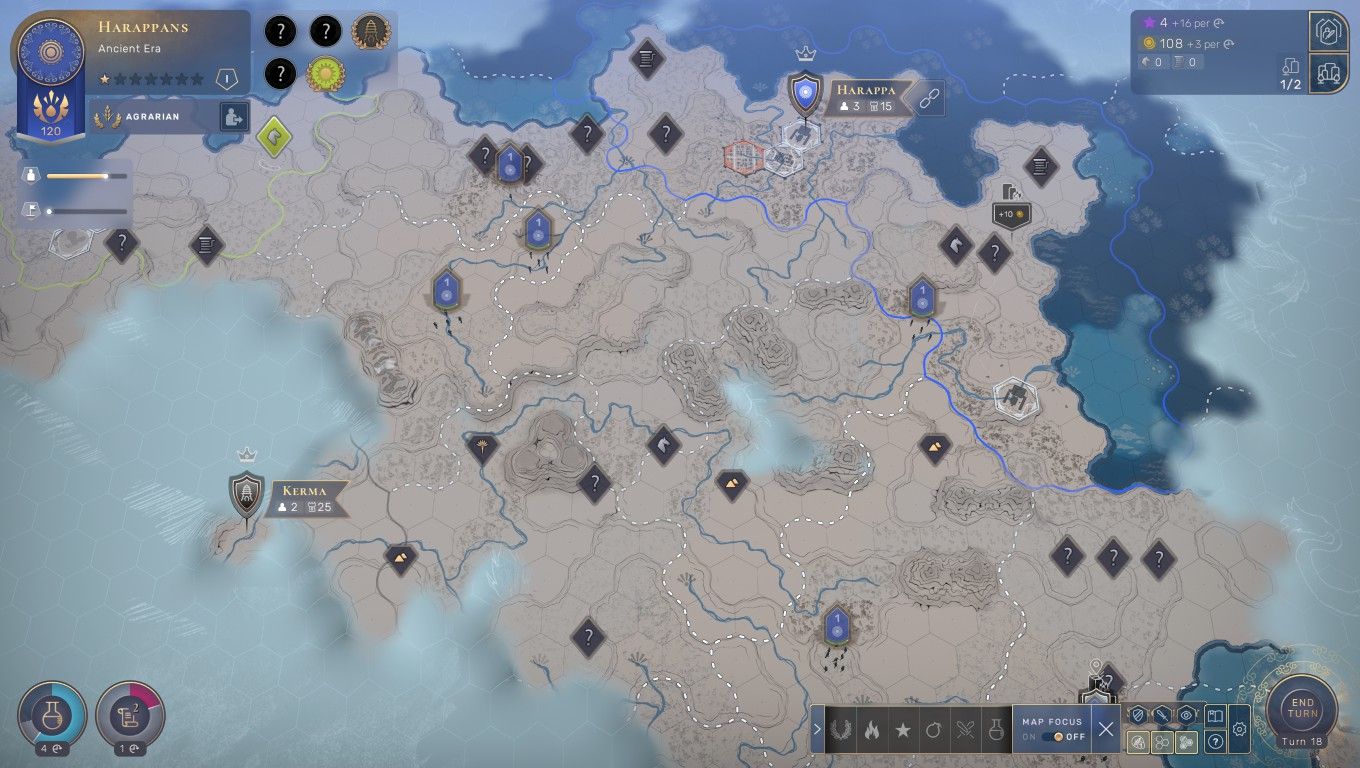
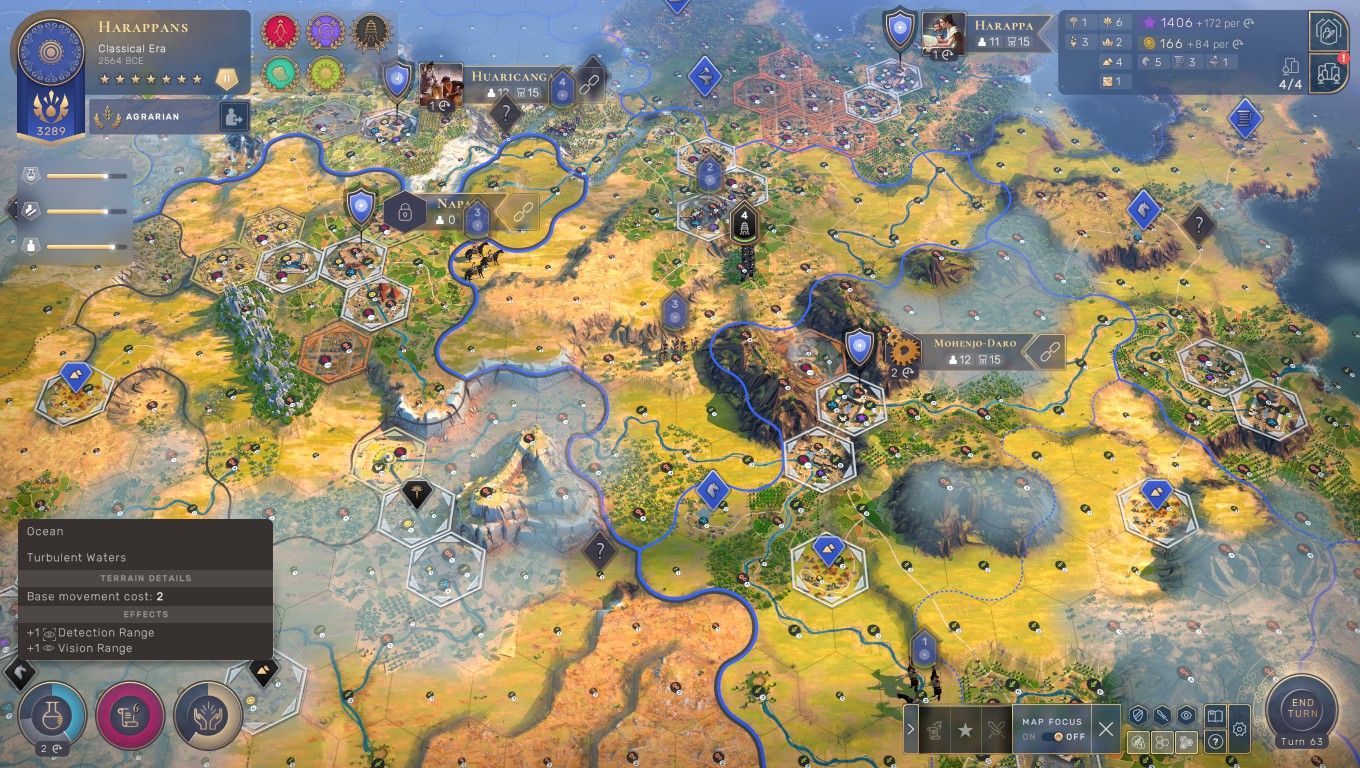
This was the overview situation roughly 50 turns into the game after my capture of Huaricanga. Agamemnon had founded a second city to the northeast at Napata and filled out the area surrounding his initial capital at Kerma which was attached to three or four additional regions. Otherwise my landgrab had been wildly successful in taking control of the whole border region and getting far more than my fair share of the available terrain. I had initially intended for Lothal to attach to the region to its east and then realized that I could be even more greedy by attaching it to the region to the west, leaving space for another city in the southeast corner. With the addition of the barbarian city, my blue borders now wrapped around Napata on three sides. Needless to say, war with the Persians was only a matter of time and I was scrambling to train as many swords as possible out of my two mature cities of Harappa and Mohenjo-Daro before the enemy crossed the border. At least I had plenty of food on hand to turn population into units.
Since Agamemnon was obviously going to declare war on me no matter what, I went ahead and poked the bear further with this cheeky move:
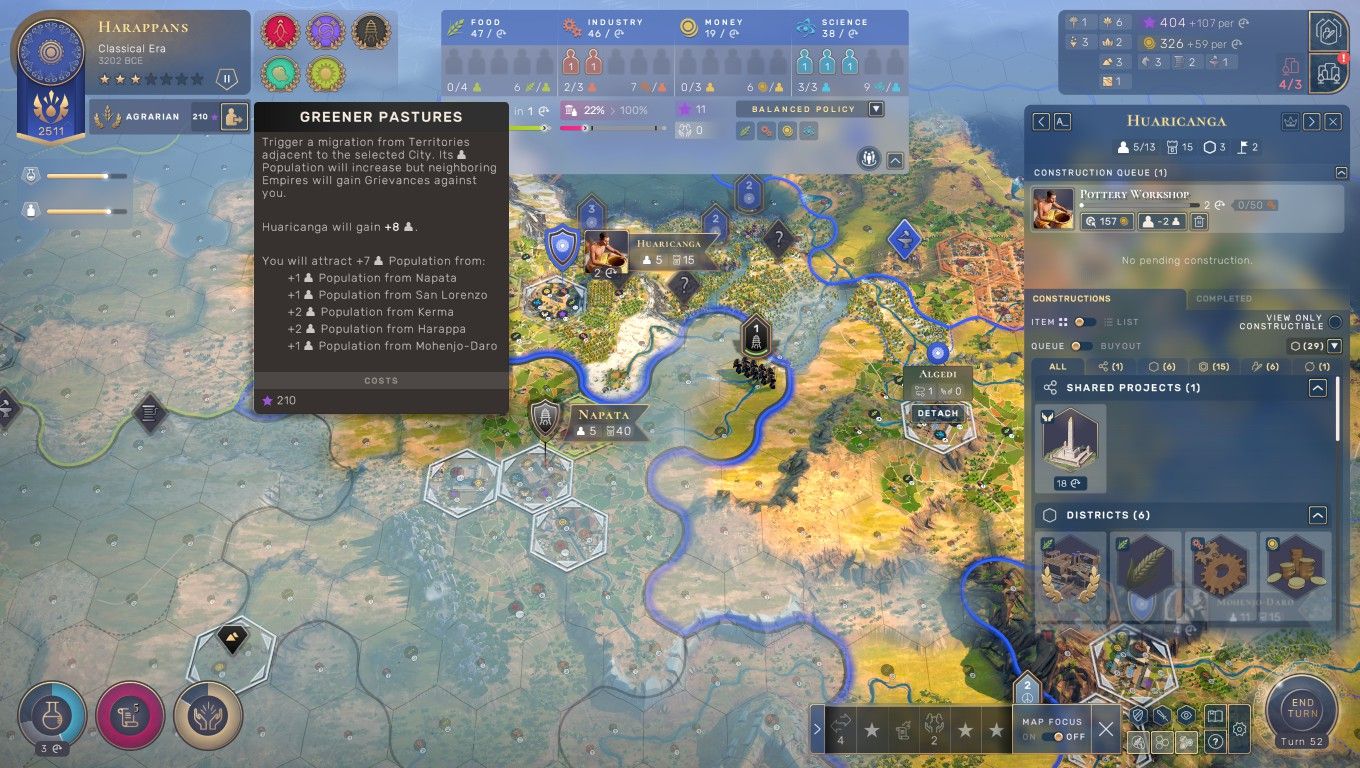
The Harappans are an Agrarian culture and as a result they have the option to use the "Greener Pastures" ability in their cities. This allows the player to spend influence at a city to trigger a population migration from other nearby territories, including regions that are controlled by your opponents. This ability is at its strongest in the early game where the tile yields of each city are lower and it takes longer to grow population points; the Harappans can be an incredibly annoying neighbor when they start stealing away your population with this ability. Here at the captured city of Huaricanga, I found that I could spend 210 influence (two turn's worth of influence) to gain eight population points. While three of them would transfer over from my own cities, the other five population would be stolen from Agamemnon and Makeda's cities. This hadn't been worthwhile to do earlier since I needed to direct scant influence into expansion but with the border locked up I had the luxury of splurging a bit to speed up the development of the new city. Huaricanga shot up to 13 population where it could fill out all of its specialist slots and bleed off excess pop into some additional sword units. Greener Pastures is a powerful early game ability which is reigned in largely by the hundred other competing things that influence needs to be spend on.
Of course, the AI leaders don't like it very much when Agrarian cultures steal their population away like this. I knew that I didn't have long before Agamemnon blew a fuse and sure enough he declared war two turns later on Turn 54. I had been fully expecting this and just barely had enough swords ready to parry his first invasion. The initial attack came in the south at Lothal where I used a pair of swords, an old Runner unit, and the levied defenders of the city to push back a ministack of four Persian units. Another attack followed immediately in the north at Huaricanga:
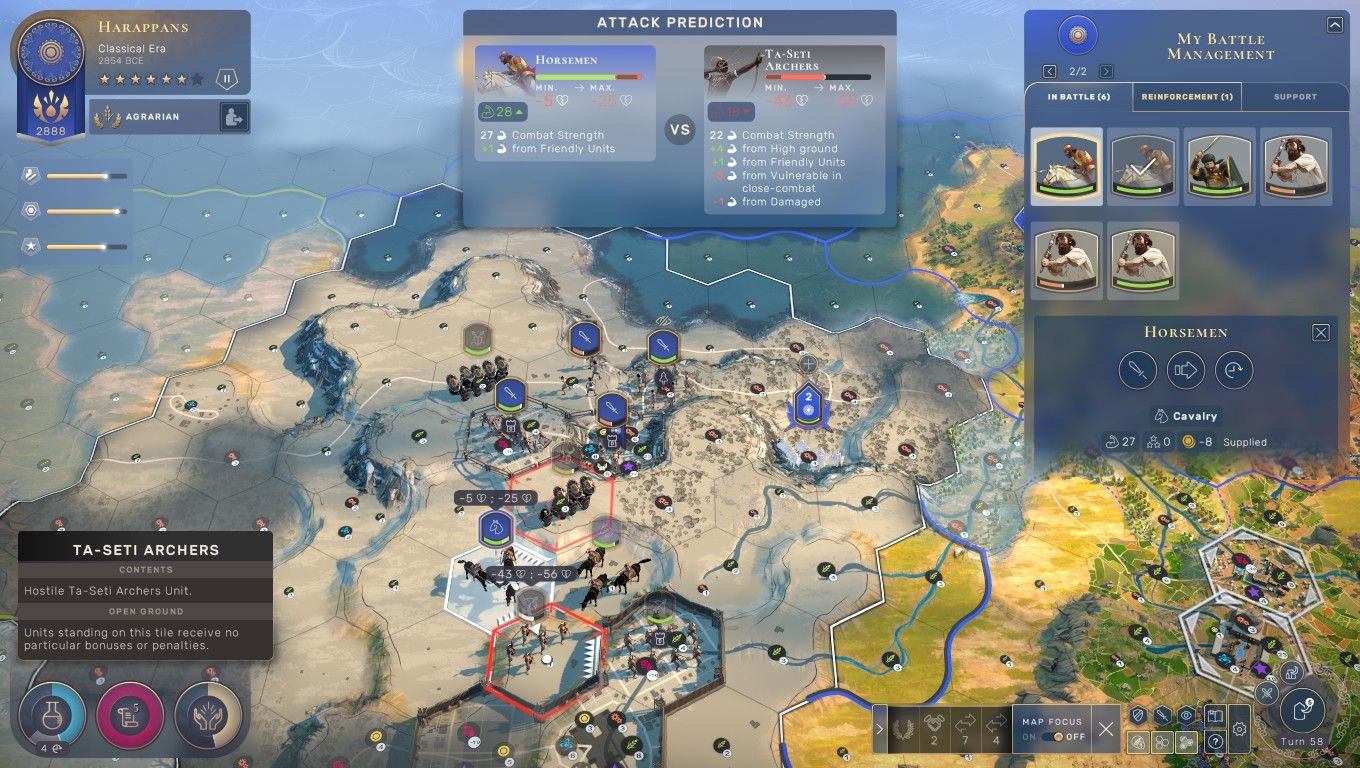
Tactically speaking, I'm not sure if it was better or worse for the AI to attack in multiple places as opposed to keeping all of its forces concentrated together. It was probably the worse option to be honest, especially since I had several stacks playing zone defense which could congregate together as needed to push back Agamemnon's probes. We fought a major battle at Huaricanga and I found my units once again needing to climb the rugged terrain to reach enemy units camping out on top of the hills. What was especially annoying was the fact that Agamemnon's city of Napata was so close to Huaricanga that they shared in the same combat zone, allowing the Nubian Ta-Seti archers to camp out within the fortifications of Napata and still take part in the battle. I probably should have build a defensive garrison district or two since I knew fighting was inevitable here, I simply didn't think about it ahead of time. I used a combination of the city's levied population, swords, and horseman units (former Runners which had been upgraded) to hold the line and defend the city. Agamemnon lost his four attacking units and this latest incursion was turned back.
I wanted to go on the offensive myself and capture the city of Napata. However, I ran into one of the unpleasant side effects of Agamenon's choice of Persia for his Classical era culture: the Immortal unique unit. Immortals in Humankind are a much stronger version (27 strength) of the Ancient era spearmen (18 strength) which make horsemen essentially useless for combat. I basically had no choice but to train swords because I certainly wasn't going to have any success against those immortals with horse units or the piddly 17 strength on archers. Immortals also gain an additional +3 strength when fortified or when fighting from higher ground; this was when I badly felt the lack of any unique unit of my own in the Classical era! I peeked at Napata and spotted that there was no way to capture the city so long as it was defended by immortals behind its fortified walls. I needed Agamenon to send his units out into the open where I could swarm them with superior numbers and then take the city when it was protected only by its levied populace.
In other words, I needed a situation like this one where a Persian stack of units moved into my territory and I was able to block its retreat with mutually reinforcing stacks of my own. Now technically this picture came from a few turns later, after I had already captured Napata, but it was a reprise of the same situation which had taken place repeatedly on earlier turns. Agamemnon's aggression was his undoing as I kept killing his stacks in isolation since he never stopped trying to invade my territory. And it was a good thing that he acted so foolishly because the immortal units were really hard to kill! I did a poor job of taking screenshots during this war but I remember one fight where I had 12 units (mostly swords) attacking 4 of his immortals and my whole army was redlined by the end. The immortals kept running up to the high ground and fortifying there where they were fighting at something like 35 strength and I had to use overwhelming weight of numbers to defeat them. The AI does a good job of grabbing strong tactical positions within each combat; its weakness is understanding the bigger strategic picture about where and when to fight in the first place. This war largely consisted of me playing zone defense with stacks of swords and swooping in to pick off Persian units whenever they marched into my territory; we danced this same dance for about a dozen turns to greater and greater success on my part.
After 15 turns of fighting that included my capture of the undefended Napata, Agamemnon's war support hit zero and he was forced to the peace table:
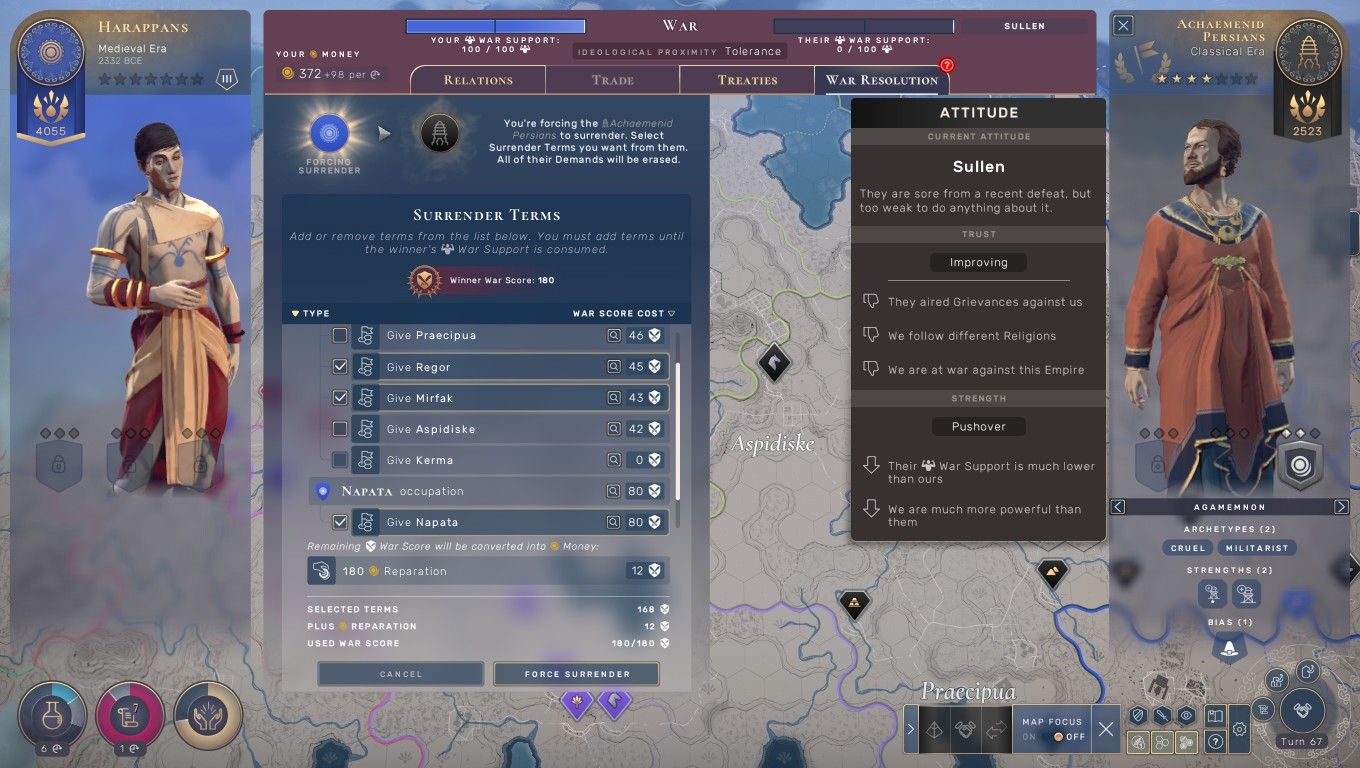
I finished with a war score of 180 which was enough to receive formal control of Napata along with two additional territories. This was largely due to the fact that I finished the conflict with a perfect 100/100 war support which translated into extra points to spend here on the surrender screen. I still think this is a terrible gameplay mechanic since it's so unintuitive and hard for newcomers to understand; however, with additional experience I've gotten to the point where I can mostly work around its bizarre rules. I knew that I wouldn't be able to eliminate Agamemnon from the game in this conflict and I was content to steal away half of his territory along with one of his only two cities. This proved to be a devastating defeat for the Persian leader and he wouldn't be able to recover from taking this kind of a pounding, not when I would have six cities to his lone capital.
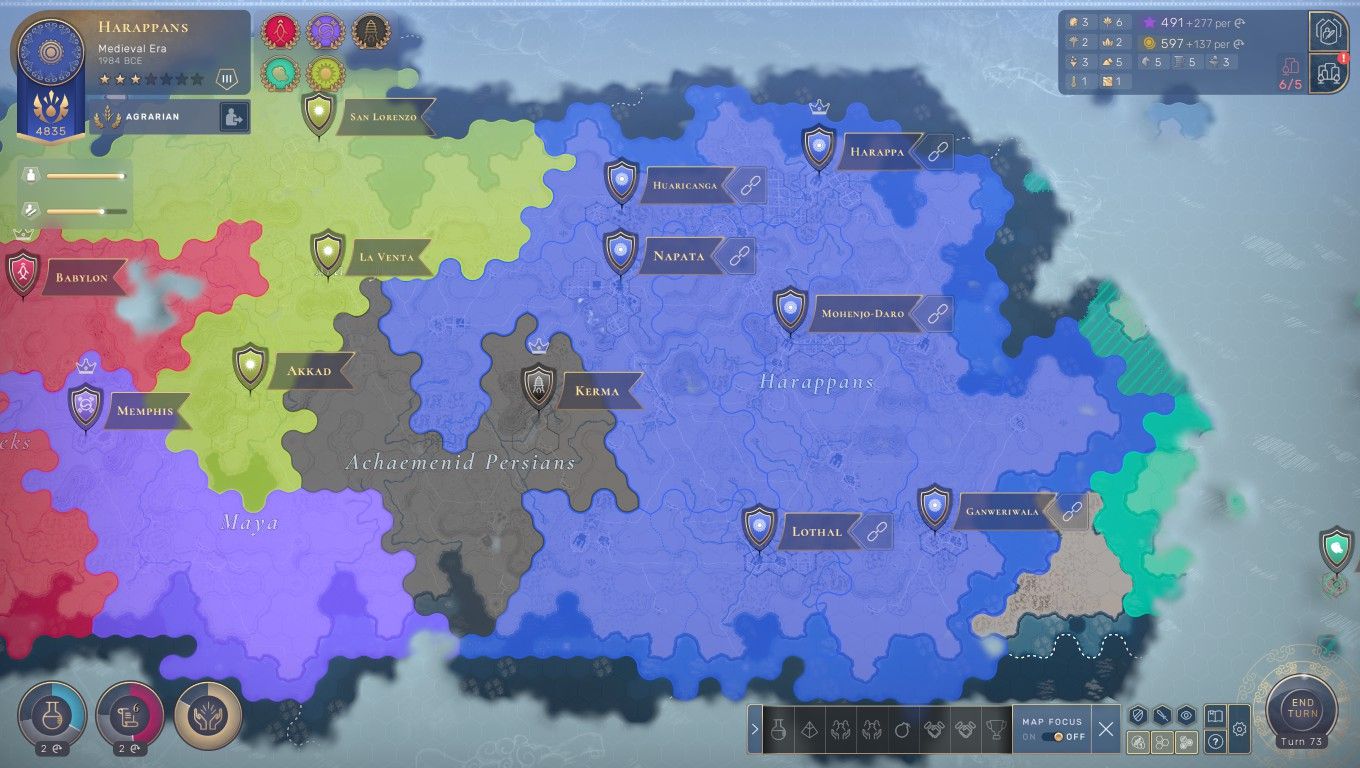
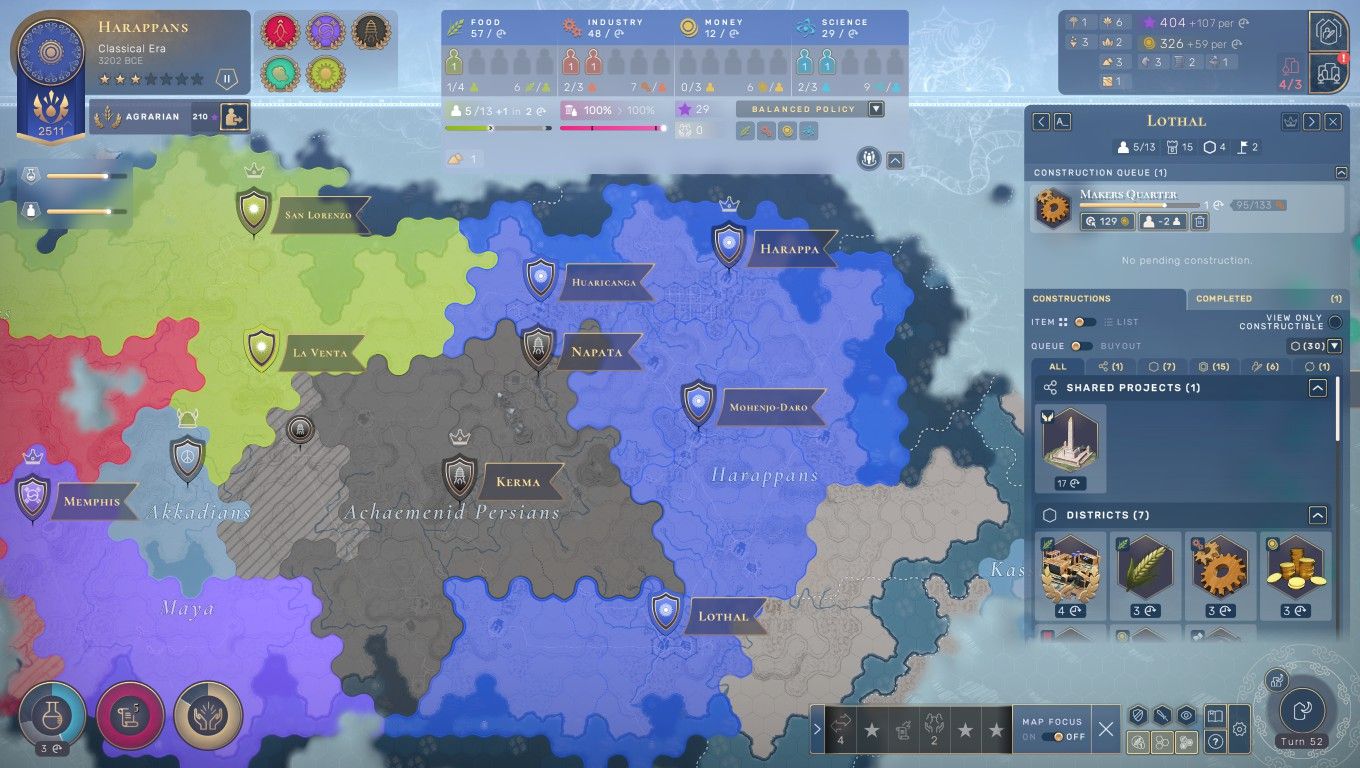
This was the transformed map in the aftermath of the successful war. Whereas before Agamemnon had been roughly equivalent in power to my Harappan empire, the situation had now swung lopsidedly in my favor. The captured city of Napata would end up with three total regions and became a strong contributor to the wider nation as I took advantage of several Market Quarters that Agamemnon had built there to increase my gold/turn income. I had also taken care to found another city in the far southeast at Ganweriwala before signing the surrender treaty with the Persians. The cost to upgrade an outpost into a city increases based on the total city count so it was significantly cheaper to found Ganweriwala and then pick up Napata in the treaty rather than doing things the other way around. There was a small island off the eastern coast which I could have colonized as well but it lacked any resources whatsoever so I left it as untouched territory.
I had earlier advanced to the Medieval era at the tail end of the conflict with Agamemnon. The Classical period was another successful era for the Harappans as I accumulated 12 stars in total before advancing to the next age, again retaining the same Harappan culture with a further bonus to fame. I was landing most of those stars in the Science, Population, and Expansion categories which tend to be some of the easier ones to achieve. I basically never get the Influence or Money stars which feel like they're set way too high by the designers. The Expansion star also used to be set too high because it wasn't scaled by map size and now it's a lot easier to achieve on Small maps since this was fixed in patches. The other big change was the Military star which I had maxed out thanks to fighting so many Persian units. I had 2 kills when starting the Classical era and finished it with 28 kills - there was a lot of Persian blood on Harappan swords.
A dozen turns of uneasy peace with Agamemnon followed after the signing of the treaty. Now that I was in the Medieval era, I concentrated on pushing towards greatswords at Heavy Infantry tech which are the next tier of unit above the normal swords. Greatswords have 35 strength and I knew that they would be required to crack the immortals that would surely be defending Agamemnon's capital city. This was a situation where I was willing to delay the scientific techs at the top of the tree in order to focus on having greater military power online sooner. Greatswords weren't cheap units at 400 production and 2 population cost apiece (or alternately 400 gold upgrade cost from my existing swords) but they would be worth it.
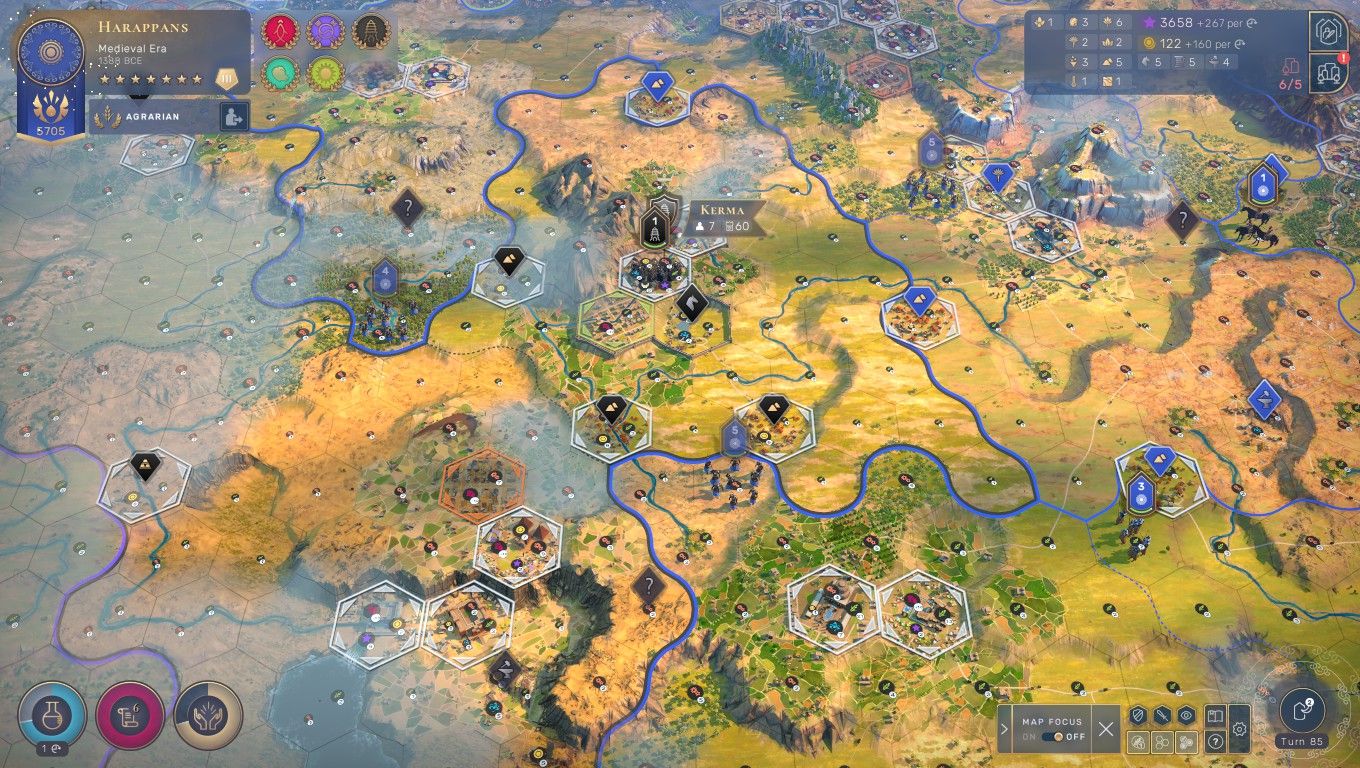
I was also using these turns since the last treaty to manipulate the peacetime war support numbers in my favor. This is one of the things that threw me off when I started playing Humankind: one of the factors in the surrender screen's finishing war score is the war support that your nation possessed at the *START* of the conflict. If you start a new conflict with a war support of 20 and immediately defeat your opponent then you won't have enough war score to get anything via the surrender mechanic. This is counterintuitive but it's vital to understand how the system functions. The key to making this crummy system work is to pump up your war support ahead of the next conflict by making lots of demands of your future opponent. I've had the most success by demanding that an AI leader join in an alliance with me, and then when they refuse I can pick up 3 war support per turn for having more active demands than them. Of course, making demands will give the other side a bunch of war support as well but that's actually a good thing because it means more time to beat them down and extract concessions before being forced to that idiotic surrender table. Anyway, the net result was that I was able to get my war support all the way up to 89 in the span of 18 turns when I launched my own invasion of Agamemnon on Turn 85:
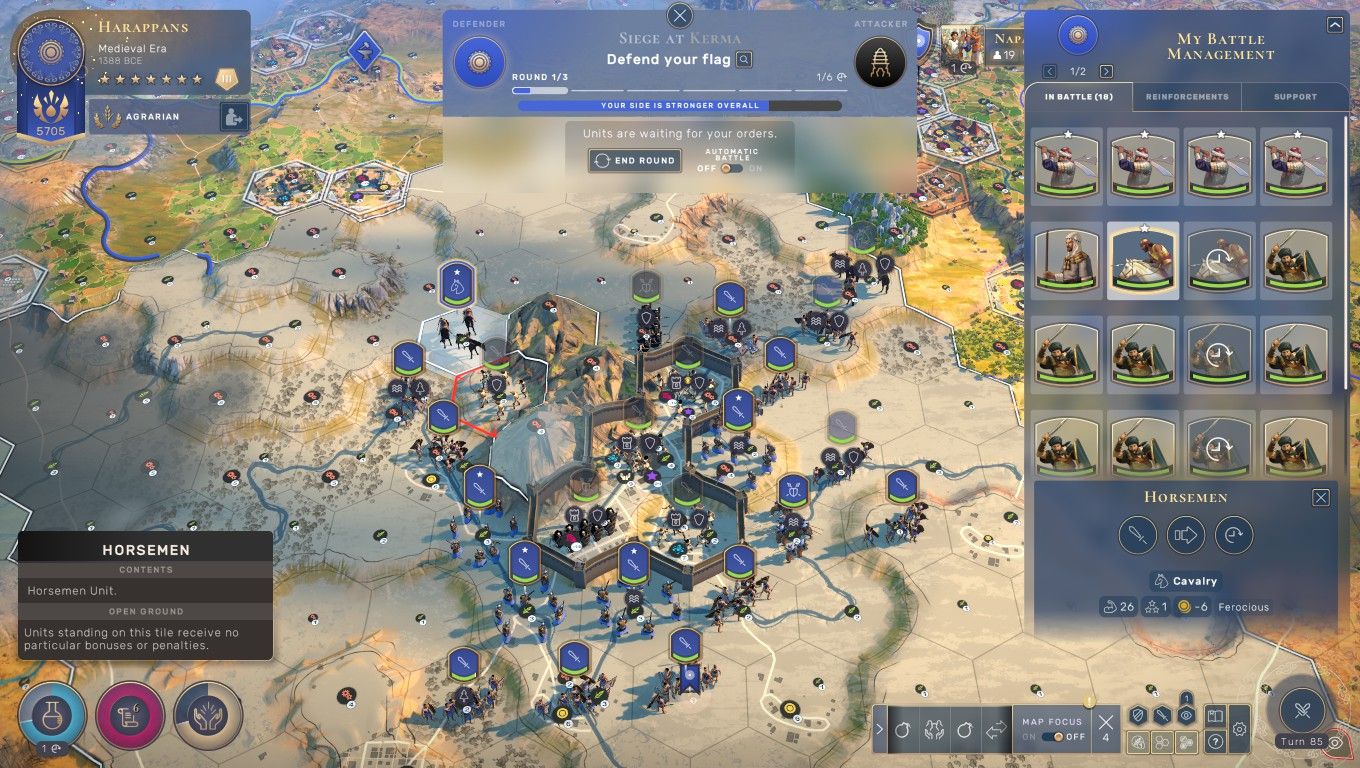
Technically it wasn't even a "Surprise War" because I was over 80 war support when the conflict began. The Persians had no chance in the fighting since I had outscaled them enormously over the intervening turns, with my army now making use of Medieval units while they were still stuck in the Classical period. Agamemnon played this the best way that he could out a slew of terrible options, hunkering down on the hilly ground within the walls of Kerma and forcing me to dig out his units one by one. The mountain range on the western side of Kerma made this an annoying process but I had overwhelming numbers and the technological edge on my side so it was only a matter of time until the valiant defenders were crushed into oblivion.
Since Agamemnon had no other cities remaining, I was immediately transported onto the surrender screen on the next turn. This is another quirk of the gameplay which is never explained and has badly caught me off guard in the past. It can sometimes be a very bad thing to capture your opponent's last city, which makes no sense whatsoever but that's how this game works. In this case, I had started the conflict with 89 war support and finished it on this turn with 95 war support; add in 40 war support for capturing Kerma which summed to the screenshotted 89 + 95 + 40 = 224. I knew that this would be enough to take the capital and all of its attached territories with left over war score to spare. If it hadn't been enough, then the proper course of action would have been waiting to capture Kerma until I had the chance to raze some of its attached outposts. Otherwise, Agamemnon would have survived and one of those outposts would have magically become the new Persian capital. Like I've been saying, it's a pretty dumb system.
But Agamemnon did not survive and his empire was completely wiped from the map:
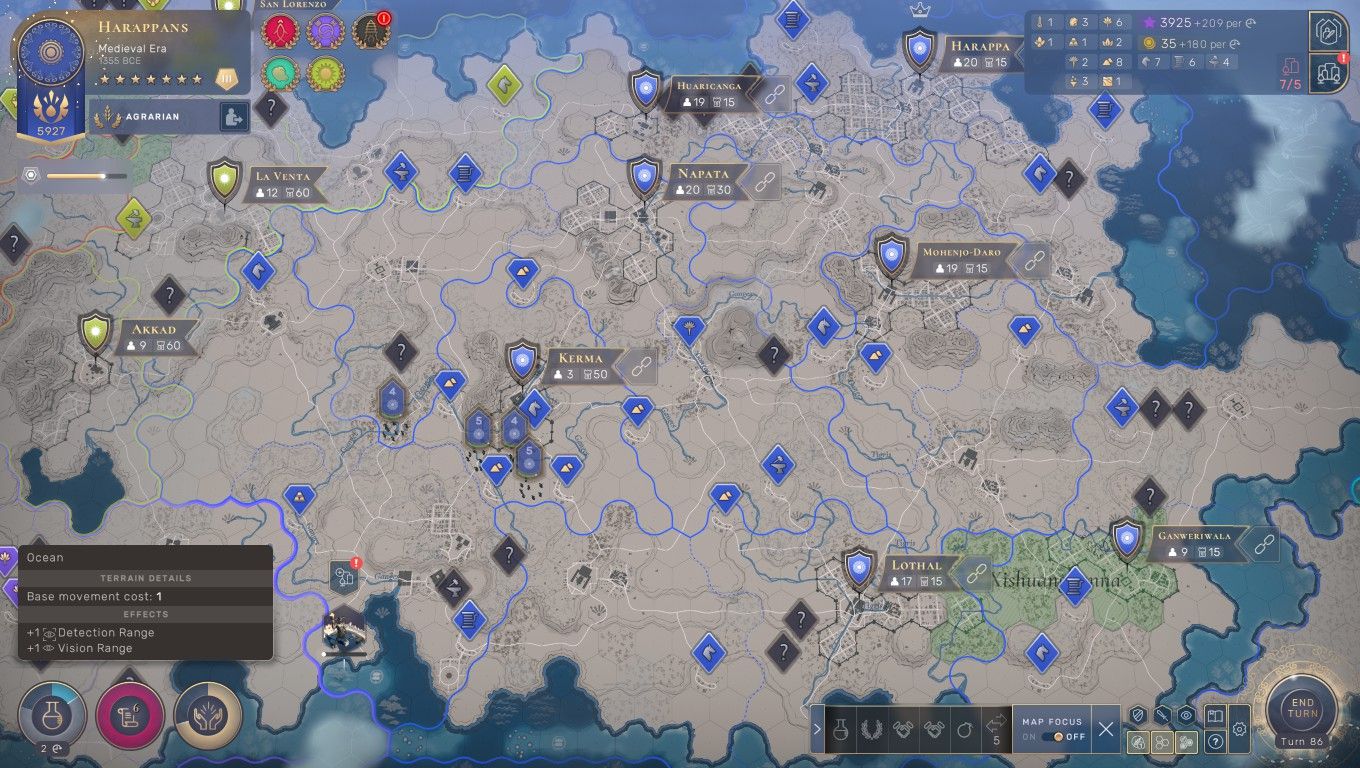
I opted to keep Kerma rather than razing and replacing it with a new city since I didn't want to spend the influence on a resettlement. Besides, most of the early game infrastructure was already present thanks to having been the capital of an AI empire. Kerma brought me up to seven cities in total which was two over the cap and costing me 120 influence/turn in penalty. I had complete dominance of the eastern portion of the continent although still relatively little in terms of luxuries. This map just did not have that many of them and I was heavily importing additional luxuries from Makeda and the other AI leaders to the west. With Agamemnon finally out of the way, the competitive portion of this game was essentially over. Devouring the lands of the strongest AI leader on the map had snowballed me well ahead of the other AI empires and there was no way that they were ever going to catch up to the growing Harappan lead in fame, not with the massive fame bonuses I was accruing by sticking with the same culture for the whole game. The real question was where I wanted to head next from this position: sit back and play a leisurely builder game, or keep pushing forward and look to keep the conquest train rolling along?
The answer: more blood for the Blood God. I would be looking to push for conquest in this game. 


