
Watch this game on YouTube (Playlist Link)
This is a writeup for a Humankind game that I named Mansa Musa's Market Quarters that took place on Livestream during late 2021. This game was still taking place on the release version of Humankind and one of the foremost balance problems at the time was the dominance of production over all of the other yields (food, money, etc.) in the gameplay. High level players figured out pretty quickly that the Makers Quarters districts that added more industry were overwhelmingly better than all of the other options and spamming mass industrial districts was the best way to handle city development. This was on full display in my Tutorial game for Humankind, which was not a variant and in which I constructed far more Makers Quarters than any of the other districts. I thought that it would be fun to remove the industrial districts as a variant challenge and see how much tougher that would make things. This became my one rule for the game: no Makers Quarters districts (or unique districts that duplicated them) allowed.
If I wasn't going to be relying on industry to build things, that suggested that I needed to emphasize money so that I could cash-rush stuff to completion. Obviously this was suboptimal as a gameplay choice but I wanted to see how viable going the money route would be. For theming purposes I decided that I would play as Mansa Musa for this game, complete with changing my in-game avatar to look more like the historical Mansa that we all knew from Civ4. This also felt like a good opportunity to explore the naval side of the gameplay a bit more and therefore I set up a Small map with five medium-sized continents. There would be six total empires in the game, myself and five AI empires, which meant that I would almost certainly be alone on the starting continent. This was a pretty serious variant so I set the difficulty level to "Empire" which was 5 out of 7 in terms of challenge. With the basic framework for the game established, it was time to get started.
I was immediately dismayed to find that my Neolithic tribe had spawned in an utterly barren portion of the map. The initial tribe appeared in a dense forest that had no food available and then crossed onto an arid plain of rocky ground that also lacked anything in the way of food. Well, this is one of the advantages of having the Neolithic era in Humankind: the player doesn't have to settle their first city right at the initial starting position and can explore a bit while accumulating food and influence. Unfortunately my hopes of finding a promised land of milk and honey quickly evaporated as the tribe explored more and more of the starting continent. Aside from that small patch of forest where my unit first spawned, the whole thing was nothing but an endless stony field with only a single tiny river in the south. One of the Livestream viewers who had played Humankind a good bit said that it was the worst starting continent they had ever seen - yikes. Ironically, these desert plains would have been pretty good terrain for building Makers Quarters since they all had industry yields. No such luck in this game though!
Making matters worse, I stumbled into the starting units of a blue AI nation a couple of turns into the game. Argh, you've got to be kidding me! Not only was the landscape a barren wasteland, I had also drawn the terrible luck of starting on the same continent as one of the AI empires. Everyone else had their own continent to themselves but I would have to struggle throughout the early game to claim any territory at all. Keep in mind that the AI is very aggressive in Humankind and the blue empire immediately moved to attack my tribal unit which was wounded from hunting a deer. I was able to ransack an animal lair for enough food to produce a second tribal unit, then used the pair of them to kill one of the AI tribal units when it attacked, barely surviving with both units having less than 15 HP remaining. This was all of six turns into the game, sheesh! The AI already had an outpost set up and I had to race to use the influence I'd picked up to settle my own competing outpost to the north.
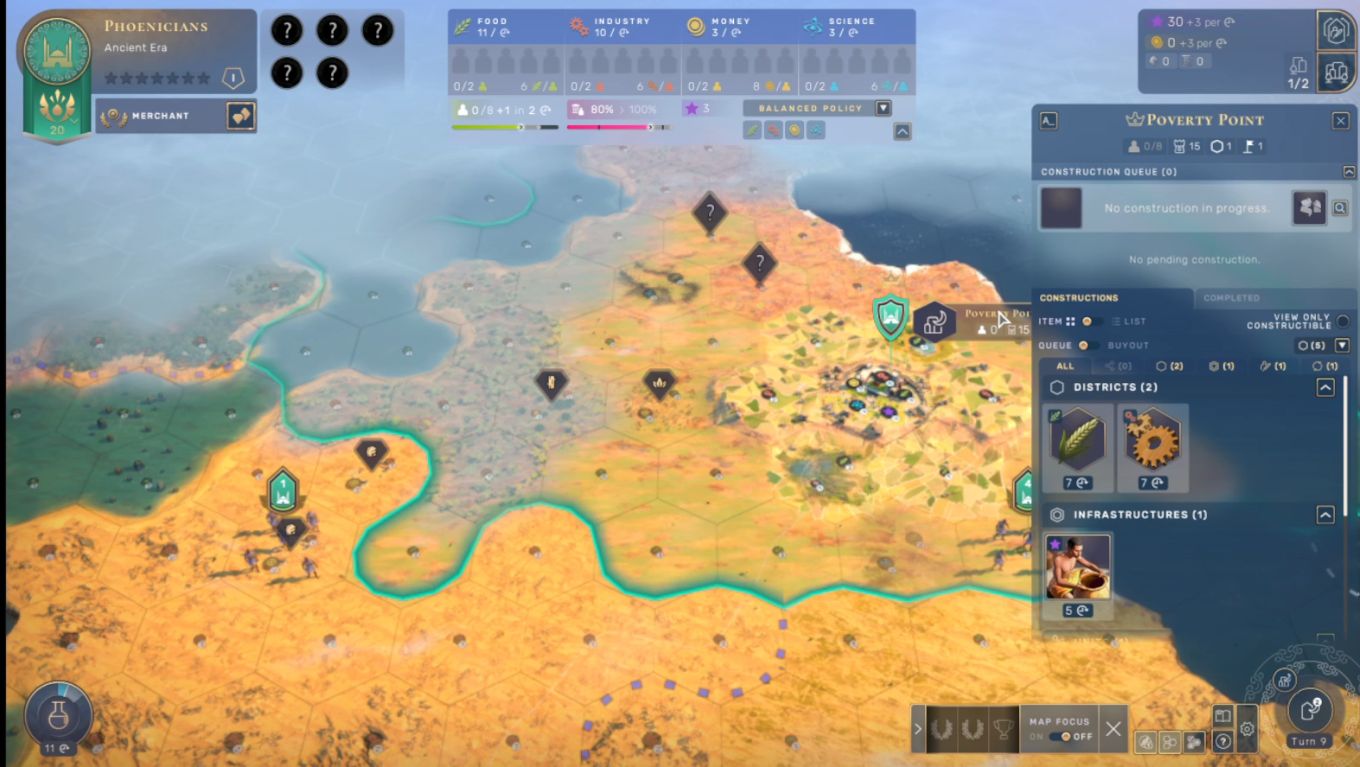
I managed to hit 5 tribal units fairly quickly afterwards thanks to an event and a successful mammoth hunt. Since I wasn't even close to landing the curiosity star, I opted to advance into the Ancient era and take my first culture. Not having the +1 science per population legacy trait hurt but there was nothing to be done about it. I went ahead and picked the Phoenicians to make use of their unique Harbor district and extra money for each Trader specialist in cities. In retrospect, I probably should have chosen the Nubians instead who get +5 money on luxury and strategic resource deposits as I had a lot of resources in the immediate area. They also would have unlocked a far more useful unique unit in the Ta-Seti archer as opposed to the Bireme of the Phoenicians; I had avoided Nubia because I wasn't allowed to build their unique district since it counted as a Makers Quarter. In any case, advancing to the Ancient era allowed me to turn my outpost into a city (which we named Poverty Point in an appropriate Civ4 AI Survivor reference) and transformed my tribal units into scouts.

That last part was a big deal because the tribal units only have 10 strength while scouts have 13 strength. Even though scouts lose the 20 HP/turn regen that tribal units always receive regardless of their location on the map, gaining that +3 strength advantage was a huge deal. It allowed me to move aggressively against the blue AI empire because they were still stuck in the Neolithic era and couldn't match my units in a straight-up fight (even with the +1 strength that the AI receives on all units on Empire difficulty). I raced down to the south and ransacked their outpost which prevented them from advancing the era and turning into a culture in their own right. Removing their presence allowed me to set up an outpost in the same region to the south and attach it to Poverty Point, something that my pitiful capital city badly needed for the additional yields. The blue AI then tried to set up a new outpost further to the south but I had been able to split their tribal units apart and pick off several of them in groups of one or two, keeping my "mighty" stack of 4 scouts together for safety. Eventually I killed their last unit with my main stack even as a lone scout razed their second outpost. And that was that for the blue AI.
...or so I thought. Despite having no units and no outposts remaining, the blue AI magically sprang back to life again - and with 4 new tribal units to boot! What the heck?! This was ridiculous but apparently the AI can respawn in Humankind even if the player kills all of their units and removes their presence completely from the map. That was beyond annoying but my own scouts had been gaining quite a bit of experience from all of this combat and I figured that I could simply wipe them out again. After a tough battle I destroyed all four of the respawned tribal units and ransacked their new outpost. My reward was to have the blue AI respawn a SECOND TIME on the very next turn! Oh you've got to be kidding me!!!  They actually managed to pop up with two outposts this time and 4 more of the same tribal units again. The blue AI also had one of those outposts in the same territory where I was about to set up my second city, ruining my short term plans. This was utterly ridiculous, what was going on here?!
Sadly we realized that it is not possible to eliminate a culture in the Neolithic era in Humankind. They will always keep respawning until they advance into the Ancient era; this gameplay mechanic apparently exists to protect the player from losing their only unit on Turn 2 or whatever and getting an instant game over. It was completely rage-inducing to keep wiping out this AI and have them pop right back into existence again with new units that had to be killed. Remember, the moment that the blue AI advanced into the Ancient era all of their tribal units would become scouts and I would lose my entire advantage over them. I was lucky here that the blue AI split up their new units so that they could be killed off individually rather than keeping them grouped together. I managed to eliminate almost all of their tribal units before the blue AI finally entered the Ancient era and turned them into scouts. This was weirdly good news in a way since it finally allowed me to eliminate them without another respawn. I declared war, sieged down their one city, and that was that.

Except that no, it still wasn't over yet. I had captured the blue AI capital city but I knew they had another outpost somewhere in the territory at the southeast corner of the continent. I had my main army walking around the region trying to find the outpost that I knew had to be there and couldn't find it. Finally I managed to discover what had happened: the blue AI outpost wasn't displaying on the map due to a visual bug in the game. I had walked right past it three times because the outpost wasn't displaying on the map. Here's a picture of the visual bug to show what it looked like; the tile with the outpost looked no different from any of the other plains tiles and only showed that an outpost was present when mousing over the exact tile. This bug meant that I wasn't able to raze the outpost before the blue AI's war support hit zero and then I didn't have enough war score to demand both territories in the enforced peace. So the blue AI was going to survive yet again, this time because a visual bug made their outpost invisible on the map. Well I wasn't going to stand for that nonsense and I reloaded half a dozen turns back in time to correct the problem. I felt zero guilt about doing this: I had my scout army walking through this region specifically to ransack that outpost and it survived only because the darn thing was invisible on the screen. As a result, when the blue AI's war support hit zero this time, they had no territories remaining and finally, FINALLY expired from this world. Thanks goodness!
The removal of the blue AI was a necessary precondition for doing anything else in the game but I was hardly in a good position. This was a truly atrocious starting continent with only five territories of poor quality to its name. While there were a lot of resources here, the complete lack of food or rivers meant that it was a poor place indeed to try and build an empire. Not only did the other AI empires have their own starting continents, they were also significantly larger than the one that I had rolled. I had the true dud start in this game. I needed to get to Trade Expeditions tech in the Classical era to be able to embark land units on water tiles and start expanding overseas. In the meantime, Poverty Point was by far the weakest capital city that I'd ever experienced in Humankind and it was further crippled by its inability to construct Makers Quarters. At least having a second city captured from the blue AI in the south (which we renamed City of Immortals due to their endless respawning) did help a good bit. The main thing that I was doing economically was connecting my resources (even using the Merchant cultural ability to spend influence to connect them) and trying to get enough food into my barren cities to run Scientist specialists. All of the fighting against the blue AI had at least given me some Military stars which helped keep me somewhat competitive with the other AI empires on fame.

I emphasized Sailing tech much more than usual in this game to unlock the unique Phoenician Harbor district and their unique unit the Bireme. I was disappointed by the output of the Haven district which didn't deliver as much food or money as I had hoped but the Biremes would wind up being surprisingly useful in this game. They quickly met the other AI empires in this game: a yellow culture to the east (Elissa), a red culture to the west who I nervously noted had taken the Huns for the Classical era (Agamemnon), and then a brown culture with the bear flag (Midas) who appeared to be further away. The final AI culture had the black flag and I knew was playing as the Harrapans; they had a massive lead in fame and I was seriously concerned that they might be running away with the game. I had hoped that there would be some unclaimed land overseas but unfortunately my biremes found slim pickings out there. (They did score a ton of curiosities in the water worth more money and influence/science and even a few additional biremes.) There was little land to be found however and I was left with this tundra island in the north along with an even icier island in the far southeast. I would set up a third city here that we named Frozen Assets due to the sheer lack of anywhere better to settle.
This was about the time that I advanced to the Classical era myself and chose the Carthaginians. Their passive ability grants -25% buyout cost on all rushed production which felt like it would be extremely useful for this variant. Carthage also had a unique Harbor district in the Cothon that added production for all adjacent water tiles, one of the few ways that I could attain some additional industry within my variant rule of not allowing Makers Quarters. I wasn't planning to use Carthage's War Elephant unique unit which has the Charge ability (bonus damage if it moves to attack) and gets extra damage against weaker opponents but it certainly couldn't hurt. And it turned out that I was going to need those elephants because Elissa (the yellow AI) declared war shortly after making contact. Those were her units sailing across the water towards me in the picture above and I can confirm that the AI is much better at attacking overseas in Humankind than in Civ4. (It's about a billion times better than the completely helpless Civ6 AI.) Elissa's capital of Mykene was right across the water to the east and I had to scramble to defend against this invasion threat.

Elissa had two stacks of four units in her initial army. The best units that I could build at this point were swords (thank goodness my continent had plenty of iron resources) and I spammed out half a dozen of them from Poverty Point and City of Immortals to counter her attack. This was painful to do because Poverty Point had so little food; I hated turning those population points into units but I had no choice. I managed to get one of the two Elissa stacks to retreat when it landed ahead of its fellow compatriots, then hit the same stack again on the next turn when retreating wasn't possible and it was split off from the other stack. This allowed me to kill it pretty easily (even making use of levied units from Poverty Point since this was a siege) and then turn on the other stack to defeat each of them in isolation. At this point Elissa turned and ran away by re-embarking her second stack into the water and that effectively ended any threat to my cities. Not the greatest tactics from the AI to be sure but still pretty good stuff to bring close to ten units across the water in an invasion. If I hadn't spammed out swords from my two cities before the siege began I would have lost my capital to this attack.
I chased Elissa's units back to her capital city and came close to capturing it. However, she was able to reinforce with new units from her other cities and I didn't have quite enough to push on and take Mykene. Elissa was also losing war support each turn because she had initiated an unjust "Surprise War" against me which was counting down the turns unit she hit zero. When the war eventually came to a close, I had a war score of 124 which should have been enough to take a territory or two off her empire. However, I ran afoul here of yet another of the byzantine complexities of the surrender mechanic in Humankind: none of my existing territories shared a border with Elissa except with her capital of Mykene. Apparently you can only demand territories on the surrender screen if they touch the borders of one of your own territories and of course you can't demand a territory held by one of their cities unless it's been directly captured. Even though I had enough war score to take some of Elissa's outposts, none of them touched my island and therefore I couldn't ask for them. I think the surrender screen is my single least favorite thing about Humankind and I would completely rework this mechanic if I could. In any case, I had to settle for reparations money and nothing else even though I had spanked Elissa pretty good after the opening turns of the war.
The other reason why I didn't push harder against Elissa was due to a new threat emerging in the west: the Huns had declared their own war and that was serious bad news.

The Huns are widely viewed as having the most overpowered unit in the game in the form of their Hunnic Hordes. These mounted archers can move, fire, and move again to keep themselves safe in combat, and furthermore winning battles causes them to spawn additional Hunnic Horde units in a snowball that never stops. While it's true that the Huns have serious economic penalties to offset these units (they can't upgrade outposts into cities or attach them), the Huns were a universal ban in Multiplayer because their unique unit is basically unstoppable. Even if some of them die in combat, they keep on multiplying and spawning additional units until they overwhelm the target. All of my toughest fights in Humankind have come against the Huns, even in my very first game on Livestream when they repeatedly turned back my attacks despite being a full era behind in tech. You do not want to fight the Huns in the Classical era if at all possible; wait until their empire transforms into something else and come back at a later date. I had been specifically trying to avoid war with Agamemnon for this very reason and now I didn't have a choice in the matter.
The Huns started out by moving two stacks of their Hunnic Hordes across the southwestern ocean to menace City of Immortals. I was frantically bringing back my units from Elissa's territory in the north and racing them down there for defense. That's when the Huns brought another completely separate stack in the far northwest that suddenly showed up on the doorstep of Frozen Assets. I didn't have any units scouting up there to provide advance warning and this caught me completely by surprise. Although I'm sure that this was partly coincidence, the AI had fooled me by sending a bunch of units in the south and then sneaking another force to an undefended city in the north. There was nothing that I could do about this, Frozen Assets was toast and the Huns took it over. Now that they had captured a city, my war support would start ticking down each turn and I was under time pressure to take it back or else I would be the one facing the surrender screen. As bad as this was in the moment, I was impressed at how the AI was posing a legitimate threat. This was only difficulty 5/7 and I had my hands full trying not to suffer a catastrophic defeat. It was a far cry from the idiotic bumbling of the AI that I've come to expect from Civ6.

The Huns caught me with a pretty solid punch to the jaw and now I needed to respond or else find myself knocked out for the count. Those biremes from earlier in the game came in handy here once again at disrupting some of the Hunnic Hordes as they tried to cross the water between our continents. It was a real shame that the biremes couldn't shoot units on land but they did manage to serve as distractions in some of the combats that took place, the Hunnic Hordes firing at them instead of more important targets. I was able to win an important victory in the battle pictured above when I forced a retreat from the Huns with one army and then hit the same units with a second army on the same turn which prevented any further retreats. That allowed me to clean up these four units and importantly gain some war support to buy time to recapture Frozen Assets. I also managed to reach the Carthaginian war elephant unique unit on the tech tree and they proved to be an effective counter to the Hunnic Hordes. The war elephants were able to make use of their Charge ability here in the open field and their bonus Trample damage was excellent against the Hunnic Hordes with their lower base strength. There were several points in time where a war elephant was able to land the one-shot kill against a Hunnic Horde when I had enough combat bonuses stacked up.
This first victory cleared my territory of Hunnic units and allowed me to start pushing north towards Frozen Assets. I fought another larger battle in the narrow straight just above Poverty Point, catching half a dozen Hunnic Hordes and pinning them up against the coastline. The horse units were their usual obnoxious selves, shooting my units and then running into the water (using my Harbor districts!) and then popping out again to shoot once more on the next island over. I was able to wipe out this second stack but suffered several casualties in the process as the Hunnic Hordes fired at my embarked units while they had lowered defense in the water. The good news was that this cleared the way back to Frozen Assets which I was able to recapture and stop bleeding out war support on each turn. Now the ticking clock had shifted over to the other side since the Huns had initiated their own unjust war and they were slowly losing a little war support each turn. I thought that I might even be able to advance onto their continent and try capturing or razing some of their outposts in the north across the water from Frozen Assets.

But no, the Huns weren't finished yet. While the core of my army was up in the north by Frozen Assets, they moved two fresh stacks of Hunnic Hordes onto that narrow snaky island inbetween our continents and charged straight for Poverty Point. My forces were out of position to defend against this latest attack and I had to race to get more units out of Poverty Point and City of Immortals again. There was so much fighting taking place in this game that I'm kind of glossing over how terrible my economy had been. My starting continent was garbage and then I had to keep sacrificing population again and again for more units to defend myself. The capital had a mere 10 population almost 100 turns into the game! I threw together a completely ragtag group to defend Poverty Point and found myself facing down 8 invading Hun units with two swords, two elephants, a pair of biremes, and a bunch of peasant levies. The biremes bought valuable time by serving as a distraction for the Hunnic Hordes while the elephants were amazing in pulling off several one-shot kills. I was able to extend the battle into a second turn and bring in a couple of additional reinforcements, finally winning the battle with a bedraggled group of severely injured defenders. This was an exceedingly difficult fight and I hung onto my capital by the narrowest of margins. I continued to be impressed by the combat performance of the Humankind AI which was making me sweat things out in these wars.
That was the turning point against the Huns and the fighting was all downhill from there. The Huns made another attempt at taking City of Immortals in the south (and yes we had fought battles for control of all three of my cities) but I had enough elephants and swords on hand that this wasn't a serious danger. Annoyingly, they managed to kill one of my units by escaping into the water and getting off one more shot with their last unit, argh! Nonetheless, this latest incursion was also cleaned up and my territory was finally free of Hunnic Hordes. Agamemnon's war support ticked down to zero and I was able to get an excellent result on the forced surrender screen. I had won enough battles to get a final war score of 137 which turned into three territories on the Hunnic continent. (I had enough war sscore for the third territory thanks to a bireme forcing a retreat of a Hunnic land unit on the last turn before their surrender - thanks for the 5 war support!) Their inability to upgrade outposts into cities was a huge advantage here since it allowed me to claim lots of land despite not having taken any Hunnic cities in the conflict. These were the new prizes:

The territories listed on the map as Anadolu, Menkib, and Tiaki were the ones that had just passed over into my control. This was the entire northern half of the Hun continent and I would turn these outposts into two cities, one in the north that attached to the territory below it and then a second city along the Hunnic border. The quality of the terrain was vastly better on this continent and it was a huge relief to have "normal" cities that weren't limited by the horrendous local landscape for a change. This was a difficult, hard-fought war but the rewards for victory were enormous. I had finally broken out of the straightjacket of my starting continent and pushed out to five cities / eleven territories. That was larger than any of the other AI empires and the additional resources helped pull along my economy while playing this wacky variant. As for the Huns, they never really recovered from losing half their territory and fell far behind in technology and fame. I planned to leave them alone for now so that my war support could recover and then return later to claim the southern half of their continent as well.
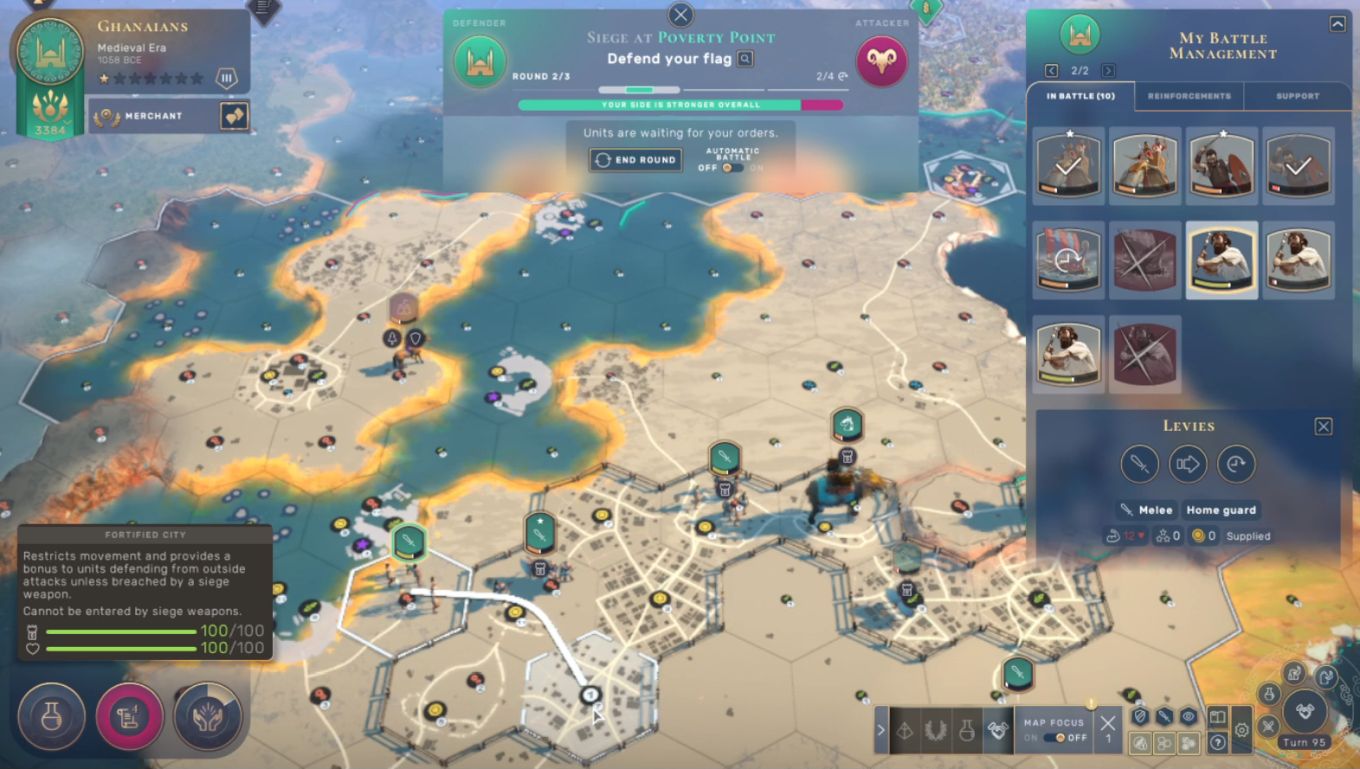
While all of this warring was going on, I had earlier entered the Medieval era and chosen the Ghanaians as my next culture. The Ghanaians are another Merchant culture that gain +5 money per access to each luxury/strategy resource and have the Luxuries Market unique district which is a souped up version of the standard Market Quarter. They are essentially the Medieval culture to choose when emphasizing a money-based strategy as I was doing in this game and were therefore a no-brainer choice. This was also the point in the game when I finally managed to contact the final AI empire in the game, the former Harappans with the black flags which were being piloted by Mama Ocllo. This allowed me to use my huge income to purchase access to every resource that they possessed, just as I had earlier done with Midas who was running the brown AI empire. I've mentioned a bunch of times that it's too easy to snap up all of the AI resources and then enjoy massive stability in every city; hopefully this will be addressed in future balancing patches.

The main focus of the game was a new war, however, one that I initiated against Elissa. I had advanced in technology enough to have an edge in military quality thanks to access to greatswords and pikes, and I still wanted to get revenge against Elissa for her earlier invasion. The eastern continent was very close to Poverty Point and this was the natural avenue to take for further expansion. Elissa had just reached the Medieval era herself and adopted the Franks for her new culture. I was attacking with almost 20 units which had a tech advantage and I thought that this would be enough to overpower Elissa without too much difficulty. That assumption proved to be completely wrong and I quickly found myself with a deadly struggle on my hands. Elissa responded to my invasion by spamming units out of her cities just as I had done when attacked earlier. This was ruinous for her economy to keep losing population points but it made it difficult to attack, especially when combined with the fortification bonus that she enjoyed from her districts. Mounted units cannot attack enemy units inside fortifications in Humankind and this made my leftover war elephants mostly impotent. Elissa did an excellent job of frustrating me by dashing her units in and out of her fortifications while my units had to slog their way inside.
The danger in this war came from the war support mechanic. Because I had declared an unjust "Surprise War" against a neighbor, I was losing 4 war support each turn and stalemate would result in an eventual victory for Elissa. I had to win battles (which grant 8 war support for each victory) or capture some of her cities which reduce war support each turn for the loser. Humankind correctly stacks military combat in favor of the defender and I soon realized that I was in real danger. My crippling weakness was a lack of any ranged units to shoot back at the defending Frankish units hiding within fortifications; I was very heavy on greatswords and pikes, good units but unable to attack outside of melee range. This was due to a flaw in Humankind's gameplay: crossbows are supposed to be the ranged unit of the Medieval era but they are absolutely terrible units, with all of the weaknesses of both earlier archers and later muskets. They have both the close combat penalty of archers and the line of sight restrictions of muskets - ugh. The developers need to remedy this oversight in patching because there's a crippling lack of viable ranged units in the Medieval period that can only be filled by unique units at the moment. Elissa did have ranged units available because she had earlier used the Mauryan culture for the Classical era which has Samnahya elephant archers as their unique unit. Those darned elephants kept shooting my units to death from inside the fortifications and it was not fun at all! My lack of a similar ranged unit forced me to fight me way into the Frankish fortifications with pure melee units and that became a nasty slog.

I managed to take Elissa's capital city of Mykene after some fierce fighting on the plains east of the city. I had to initiate combat in a non-siege battle first, then come back and grab the city after I had killed a bunch of the Frankish units in the open countryside. This gave me control over a huge swath of the eastern continent since Elissa had a bunch of outposts attached to Mykene and they all came along with the captured city. My units were so beat up at this point that I had to stop to let them rest and heal but that may have been a mistake since it gave Elissa more time to train additional units at Knossus. I could see the population of the city dropping as she rushed more defenders out of it each turn. When I came back to Knossus with my units healed back to full, I initiated a new battle only to find that I didn't have enough units to break through the fortifications. This was really bad since a defeat in battle would drop my war support down to a point where I could lose the whole war. My units couldn't break through the defenses of Knossus and I could see that they were going to be wiped out by Frankish ranged units shooting from inside their fortifications. This was such a huge disaster that I had to reload back to the start of the turn and seek to force a battle outside of Knossus. That was an ugly move since I was basically cheating to undo a strategic blunder, ugh. I'm still learning the Humankind gameplay though and this was a teaching moment for sure. I didn't have enough ranged units with this army and I hadn't been training new units over the course of the war as I should have been doing. I was sloppy here and had to reload to undo my mistake.
After that reload, I sought to fight a battle outside of Knossus itself and was eventually able to induce a huge fight in the open field. (The AI should have remained on the defensive but that kind of strategic concept was a bit too complex for it to understand.) We had a bloody engagement that lasted for two full turns in which I killed off the core of the Frankish army at the cost of almost half a dozen of my own units. While this was going on, I had been razing Elissa's former capital of Mykene so that I wouldn't have to use up war score demanding it in the peace treaty. When Mykene finally disappeared after three turns of ransacking, the outposts attached to it instantly turned into new independent Frankish cities and went back over to Elissa's control - what the heck?! That was a bizarre gameplay mechanic that I hadn't seen before. I guess I should have tried harder to raze those outposts to stop this from happening. Anyway, Elissa's war support ticked down to zero at the same time that this happened and I was back on the forced surrender screen again:

Once again I ran into immense frustration from the surrender mechanic. I had 139 war score which would normally be enough to pick up two or three territories since they are valued at about 40-50 war score each. However, I continued to run afoul of the ridiculously complex rules that govern this mechanic. Knossus couldn't be surrendered because it was a city and I hadn't captured it during the conflict. Similarly, Parisius was another city down in the south that hadn't been captured, and the two former outposts that had been attached to Mykene were also now magically cities which therefore couldn't be transfered to me. Of course there were a couple of outpost-based territories that would normally be fair game, but nope, none of them "bordered" my territory and therefore they were also off limits. The territory of Theemin sure as heck looked like it bordered the captured territory of former Mykene but a narrow one-tile strip of land prevented them from touching one another. (It's just visible in the screenshot above.) Therefore I couldn't ask for a single territory at all - nothing for me whatsoever aside from reparations money. Once again, this whole surrender mechanic is just awful. The rules about how it all works are completely unintuitive and fiendishly complicated for players to understand. But most of all it's just not fun to play. The war support mechanic actually works great and creates a lot of tension in warfare but the surrender screen is a dumpster fire. The design team needs to make drastic changes here or remove this gameplay mechanic entirely.
Fortunately you do not have to sign the surrender agreement at the start of the turn. The player has until the *END* of the current turn before they must sign the deal and that grants a very short window to take further action to change the situation. The sharp-eyed Livestream viewers pointed out that if I could capture Knossus on this turn then I would be able to take the city itself plus then I would be "bordering" those additional territories which were just out of reach. I was actually already in a combat that Elissa had started so first I had to win that fight, then throw everything that I had against the city of Knossus which was now stripped of defenders after the heavy fighting that had taken place. I had just enough movement points available to pull this off and did take Knossus against its levied peasant defenders. This allowed me to gain control of Knossus and an additional territory on the surrender screen before the turn ended - thank goodness! Along with Elissa's former capital of Mykene, I had gained two cities and three territories from this conflict. The Frankish empire was bisected into two pieces with the pair of former outposts in the north and then a third city in the south. Elissa would no longer be able to challenge me again. It had not been an easy war at all though and I continued to be impressed by the AI's performance in combat. The fact that I had been repeatedly frustrated and even forced to reload to undo a major mistake was an excellent sign for the longterm health of Humankind as a game.

With half of the Hunnic and Frankish empires under my control in addition to my own starting continent, the toughest parts of the game were now behind me. I adopted the Venetians for my Early Modern culture because they had another Market Quarter for their unique district and a passive ability that granted extra gold for each foreign trade route. I had an awful lot of overseas trade routes with Midas and Mama Ocllo and my core cities were spamming out more and more Market Quarters since they couldn't build the normal industrial districts. I was specializing each city for either money or research and had about half of them on each yield. Patronage tech arrived on Turn 138 and that unlocked the brokenly-overpowed luxury manufactories which blew open the game as usual. I'm really hoping that the designers address these things in their upcoming balancing patch because the benefits from the luxury manufactories are so insane. With double the territory of any AI leader and access to those manufactories my economy exploded and left everyone else in the dust. Income hit 1000 money/turn, then 2000/turn, and kept going up with no sign of stopping. I engaged in a lot of cash-rushing since I had so much money on hand to play around with. The newer cities founded in the wake of my conquests already had all of the infrastructure from earlier ears but I could and did cash-rush a bunch of districts to completion. Why not? I had the money and I might as well use it.
I've gotten a bit better over time at manipulating the war score number in and out of combat. I wanted to return to war with Elissa again to complete the conquest of her remaining territories. However, after a war ends your war support drops to zero and slowly ticks up by 2 points each turn towards the natural equilibruium point of 50 war support. I wanted to get back up to 50 again since the starting war support value factors into the final war score on the surrender screen, and I managed to do this by issuing some demands towards Elissa. I demanded that she sign an alliance with me (heh) and she refused since she hated me. Since I had more active demands than she did, this caused my war support to increase by an additional 3 points per turn for a total increase of 5/turn. This took me back to the natural 50 war support in short order and then I launched a new invasion to finish the job. Elissa hadn't been able to recover from the last war and my units were more advanced than ever thanks to my new technology. I rapidly ran over her cities in the north, ransacking each one to the ground so that I wouldn't have to ask for the territory on the surrender screen, and then finished things off at her last remaining southern city. Goodbye Elissa, you were a worthy opponent and made me work hard in this game.

The rest of the game was cruise control from that point. The pace of the turns increased significantly in real-life terms as I no longer had to fight through difficult, stressful battles with Elissa's units. I took the Siamese as my culture for the Industrial era since their passive ability added 3 industry per district. That was a huge boost for my cities which had lots of districts but no Makers Quarters. The Siamese Floating Market unique district was another way to obtain production since it added industry while serving as a Harbor district and thus not running afoul of variant rule. I was honestly surprised at how much industry I wound up having despite not building any Makers Quarters; for example, Poverty Point had 918 industry/turn in the screenshot. Luxuries and manufactories were doing a ton of work there along with the various production bonuses that can be obtained through infrastructure and not districts. I didn't stay in the Industrial era for too long since this game was clearly over and there was no reason to drag things out. I advanced into the Contemporary era and picked the Japanese once again so that I could make use of the utterly broken Collective Minds ability. I couldn't even build Japan's unique district because it counted as a Makers Quarter and it didn't matter. Collective Minds transforms industry in the chosen city into science... but it also transforms money in the city into science as well. Suddenly Poverty Point went from producing 300 science/turn up to producing 3000 science/turn and I could fly right through the remaining tech tree to the tech victory. Humankind's endgame balacing was in rough shape here in the release version and we can only hope that it will improve with time. At least the endgame doesn't last very long: turn on Collective Minds, hit 30k science/turn immediately, win game 15-20 turns later.
The only other development of note in the waning turns was my elimination of Gilgamesh. He had never recovered from the earlier war and his army was still mostly composed of Hunnic Horde units. I had already hit the end of the tech tree and reached the Exosuits technology which grants all of your units +8 strength and +4 movement. But since I was skipping over the optional endgame military techs my army was still composed of muskets and knights - muskets with exosuits, LOL!  They were all able to one-shot the Hunnic Horde units with ease and I expected to raze my way right through the remaining three Gilgamesh cities. I took two of them and was in the process of razing them when suddenly a forced surrender popped up even though Gilgamesh wasn't close to zero war support. What in the world?! I don't know if this was a bug or whatever but he had 70+ war support and the surrender screen appeared anyway. Have I mentioned enough times that the surrender mechanic suuuuuuuuuucks in this game? Anyway, I took all but one of his territories in the forced surrender and then came back and finished the deed a few turns later. Good riddance.

And that was it. I finished the tech victory at the start of Turn 182 and won the game at the end of the turn. The final ending fame was 11,865 with Midas in second place at 6147 fame and Mama Occlu the only other surviving AI leader at 4468. This was an entertaining game and it challenged me to work around the terrible starting position, the endlessly respawning blue AI, the constant invasions from the east and west, and then the difficulty of fighting through enemy fortifications with no ranged units. Even though this was a pretty severe variant, I was repeatedly impressed at how tough the AI proved to be on difficulty 5/7 where they were far short of the Humankind bonuses. The balancing needs to be tightened up by the developers but this is a solid foundation for a strategy game. I'm planning to run another game on Livestream whenever their big balancing patch comes out. Until then, thanks as always for reading along with these reports.


