
Livestream Link (for those who would rather watch first before reading)

OK, time for another FTL report! This time I would be using the Zoltan B, a ship that I've often seen ranked among the strongest in the game. Let's start by going over some of this ship's advantages. First of all, the Zoltan B gets to use the Zoltan Shield augment, one of the best in the game. Like all of the Zoltan ships, you begin every fight with 5 bonus points of shielding that prevent all damage until breached, as well as blocking teleportation, hacking, and mind control. This design in particular has to lean on its Zoltan Shield quite a bit at the beginning of the game. The Zoltan B also gets three zoltans for crew, and that's always a nice like perk, even if one of them has to be wasted on piloting where the extra reactor bonus is useless. (Note however that the Zoltan B only starts with 5 reactor power, which means that most of this advantage goes up in smoke. This is typical for the Zoltan ships, they usually need to reach lategame for their racial bonus to provide a true advantage over normal designs that simply start with more default reactor power.)
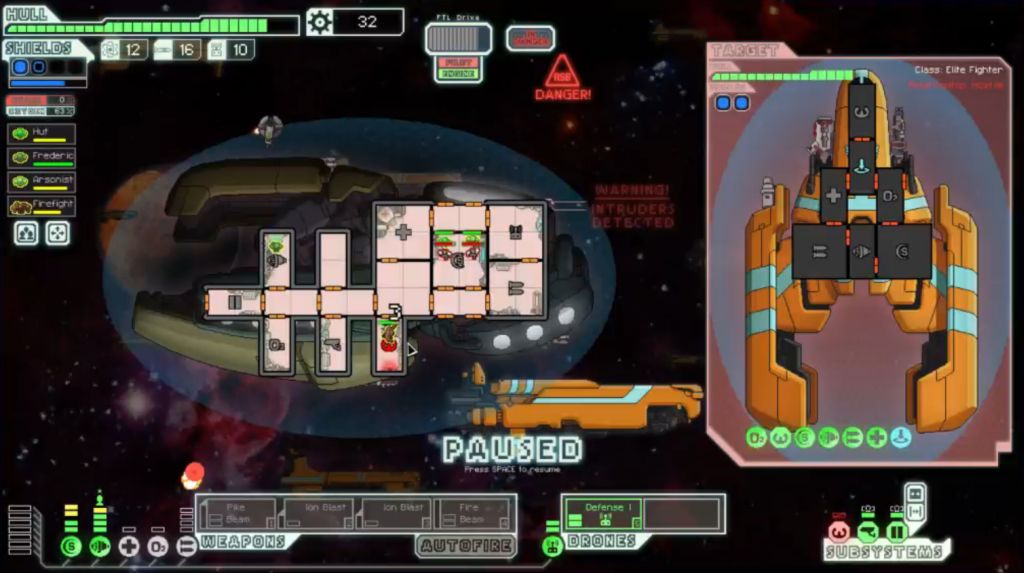
The biggest strength of the Zoltan B lies in its weapon setup. This cruiser has two Ion Blasts and a Pike Beam, with the two ion weapons together firing fast enough to create an ion cascade. By chaining the ion damage together, and firing repeatedly at enemy shields, you can keep their shields offline permanently. Then simply fire the Pike Beam against the helpless opponent, and move on to the next encounter. This is the reason why the Zoltan B gets rated so highly by the FTL communuity, and this is indeed one of the very few starting weapon setups that can work into the lategame. I'm not as sanguine on this weapon setup though, and it definitely has some weaknesses. The ion cascade relies on hitting ion shots repeatedly to keep enemy shields offline. If you get a string of misses, then the ion chain will be broken, the shields will recharge, and the whole process has to start all over again. This is especially bad against those auto scouts with 40% evade in Sector Seven and Sector Eight. Cloaking can also disrupt the ion chain and force the Zoltan B to begin all over again. (I knew this, as I'd been using my own Cloaking unit in past runs to do this exact tactical maneuver!) Defensive Drone IIs also wreck havoc on this strategy by shooting down the ion shots and breaking the chain. Finally, there's another glaring weakness to the ion cascade: it takes a long time to set up. Sure, once the shields are permanently offline it's all well and good, but that can be a slow process once the rebels start appearing with three and four shield bubbles. Once of the key tactics in FTL is knocking out enemy weapons as fast as possible, to prevent your own ship from taking damage. I'm suspicious of any weapon setup where I'm forced to sit back and defend for long periods of time. You want to be the one striking first! At least the two Ion Blasts fire very quickly, enough to level up the crewmember in the weapons room in a hurry.
There's also a serious weakness to the Zoltan B setup: it starts the game with no normal shields!  You do have a shield unit (no need to search for one in a store), but it starts the game at level 1, not enough to power a single shield layer. The Zoltan B requires a one-time investment of 100 scrap to take the shields to level 2, and after that they function like normal shields. The player therefore has to ride out the early game by leaning very heavily on the Zoltan Shield to prevent damage. If you get caught in an asteroid field, or against enemy Combat/Beam Drones, you can be in for a very rough ride. Furthermore, the ship is extremely vulnerable to boarding, with level 1 Doors to start, poor venting hatches to the outside, and an awkward layout of rooms. Engines, Oxygen, and Doors are in isolated spots, and I had a lot of problems defending them with the horribly weak zoltan crew. In other words, once that Zoltan Shield goes down, you're in for some trouble with this ship!
My personal thought is that this ship is above average, but not in the top tier. Out of the 28 ships in FTL, I'd place it around the 8-10 range at a rough guess. I personally prefer laser gunships like the Kestrel A/B and Federation A, although that may simply be an issue of playstyle. Some members of the FTL community clearly love this ship and think it's amazing. Anyway, on with the chronicle for this particular game.
The first goal was saving up the 100 scrap needed to unlock the non-Zoltan shields. There are too many things that can destroy your ship without any shield layers, and too many ways for the Zoltan Shield to be broken. This is significantly more difficult on Hard difficulty, where you begin the game with zero scrap and the rewards are so much lower. For example, the first two battles both went flawlessly... and yielded all of 31 scrap combined. Heh. The next encounter took place in an asteroid field, where the complete lack of shielding had several asteroids slamming into the hull. It was pretty amusing how the asteroids were more dangerous than the opposing rebel ship! I had to jump out postbattle without having a chance to repair the damage, and that immediately landed the ship into another messy situation:

This rebel ship had a missile launcher and a combat drone. The dual threat meant that I could not focus my ions on one system (normally weapons) to keep down damage while waiting for the Pike Beam to charge. I chose to focus the enemy Drone Control, since that combat drone was doing the most to shred my hull. This of course left me vulnerable to the missiles... I was fortunate that the weapons were never taken offline by either of these threats, and I was able to limp out of the battle while taking only modest damage. That also gave me a chance to pause and fix all the damaged systems. This could have been MUCH worse, a possible game over situation if the luck factors had gone against me. I would repeat this battle again versus a nearly identical rebel ship: combat drone, basic laser, and minibeam. That one played out in much the same way, with my ship taking modest damage and barely escaping a complete mess. At least the second one resulted in a double scrap reward from grateful civilians, and put me over the 100 scrap target. Now I'd have at least the basic level 2 shields for the future.
That was about all that I was able to accomplish in Sector One. I had the good fortune to get lots of fights, nearly every beacon holding an enemy ship. I had the bad fortune to see the exit placed about as far to the left as it ever appears, forcing me to leave the sector very early. You have no chance against the rebel fleet in the first couple sectors, get out of there and make sure not to get caught. The sector map was striking:

Three green civilian sectors, two purple nebulas, and thirteen red hostile sectors! I think that was the first time I had seen a map with so much red on it. That's not necessarily a bad thing though, as the hostile sectors tend to have more battles overall (which is what you want) at the expense of having fewer stores. The map suggested that this would be a run full of potential danger, and that proved to be correct.
I picked up a rockman crewmember right at the start of Sector Two, which was a great stroke of luck. The new guy went into the Piloting room, so that I could switch the zoltan there into the Shield room for the free reactor power. I almost landed a mantis crewmember in the next battle, getting the event where you have a 50/50 chance to pick one up as a fugitive from an Engi ship. Instead, I got the "bad" result from the event, which causes five hull damage and the mantis escaping back to the original ship. Bah. After patching up some hull damage at a store, I ran into a distress signal where I gave away some fuel in exchange for a Fire Beam. That was an interesting weapon indeed, as the Fire Beam deals no damage directly but sets fires everywhere in the enemy ship. Against rebels with weak weaponry or no Medbay/Cloning Bay, I could swap out the Pike Beam and use the Fire Beam instead. Killing all enemy crew without destroying the ship results in better scrap rewards, after all. This could be a lot of fun in practice:

The Fire Beam tended to result in horrible, agonizing deaths for the enemy crew. They would either be burned alive, or they would hide in some corner until the Oxygen system burned out, resulting in a slow death by asphyxiation. Nasty going either way.  Entertaining as this was for the moment, I would have to switch back to the Pike Beam soon enough as the enemy ships ramped up in difficulty.
As for my own ship, I was putting the scrap rewards into upgrading engines (level 4) and then into shields (heading towards level 4, for the second shield layer). The Zoltan ships can be microed between shields and engines at the opening of most battles, starting with power in engines while the Zoltan Shield is up, then switching to normal shields when it gets broken. This worked pretty well, although I made some micro errors at time and didn't swap power quickly enough, resulting in unnecessary damage taken. Ah well.
At the beginning of Sector Three, I sold a few extra weapons and augments that I'd found up along the way (Stun Bomb, Boarding Drone, Hacking Stun) to pick up a Drone Control + Defensive Drone pair. They actually came separately, I sold the System Repair Drone that came with the drone system and bought the defensive drone for an effective 35 scrap. This was a bit of a gamble on my part, choosing to invest in a system which would help me down the road, but not something that made me stronger immediately. I would have been much safer if I had put that 110 scrap into level 5 engines and progress towards level 6 shields. Sector Three is earlier in the game than I normally like to go for additional systems. Still, my previous run with the Zoltan B had been terminated due to lacking a defensive drone while passing through Rock Space, an endless barrage of missiles slowly plinking away at the hull until it exploded. I did not want to see that happen again! So this was a bit of a gamble, and I would have to ride things out slightly below The Curve for the moment in the hopes of having a stronger lategame. Of course, now that I had a defensive drone on hand to stop enemy missiles, I failed to see any rebel ships pop up with missiles for the whole rest of the sector. Of course, none of them appear when I have a way to shoot them down!
The next couple battles were indeed on the tough side. My expensive drone purchase had left the Zoltan B still lacking level 4 shields, and that was not a good thing this far into the game! I was still winning fights, but it was impossible to avoid some wear and tear in each one. Then I got the mantis fugitive event again, and for a second time landed the "bad" option, taking five more hull damage. Sheesh, twice in a row!  I was still hurting badly on crew, and one (or two!) more mantises would have been incredibly helpful. I did manage to reach level 4 shields for the second bubble, however the Zoltan B was down to a mere 2 health remaining at this point. Yikes! This run looked like it was about to end in horrible fashion. Then I found this lifeline:

A store! A place where I could repair! Unfortunately, it was in a corner of the map where I would definitely have to face the rebel fleet, at least once and probably twice, in order to reach the exit. Still... what choice did I have? This run was going to end if I didn't heal up immediately. So off the ship headed to the store, where I was forced to spend 56 scrap to repair 28 hull damage. I went all the way back to full, since I would certainly be taking some damage from the rebels on the exit route. It's PAINFUL to spend scrap like this on Hard difficulty, as you're not sinking it into upgrading the ship. Nearly all of the scrap from this sector had gone into the defensive drone and this repair job, which was far from ideal. Again, it's not like I had much of a choice here. It was repair the ship or die horribly in the next battle. But the Zoltan B was falling dangerously behind on the dreaded Curve, and I knew that the rest of the game would be an uphill struggle from here on out.
As expected, I had to run my way through the rebel fleet to escape to the exit beacon. When doing these fights, the key number to watch is your engines level. The higher your engines, the faster your FTL drive charges, and the faster you can escape. Level 6 engines will get you out before the first ASB missile fires, and level 4 engines will allow you to escape while only facing a single one of those shots. Level 3 engines or lower, and you're really pushing your luck. (Level 2 or level 1 engines, and you're a goner.) Note that you also have to power the engines from the reactor to get the FTL to charge faster - it's not enough just having them! Anyway, I had level 4 engines here, which was dangerous if not suicidal. I depowered all my weapons to be able to route everything to engines and shields. The first rebel fleet encounter went off without a hitch, with my ship actually dodging the only ASB fired. Awesome! Now I had to survive a second battle at the exit beacon itself. This rebel ship had a missile launcher, Heavy Laser II, and a Flak II - whoa! Glad we only needed to escape, not fight the thing. It looked like my crew was about to make it out... only to have the first ASB land in the Piloting room:
DISASTER!  That was the single worst system for them to target. Instead of leaping away a few seconds later, my crew needed to repair the hull breach, then the piloting itself, and then finally they could start charging the FTL system again. Nor I could I do much in the way of moving in extra crew for repairs, with my zoltans fighting off teleporting invaders at the same time. An extra mantis really would have helped here... Anyway, I did move over the zoltan from the engine room, since he wasn't doing anything in there while we were sitting at 0% evade with no piloting. Together with the rockman, they fixed the hole in the ship, then repaired most of the piloting - only to have a missile crash into the piloting room. Argh! OK, almost got that fixed now... Yes! FTL back online. One more ASB slammed into the ship, fortunately hitting the depowered weapons room. The Zoltan B leaped out of there, heading into a nebula sector to rest and repair. Because that one ASB shot hit piloting, the hull wound up taking 11 damage from this encounter. It would have been zero if we had landed a dodge at 35%, or three damage if something other than piloting/engines had been hit. So a bit of poor luck there, but we made it out, and the run would continue onwards.
I had to give the Zoltan B credit for one thing: I was still using the same weapons setup from the start of the game. Just relying on the two Ion Blasts and the Pike Beam, now in Sector Four. Even enemy ships with three shield bubbles could be taken down so long as the ion cascade went uninterrupted. I'd been spending money on literally everything other than weapons, and this ship's setup had allowed me to get away with it thus far. Halfway through the sector, a zoltan ship made this rather generous surrender offer:

Yep, I think we'll be taking that one, thanks.  By upgrading weapons to level 5, I could simply replace the Pike Beam with the Halberd Beam, a weapon which would still operate through one shield layer, and which would deal substantially more damage when all shields were removed. I came across a store at the end of Sector Four that had Heavy Laser II on sale, and that looked like another good fit for an endgame setup. Use the two Ion Blasts to take down the enemy shields, then fire those Heavy Laser shots to set fires/breach the hull/stun crew, and rake the Halberd Beam across whatever was left. I would end up selling the Pike Beam and Fire Beam to make this work, while also repairing the ship once again. The one potential weakness of this weapon setup was the two Ion Blasts; if they couldn't initiate an ion cascade and eliminate enemy shields, I would be completely impotent. I was hoping that I would be able to find a Hacking system to remedy this issue, as hacked engines (for 0% evade) or hacked shields (just drain them all away with level 3 Hacking!) would solve my weaknesses. Of course, by purchasing a lategame weapon that I wouldn't even be using for awhile, I was again setting myself back in the short term. My shields were still lacking, and needed to be upgraded to level 6 immediately.
Fuel also became a major issue, as I failed to get much from defeating enemy ships. I never can figure out why that happens, some runs I have way more fuel than I can ever use, and on other runs I'm frantically scrambling to purchase more from stores. Random chance, I suppose. At least the enemy ships were easy for the moment, with the ion combo and the Halberd Beam easily sufficing to take down all comers.
Sector Five was a Rock sector, and here the defensive drone purchase from earlier finally paid off in spades. I think the voyage might have ended right here without the drones shooting down so many missiles. This area also had a completely bizarre beacon layout, with large sections of the map unconnected to one another. I had to skip visiting a store (despite needing fuel desperately) because it would have forced two backtracking FTL jumps to visit. What a waste. I went as low as zero fuel at once point without ever completely running out, and the battles encountered along the way produced some very nice scrap payouts. Sector Six produced more rewards, including a new rockman for the crew, along with more generally easy battles. I upgraded weapons all the way to level 8 to get the Heavy Laser II in play, and even set things up to fight the rebel fleet once in exchange for reaching three more beacons. It worked just as planned, taking a single ASB hit for three damage, while picking up 100 scrap at those extra beacons. These were the two sectors where the run started to get back on track.
The ships in Sector Seven were noticeably tougher. I had no choice but to run from an auto scout encountered first, one that had an Ion Blast II, a Heavy Laser II, a Minibeam, and an Ion Bomb. Oh, and the battle was also fought in an asteroid field. Run away! I saw an ion bomb appearing in the Piloting room, and jumped out before it could detonate. Whew. That landed the ship in another tough scrape against a mantis ship, where the crew had a tough time fighting off invaders. Then another auto scout with high evade (and the full four shield layers) kept breaking my ion cascade, dragging out the battle for ages on end. It lasted long enough that they ran out of missiles and bombs, the auto scout's ion bombs causing some real problems before their stockpile was depleted. Eventually enough of my shots hit to get through the shields with the Halberd Beam, and that was that. Fortunately, the sector had a large nebula on the east side of the map, and I was able to jump around in there and accumulate quite a bit of scrap, over 300 in total. And right in the back corner was one final store, which had the motherload of useful systems for sale:

Cloaking AND Hacking for sale!  I was hoping for one or the other, and the store went ahead and offered up both. That was a dream scenario, and I happily picked up both of them. Hacking was almost mandatory for my weapons setup to get through the flagship's evade in the final battles. Cloaking would allow me to dodge all the nasty stuff that the flagship throws out. It was the perfect offensive and defensive combination. Visiting the store did mean that I had to face the rebels twice before reaching the exit beacon, but with heavily upgraded engines and a Cloaking unit, that wasn't especially dangerous. I dodged both ASB missiles with the cloak, and successfully made it to Sector Eight with 1 fuel remaining. I had full health now, all of the systems in place to defeat the flagship, and enough fuel to reach the base. This seemed like a lock for victory.
A rebel auto scout had different ideas:

This ship didn't look too bad at first glance. Combat drone, beam drone, Ion Blast II, missile launcher, and a bomb. I was trying to save drone parts here, since I only had nine of them, and that was cutting it close for the flagship battle. However, I made a critical mistake, and I should have launched a Hacking drone against the enemy piloting/engines immediately. The auto scouts in Sector Eight have ridiculous evade, and this one turned out to be 40%. The high dodge chance meant that I could not get enough ion shots to hit the target to initiate an ion cascade, leaving my ship sitting there uselessly with Halberd Beam and the two-shot Heavy Laser II. It really showed the flaw in my weapons setup, if the ions were unable to consistently hit the enemy shields. On the other side, those seemingly innocuous weapons were deadly in their own right, with the Ion Blast II consistently setting up an ion chain against my own shields, and the Ion Bomb locking onto key system after key system. Shields were hit first (pictured above), then Piloting. And once my shields were down, that stupid combat drone was running around poking hole after hole in my hull. Argh! Eventually they ran out of missiles/bombs, and I realized that I needed to use a Hacking drone to get through the battle, but by then the damage was already done. I took SIXTEEN damage from this encounter! Worst of all, this was an entirely self-inflicted wound. I could have escaped this encounter with minimal fuss if I had been willing to use a Hacking drone at the start. Instead, I took a huge pounding and wound up using one anyone, actually going through three drones in all. (One for hacking, one for defensive drone, one for antidrone.) What a disaster. 
Fortunately there turned out to be a store nearby, the one store that always appears in Sector Eight (and I rarely seem to find), so I figured that I could fight another battle and then hit the store for a repair. To my dismay, the next rebel ship was another lengthy and difficult encounter, where I mistakenly tried to use Hacking against the enemy shields (four layers, of course). This did not work very well since Hacking was only level 1, and I really should have gone with piloting or engines. By the time that I limped out of that struggle, the Zoltan B had only nine health remaining. Time to hit up that store...

Oh no. That spot where the cursor is pointing, that was a store last turn. It was overtaken by the rebels during the last FTL jump. What a rotten piece of luck. And the repair station that I was counting on visiting next to the base was about to be engulfed by the flagship. The other repair stations were too far away to reach before the flagship destroyed the base. This was a certain game over.
Or was it? I counted out the FTL jumps and realized that I could get to the repair station to the northeast and still have time to make it down to the base. The flagship always waits a turn at each beacon before jumping, and then it takes another turn to move, and then it takes three more to destroy the base. I had six turns remaining before losing the game, and it would only take five turns to reach that repair station and hop down to the base. I had to go for it, since I wasn't defeating the flagship with only nine starting health. Just getting up there was a dire struggle in its own right, as I came across another killer auto scout sporting dual Burst Laser IIs, a Hull Missile, and an Ion Bomb, plus a Cloaking unit with the maximum duration cloak. (Why don't the rebels field nothing but auto scouts? They're clearly the hardest ships to kill in this game.) I would end up having to jump out of there when the Backup Battery died just as I initiated my Hacking pulse, in a classic case of power mismanagement. Sector Eight had therefore been a complete disaster thus far, taking tons of damage while farming almost no scrap at all. This was not looking good.
The repair station restored the ship to 23 HP, and just as importantly provided additional drone parts. I now had ten of them sitting in inventory. Would that be enough? Maybe. It was certainly going to be close. Then I had to fight my way through the rebel fleet while heading south to the base, which involved a pair of close, tense battles. Still with only five crew (and three of them zoltans), I had a devil of a time dealing with the boarders who teleported over to my ship. This was a bit of a concern for the upcoming flagship, to say the least! In the end though, I did make it to the base in time to confront the flagship. I had 21 hull points remaining... but only 6 drones. That would be just barely enough if all went according to plan, and there was a good chance that it wouldn't.

This was going to be an unusual flagship duel. The first phase was going to take a while, since the rebel Cloaking would break my ion cascade and drag things out for some time. However, at the same time the first phase would also present little damage to my own Zoltan B ship. I could cloak through their missile barrage, and that was about the only thing that could deal damage. The second and third phases would allow my weapons to inflict damage much faster, at the cost of greatly increased danger from boarding drones, the drone surge, teleporting crew, mind control, and the power surge superweapon. The first phase would hopefully be a nice warmup before things got really hairy. The initial phase actually went down exactly as I hoped, with my Hacking of the rebel piloting ensuring slow but steady damage. I caught a big break when the flagship's own Hacking landed on my Sensors unit, the single least dangerous target possible. I fired my Ion Blasts while cloaked to reduce the cooldown, and that ensured that the unit would be up in time for each missile barrage. (This is a bit of a high level micro trick, whereby you fire weapons to knock yourself out of cloaking as soon as the enemy missiles are past, thus reducing the cooldown for the subsequent cloak.) Slow and steady won this race, as I took exactly one point of damage, and that didn't even come from a missile. (Happened when two ions and three lasers all hit in a row despite my high evade.) So far, so good.
Second phase began with an immediate Backup Battery powering of my defensive drone and antidrone. The antidrone works magnificently in this second phase, and I'd bought it specifically for that reason much earlier in the run. The defensive drone even shot down the first rebel boarding drone, which was big news for my zoltan-heavy crew. The one scary thing was that drone supply; after using a Hacking drone as well, I had a mere two of them left in inventory. I would need exactly two of them for the final phase. Cutting it close indeed. Without a Cloaking unit on the flagship, I was able to setup the ion cascade and steadily strip away the rebel shields. Halfway through the battle, they killed my defensive drone, and I could not put up a replacement due to lack of drone parts! This meant that the next boarding drone would definitely get through to my ship. Now the fight became a mad damage rush, with my crew racing to knock out the flagship before it could inflict critical damage on my Zoltan ship. Oh god, their boarding drone landed in the Piloting room, one of the worst places possible! But the flagship had no shields left and no ability to dodge - zero shields and zero evade are a bad combo! - and the Heavy Laser II finished off this phase a few seconds later. Amazingly, I took only a single point of damage in this phase as well. It was pure speed here, destroying the enemy before it could destroy me. If the flagship had survived long enough to cycle through a second drone surge, this would have gotten very ugly.
The final phase was definitely going to be the most dangerous. I wasn't worried about the rebel Zoltan Shield, since my Ion Blasts would take it down in two or three fast-charging volleys, but I was extremely worried about the Mind Control and boarders. Five crew was not a lot, and zoltans always fare poorly in melee combat. All I could do was upgrade the Door controls before the battle, and pray for the best. Their Mind Control landed on my engine room zoltan, which was a break of luck. Either rockman getting controlled would have been disastrous. I could work around a zoltan switching sides. The first rebels even kindly teleported into my Medbay, where the zoltan from the shield room could go tie them up for a bit. I was honestly just trying to stall the attackers for time, not really kill them, since my weapons would be able to destroy the flagship quickly. I put up a defensive drone to stop their missiles, and then used my LAST DRONE for Hacking. Zero drones left in inventory, amazing. I was getting enough ion shots through to set up the ion cascade, and there weren't that many rebels left over to repair their ship. There was still plenty of danger though; I mistimed my first cloak and took the full brunt of the first laser surge, and later a stray laser shot hit my weapons room and knock out one of othe two Ion Blasts. (Remember, always put your least important weapons in slots 3 and 4!) Large sections of my ship were controlled by the rebel invaders; with the mind controlled zoltan, they had 4 crew fighting against 4 of my own, and 2 of mine were needed to run the weapons and pilot the ship! The whole left side of the ship was in rebel hands. But they didn't manage to get any of the truly key systems (piloting, weapons, shields) and I worked around the parts of the ship left out of my control. I used two Zoltans in the Cloaking room to power the Cloaking unit, and managed to get off one final use of Hacking seconds before the rebels destroyed the unit. That final Hack allowed me to land the full volley of ion + heavy laser shots, along with an eight damage Halberd Beam to win the fight!

Too bad the Sensors were knocked offline so that you can't see the left side of the ship in that picture. It was a real mess over there. Multiple systems damaged or knocked offline, no oxygen anywhere to force the invaders out, more rebels flooding into the Medbay even as the flagship explodes. Somehow all of the key systems remained intact, and I even managed to keep all of the crew alive, including that turncoat who got mind controlled. This phase ended pretty quickly too, with only two of the laser superweapon charges going off. With Hacking in place, this weapon setup was indeed strong enough to get the job done. Amusingly enough, the auto scouts in Sector Eight were actually harder to beat than the flagship, and that's not an exaggeration. What a wild ride.

The net result of all this was a rather pedestrian score of 4899. I scored higher in a successful run on Normal difficulty with the same ship, although I assure you that it was not nearly as memorable! Somehow I wound up with only 33 ships defeated, despite spending the entire run inside hostile sectors and visiting 99 beacons. I have no idea how that happened, it was a strange run for luck factors throughout. This run walked the tightrope line between victory and defeat multiple times, repeatedly swinging back and forth between comfortable shape and near disaster. Sector Eight in particular was just insane, I can't recall a previous trip that had so many things take place in the last area. I think that this was easily one of the most entertaining voyages that I've done in FTL. It certainly was never boring.  The run also did a great job of showcasing the strengths and weaknesss of using an ion cascade. In the right situations, it looks unstoppable, but it has some real problems with the high evade auto scouts of doom.
With all that said, I still prefer shooting a bunch of lasers. Simple and direct. Thanks again for reading.


