
Livestream Link
Flagship Battle
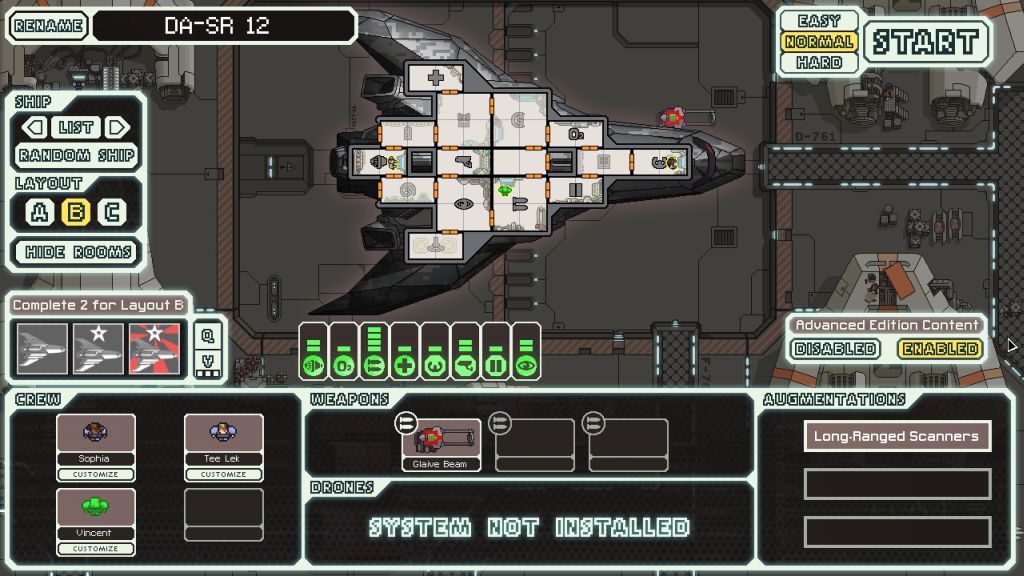
Stealth B is the ship with the most binary outcomes in FTL. What I mean by "binary" is that the Steath B tends to win very hard or lose very easily, and rarely with an outcome in the middle. It's the definition of a "high risk, high reward" setup. The Stealth B has several crushing advantages: it starts with a Cloaking unit, and not only that, one that begins already upgraded to level 2. For weaponry, it begins with a very strong endgame weapon in the Glaive Beam, the rare beam weapon that does 3 damage per room hit at a cost of four weapon power. Given the slot-limited design of the Stealth ships (which can only carry three weapons total), the Glaive Beam is a great addition for facing down the rebel flagship. If you can pick up any combination of lasers for the other two weapon slots, you're pretty much good to go. Tack on Long Range Scanners (yay!) and a very solid starting crew, and you've got some major advantages to this design.
Now for the tradeoffs. Like all the other Stealth ships, the Stealth B begins the game with no Shield unit. They will be available for purchase at any store, but you'll still have to find them and buy them for 125 scrap. Secondly, that Glaive Beam has an extremely long chargeup time of 25 seconds. Yes, one beam will wipe out any enemy ship at the start of the game, but you'll have to survive enemy fire long enough to get it off. You can use the cloaking to buy yourself some time, but it's not infalliable by any means. A single unlucky hit on your weapons system will knock out the Glaive Beam and force a repair, followed by a further 25 seconds of chargeup time. And that's saying nothing of enemy Combat or Beam Drones, or asteroid fields, or Zoltan Shields, or a random bomb or missile hit...
Starting to see why this ship is so luck-dependent? Even when played perfectly, a run with the Stealth B means putting your fate in the hands of fortune. This is one ship where upgrading Cloaking to level 3 is often a prudent move (to buy 5 more seconds of invisibility for charging the Glaive). There are still little tricks that can help, especially against enemy drones: watch to see where they're aiming, and use cloaking only if a key system if being targeted. It's also (usually) possible to use Long Range Scanners to navigate around asteroid beacons on the map. And if the player is able to get a Shield unit installed, Stealth B has a pretty awesome setup with upgraded Cloaking and the Glaive Beam. But because the early game is so luck-dependent, this ship grades out as one of the weakest in FTL. I've seen quite a few expert players pick this as the single worst ship, solely due to the randomness. (In the pre-expansion days, this was the worst ship, due to the strength of boarding and more prevalent enemy drones in the first two sectors.) I put this ship in Tier Four on my personal list, down near the bottom but above the true duds in Tier Five. One way or another, Stealth B makes for a wild ride!

On this particular Livestream run, I had to restart on the very first battle! It was an enemy ship that damaged and ionized the Weapons system repeatedly, and I just quit out of that after taking huge damage. Then you have encounters like the one above, where I cloaked at the perfect time to dodge a Heavy Laser shot, only to fail to dodge at 80% odds and have the heavy shot smash into the Weapons room anyway, dealing two damage and setting the place on fire. Fun times with this ship!  I would end up having to run from one of these early disastrous battles, fortunately hitting a repair station at a Quest beacon. I was able to heal up, get enough scrap to upgrade Cloaking to level 3, and from there the run was back on track again. Tough start overcome.
From there, I would pick up a Rockman in a surrender option, save up the 125 scrap for Shields and pick up them up in Sector Two, while also repairing back into the green. Sector Three was a rebel sector where I obtained a full scan from the first beacon, so that translated into lots of battles and lots of scrap rewards, highlighted by picking up a double scrap reward *AND* an Engi crewmember to boot at one of them. I'll avoid recapping / spoiling the rest of the run at this point - I encourage you to go check it out. There's some nice Cloaking and beam weapon micromanagement in this one that really works better visually.
One last picture:

When one side has no shields, and the other side has no protection against a Glaive Beam, everyone loses. 


