
Livestream Link (for those who would rather watch first before reading)

Next up on the agenda for a trip through Hard difficulty was the Kestrel's alternate "B" layout, known as the Red-Tail. This ship is generally considered to be slightly stronger than the Kestrel A, although both ships naturally share a great deal in common. The Kestrel B starts with four Basic Lasers as opposed to the Burst Laser II, and each of these little lasers fires one shot (at a cost of one power in weapons) on a 10 second cooldown. This means that the Kestrel B starts the game firing four shots in each volley, compared to the three shots of the Kestrel A. (Keep in mind that the default model does have the Artemis missile as another option). The extra laser shot combined with the slightly shorter weapon cooldown makes the Kestrel B stronger at the start of the game. However, those Basic Lasers are slot inefficient and don't scale very well into the end of the game. They will likely all be replaced eventually by the time of the rebel flagship battle, while the Burst Laser II on the Kestrel A will almost certaintly never get discarded. In other words, the weaponry of the Kestrel B is stronger at the start, while the Kestrel A scales better into the lategame. Of course FTL is like other strategy games where a fast start is critically important to get out in front of The Curve and start snowballing into a win. Like most others who have written on this topic, I also consider the Kestrel B to have the stronger of the two weapon setups, if only by a small amount.
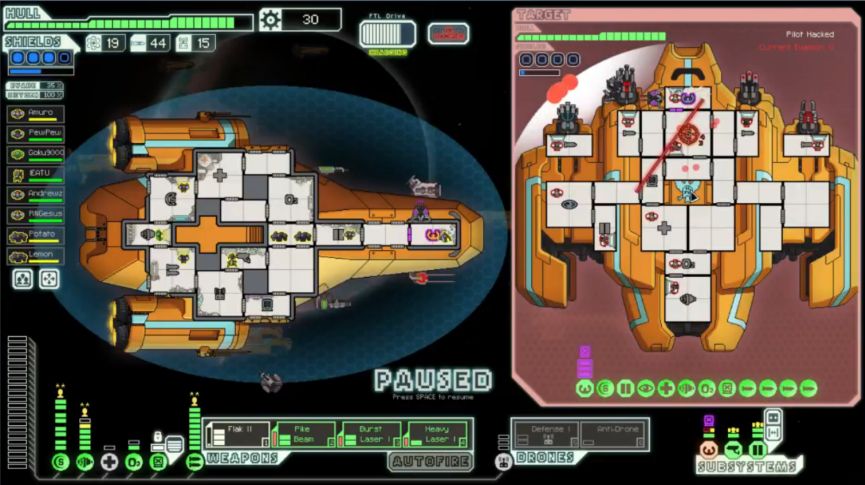
The other big advantage of the Kestrel B is the starting crew allotment. In contrast to the three Humans on the Kestrel A, this ship starts with 2 Humans, 1 Zoltan, and 1 Mantis. That's a far superior group of shipmates, with the zoltan providing free power to one system and the mantis ready to fight off any boarders. Plus more crew is always a good thing, and four is obviously more than three. This is what tips things more decisively in favor of the Kestrel B. Otherwise the two layouts are almost identical, with exactly the same starting systems and even starting levels in each of those systems. The Kestrel B is another ship with excellent weapons and no major weaknesses anywhere in the design. Interestingly, the graphics on the Kestrel B match the ships of the rebel fleet, with their orange coloring with blue trim. If all of the rebel ships were this well equipped, the Federation mission would be in a lot of trouble!
Now for the actual run. The ships at the beginning of Sector One kept trying to run away, and fortunately I was able to shoot them all down before they managed to escape. That seems to be another random element, sometimes the enemies will stand and fight to the death and sometimes they will be looking to run. It took about five battles to reach the 50 scrap margin for level 4 shields (two layers of shielding), always such an important goal in the early game. I had taken eight hull damage already through the first half of Sector One, but afterwards the damage would drop to almost nil once those extra shields were in place. Don't fool around at the start of the game, get those shields up ASAP to minimize hits. One layer of shields doesn't block very much.
The single most important break of the run came at the end of the first sector:

One of the storage caches guarded by an auto scout turned out to have a Flak II weapon inside.  This was a massive find, one of the four or five best possible weapons that could have appeared. Flak is kind of a unique weapon in FTL; it fires out a bunch of projectiles that rarely do direct damage to hulls, but the projectiles are very good at stripping away shields. The Flak II shoots out seven little rocks and is nearly guaranteed to take out any shield defenses, even level 8 shields with the full four layers. The drawbacks to the weapon are the three power consumption and the extremely long chargeup time (21 seconds). These make the Flak II impractical as an early game weapon. But... I already had an awesome early game setup, and now I had a tool that would destroy the lategame as well. The Flak could sit in storage for a while until I had the weapons level needed to power it. This was just a gamebreaking element of good luck, and it triggered before I even finished the opening sector. Amazing.
From this point out, anything other than victory over the rebel flagship would have been a drastic waste. I mean, free Flak II in Sector One?! Come on.
I was actually caught by the rebels at the end of Sector One, another case where they reached the exit beacon first by millimeters on the map screen. That could have been a total disaster, but fortunately the Kestrel B only took three damage from a single ASB shot. Could have been far worse. I bought a Burst Laser I in a store at the start of Sector Two, swapping out one of the Basic Lasers in the process. This didn't really change my current offensive setup (still firing four lasers per volley) but it gave me a more slot efficient weapon for the lategame. I would end up using that Burst Laser I for the rest of the game. This particular run also had some of the craziest luck I can remember when it came to dodging missiles. The ship dodged a disgusting number of enemy missiles at 20-25% evade, way more than should have been possible. This prompted the Livestream to suggest renaming one of the new Human crewmembers picked up in events to "RNGesus" in tribute to the kindness of the RNG (random number generator). Sure, why not. I even obtained a full reveal of the Sector Two map from the very first beacon after defeating another autoscout. Luck seemed to be on our side again, even more so than with the Kestrel A.
The ship to ship battles were pretty easy all throughout these early sectors. I upgraded weapons to level 5, and that allowed me to power the Burst Laser and three Basic Lasers, for five total shots per volley, still on a low cooldown. It was plenty to deal with ships that only had level 2 or level 4 shields. The main source of damage was enemy missiles, as I still lacked a Drone Control or Cloaking unit. The toughest early battle was probably one that didn't have an enemy ship at all. Instead, it had four mantises beaming into the piloting room and nextdoor hallway:

A four mantis boarding party can be pretty tough to defeat. It's actually very easy to get a game over here if you don't have experience at dealing with boarders. I did not have upgraded doors yet, but fortunately one of my crew was standing in the door room for a free level. This allowed me to vent the room that the mantises beamed into, and eliminate at least some of their health due to lack of oxygen. After that it was a wild scramble with all hands on deck chipping in, and thankfully I did have six crew on board to help in the fighting. The mantises managed to destroy the oxygen system, but I was able to lure them into the medbay after that and put an end to the threat. Whew. Nobody died, although it was touch and go there for a few moments.
I finally was able to purchase a Drone Control + Defensive Drone pairing at a store in Sector Four, always nice to get them together instead of needing to pick them up separately. I'd found an Antidrone along the way earlier, and that would be helpful for the second phase of the rebel flagship later. As usual, the defensive drone cut down on the damage taken from random missiles drastically. I did have to worry a little bit abount drone parts though, as I'd sold some drones in events earlier and only had half a dozen drones in inventory. I never quite ran out of them, but there were a few times when I was down to three or four drones left, and it was a bit tight.
I made the swap over to using the Flak II around the start of Sector Five. There were too many enemy ships with level 6 shields and the lasers weren't cutting it on their own anymore. The Flak performed just as well as expected, stripping away the enemy shielding and then letting the lasers go to work on the hull. I found a Heavy Laser (one shot that deals two damage) in another storage cache, and swapped out one of the Basic Lasers for that new variety. Why not, it was the same single shot that cost one weapons power, only now dealing 2 damage instead of 1 damage. Clear upgrade. With weapons increased to level 7, I was currently running the Flak II, the Burst Laser, the Heavy Laser, and one remaining Basic Laser. Strip off the shields, and then the lasers pour in five total damage if all of the shots hit. Not bad. Here's what that looked like in practice:

This rebel ship was absolutely shredded by the new weaponry. They had been trying to escape, and perhaps with good reason. For the final weapon slot, I would later replace the Basic Laser with a Pike Beam. All of the beam weapons combine extremely well with Flak, since the flak projectiles are so good at taking down shields. I would purchase Hacking from a store in Sector Six, adding more potential options for the last boss fight. To add insult to injury, I also found a Hull Repair Drone and recruited two Rockman crew for free through events. This was the run that kept on giving.
There really isn't much more to say about the later sectors. My ship had gotten way out in front of The Curve, and battles were relatively routine. Lack of drone parts was the only real limitation, keeping me from using hacking and the hull repair drones more often. I was looking for Cloaking, Mind Control, and the Backup Battery in stores, unfortunately failing to find any of them. I had 300 scrap saved up at one point in Sector Seven (another sign of how well the run was going), only to find that there were no new systems on sale. That was a disappointment. Well, I was certainly not in a position to complain. I had plenty of tools at my disposal. Soon enough it was time to take on the rebel flagship in Sector Eight.
In the first phase of the flagship battle, the enemy ship began by hacking my weapons. That was one of the worst possible targets, and combined with the flagship's cloaking unit in this first phase, I was finding it almost impossible to get off any shots. After a round or two of this foolishness, I decided to beat a tactical retreat and jumped out of the situation. There was a repair station right next to the base, so I hopped over there and grabbed the free scrap and free healing. Then I jumped right back to fight the flagship again. Hey, it runs away after the first and second phases, why couldn't I do the same thing? Anyway, on this second occasion the hacking landed on piloting instead. Not a great result either, but better than hitting shields or weapons. (Fortunately the AI is too stupid to coordinate firing its weapons when piloting has been hacked for the 0% evade.) This time the battle went as expected: I hacked their piloting to take out the flagship's own ability to dodge, then hit them with Flak II (removing the shields), my lasers, and a five-room Pike Beam. I was aiming at shields again, since that seems to work the best here on Hard difficulty with the changed layout of the flagship. The first volley did 10 damage and took out half of the flagship's healthbar. The second volley raked their hull again and ended the first phase. I took four damage, which was removed with a hull repair drone after the battle was over. A good start after that initial retreat.
For the second phase, I powered up the Antidrone and had it running the entire time. I actually swapped its position with the defensive drone, putting the antidrone in slot one, because it was genuinely more important in this phase. That antidrone does a fantastic job of shutting down the combat and beam drones that the flagship likes to use in the second phase. It's worth holding onto one the whole game just for this battle. Sadly I forgot to power a defensive drone at the start of the fight, and again an enemy boarding drone punched through to my ship. I had plenty of crew on hand to kill it, but that was a sloppy mistake. On the offensive side of things, two full volleys took the flagship down to a single point of health remaining, as well as knocking out their shield unit. That was pretty much all she wrote, and the next shot put an end to this engagement. I had taken two damage, again removed by a hull repair drone.
I was most worried about the third phase of the battle, since I viewed enemy boarders as the most serious threat to my ship. The flagship was losing badly to my Kestrel B in straight up ship vs. ship combat; the only realistic scenario for the rebels to win the game was through melee combat. Two enemy crew beamed over at the start of the third phase, and the rebel mind control hit one of my two rockmen. That wasn't great, but it could have been a lot worse. I vented oxygen to get some free damage at the start, and then a huge brawl began in the oxygen room, my crew against theirs. I had to retreat temporarily back into the medbay (which was upgraded to level 2 for the faster healing, and thank goodness!) but in the chaos I didn't micro correctly, and one of the crewmembers died. Poor RNGesus was the unlucky fellow! What a shame. It was looking very dicey for a few moments when half my crew was healing and there were still four enemy marines on board, along with the mind controlled rockman. But we hit a tipping point right when the mind control wore off, as suddenly I gained an attacker and the rebels lost one. My own guys were popping out of the medbay for a second round, and their boarders had no way to heal. Once the first of them died, the rest started going down like dominoes. I realized later that I could have made this easier on myself by hacking their mind control unit once the Zoltan Shield was down. That would have countered the most dangerous aspect of this hand to hand fight, the flagship's ability to seize one of my own fighters. I'll remember that for the future.
Anyway, this whole time I had kept my gunner in the weapons room for faster charging (indicating that this wasn't a true life or death crisis), and once the Zoltan Shield was down, the flagship started getting pounded once again. The first full volley took out three layers of shields and nearly half of the enemy ship's lifebar. The second volley destroyed the flagship completely, with the flak scoring four or five damage in its own right now that the shields were eliminated. Game, set, and match:

For all of the chaos taking place inside my ship, the hull had only taken five damage in the last phase. As I said, the direct ship against ship combat was pretty easy. Flak II along with nearly anything else outputs immense damage. If I had managed to pick up a cloaking unit somewhere along the way, I might have made it through this battle without taking any damage at all. The only true loss had been poor RNGesus, who had fallen at the hands of his own rockman crewmember. One of the Livestream viewers summed this up perfectly: "He died for our sins." 

This run did not score quite as high as the Kestrel A run from earlier. Score seems to be heavily based on the amount of scrap earned (along with the bonus modifier for difficulty level), and I had both Long Range Scanners and Scrap Recovery Arm during that previous playthrough. It's no wonder it scored a bit higher. I don't really care that much about the score, of course, it's more about the journey along the way. This was a fun game to do, and it wasn't really that hard given all of the luck factors that went my way. Picking up the Flak II in the first sector through complete dumb luck was obviously the most important element. That essentially won the game right there so long as I avoided any stupid mistakes. I certainly hope that future runs can do as well, although odds are that many of them will go horribly wrong. Of course, that also can be a lot of fun too...
Thanks again for reading.


