
Faster Than Light (FTL) is an indie real-time strategy game released in 2012, with a free expansion (known officially as the "Advanced Edition") added in 2014. Although it's often called a roguelike game due to the high difficulty level, FTL doesn't really share many features with the genre other than randomly generated maps and death meaning a permanent game over for each particular run. The goal in FTL is to pilot your spaceship across eight sectors, encountering increasingly difficult ships along the way, and culminating with a boss battle against the rebel flagship at the end of the last sector. Each sector has a series of beacons that function as random encounters from traditional pen and paper RPGs. Your crew might fight a battle against another ship, they might gain scrap (the game's currency) as a reward, you may find a new weapon or additional crew members, or something horrible might happen in a random event. There's a time limit for each sector, however, as the rebel fleet will chase down your ship and force you to jump to the next sector. FTL's gameplay is therefore based around maximizing the gains from each area in a limited amount of time, with a healthy does of randomness thrown into the mix. No two runs will ever play out in quite the same fashion.
The game can also be extremely punishing for newcomers and players who don't know what they are doing. There are no checkpoints or save spots, and when your ship is destroyed, the game is over. Start again from the beginning, kiddo. The game's difficulty level is probably the number one complaint from reviewers, both official and user-submitted. A lot of people think that the game is way too hard, and I agree that things can be brutally unfair sometimes when the game's random elements go against you. But like many others out there, I actually enjoy the challenge factor of FTL, and furthermore think that the many of the reviews exaggerate too much. With a little bit of practice and understanding of FTL's mechanics, the game's lowest difficulty setting of Easy truly is pretty easy to defeat. Normal difficulty makes for a good challenge that's still winnable most of the time, while the Hard difficulty setting (added in the expansion) requires some luck for even the most skilled players to come out victorious. To make a long story short, FTL is a game that will continue to punish bad choices and poor gameplay until the player manages to improve. No amount of grinding will allow you to level your way past obstacles. It's easy to see why this indie game turned into such a huge success in a world where most of the huge publishers seem determined to simplify everything for mass market appeal. (Not that there's anything wrong with that - but we don't need EVERY game to have constant checkpoints and hand-holding!)
On this page I'm going to lay out some of the basic strategic concepts for FTL. This isn't the place to find a list of what all the ships look like and what all the weapons do; go check out the FTL Wiki page for that information. Most of the other strategy advice that I've found on the Internet to date has been pretty basic and not very helpful for anything beyond complete newcomers. (For example: Exploring more beacons is a good thing? I should fire my weapons together at the same time? Leveling up your crew members is a good idea? Wow, thanks so much for that advice! That's REALLY useful and not at ALL obvious!  ) I think that we can do a little bit better here. These are my thoughts on what generally works and what doesn't work for a successful mission.
EDIT: Since writing this section, there's been an excellent general strategy guide for FTL posted on Reddit. Feel free to go check it out for more information.
The Three Basic Rules of FTL

Number One: Fighting Is Good
This is one of the most basic mistakes that newcomers to FTL will make. Someone who is learning the game might think that FTL is kind of like Star Trek, where the captain of your ship uses intelligence and diplomacy to make their way through the galaxy, fighting only as an absolute last resort. And while that would make for an interesting game in its own right, FTL doesn't work that way. As the title above says, fighting is good in this game. You want to fight as much as possible. That's because fighting other ships is the only reliable way to accrue scrap, the most precious commodity in FTL. Scrap is used as currency to buy things from stores (weapons, crewmembers, "augments" which function as extra bonuses of different sorts, etc.) However scrap ALSO functions as experience points as well, since scrap is used to ugprade your ship's systems and power reactor. Yes, in FTL your gold and experience are the same thing. This obviously makes scrap an incredibly valuable commodity. Get as much of it as you can. The strategic elements of FTL largely revolve around how to spend your scrap in the most optimal fashion to achieve victory. (As opposed to the tactical gameplay of fighting battles, which we'll get to in a minute.)
So you want to amass as much scrap as possible, no surprises there. It may be an obvious point, but I can't tell you how many newcomers I've seen playing FTL on Livestream who don't make the connection to the next logical step: you want to fight as much as possible, for that very reason of collecting scrap. Destroying enemy ships will always result in a scrap payment of some kind. Even better is killing all of the crew on the enemy ship without destroying it, this results in a larger payout of scrap. Boarding the enemy ship with a crew teleporter and eliminating everyone is the method that typically results in the most scrap and highest scores in FTL. While it's true that sometimes you can pick up scrap from events without fighting in some fashion, this is not a reliable method for success.
Instead, you should be looking to fight as much as possible pretty much all of the time. This is the reason why the Long Range Scanners are the best augment in the game: they allow you to see where the fights are located, thereby securing more scrap and snowballing into a stronger ship over time. I'm always happy to jump into an asteroid field or next to a sun - those are guaranteed battles against enemy ships! Don't avoid those areas out of fear of taking damage. The scrap is too valuable. Similarly, you should try to select the dialog options that lead to fights as much as possible. Sometimes the "blue" option isn't the best choice because it will allow your ship to escape without a fight. That's bad!  You want a battle whenever possible, with the obvious exception of staying away from a situation that will destroy your own ship. But that's something that should only happen rarely. It's nearly impossible to win in FTL by consistently running away. Remember, the enemy flagship will be sitting there in the last sector no matter what. The whole rest of the game is a process of leveling up to face that final boss. There's a limited number of encounters in this game before reaching the rebel flagship - make the most of them!

Number Two: Don't Upgrade the Reactor
Here's another mistake that I've commonly seen from newcomers to FTL. The tactical side of the gameplay (fighting the ship versus ship space battles) is largely based on three things: firing your weapons, moving your crew around, and managing the power in your systems. Most people seem to handle the first two areas quite well. They'll correctly fire their weapons in a burst to get through enemy shielding and target an important system on the other ship. (This is most often weapons, followed by shielding or piloting/engines.) They will move their crew around to deal with boarders, repair broken system, and put out fires that spring up. That's why I find it puzzling that so often the third aspect of the tactical gameplay gets ignored, moving power around between different systems. This is fully as imporant as the others, and it's critical to mastering FTL as a game. Do not "fire and forget" the power on your systems!
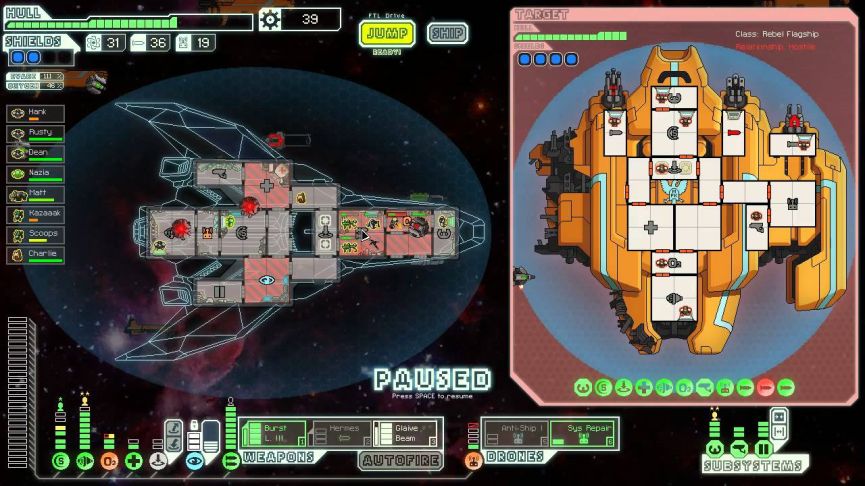
I can summarize this idea in one piece of advice: Don't Upgrade the Reactor. When you have limited scrap to work with on the higher difficulties, it's imperative to spend it wisely. And it's nearly always better in this game to upgrade your SYSTEMS over the REACTOR itself. You do not need to power every system at every point in time, and in fact if you're doing it that way, you're not maximizing your scrap spending. The picture above is a typical example of this that I snapped off of someone's Livestream. I have circled in yellow the "reactor bar of shame" at the bottom left. This poor fellow has every system powered and five unused power in the reactor. Five bars! That's roughly 150 scrap that could have gone to upgrading some systems instead, enough for level 6 shields or four more levels of engines, both of which would be very useful here. Note that this player also has power going to the medbay needlessly, and power going to a heavy laser that can't fire through the shields of the enemy ship, and power into the crew teleporter that isn't strictly necessary. (You can pull power out of a teleporter while it's not being used and divert it back in there as soon as you intend to use it. Having power sit there while the thing isn't being used is pointless.)
In other words, this player above is wasting hundreds of scrap due to poor power usage and way too many reactor upgrades. If you're learning this game, try to see how far you can get without upgrading the reactor just for practice once or twice. The Zoltan ships are a good place to try this, they start with tiny reactors and force the player to move power around to utilize systems. In the hands of an experienced player, a typical FTL ship will have far more system upgrades than reactor upgrades, with power getting shifted around from one to the other at a dizzying pace in each battle. You can customize what's being powered depending on the threat posed by each unique enemy. My general rule of thumb is that only shields and weapons should be powered at all times, and even that dictum can be violated in certain situations. Of course you do need to upgrade the reactor sometimes to have enough power, but don't make the mistake of putting too many upgrades there early on. Avoid the reactor bar of shame! 

Number Three: Stay Ahead of The Curve
This section is similar to the first one above in pivoting back to the strategic side of the gameplay. I want to introduce the notion of "The Curve" in FTL's difficulty level, because it's something that I plan to discuss a lot in any future writings on this game. Like most other games, FTL gradually increases the challenge as you progress further. Each sector has ships that are more powerful than the one before it, even though individual battles can vary quite a bit. (My best understanding from empirical observation is that enemy ships in each sector get a certain scrap value, and the game then randomizes what can appear based on that value within certain set parameters. This is why some ships will have heavy defensive setups but little offense and vice versa.) We refer to this gradually increasing difficulty scale as "The Curve", since it resembles a non-linear function that slopes up over time. In order to succeed in FTL, you must stay ahead of The Curve - this is why it's important to fight as much as possible. Once you fall too far behind the dreaded curve, defeat is almost a certainty.
Let me provide some examples of how this functions. Lasers and shields are one of the best ways to demonstrate this in practice. Most ships begin with one layer of shields, providing defense against a single laser shot. One of the best strategies in the first sector of the game is often to upgrade shields to the second layer (four total points in shielding) as a means to cut down on damage taken. If they enemy ship has two lasers, then they'll typically get in some damage against a single shield layer. However, the moment that you upgrade your ship to a second layer of shields, your ship is now INVINCIBLE against any possible threat that a two laser ship can produce! That's an example of getting ahead of The Curve. Once you're out in front, your ship is no longer taking damage and you can spend scrap on even more shields, making it that much harder for enemies to damage your ship. It creates a positive feedback loop where getting ahead means that you're crushing the enemy ship designs and getting even further ahead. FTL is a game very much prone to snowballing in this way. Experienced players can do this with ease on Easy difficulty, where the scrap rewards are large and the enemy ship designs are weaker. You get out in front of The Curve and never look back.
But the opposite can happen just as easily. Imagine that your ship starts with a Burst Laser (two shots) and you can't find any weapon upgrades. That's fine so long as the enemy ships only have one layer of shields, since you can get in one damage with each volley. But what happens when they start showing up with that second layer of shields? If you still only have that initial Burst Laser, you can't damage the enemy ship at all! They are now invincible against your attacks, same as in the previous example above. Adding one additional layer of shields or one additional weapon can therefore cause a huge tipping point in FTL's gameplay, as you go from smooth sailing to dire peril or in the reverse direction. The higher difficulties can be quite brutal in how this works. The enemy ship designs are much tougher, causing you to take more damage, and they also give out fewer scrap as prizes for winning. This means that you're spending more scrap on repairing your ship and purchasing fuel/missiles/drones, which means less scrap for upgrading the ship, which means falling further behind The Curve... It's very easy to get caught in a death spiral from which recovery is impossible. At the same time, finding a single weapon or purchasing a key system in a store can suddenly turn around a losing game, putting your ship back on the healthy side of things. Just remember as a general principle, stay ahead of The Curve whenever possible!

The Enemy Flagship
The rebel flagship at the end of the last sector is the key battle of the entire game. It's not an exaggeration to suggest the whole rest of the game is a processing of upgrading your ship and crew to face this final challenge. As such, I'll use this section to discuss some of the key features of this particular encounter. There are three total phases to the fight.
Phase One
This is a good place to discuss the weaponry that the flagship has at its disposal. There are four total weapons mounted on the flagship; each one has its own little cubbyhole with a crewmember inside at the top end of the ship's layout. I'll address each in turn starting from left to right. Weapon #1 is an ion weapon that shoots three ion blasts at a time, each one can take out a single layer of shields. Weapon #2 is known as the Boss Laser in the game's code, and it too fires three laser shots that deal one damage each if they would hit. Weapon #3 is a missile version that sends out - you guessed it - three missiles at a time. This one is normally the most dangerous of the weapons because missiles ignore shields, and a Defensive Drone will only be able to shoot down one of the three missiles. (Unless you can somehow get three of the things operating at once!) Finally, Weapon #4 is a beam weapon that functions pretty much the same way as a Halberd Beam, dealing 2 damage per room hit over a wide area if shields are down. Fortunately the saving grace for the rebel flagship battle is the AI's stupidity, as it doesn't fire all of these weapons at the same time. The threats will hit one after another in succession, giving you a chance to defend against each one in turn.
There are ways to counter each of the four weapons on the flagship. The ion and laser shots can be defended with shields, and having the maximum four layers of shields (eight levels of shielding) is highly recommended for this battle. Going in with less can be done, but it's asking for trouble. Obviously having more upgrades in the engines will also allow your ship to dodge more of the incoming projectiles; there's enough stuff flying around that the law of large numbers should work to flatten out much of the randomness from evade dice rolls. The first five levels of engines provide 5% evade each, and the last three levels (which are also the most expensive levels) have diminishing returns, only 3% more evade per level. I suggest always getting the first five levels, and ignoring the last few engine upgrades unless you have plenty of scrap to burn. With an upgraded pilot and engine room crewmember, that's enough for 45% evade, and that's a good place to be. Dodge chance is one of the best ways to avoid the missiles from Weapon #3, since shields won't do anything to stop them from getting through. There are two other ready solutions here. One is Defensive Drones, which will shoot down at least one of the incoming missiles. Those things are worth their weight in gold, get them if at all possible! The other strong option is a Cloaking Unit, which will allow your ship to avoid pretty much anything while it remains active. Cloaking is also incredibly powerful for this final boss battle, and it allows your ship to dodge lots of the worst stuff. Also highly recommended if at all possible. As for the beam on Weapon #4, this one rarely seems to do that much. It will be blocked as long as shields are up, and if shields aren't up, then you're probably not winning this battle anyway, are you?
Of course it's not enough just to avoid damage from the flagship's attacks. You'll also need to damage the rebel flagship and eventually destroy the thing through some combination of lasers, missiles, bombs, and so on. First and foremost, the flagship brings the maximum of four layers of shields (note: on Easy difficulty the flagship only has three shield layers). When playing through the game and upgrading your ship, it's important always to keep this in the back of your mind: "What's my plan for getting through those shields and damaging the flagship?" There are many ways to achieve this. The simplest is stacking a bunch of lasers onto your own ship, the more shots the better. On average, you need about seven shots to consistently get through the shields, since the rebel flagship has a high chance of evading some of them. Do not bring a total of four shots and a bunch of beam weapons, you will be sorely disappointed when some of them invariably miss! Missiles work pretty well in this first phase of the fight, but be warned that the flagship will use defensive drones for the second phase, and it has a Zoltan shield for the third phase. I don't suggest relying on missiles unless there's no other choice. Bombs tend to work well, especially ion bombs and fire bombs. You can target key systems, like Weapon #3 or shields or the enemy medbay, and then fire the rest of your weapons in a burst afterwards. In the Advanced Edition, flak works extremely well at taking out the shields on the flagship due to its huge size. Flak along with lasers is another great combination. A fully upgraded Hacking system can also drain away the flagship's shields, or it's possible to hack the flagship's engines to drop evade to 0% right before firing weapons. These are both good choices in the expansion.
Another potential option is teleporting boarders over to kill the rebel crew on the flagship. The most popular version of this beams your marauders into the little room where Weapon #3 fires its missiles, killing the crewmember and then destroying the weapon. This does work very well, and it can be repeated in the following phases of the battle. There's also a cheese strat that revolves around killing every crewmember on the rebel ship EXCEPT the one in the Weapon #2 pod, since this will prevent the ship's autorepair systems from going into effect. If you eliminate all but one crewmember, then the subsequent phases of the battle can be a breeze; simply teleport over your mantises or rockmen or whatever and smash the shields, leaving the flagship defenseless. It's not quite that easy, of course, since the flagship has a medbay that you'll have to deal with, and it also has upgraded doors as well. The rebels inside will go heal when they get low, so you'll need to have some kind of answer for their healing system. (Firebombing the medbay is both evil and effective!) Note that on Hard difficulty in the expansion there is a connecting hallway from the main body of the ship to the crewmen in the Weapon #2 and Weapon #3 pods. It's much harder to cheese the enemy ship with this slightly tweaked layout. Be warned as well that the flagship can cloak in the first phase of the fight, and you can't bring your boarders back while the enemy ship is in stealth mode. Still, this can be an avenue for success with an upgraded team of mantises. It definitely does make the later phases easier if you've killed a lot of the crew here in the first encounter.
One last thing about the first phase: in the expansion, the flagship has a hacking system for this fight. It will randomly hit one of your systems unless you shoot down the hacking drone(s) with your own defensive drone. The danger level depends on what system gets hacked. This can range anywhere from totally benign (sensors and doors tend to be the least dangerous) to catastrophic if weapons or shields get hacked at the wrong moment. In a worst case scenario, you can jump out of the battle with your FTL drive and retry again, hoping for another system to get hit. It's also a good idea to pay the minimal 25 scrap to upgrade Oxygen to level two before this battle, as a hacked oxygen system can otherwise spell certain death here.
Phase Two
At the end of the first phase, the left wing of the flagship will break off and explode. You still have to chase down the ship though, which will touch off the second phase of the battle. This version of the flagship no longer has the ion weapon, but it's added a new type of attack in the form of drones. First of all, this phase keeps a Defensive II Drone guarding over the flagship, which makes missiles an unreliable weapon. It's tough to get them through before being shot down. Even your laser shots will often get targeted and fail to reach the flagship. It can also be very hard to get a hacking drone over to the flagship in this phase. (There is a trick/exploit that can get around this: depower your hacking drone right when the defensive drone fires at it, then repower the hacking drone after the shot misses. Use or do not use at your discretion!)
This phase also starts sending boarding drones over to your ship almost immediately. They can be shot down with your own defensive drone, but if one of them gets through, your crew had best be prepared for hand to hand combat. It's a good idea to have 2-3 crewmembers who don't need to run the key systems (piloting, engines, weapons, shields) and can fight off the boarding drones. Mantises make the best choice here, although anything other than Engi will do in a pinch. While you're dealing with the boarding drones, the flagship will continue to fire its lasers, missiles, and beam weapon attacks as before. However, it also adds a new attack in the form of a drone surge every so often. This will flood the screen with attack drones, both laser drones and beam drones, who will sweep past your ship firing away at will. Maxed shields and high evade are a necessity here! It's also a perfect time to cloak if your ship happens to have a stealth unit on board. Another strong option is the Antidrone drone added in the expansion, which shoots down enemy drone attackers. If you don't have any of these choices available, then make sure the shields and engines are powered and hope for kindness from the random number generator (RNG).
The best parts of the enemy ship to target in this phase are Weapon #3 (the missile shooting part), shields, and the drone controls. Which to prioritize depends on the exact situation.

Phase Three
After the second phase of the battle, the right wing of the flagship will break off and it will retreat again. No, it's not over yet, you still have one more fight to win!  FTL can be downright sadistic in the way it makes you fight the final boss three times in a row. Anyway, the third and final phase loses the beam weapon from before, but it keeps the laser and missile weapons, and it adds several new threats. First of all, the flagship begins this phase with a Zoltan shield that has 10 points of shielding, double what your Zoltan ships get. Unless you happen to have a Zoltan shield bypass, you can't beam over boarders (or use hacking or mind control in the expansion) until it's down, and that will normally take at least one volley of shots. Furthermore, if you take too long to kill the flagship in this phase, the Zoltan shield will eventually recharge and reappear again! More than one seemingly assured victory has been dashed by that particular mechanic.
The flagship's crew will also begin teleporting over to your ship almost immediately at the start of the third phase. They will do this in suicidal fashion, sending everyone over as fast as their crew teleporter cools down, not caring if the rebels live or die. You can find yourself fighting against as many as five or six enemy attackers, and that can often overwhelm your ship in a hurry. One of the best defenses against this is killing off the rebel crew in earlier phases of the battle; they will not come back to life again if they perish in the first or second phase. Assuming that didn't happen, one of your best options is to have upgraded door controls for your own ship. This makes it harder for the rebels to roam around the place causing mischief, and it gives you a chance to strangle them by draining the oxygen out of the room they beam into. Note as well that the flagship uses a mind control system in the expansion, turning one of your own crewmembers against you in this phase of the battle. That can be devastating when the rebels are beaming over at the same time. I consider it worthwhile to purchase a mind control system for the sole purpose of countering this attack, even if I never use mind control at any other time. Just use your own mind control on whoever the AI targets and they will instantly revert to your control. There's not much else you can do, other than trying not to kill your own crew when they get taken over!
So the final phase uses lasers and missiles for standard attacks, plus has the rebel crew teleport over and invade your ship. There's one more attack though, the power surge "super attack" that fires off a huge blast of lasers periodically. It fires six total shots out at once, and often comes on the heels of the normal laser attack's three shots. This weapon cannot be disabled, as there's no system to target on the flagship that powers it. You can only hope that a mixture of shields and evade will cause them to miss. At this point, it's about hoping and praying that you have enough left to finish the fight. Good luck!

Final Random Thoughts
* I don't really have a favorite ship. I enjoying playing different types and exploring the gameplay for each. I will say that there are four ships that stand out for being thoroughly terrible: the Rock A, the Engi B, the Slug B, and the Stealth C designs. Each of these present major challenges, and they will surely be featured on this website down the road at some point.
* My preferred weapon setup for ships involves as many lasers as possible and maybe one beam weapon to cut apart the enemy once their shields are down. In other words, I love to build the big gunships and fire all the weapons at once. I know that ion weapons can be very effective, but for whatever reason I've never been a huge fan of them, or the attack drones that they pair so well with. I think that missiles are terrible, and I hate using them. Bombs are quite good though, targeting shields or weapons with them works very well. The flak from the expansion is amazing, probably too good for their cost and power usage.
* Favorite weapons are the Burst II Laser (3 shots for 2 power? Yes please!), the Ion Bomb (one power to disable shields for the next 18 seconds is amazing), the Halberd and Glaive Beams (beams that go through low shields and deal even MORE damage if all shields are down), and finally The Vulcan. That last weapon was added in the expansion, and it can literally win games by itself. The Vulcan is a laser weapon where the cooldown decreases after every shot. It starts at 11 seconds, and drops by 2 seconds after each shot. After the fifth shot, it's firing every second. EVERY SECOND. There is no stopping the Vulcan once the cooldown hits one second, it will strip away all the shields and then start destroying the hull. This thing is terrifying to watch in practice. Someday I'll manage to find two Vulcans in one playthrough, and it will be glorious.
* For the extra systems, I value Cloaking and Drone Control (for the Defensive Drone) the highest. Both of these are incredibly good at preventing damage to your ship, and that's ultimately what FTL's gameplay centers around. Defense is nearly always more important than offense in this game. Preserve your resources and prevent damage. Out of the rest, Hacking is also very good, and has the advantage of versatility. It can be used in several different ways, whether you choose to hack shields or weapons or piloting, or even something like the enemy medbay. The Crew Teleporter is nice for certain crews, ones that have mantises or rockmen or lanius or crystals, but it's not usually something I go after if it doesn't start on my ship. I don't really enjoy the boarding gameplay that much, a lot of it is based around exploiting the stupid AI in combat. Mind Control can be useful, although it loses a lot of its appeal if you aren't boarding the enemy ship. It works very well for that strategy, not so much otherwise. As for the Cloning Bay, I do not like it and prefer the Medbay whenever possible. The cooldown to revive dead crew is simply too long against the rebel flagship, and I hate not being able to heal my guys.
* Backup Battery: Amazing. It costs a mere 35 scrap to purchase. Get this thing in every game! 
* The best augment is Long Range Scanners, since it allows you to get as many fights as possible in each sector. Scrap Recovery Arm is the second best, increasing all scrap collection by 10% for the rest of the game. For the non-economic stuff, the Automated Reloader (10% faster weapon charge) is often a good purchase for 40 scrap, as is Shield Charge Booster (15% faster shield recharge) for 45 scrap. That's about all that I would ever buy though, as augments generally aren't worth their asking price. They are mostly "nice to have", not mandatory. I will use the ones that I find for free instead of paying to purchase new ones. For example, the Weapon Preigniter (weapons start charged in each battle) is awesome to have, but it's not worth spending 120 scrap when a full run from start to finish of a game will often produce about 2000 total scrap, and more like 1500 scrap on Hard difficulty. Close to 10% of all scrap for the whole run spent on something like that? Probably not worth it.
* The only Events that I try to memorize are the ones that cause you to lose crewmembers. I hate it when that happens. Piece of advice: if you get the one about spiders, always choose the safe option. It's not worth the risk!
There's much more to be said, but from this point on you'll simply have to try the game for yourself. I intend to write about some of my playthroughs on Hard difficulty, and look at some of the ship designs in more detail. That should be coming soon, so stay tuned for more content later. Thanks for reading.


