
Livestream Link (for those who would rather watch first before reading)

The Federation C is the first of the ships to fall under what I call the "Extreme Challenges" category. These are ship designs that are notably weaker than their breathren and present an extra level of difficulty above and beyond the norm. When played on Hard mode, some of these ship layouts become nearly impossible. You can do everything correct and still get wiped out in the first sector. For the Federation C in particular, getting the run started is extraordinarily difficult and can cause hair-pulling levels of frustration. I had attempt after attempt wiped out on Livestream before managing to piece everything together successfully. (I even included the final seconds of one of them in the linked recording above to demonstrate!)
So what makes the Federation C such a weak ship? The gaping hole in this ship's setup almost leaps off the page: you begin the game with no weapons at all! That's right, absolutely nothing to fire at the enemy ship. To win battles early on, you have to use the Teleporter system to beam over crew and kill the enemies on their own ship. Now the Federation C is not the only ship to start the game with no weapons; the Mantis B and the Crystal B also begin with nothing and rely on using their own Teleporter to win battles. However, both of those ships have far superior setups. The Mantis B starts the game with level 4 shields (two shield bubbles) AND a Drone Control system with Defensive Drone. In other words, the Mantis B is almost impervious to both lasers and missiles at the start of the game. The Crystal B similarly gets a Cloaking unit to start the game, as well as three Crystal crewmembers and their absurdly overpowered "lockdown" ability to use when boarding. Did I also mention that the Mantis B and Crystal B have the vastly superior four-man teleporter units, compared to the two-man teleporter on the Federation C? So those other no-weapons boarding ships have greatly superior defensive cababilities, as well as stronger races for boarding (mantises and crystals) AND four-man teleporter systems. The comparison isn't even close to fair.
The Federation C has no defensive drone, no Cloaking, no beefed up shield system, and no crystal race lockdown power. To compensate, it gets the Artillery Beam mentioned in the previous Federation ship reports... well, kind of. Unlike the beam weapon on the Federation A and Federation B ships, the Federation C has a Flak Artillery system. This is basically a Flak II weapon, firing out seven flak projectiles that are extremely good at stripping away enemy shields. However, it cannot be targeted, and it takes 50 seconds to charge at the start of the game. This makes the Artillery Beam almost useless in early fights; a Burst Laser II on an enemy ship will fire FIVE TIMES before that Flak Artillery fires once. The only realistic way to deal damage at the start of the run is to beam over your crew with the Teleporter and try to kill their crew as fast as possible. Meanwhile, due to the complete lack of any weapons on the Federation C, you own hull will be taking a pounding as the rebels fire away unchecked. And this is to say nothing of enemy medbays, or cloning bays, or door controls, and so on. It's a real mess. 
FTL's description for this ship indicates the difficulty of using the Federation C: "Only the most suicidal of infantry chooses to fly on this ship." Not exactly a vote of confidence! The suggested strategy is to use the Cloning Bay and the zoltan crew to do suicide bombing runs, sending over the zoltans to die and make use of their death explosions. That did not work well in my experience, however, since the zoltans are poor melee fighters and they struggled to get kills even with their energy eruption upon dying. I had better luck using the two zoltans for piloting and engines, and sending the more sturdy human + mantis combo to fight. If you can actually get the Federation C into lategame, it becomes a legitimately strong ship with the guaranteed shield removal of the Flak Artillery on a short 20 second cooldown. Surviving to make it that far is the problem.
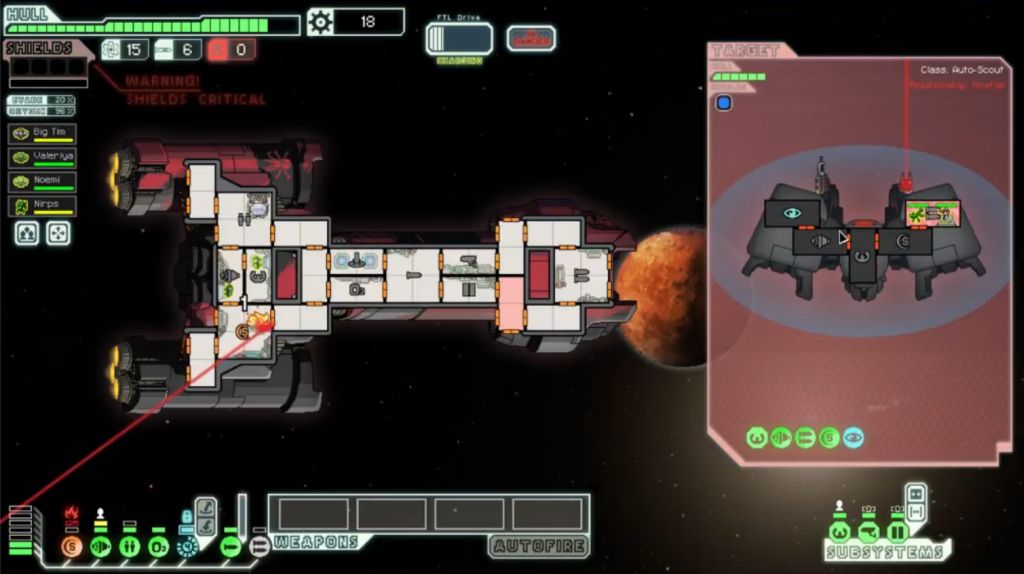
On to the specifics of this particular run. I started out by getting a pair of auto scout encounters. The first one was over a sun and handled with relative ease, but the second one had a Burst II Laser + Minibeam and was a scenario where a pre-battle event had hacked my shields. I had no protection at all from being hit by both weapons! Even the Minibeam is dangerous without shields. For these auto scout scenarios, you have no choice other than teleporting over crew and trying to destroy the weapon system as fast as possible. (The Federation C does start with Emergency Respirators to reduce damage taken from lack of oxygen.) With a Cloning Bay, there's no need to protect the crew. Send them over to die, then revive them and send them back over to the auto scout again. The Minibeam actually did most of the damage here, with no shields for protection. In the end, this stupid battle did 13 damage to the hull before it was finished. Sheesh.
The next ship had a missile launcher, and I was stuck praying that the Federation C would be able to dodge their shots with the pitiful 20% starting evade. No such luck, as three of them crashed into the hull before the human + mantis boarding pair could kill the enemy crew. I even had to pull my piloting zoltan away from the helm to put out a fire before it spread throughout the ship. The following ship had another missile launcher, which took out my shields, allowing a Heavy Laser shot to get through for another 2 damage. Argh! At least it resulted in a double scrap reward, granting me enough for level 4 shields (the second bubble) and a reactor upgrade. However, my poor ship had already taken 20 damage in getting that initial upgrade, waaaaaaaay more than most other voyages. Twenty damage from the first four encounters!  Nevertheless, as sad as this beginning had played out, it was still better than most of my other attempts. Lots of them died or were hopelessly crippled in the first couple of beacons.
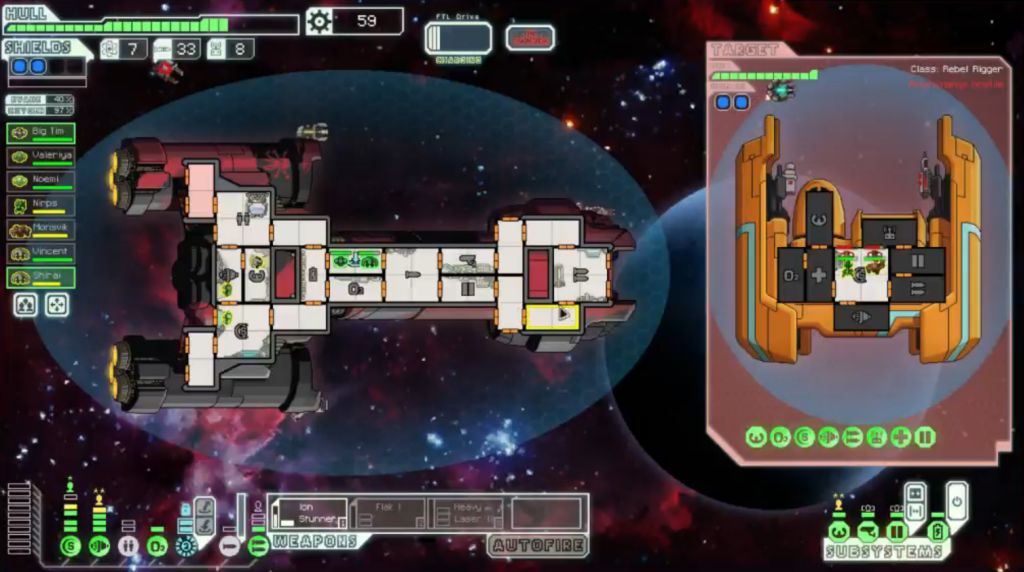
I did start landing some good fortune over the next few jumps. A distress signal resulted in a rockman addition to the crew! Now I could use the human to pilot the ship, send the two zoltans into engines/shields, and use the mantis + rockman for boarding. That was a much stronger invading pair. Then I picked up an engi as a prisoner reward from another battle, allowing me to shift the new android crewmember into the piloting room and use the human as a followup teleporter, once the cooldown for the initial mantis/rockman duo had worn off. Here's the three of them in action together, picking up a free weapon as an end of battle reward:

The Ion Stunner appeared to be a fairly useless weapon, ionizing shields not being very useful when you have no other weapons to follow up the attack. However, some of the viewers in the chat pointed out its unique feature: the Ion Stunner will stun anyone in the enemy shielding room if it hits, regardless of whether or not it breaks through all of the shield layers. In other words, they can have the maximum four shield bubbles, and even if the Ion Stunner only takes out the top layer, it will still stun anyone in the enemy shielding room, even with the other three bubbles intact. Very strange how that works. This was something that I could abuse to my advantage: teleport the mantis and rockman into the enemy shield room, then walk out of the room just before the Ion Stunner projectile hit. Walk back into the room and start hacking away at the helplessly frozen enemies! It was a bit of a cheap trick, but I had to use everything at my disposal. This is probably the biggest reason why I dislike the boarding gameplay with a Teleporter in FTL. It's heavily based on abusing the stupidity of the AI crew, and it's also very micromanagement intensive. Because I had to spend so much time microing my crew as part of these invasions, this turned into a marathon run before it was done.
I made use of a store at the end of Sector One to patch up the hull, spending 30 scrap to repair 15 damage. This still left the Federation C at 22/30 HP, fortunately now out of the dangerous red area. The next battle against the rebels had a ship with a Medbay, the first one I'd seen thus far. That made things enormously more difficult, and I would only win this fight via two shots from the Flak Artillery (at 50 seconds cooldown for each one). The reward for this lengthy and tedious encounter: 10 scrap and 2 fuel. Yay? Then the first battle in Sector Two was another ship with a missile launcher and a Cloning Bay. I did manage to kill all of their crew and take out the cloning facility, but not before a constant swarm of missiles pinked me down to 10 HP. This run continued to be... frustrating.
After an extremely slow (but fortunately not dangerous) tussel with an auto scout, I picked up another huge break of luck:

Wow, a free Flak II gun!  This was effectively the same thing as the Flak Artillery beam on this ship, only with a much faster chargeup time (21 seconds) at a cost of three power. Now I finally would have a real weapon to use, albeit a slow and inaccurate one. I could also sell the thing for a huge scrap payout at a store in a worst case scenario should the need arise. This free weapon was simply huge. I immediately had tough decisions to make about weapons, since the next jump led me to a store that offered Long Ranger Scanners and Flak I for sale. What did I want to do in terms of buying and selling items here? After much thought, I sold the Flak II (40 scrap) and Emergency Respirators (25 scrap) and purchased Long Ranger Scanners (30 scrap), Flak I (65 scrap), and used my remaining 16 scrap to fix 8 hull damage. This left me with zero money at all, but a highly useful weapon in the form of the Flak I and Long Range Scanners to find more encounters. I preferred Flak I over the Flak II due to the vastly superior chargeup time (10 seconds compared to 21 seconds) and the lesser power cost. Besides, I already had a "free" Flak II in the form of the Flak Artillery - I didn't need two of them! I hoped that these decisions would work out in the long run. I still needed to upgrade weapons to level 2 (at a one-time higher cost penalty!) and improve engines, which remained weak. Too much scrap had been spent already just repairing the ship, but what else could I do? The voyage would already have ended without those fixes.
Making matters even more complicated, I was also nearly out of fuel at this point. There hadn't been scrap available to purchase more at the store, not if I wanted those other upgrades, and so I was gambling here that I could pick up more in battles along the way. Fortunately the new Long Range Scanners led me perfectly through the rest of the sector, jumping from battle to battle without pause. I was now sending four attackers over to the enemy ship in each fight, starting with the mantis + rockman pair, and then adding a human + engi (for lack of anything better) in the second wave. One of these victories produced a stash of six fuel, and that pretty much ended my fear of running out. Thank goodness. After all of those tough enemy ships in the first part of the game, I was now finally hitting on a series of easy fights. No enemy medbays or cloning bays, no missiles, just lasers that had little chance of penetrating through my shields. I turned the resulting scrap into additional levels in weapons (now able to use the Flak I if needed), the level 2 teleporter for faster cooldown, and finally the engines levels I had been neglecting. Perhaps I'd be able to pull off this run after all.
Sector Three was a pirate sector, and it continued to offer up fairly easy battles. While I would take damage from time to time - such as in one of those stupid ion pulsars where my shields were knocked out and two Heavy Lasers smashed home - mostly the enemy ships lacked missiles and had little effect. I actually came close to having enough scrap to pick up Cloaking in a store, but the system is extremely expensive for Sector Three. I went instead with the Backup Battery for the moment and patched up the hull yet again. Three times in three sectors! Then at the end of the sector, I found another store and actually repaired yet again. Good thing I kept coming across those stores for timely repairs. I think I'd taken a good 50 damage already, heh.
The first battle in Sector Four produced the Heavy Laser II as a reward for killing all of the enemy crew. This was a weapon worth holding onto, since it paired extremely well with my Flak Artillery. Although the Heavy Laser II costs three power to use and only fires two shots, each of those shots will deal 2 damage and has the chance to set fires, breach the hull, and stun crew. It's a devastating weapon if you have something else in place to strip away enemy shielding. I intended to hold it in storage for the moment for potential use in the lategame.
Here was an example of a battle that took long minutes on end from the beginning of Sector Four. This rebel ship repeatedly frustrated my attempts to knock out their Medbay, using their missile launcher and their Burst II Laser to damage various systems on my ship. I was trying to use the Flak + Ion Stunner to get the medbay out of commission, and unfortunately the Flak is a notoriously inaccurate weapon. What I wouldn't have given for some kind of bomb here! I teleported one crewmember after another to the enemy ship, seeing them die repeatedly, only to come back to life in the Cloning Bay and go off to fight again. Well I did finally come out on top, accepting a surrender offer after taking six hull damage across five full minutes of real world time. It was not worth the effort, quite frankly. Should have used the Flak Arillery here.

This was another battle from Sector Four where straightforward boarding tactics were useless. This Engi ship had the Engi Medbot Dispersal augment, which automatically heals the crew at all times so long as the medbay is powered. This meant that the mantises over there were constantly regenerating health, making hand to hand combat futile. I initially thought that this battle was impossible, but the stream chat helpfully pointed out that I was forgetting about the Flak Artillery beam. Aha! I could wait out the long chargeup time (this ship had little chance of damaging me), let the Flak Artillery strip away all the shields, fire the Heavy Laser II onto the enemy medbay and disable it, then teleport my boarders into the medbay and kill the opponents there. This worked like a charm, and it would become the basis of my offense against dangerous enemy ships going forward. Now that we were shifting into the mid to late game, the Flak Artillery was beginning to be something more than a useless decoration, and an important part of the overall strategy.
The next store had a Cloaking unit for sale, and by selling a random Defensive Drone that I'd found along the way, plus the Ion Stunner, I was able to pick it up. Awesome! One of the weaknesses of the Federation C is the system slots taken up by the Teleporter and Flak Artillery. There's only room for one more system, so you have to pick between Cloaking and Drone Control and Hacking. Only one of them can be put into use. Cloaking is clearly the best to have, and I managed to get it as early as Sector Four! As for the Ion Stunner, I bid a fond farewell to the weapon. It helped me enormously on this run, and I was sad to sell it. Had no choice though, otherwise I wouldn't have enough scrap.

This mantis prisoner picked up along the way rounded out my crew at the maximum of eight. Now I had my ideal setup for the Federation C: an initial boarding group of two mantises, followed by a second wave of a rockman and a human. This left an engi to pilot, another engi to run the weapons room, and a zoltan each for engines and shields. Just about perfect. One of the nicest things about the invading gameplay with a teleporter is that you do tend to get lots of crewmembers in the aftermath of battles. I had very good luck with recruits all throughout this run, and some timely pickups with key weapons too (the Ion Stunner, the Flak II, the Heavy Laser II, etc.) For all of the problems and setbacks along the way, this was actually a fairly lucky run.
I was down in the red again on hull damage by the time that I limped to another store in Sector Five. Here I managed to get another key augment:

The Backup DNA Bank protects your crew against dying permanently even if the Cloning Bay gets depowered or damaged during a fight. It's an insurance policy against disaster, and for a run like mine where the crew was dying constantly, it was worth its weight in gold. I was honestly amazed that I hadn't lost anyone to this point in time, considering how often I'd had dead crewmembers. One missile hitting the cloning bay at the wrong point in time could have spelled doom for my mantises. Now I was protected against that bit of RNG trickery. And it was a good thing that I did, because I would have lost crew several times later on without the protection from the Backup DNA Bank. As for the rest of my scrap, I invested yet another 50 or so money to fix up the hull yet again, for the sixth or seventh time on this run. The amount of damage that I'd repaired along the way was beginning to border on the absurd.
The battles continued, one after the next, each one lasting long minutes on end. Most of the ships that I came across now had either a medbay or cloning bay on board, forcing me to take them out in some fashion before administering the kill with mantis claws. I was sinking my scrap into additional upgrades for the Flak Artillery now, reducing that ungodly long chargeup time into something more manageable. Getting the Flak Artillery to fire at the right moment was sometimes a bit tough, since it always shoots immediately when powered up. (You can't hold a charged shot like most weapons.) Sometimes I would have to depower the thing temporarily to get it to line up at the right moment. Anyway, the general pattern remained the same: fire Flak Arillery to remove shields, then use the Heavy Laser II to punch out medbay/cloning bay, then send in the invaders. I even found a Heavy Laser I in the aftermath of a battle, giving me a third heavy shot to add to the mix after upgrading weapons. Later I found ANOTHER Heavy Laser at the start of Sector Six after destroying an auto scout. Eight damage and near certainty of fire + hull breach if they all got through - nasty stuff!
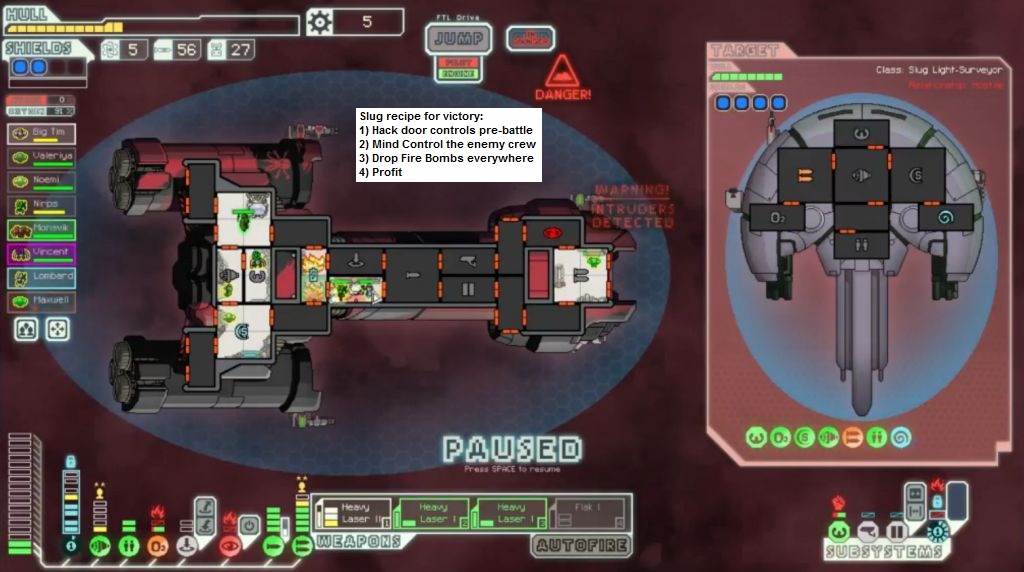
I don't have too much more to say about Sectors Six and Seven. I went back and watched them on the Livestream recording, and there were lots of very lengthy encounters, but they generally followed the same pattern described above. The micromanagement required for each of these fights definitely verged on the tedious at times. (Especially the one battle where a slug ship kept firebombing me over and over and over again. I think almost half the ship was on fire at one point, heh.) Without a defensive drone, I was always at the mercy of some key system getting knocked out by a random missile, and I continued to take a steady stream of damage along the way. Even as late as Sector Seven, I had to spend another 60 scrap repairing hull damage at a store. I seriously think I fixed somewhere between 80 and 100 damage at stores over the full course of the run. Simply insane.  As for the rest of my scrap income, it was going into level 8 shields, level 5 engines, the maxed out level 4 Flak Artillery, and level 7 weapons. My endgame offensive setup would use the Flak Artillery, the Flak I weapon purchased so long ago, and a truly vicious Heavy Laser II + Heavy Laser I + Heavy Laser I grouping. With the shields down from 10 total flak projectiles, those heavy laser shots should wreck utter havoc on anything in their way. It was time to test them in practice.
I needed the free repair at the start of Sector Eight along with a repair station visited on the first jump to get back to full health again. (Taking damage: kind of a theme for this run!) I picked up a massive 123 scrap payout from a double reward at the next beacon, then 65 scrap from the next fight, and that pretty much gave me everything that I needed for the flagship. I would be able to get all my weapons into play along with the minor little extras like level 2 Oxygen and Piloting. Time to meet the endgame boss and do or die.

My biggest concern in the first phase of the flagship battle was timing my Flak Artillery around the enemy's ability to cloak. I'd had some problems with that in the past since the timings lined up just wrong enough for the Flak Artillery to fire, followed by the enemy ship immediately cloaking. I slowed the thing down slightly to make sure that wouldn't happen here... only to fail the timing anyway, heh.  Pretty dumb. When the flagship's Hacking drone landed on my Door system, I knew that I was in pretty good shape despite my mistake. I used my own Cloaking to dodge the first volley of missiles, while also buying time for my own weapons to charge. When I actually managed to coordinate a volley correctly, it took out the entire shield unit on the flagship immediately. From level 8 shields down to zero in a single burst. That picture above shows the damage taken instantly. I think all four of the Heavy Laser shots hit, and since each one does 2 points of damage to hull and systems, that was the whole shield unit deactivated at once. I probably killed a rebel crewmember in there too, although without upgraded scanners I couldn't know for sure. Nasty, nasty damage. With no shields it was easy to fire the lasers again the instant they came off cooldown, and the flagship exploded like a popped balloon. I took all of three damage, and it could have been zero if I hadn't messed up the initial Flak Artillery timing.
Without a Drone Control system, I knew that I'd be fighting off boarding drones in this second phase of the boss. The first one annoyingly landed in the engine room, where the cramped quarters meant that I could not send four attackers to down the thing quickly. At least there was no enemy cloaking to worry about anymore, and that allowed me to fire off a full burst as soon as the Flak Artillery was charged. The 10 flak particles and 4 heavy laser shots combined to deal nine hull damage to the flagship and instantly crush its shields again, from the maximum four bubbles down to nothing. Now the boss was easy pickings again, with no defenses other than evade from piloting, and another cycle from all of my weapons finished it off. I'd even been able to cloak through the flagship's drone surge and avoided taking damage from anything other than missiles. This was pretty easy stuff, about as tame as the flagship ever gets.
There was a bit of ill luck in the third and final phase when one of my two mantises was hit with the rebel Mind Control. You can't really stop a mantis with maxed out attack when it gets targeted by level 3 mind control, they will kill anything sent after them in seconds. I simply fed the rest of my crew to the insanely powerful mantis, letting them die and then revive in the Cloning Bay while waiting for the mind control to wear off. Zerging it up for the win! The rebels who tried to teleport over picked a bad spot, in a room that had an open hatch to the vacuum of space. With maxed out Doors on my ship, I took away their oxygen and let them suffocate helplessly. My guys were pretty good at fighting hand to hand, they had plenty of practice on this trip. Defensively I ate a lot of missiles while slowly cutting through the flagship's Zoltan Shield, and didn't get as many dodges as my 45% evade would have suggested. Counterbalancing this bit of bad luck was the fact that none of the missiles hit important systems, mostly damaging empty rooms or things like the Backup Battery that I could live without. No damage to weapons or shields or cloaking, thank goodness. My first offensive volley after the Zoltan Shield was gone did only modest damage, since three of the four Heavy Laser shots missed. The second volley was the money shot, destroying the rest of the shield unit and crippling the flagship. From there, I could fire my weapons one at a time as soon as they were charged, and take out the remaining weapons at my leisure. Even mind controlling one of my mantises a second time wasn't enough to change the course of this battle. Down went the flagship:

The longer length of the fight due to the flagship's Zoltan Shield, combined with more missed shots from my weapons, meant that I took more of a pounding from missiles and more overall hull damage. It was a bit of a sloppy third phase on my part to be honest, but a victory remained a victory. This voyage of the Federation C kept taking damage right up until the end of its days. If this were real life, that ship would have been horribly pitted and scarred, a complete patchwork job by the time this all was over. I was just glad to get this over and done with.

This run wound up on my overall High Score list, no doubt due to the higher scrap rewards from boarding and invading ships. Interestingly, my other victory with the Federation C (not played on Livestream) occupied the highest place at the time of this picture. The high scrap total can be somewhat deceptive, considering how much money I had to spend repairing the hull over the course of this run. I felt that I had enough scrap to win comfortably, but not so much that I was running out of things to spend it on. It's almost a shame that this endgame screen doesn't keep track of how often your crew ends up dying, because my guys perished at a ridiculous rate throughout this voyage. Rare was the battle where someone did NOT end up dying. That Cloning Bay saw a lot of use, let me tell you!
This is one of the hardest ships to use in FTL. Even with all of the problems on this run, I still had well above average luck go my way. I picked up lots of extra crew, found many useful weapons, and always managed to hit stores when I needed hull repairs. I'll probably do some of the easier ones next to get a break before going back to more of the extreme challenges. Thanks for watching/reading as always.


