
YouTube Link Part One
YouTube Link Part Two
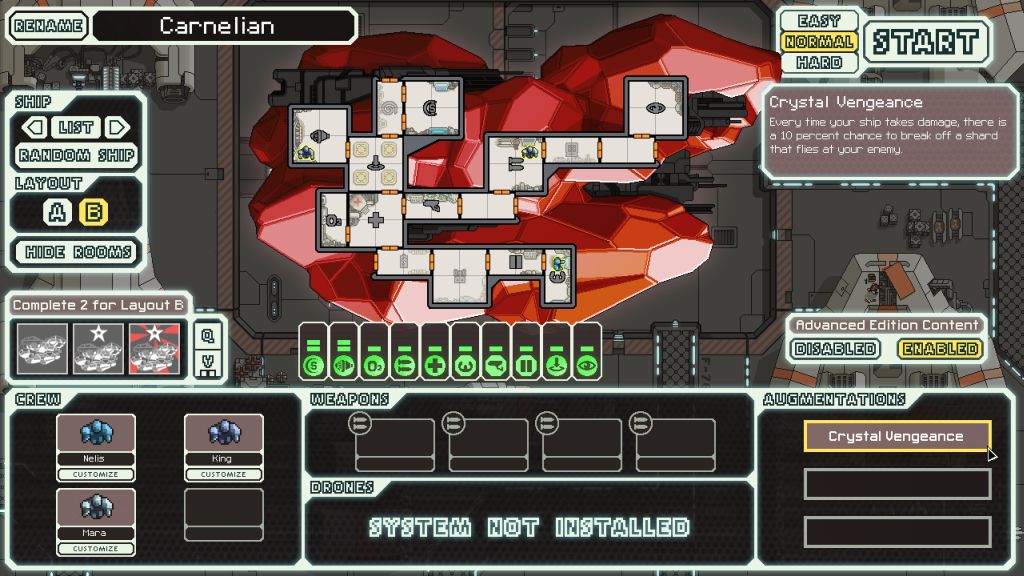
The Crystal B ship is the strongest design in FTL. This is the near-universal opinion of the online community, and I share in that view. It is well worth the difficulty of unlocking the Crystal Cruiser, the game's hidden secret ship. The strength of the Crystal Cruiser can be summarized in three things: a four-tile Teleporter system, an allotment of the overpowered Crystal crew, and a Cloaking system. This is one of only three ships that have the four-tile version of the Teleporter, and the design is clearly far superior to the Mantis C. It's a closer comparison to the Mantis B ship, but the Crystal B starts with a Cloaking unit and three Crystal crew as compared to level 4 shields, a Drone Control + Defensive Drone combo, and and two Mantises. As good as the Mantises may be for boarding, the Crystal race is even more powerful due to their "Lockdown" innate ability. This allows the player to remove enemy Medbays from the picture (if not Cloning Bays) and fight 3 vs 1 or 3 vs 2 battles that the defender has no chance of winning. The Cloaking unit is also significantly more expensive than the Defensive drone with attendant system (150 scrap against 85 scrap), and the Crystal Cruiser furthermore has 3 crew instead of 2 crew. On top of that, the Crystal B also starts with the sellbait augment of the Crystal Vengeance, which can be converted into 40 scrap at the first store visited - almost paying for level 4 shields right there. As good as the Mantis B happens to be as a boarding setup, the Crystal B is even better.
A typical battle with the Crystal B looks something like this. The player sends 2 or 3 of the Crystal crew into a key room on the enemy ship, often Weapons or Piloting, then they start Locking down the room to fight at favorable numerical odds. Even in a straight up 2 vs 2 situation, the Crystals will always win against anything other than Mantises and Rockmen, due to their extra health (125 HP). The player can also use the Lockdown ability to prevent the enemy crew from running away when their health gets low, ensuring guaranteed kills. (As I said before, enemy Cloning Bays are a lot more trouble than Medbays for the Crystal B.) Meanwhile, your own ship has can use the Cloaking unit to dodge anything too dangerous from hitting while the boarders do their thing on the enemy ship. As the player accumulates more crew, the Crystal B only gets stronger and stronger, with the four-tile Teleporter + Cloaking duo remaining incredibly powerful for the entire game. With the bonus scrap reward for collecting crew kills, the Crystal B usually gets plenty of extra crew and has lots of extra money to spend. There's a reason why this ship is held in such high reward.
There are only a few weaknesses to the Crystal B's setup. The first and most obvious is the lack of any starting weapons. Naturally the Teleporter unit is the offensive tool for this design, however there are a couple of situations where that won't work, namely against autoscouts and Zoltan Shields. Technically it's possible to kill the auto scouts - but only by sacrificing one of your crew to do it, which is not a desirable trade! And of course there's no way of boarding a ship with a Zoltan Shield at the start of the game. Interestingly, all of the other Teleporter-based ships have some other way to get around this situation. (Lanius B has the Advanced Flak, Mantis B has the Boarding Drone although it too can't deal with Zoltan Shields, Mantis A has a Basic Laser, Mantis C has the Stun Bomb and a Cloning Bay, Slug B has the Artemis Missile, and Federation C has the Flak Artillery and a Cloning Bay.) Only the mighty Crystal B is truly helpless against the most basic auto scouts. You'll want to get some kind of weapon quickly to solve this hole. The Crystal B does also start with level 1 "weak" Weapons, which means a one-time payment of 40 scrap to upgrade to level 2. Otherwise, this ship has no flaws in its build. It's very easy to use the boarding gameplay to snowball into a position far out in front of The Curve. If you can't win with the Teleporter on this ship, it's doubtful you'll be able to do it with any ship. The Lockdown ability makes it almost trivially easy to kill enemy crew.

I played this particular run about a week before Christmas, and we ended up with a bit of a holiday theme for the humanoids manning my ship. The very first beacon had a complete disaster of an encounter, up against a ship with a missile launcher and a Combat Drone. That might not look too bad, but the first missile hit my Piloting system (through my own cloak at 20% odds!), followed by the second missile taking out my Cloaking unit, and then the third missile knocked out my Shield generator - with the Combat Drone still hanging around. You don't want to see your shields eliminated when one of them is firing shots every 5 seconds! There were also three enemy crewmembers on the other ship, and I ended up having to recall my Crystal boarders to heal, which stretched this battle out longer than it should have lasted. All told, we took 9 damage before this disaster of a fight was over. Sheesh. Could have played that a little better perhaps, but still.
Next up was a ship with two Heavy Lasers fought near a sun, where I knew I'd have to take one Heavy Laser shot of damage unless I could get a low percentage dodge. Unfortunately that shot hit the Shield unit and knocked them offline, meaning even more damage taken. Yikes - bit of a rough start here! Fortunately I was able to hit a store next and fix up the hull, along with trading the Crystal Vengeance + 10 scrap for the much more useful Scrap Recovery Arm. Picking up that thing is always a bit of a gamble, as you're investing 50 scrap into not making your ship stronger right away. However, with a boarding strategy and Scrap Recovery Arm in hand, my income would be stratospheric later on if I could ride out the early game.
Then at the next beacon, FTL decided that it truly was the holiday season, and it was time for me to open my gifts:

Why yes, that is indeed a free Burst Laser II, thank you very much!  This was probably the single best random drop possible, even better than a Weapon Pre-igniter as I had nothing to pre-ignite at this point! Now I only needed to upgrade my weapons to level 2 and I'd be in tremendous shape, able to board with the Teleporter and also shoot out key targets on the enemy ships at the same time. Unfortunately the next two battles were both against autoscouts, and I could not kill either one for the scrap reward. I had the Burst Laser II sitting there in the hold, unusable until I could save up 40 scrap - argh! I did finally get a fight against a non-AI based ship and slaughtered them all for enough scrap to upgrade weapons. I'd be set for autoscouts and Zoltan Shields going forward.
I chose to head to an Abandoned Sector second, which I realized was a mistake about three seconds into the first battle against a Lanius ship. Ummm, they have no oxygen over there, probably not a good idea to go boarding! I fell back on the Burst Laser II instead, which was up to the task of engaging in gunfights, especially when supplemented by Cloaking. The Lanius ships had a lot of Flak Is on board, which I was able to cloak past repeatedly just after firing the Burst Laser II. This was a nice area for farming up additional income, even with a weird sector layout, and I was able to accumulate level 4 shields, level 3 engines, and a level 2 Teleporter unit by the time it was done.

Sector Three started by dropping a Hull Repair drone as a reward from the first battle, another huge break of fortune that I probably didn't need. This essentially ended the debate of what system to purchase for my last remaining system slot; I could have Drone Control or Hacking or Mind Control, but only one of the bunch. The free Hull Repair drone certainly tilted this towards the Drone Control system. The second battle gave me a map reveal upon winning, making the rest of the sector a breeze to navigate. I've mentioned before how nice that can be as another small element of a run. The biggest weakness holding me back was a lack of additional crew, as I still hadn't found any so far. I probably should have been more aggressive about sending my Crystal pilot over to the enemy ship as well; I'm always a little hesitant to do that, however, as you can have some very bad things happen if there's no one available to repair damaged systems on your own ship. For now though, I was still making steady progress.

I had 200 scrap saved up by the end of Sector Three, and this store allowed me to convert it into some major goodies. No crew for hire, but they had just about everything else that I wanted. I napped the Halberd Beam here and a Backup Battery, then upgraded weapons to level 4 in preparation of using Burst Laser II + Halberd together. For some reason I totally forgot that I had unneeded Antidrones to sell and a Hull Repair drone sitting in inventory. I passed up a Drone Control system here for no reason!  That was pretty silly. Well, at the very least I picked up another member of the holy trio of weapons here, which was far from a bad thing. Could have, should have been a smarter purchase though.
Sector Four had a few empty jumps at the outset, then finally began to open up the faucet on extra crew. I found a Human in an event dialog, and he even came with Piloting skill! That allowed me to move all three Crystals over to invasion duty with the Teleporter. I also had enough scrap to upgrade the weapons to level 5 and get both of my weapons into play, letting me shoot out pesky Cloning Bays to aid in boarding. I dove past the Exit beacon at the end to pick up a few extra battles, with little fear of the rebel fleet given my Cloaking unit. This was well worth it, as I found a Rockman prisoner with Weapons skill in the aftermath of a victory. Now I had a full group of four attackers for my Teleporter, finally, with the three Crystals and the new Rockman.
I had a very interesting encounter at the start of Sector Five:

I was completely out of fuel after going through about five empty beacons. I needed to get some fuel from this battle. Then, the asteroid field ended up nearly killing my boarding crew - down to 1 HP on the enemy hull with all four of them over there!!!  I was able to pull them out just seconds before fires burning on the enemy ship blew the whole thing up. Yikes, that could have been a deathblow for this run there. Whew. I did get 3 fuel from the battle, and the voyage could continue. Then I fought another very difficult battle on zero fuel against a ship with a Zoltan Shield, a Burst Laser II + Hull Beam + double ions, three shield bubbles, a Cloning Bay - and it was running away. That was one of the toughest fights I've had in a long time, but my crew was just barely up to the task. For all of the good luck that I'd been having, FTL is never a cakewalk, even with the game's strongest ship.
I purchased a Drone Control + Defensive drone combo at the end of Sector Five, and that along with the Hull Repair drone in stash had me back in business again. It's truly amazing that I had so many problems with fuel on this run, given how I was getting the crew kill bonus with nearly every victory. Once that was finally solved with slightly better fuel drop luck, there were relatively few issues remaining to overcome. I purchased two crew in a store in Sector Six, grabbing a Zoltan with max skill in weapons and an Engi to run the engines (heh). Usually I prefer to avoid putting a Zoltan in the Weapons room, since any time that it has to move it can potentially depower one of the weapons, but I had zero skill in that area to date, so it seemed prudent for once. Then I found a Pike Beam floating in space, which nearly had me set to face the flagship. One more laser or bomb would suffice. Instead, I would purchase a Flak I at a store to complete the holy trio. Another Engi came along for the ride at the end of a battle and rounded out my crew at the maximum of eight; I would also replace my Rockman with a Mantis who came with fighting skill already maxed out. Along with three Crystals to Lockdown rooms, and outstanding weapons to shoot out enemy systems of choice, my boarding team was now downright disgusting.
Most battles in the last two sectors looked something like this:

I would dump my attackers into the best four-tile room on the opposing ship, and immediately Lockdown the room with one or two defenders inside, slaughtering them in short order. Then I'd try to trap the remaining opponents on board in groups of 1 or 2, using further Lockdowns as needed. Rinse and repeat. The Burst Laser + Flak + Halberd combination could take out virtually anything I wanted, while I also had Cloaking + Defensive drone + Hull Repair drone to keep the Crystal B itself out of trouble. There were only two things holding me back now. First of all, I ended up going to another Abandoned Sector for Sector Seven, and I was unable to use the Teleporter against many of the airless Lanius ships. Whoops - twice on this same run!  Secondly, I almost ran out of fuel again, due to more bizarre luck with postbattle drops. They just would not give me fuel for whatever reason. The jump into Sector Eight used up my last unit of fuel! Good thing you always get 10 for free at the start of the final sector. The rebel ships in Sector Eight were noticeably easier than the ones I had just been hitting in Sector Seven. Everything except one autoscout encounter that took almost 10 minutes of realworld time to complete - one place where the lack of Hacking was really noticeable. I swear that thing was more dangerous than the flagship...

I planned on killing the whole rebel crew on the flagship in the first phase. There's no ship better equipped to do this than the Crystal B, as the Lockdown ability can prevent the rebels from escaping into their level 3 Medbay for healing. I also had Cloaking to dodge missiles in an extended battle, plus Hull Repair drones to fix any damage taken. When the duel began, the flagship's Hacking drone wound up landing on my Drone Control system, which was one of the better targets. In particular, I wanted to avoid having my Teleporter hacked and taken offline for large portions of the fight. I sent my boarding team into the flagship's Shield room as soon as their initial cloaking wore off. There was one poor rebel sap in there, who died in about three seconds after I immediately Lockdowned the room to trap him in there. My guys punched the Shield unit for a little while after that, and when four more rebels flooded into the room to stop them, I used my second Lockdown to kill all four of them. I had three Crystals and one Mantis, all of them with maxed out physical combat stat - they had zero chance.
I made one other little micro move that helped me here. Realizing that vision on the inside of the enemy flagship would be more helpful than extra reactor power, I moved my Zoltan from the Shield room into the Sensors room. That gave me a small extra edge in tracking what the rebel soldiers were up to. I would end up pulling my boarding team back to the ship once to heal up, at which time I was able to shoot out the flagship's Medbay with my guns. Then I teleported directly into the broken Medbay, killed the remaining four rebel crewmembers (who had nowhere to run), and smashed out the remaining systems at my leisure. That made for an easy first phase; I think that I took 2 damage overall. (I had foolishly not gone into the battle with full health, forgetting the Hull Repair drone once again. Oops.)
The second phase of the flagship tends to be quite easy if you're able to eliminate the crew in the opening round. I teleported my four attackers into the flagship's missile room and Shield room, and eliminated both of them in short order. I actually forgot to put up my Defensive drone at the start of the engagement, and that let the flagship's Boarding drone get through to my hull. That was another silly mistake. Well, I could fix that here by firing on the flagship's Drone Control room, something that I rarely do in this phase. But with missiles and shields offline, and no one to repair them, there was no reason to avoid doing so. Zero damage taken and a very easy fight indeed.
The third phase is always a little harder, if only because of the Zoltan Shield that the flagship totes around, and the Mind Control can be a pain as well. Still, with no rebel marines to worry about, the danger was a lot less than normal for this run. The Mind Control wound up hitting my Human pilot, which was OK if not great. One of the Engis would have been best, the Mantis would have been worst. It took about two full volleys from my weapons to take out the supershielding, and then the boarding team was off to do their dirty business again. With weapons firing away and Crystal fists smashing the rebel machinery, it didn't take long at all before the flagship was hanging in electrical tatters. I pulled my guys home with the Teleporter and snapped this picture as Flak particles were flying en route to finish the job:

No shields, no lasers, no missiles, and 1 point of hull remaining. Meanwhile, the Hull Repair drone had my Crystal ship back at full health, after taking four damage from random missiles and superweapon shots. That's about as broken as I've ever seen the flagship right before achieving victory. This was a pretty thorough spanking of the game's final boss. 

I finished with a surprisingly low score for Hard difficulty, only barely cracking 5000. I suppose that I didn't actually collect that much scrap over the course of this run, only a little over 1600. I think it's a testament to the strength of Crystal B that this particular run felt so easy despite a supbar total amount of scrap. (The early Scrap Recovery Arm undoubtedly helped here as well.) Note as well that I only have two games played with the Crystal B, both of them victories on Hard difficulty. I tend to avoid playing the boarding ships since I don't enjoy their gameplay as much, and the Crystal B is so strong that it almost verges on boring at times. Nonetheless, I hope that you had a kick reading about this particular journey. If you ever want to go smash the rebels with a ridiculously powerful boarding setup, or play for the highest possible score, this is the top ship to use.


