

YouTube Link Part One
YouTube Link Part Two (Flagship)
The Crystal Cruiser is FTL's secret ship. If I remember correctly, the crystal ship and the crystal race itself were added to the game by a fan who pledged the top donation when FTL was doing its Kickstarter funding drive. In the pre-expansion version of FTL, the only way to unlock this ship was to complete the secret crystal quest, a very difficult feat indeed that involves hitting three different quests in the same run. (First finding the stasis pod, then getting a crystal crewmember out of it, then finding the beacon leading to the secret crystal sector in the Rock Homeworlds.) Fortunately, the Advanced Edition added another condition for unlocking the Crystal Cruiser: beat the game with the A and B layouts of the other nine ships. The difficulty level doesn't matter (Easy is fine), just win with all of the other ships and the Crystal Cruiser is yours. I still hear people complaining about this all the time on FTL Reddit, and it doesn't make a lot of sense to me. Of course it should be tough to unlock the game's secret ship! What's the point of it being secret otherwise? With this second non-RNG dependent way of opening up this ship added in the Advanced Edition, the system feels pretty fair to me. I defeated the rebel flagship with all the other ships and unlocked the crystal ship that way.
The Crystal B Cruiser is generally considered to be the strongest in the entire game: 4-tile Teleporter + Cloaking + Crystal crew = serious rebel smackdown. The Crystal A often seems to get overlooked, however, possibly because it doesn't stand out as much as its overpowered brother. Some of the commentary I've seen online rates this as a mediocre to poor ship. I don't agree with that sentiment at all, as I placed the Crystal A at the top of the "above average" ships in my FTL Tier List. While this design is no Mantis B or Zoltan A, the ship nevertheless has an excellent setup. The Crystal A starts with some very unconventional weaponry in the Burst Crystal I and the Heavy Crystal I. These are essentially a weird crystal version of the Burst Laser I and the Heavy Laser I, with slower chargeup times and the ability to pierce one shield layer. They also have a chance to breach the enemy hull (and can get shot down by enemy defensive drones like missiles) in exchange for losing the ability to set fires. I rate these weapons as very slightly weaker than their non-crystal counterparts, as the extra chargeup time will more often let an enemy ship get off a shot before your own ship gets to fire. That said, Crystal A is still effectively like starting with a Burst Laser I and a Heavy Laser I - those are very strong starting weapons! And since all ships at the start of the game have either zero or one shield bubble, your opponents are effectively shieldless for the first two sectors. Remember, like most other strategy games, the beginning of the run is extremely important for getting out in front of The Curve, and the Crystal A thoroughly dominates the early portions of the game.
This ship also has the advantage of starting with arguably the best crew in the game: two Humans and two Crystals. The two humans can pilot the ship and man the engines, leaving the overpowered crystals to use their Lockdown ability against boarders. Or the player can purchase a Teleporter and look to go invading themselves. (Sorry, only the two-tile version of the Teleporter on this ship though!) Crystal A also has no serious weaknesses in its starting systems, and begins the game with the Crystal Vengeance augment, which can (and should) be sold for a massive 40 scrap at the first store. You can effectively trade that useless augment for level 4 shields or a Defensive Drone, both of which cost 50 scrap. On the other side of the ledger, there are no obvious drawbacks to the Crystal A's design. It's a well balanced ship that can be tailored pretty much however the player wants. I suppose the biggest downside is the lack of any additional starting systems, no Hacking or Mind Control or Cloaking or whatever else. In many ways, Crystal A is a superior version of the Kestrel A: another well-rounded design.
This writeup does not have an accopanying Livestream link. (I've added a link to a Crystal A run, but it's for a different run than the one described here.) I had started a run offstream with the Crystal A, not thinking too much about it and looking to have some fun. Because the early game of the Crystal A is quite strong, I was able to invest my initial scrap into taking shields to level 4 for the second shield layer, rather than having to save everything for an immediate weapons upgrade. I also hit on a huge swing of luck when I was able to sell the Crystal Vengeance in exchange for a Scrap Recovery Arm augment at the very first store in Sector One. Normally I'm not able to afford the Scrap Recovery Army (+10% scrap from all sources) on my runs, as it's essentially a "win harder" condition. Struggling runs can't afford the 50 scrap investment, and winning runs don't need it because they're already ahead. It's the Mejai's Soulstealer of FTL! This was the perfect opportunity to get it, however, right at the outset of a run and paid for with the sale of a useless augment.
This ideal window to purchase the Scrap Recovery Arm would pay off in a major way. A difference of +10% scrap might not sound like a lot, but it was enough to boost me well out in front of The Curve, especially with a ship that was already strong to begin with. For someone like me who plays Hard difficulty pretty much exclusively, the additional income was definitely noticeable compared to a normal run. The Crystal A's weapons allowed me to ignore the first enemy shield layer completely, and they had little trouble with two layers as well, letting me spend my boosted scrap income on defenses. That meant I took less damage, meaning fewer repairs, and so on. I was out in front of The Curve and flying high. I would purchase a Hull Laser II in Sector Three, this weapon's 15 second chargeup time coinciding very nicely with the Burst Crystal I. Later I would even find a Hull Beam and a Defensive Drone II for free along my journey. I would pick up Drone Control, Hacking, and Cloaking systems to further pimp out the Crystal A with extra goodies. This looked like a routine winning run, nothing too special or out of the ordinary taking place.
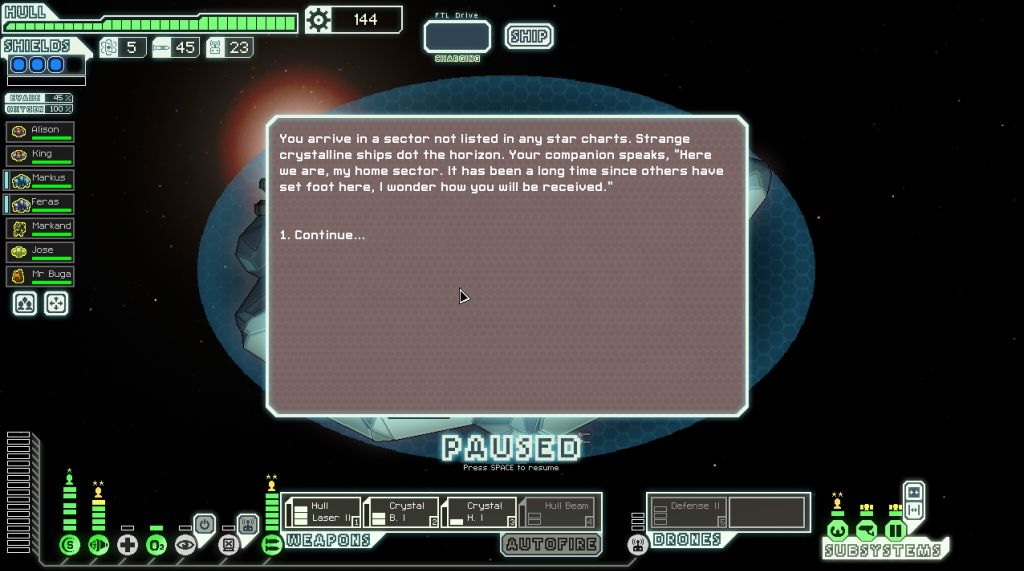
And then I visited a beacon in Sector Seven and this happened out of the blue:
Holy crap!  That was the text for the secret crystal event! I hadn't even considered this as a possibility, never noticing that I had been in the Rock Homeworld sector. Note as well that I did not use the "Ruwen" trick, which causes a quest beacon to appear in the Rock Homeworld sector if you have a Crystal crewmember on board. This was a complete surprise to me. I've probably completed close to 200 runs with FTL at this point, and this was the first time that I managed to reach the secret crystal sector. This was going to be an entirely new experience for me as an FTL player.

Here's the map of the Hidden Crystal Worlds. I was hoping that the store would have some of the unique crystal weapons for sale, only to be disappointed with regular stuff. (In particular, I wanted to try the Heavy Crystal II: a single shot that deals 4 damage when it hits. And I had Hacking, so it would have hit! Ah well, maybe another time.) I would pick up a third Crystal crewmember in an event dialogue in this sector though. I could have had even more Crystal guys on my ship, but that third one put me up to the maximum of eight lifeforms on board. I didn't have a Teleporter so I guess it didn't really matter. With three Crystals and a Mantis, I just laughed when anyone tried to board me.
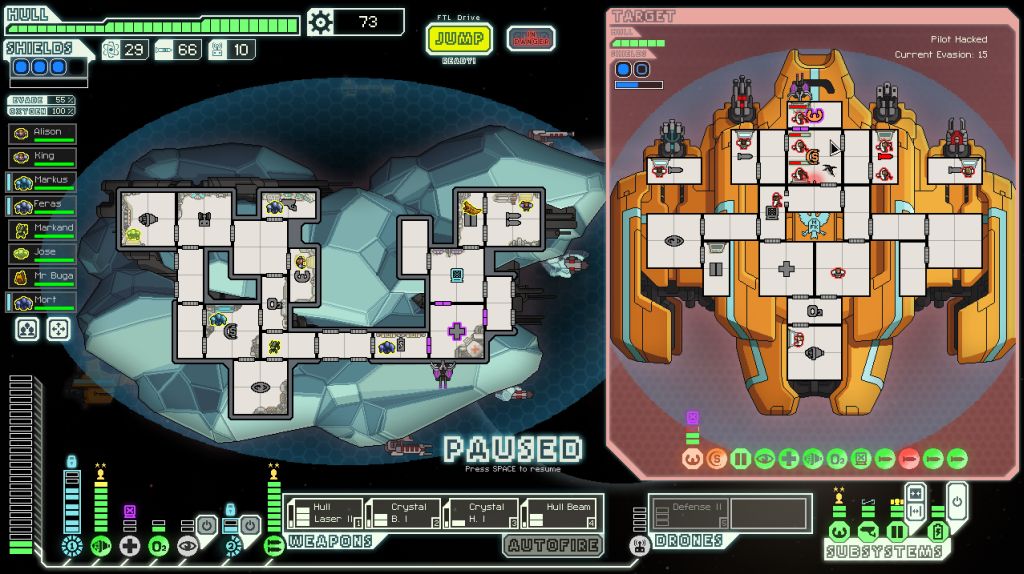
I also had the chance to test my ship against some of the Crystal sector's finest warships:

Since the crystal weapons are extremely rare and never appear on normal enemy ships, I had no idea what this enemy was sporting. That was a weird feeling! It was like being a newcomer again, having to wait and see what would come out from the other side when it fired. I think I've said this before but it bears repeating: recognizing what weapons are present on the enemy ship is hugely important in fighting the tactical battles in this game. Knowing what they do, how long their chargeup times are, and so on helps a *LOT* in FTL.
Anyway, it didn't really matter because the Crystal A that I was piloting was exceptionally strong for this point in time. I had nearly impregnable defenses (good shields + engines, Defensive Drone II, Cloaking) combined with a lot of projectiles to rip apart enemy shields. The crystal weapons are a little bit weird in the sense that they won't break that last shield bubble; I had to experiment a little bit with the firing timing to get all the shots to line up right. I had to fire the Burst Crystal first, then the Hull Laser a half second later, then the Heavy Crystal and the Hull Beam. When done correctly, the Burst Crystal and Hull Laser would pop all of the enemy shields and then the Heavy Crystal and Hull Beam would go to work. Once I figured it out, this setup + Hacking just decimated everything.
I forgot to mention that I had purchased a second Scrap Recovery Arm sometime in Sector Four or Five. That had pushed the snowball rolling along down the hill even faster. Would you believe I had the chance to purchase a THIRD Scrap Recovery Arm at a store in the Hidden Crystal Worlds?

Well, I could have done so, but I went for the Weapon Pre-igniter instead. I hope you'll forgive me.  It's always a treat to use that thing since I so rarely have the scrap to spare for it. While this wasn't an especially Pre-igniter friendly weapon setup here, no Flak II + Glaive Beam combo or anything like that, getting in the first salvo instantly at the start of each battle is a pretty huge edge. I actually forgot to fire many times, sitting there with weapons fully charged at the outset of a fight doing nothing! Heh. Force of habit at work there.
I ended up with a lot of scrap on this run:

Like, a whole lot of scrap. Normally I'm scrambling to keep everything on the ship running one step away from disaster; for this game, I had more money than I had things to spend it on. Level 8 engines is a huge waste of scrap - the last two levels cost 200 scrap for 6% extra evade - but I had the scrap, so why not? Even with that outlay, I could still damage buffer every system and take Piloting + Medbay to level 3, neither of which was necessary. Technically I was still a long distance from completely maxing out the ship though; curse you Drone Controls with your eight levels!
The flagship did not pose much of a threat this time around. I fired a Pre-ignited volley as soon as the flagship's initial cloaking wore off, and with Hacking on board, that was a guaranteed 3 damage getting through plus a Hull Beam across four rooms. You might notice that I disabled the missile weapon on the flagship in my initial volley, and I haven't even needed to use my own Cloaking unit. I've gone back and forth on whether it's better to focus on the flagship's Shield room, to take out their defenses and get the battle over faster, versus trying to disable the missile launcher, the flagship's most dangerous weapon. Here on Hard difficulty, the AI crew will repair the missile weapon pretty quickly, so it's quite different from Easy or Normal where smashing out the missiles is almost always the best tactic. If I can get a guaranteed knockout of the missiles using Hacking or beams, I'll typically go for it now. If not, I'll pile all my shots into the shield room since I don't know how many will be getting through, and then decide where to aim the second volley depending on what happens. In this situation, I fired the Hull Laser and Crystal Burst against the shields, and used the Heavy Crystal (2 damage) + Hull Beam (1 damage) to eliminate the missiles. This picture came after the second volley, which crippled the rebel defenses and essentially ended the battle. No damage taken in the first phase.
The second phase was even easier, since I didn't have to work around the flagship's ability to cloak. The first Pre-ignited + Hacked volley took out the rebel missile weapon again, and I'd never see a single missile in either of these first two phases. That left my own cloaking available to dodge the drone surge, and effectively removed all danger. I was doing so much damage that the battle nearly ended before the flagship could get off its drone surge. Zero damage taken again.
The third phase was a bit trickier since I had to get through the Zoltan supershield. There would be no immediate removal of the flagship's missiles this time around, and despite the Defensive drone + Cloaking + max engines, some of the rebel shots would get through this time around. Not many, of course. I hadn't managed to kill too many of the rebel crewmembers in the first two phases, which meant five or six of their marines beaming aboard throughout this final phase. However, my crew was extremely strong in melee combat this game, with 3 Crystals and a Mantis and a Slug all available for combat duty. With that many hands on deck, plus the maxed out level 3 Medbay for fast healing, the rebel invaders didn't achieve much of anything either. I can't remember who was hit by Mind Control on my side; I think it may have been the Zoltan? In any case, this was about as easy as the final phase ever gets and I won with 4 total damage taken:

I actually messed up the micromanagement and failed to have my Defensive drone powered for one of the missile volleys. This could have easily been 1-2 damage taken if I had played it a bit smarter. With really good evade luck, it could have even been a perfect flagship battle. Regardless, it was a dominant victory, and it's always fun to crush the final boss like soft putty in your hands.

This run came in as my second highest score to date at 6436 points. I think that it would have taken the top spot with a little more encounter luck in the Hidden Crystal Worlds; I only fought two battles in the whole area. This run never managed to find Long Range Scanners, which makes the high score that much more remarkable. For the curious, the Scrap Recovery Arm augment does not boost your endgame score, so that did not factor into this result (aside from the benefit of having tons of money to spend). It was noteworthy that I did set a crew record for most jumps survived with my pilot, and I ended up one beacon short of the most visited. All in all, it was a very memorable run.
So there you have it, the story of my first encounter with FTL's secret easter egg, the Hidden Crystal Worlds. I love the fact that the secret sector is encountered so rarely, as it really makes it special to come across the place. I'm still hoping to get back there with a Livestream run at some point, and I want to find one of those Heavy Crystal II weapons in a store! It's too bad that I wasn't recording when this run took place. That said, the Crystal A run that I've linked at the top of this page was also a pretty amazing run. It also made the top five ranking on my High Score list, and I somehow wound up with the following weapons combo: Burst Laser II, Burst Laser II, Burst Laser I, Burst Laser I. Ten total shots per volley on a twelve second cooldown. Do you like pew pew pew action? Go check it out! 


