
For The King has three different game modes to choose between. Two of these game modes tend to function similarly, the main game mode and the Dungeon Crawl mode. In both cases, the player works to explore the landscape and ultimately clear out a series of dungeons before the ticking chaos meter gets out of control. The main game mode has a bit more structure to it than Dungeon Crawl mode, but in both cases the fundamental rules of the game remain essentially the same. The third of the three game types, Frost Adventure, takes things in a different direction entirely. I'll be exploring the Frost Adventure mode in some detail in this game writeup, on the highest difficulty level of Master.
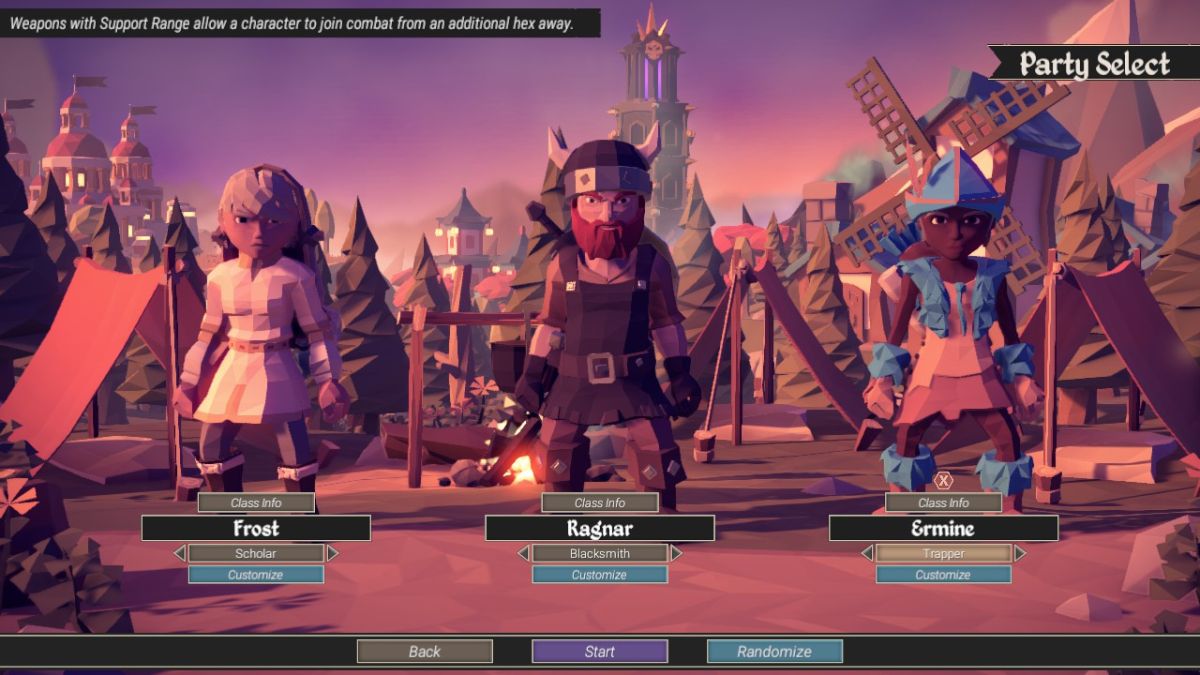
Frost Adventure Mode
Scholar, Blacksmith, Trapper
Master Difficulty
I chose to feature three different classes on this playthrough than the ones I used in my Tutorial game. The first of these was the Scholar class, represented here by the character of Frost. Scholars are an Intelligence-based class like the Herbalist that I took in my previous adventure, but they give up the Party Heal skill in favor of an ability known as Refocus. This grants the Scholar a percentage based chance (half their Intelligence) to gain a point of Focus back at the end of each turn. Refocus is one of FTK's best abilities and can be reliably counted on to restore a point of Focus almost every other turn, although it doesn't work in bad weather or when the Scholar is poisoned. Since the Scholar also brings the game's highest starting Intelligence stat (78) and excellent Speed (70), this is one of my favorite classes. It's not far behind the Hunter for the title of being the game's best class.
My second character, as represented by Ragnar, was the Blacksmith class. This is a Strength-based class with excellent Strength (76) and the game's highest starting Vitality score (80). Blacksmiths deal good damage and have a lot of health. The special class ability is Steadfast, which gives Blacksmiths roughly a 15% chance to take no damage when hit with an incoming attack (it does require having a shield equipped). However, much of the advantages of this class goes up in smoke due to the terrible Speed stat on the Blacksmith, the worst in the game at only 56. The Blacksmith will routinely take his or her turn after the monsters have had their actions, and that's a serious drawback indeed. While I like this class and their ability to tank damage can make Blacksmiths handy to have on a team, I don't consider this to be one of the strongest options.
Finally, I brought Ermine along in the final spot as a Trapper. This is an Awareness-based class and is essentially the alternate version of the Hunter class. Unfortunately, the Trapper is inferior to the Hunter in almost every way, with lower Awareness and lower Speed in the two most important stats, and then lower Vitality, lower Strength, and lower Intelligence as well. The only stat advantage that the Trapper has over the Hunter is in Talent, where the Trapper has a high enough base score (72) to use Talent-based weapons if desired; this is about the only positive thing that I can say about the Trapper class. The innate abilities of the Trapper are mostly useless. They get the "Elite Ambush" skill which makes it easier to Ambush opponents, but I've found in practice that you're still only looking at roughly 50/50 odds to get off a surprise attack, and since the penalty for failing is the enemy getting an extra attack instead, I haven't found it worthwhile even with a Trapper. The class also has "Elite Trap Disarm", which also doesn't matter much because it's pretty easy to disarm traps in general. In contrast, the Hunter gets "Elite Sneak" to skip out of unwanted combats, "Energy Boost" with roughly 40% odds to get an extra movement point each turn, and "Called Shot" that grants 10% odds for a perfect attack roll and critical hit on every attack with a bow. Long story short, the Trapper is inferior to the Hunter in pretty much every way possible, and there's virtually no reason to take a Trapper outside of playing a variant challenge. This is probably one of the few times that you'll see me using this class.
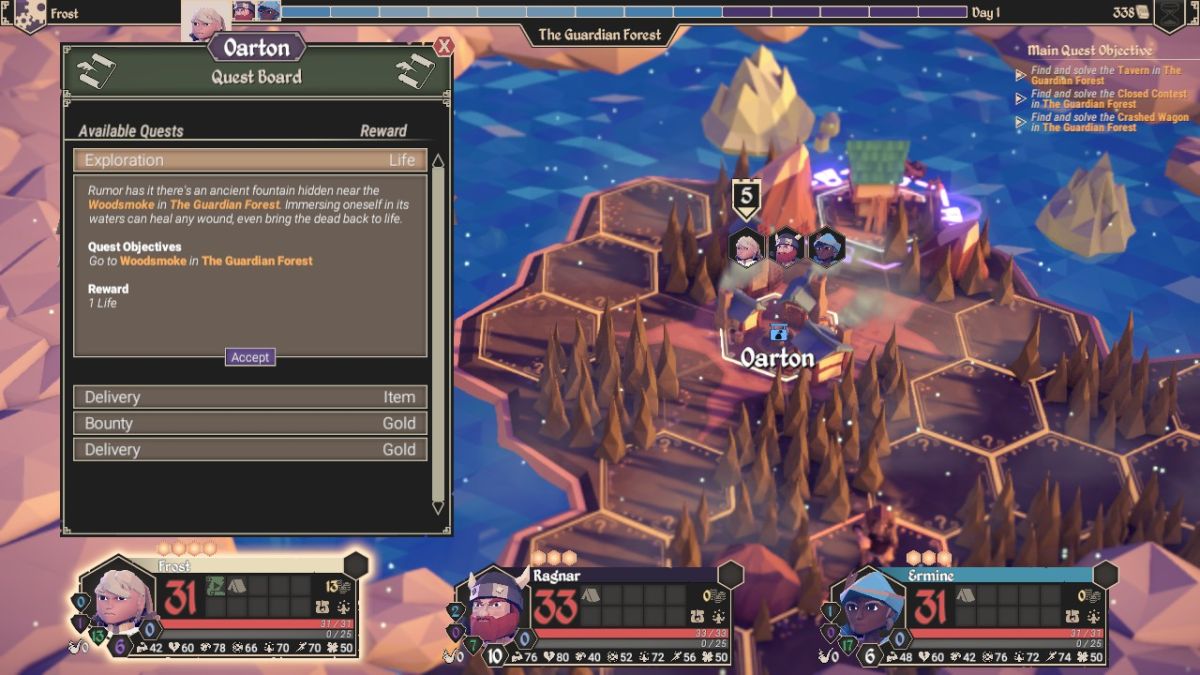
Frost Adventure opens in a snowy version of the Guardian Forest. The initial quest is to collect three objects hidden in the starting area which can be exchanged for a boat deed at once of the docks. This is a nice change from the base game where the boat has to be purchased, although it also does lock the acquisition of the boat behind storyline quest progression. In practice, the player will spend the opening portion of the game doing the same things as usual, exploring the Guardian Forest and tracking down the plot devices needed to progress the game further. Unlike the normal game mode, the Guardian Forest is always an island region in Frost Adventure and it's impossible to enter any other part of the map until finishing the quest and obtaining the boat. At least this keeps players from stumbling into more difficult parts of the map by accident.
The biggest difference of Frost Adventure mode can be seen immediately at the top of the screen: there's no chaos meter to worry about. Chaos as a concept does not exist at all in this game mode. This makes Frost Adventure the easiest of the three game modes by a wide margin; the player can take things slowly since there's very little need to rush anything. (Again, imagine playing FTL with no rebel fleet for a good comparison.) The designers compensate for this by making the map itself hurt your characters: any turn that a character ends outside of a town deals damage to them, starting at 1 point of damage and eventually reaching 5 points of damage later on. However, this just isn't all that dangerous and it's relatively easy to work around this restriction. I think that the designers thought that this would be a lot more consequential than it actually is. The designers also seem to value equipment that grants health back at the end of each turn much higher than I do; I almost never put that stuff on my characters because +2 HP/turn isn't nearly as helpful as more armor/resistance or more Speed or more primary stat. Designer misunderstanding of their own game is the biggest reason why Frost Adventure tends to be easier than the other game modes.
That said, this was still Master difficulty and that meant that it wasn't going to be a cakewalk. Here on the highest difficulty the party starts with no lives at all. If a character falls, they will remain dead until the player manages to find another party life somewhere. I had the great fortune to pick up a party life as the quest reward in the starting town of Oarton, and it was an extremely easy quest to fulfill: go to the other town in Woodsmoke. I could literally see that village from the starting screen, heh. I took the quest and almost immediately had a small safety margin against potential disaster.

The first thing to do in every game mode of FTK is to upgrade your starting weaponry as soon as possible. (Again, this is very similar to the early gameplay of FTL where improving weapons is usually the top objective.) Most classes begin the game with a weapon that deals either 6 or 7 damage, while there are better weapons for sale in stores that typically have a damage of 9 or 10 points. It doesn't take a mathematical genius to see that increasing the damage of your characters by roughly 50% is a huge improvement over the starting armaments. In this game, I was able to pick up a Dull Spear right away for Ermine to take her damage from 6 up to 9. The Dull Spear also had only two Awareness checks per attack as opposed to three Awareness checks, raising the total expected damage per attack from (0.78 * 0.78 * 0.78) * 6 = 2.84 to (0.78 * 0.78) * 9 = 5.48. In other words, the Dull Spear was about twice as good in total damage output. However, the Dull Spear had the Breakable property (the shattered icon in the top left corner), which meant that on a critical failure (all misses), it would break into pieces and become unusable. There was about a 5% chance (0.22 * 0.22) of that happening on any given round of combat. Since the Dull Spear was extremely cheap to purchase at only 10 gold cost, I figured it was worth it to play the odds for the moment in the hopes that the spear would avoid breaking. If it did, I could always go back to the default starting Trapper weapon.
Ragnar had a more reliable option in the form of the Rusty Knife. This was one of the rare weapons that used Vitality for the stat check instead of one of the game's four primary stats, but that worked perfectly for Ragnar since his Vitality was even higher than his Strength. The Stab attack on the Rusty Knife ignored armor and came with 5% critical strike chance plus, best of all, a huge +7 to Speed, something that Ragnar badly needed. His damage actually went down from the 10 damage on the Blacksmith's starting hammer, but that weapon had four Strength checks on it so effective damage went way up (from 3.33 to 7.20). I was more than happy to pay 8 gold for that much of a weapon upgrade. Unfortunately neither of the two initial towns had any Intelligence-based weapons for sale, and Frost was forced to stick with that 6 damage Scholar's Book for some time to come.
Note what else wasn't for sale in either of the two starting towns: Godsbane herbs. The healing herbs are quite rare in Frost Adventure mode, although the game makes Tinder Pouches much more common to compensate somewhat. I had to hope for the moment that I could make it through the Guardian Forest with zero healing herbs on hand. Hey, it could be worse: without that friendly initial quest that gave me +1 party life, I wouldn't be able to revive anyone if they died!

With that in mind, I took my time carefully clearing out the forests to the east of Woodsmoke, returning frequently back to the inn for healing whenever anyone dropped below 20 HP. I was working through the wilderness in clockwise fashion, first moving along the northern coast and then heading south when I ran into the impassable rock wall that formed the boundary of this region. This Sanctum was the first item of real significance that I found while exploring. It granted the recipient +2 max focus and, more importantly, the chance to survive one killing blow at the cost of losing the Sanctum's benefit. It worked out that Ermine was in the best position to grab the Sanctum, and she was a good fit for the benefit too. Honestly though, I would have given it to anyone, even Frost who had the least need with her Refocus ability. On the highest difficulty, it's the protection against dying that you really want. I would never hold off on taking a Sanctum in the hope of finding one with a more perfect fit for a character later on. Party lives are too hard to come by.

Further off to the west was this collection of enemy Beastman camps. Note the way that I have my characters positioned here; they would be pulled into any fight within two tiles of the battle, and all three of them are able to join a combat against either of the two camps. I was also fortunate enough to have a Healing Wagon nearby and the town of Woodsmoke not too far away for the healing that would inevitably need to take place after fighting through these encounters. Gold is very scarce at the beginning of the game and Beastman opponents tend to be a good source of income. I was also able to capture the Steadfast ability kicking in for the first time against one of these camps:

There it is in action, blocking an otherwise successul blow and taking zero damage as a result. Interestingly, the FTK Wiki page states that Steadfast as an ability has a higher chance of appearing when an incoming attack would deal a larger percentage of the Blacksmith's health. In other words, the more damage the Blacksmith is facing from an attack, the more likely Steadfast will appear, although it never gets higher than about 20% odds no matter what. This was a very timely instance of the ability appearing, stopping a four slot enemy attack that likely would have dealt about 10 damage. Ragnar was one experience point away from leveling up here, and I was hoping to get him through this fight without needing to return to the inn for healing since he'd get some HP back when he hit Level 1. Frost and Ermine had already reached the mark. They were all just starting to get defensive equipment via item drops, which led to odd things like Ragnar wearing a Talent-based plumed hat for lack of other options. Better than having nothing on!
If you look back at the overhead map image above, you'll see a building with an orange roof near the cluster of Beastman camps. This is the location of the Tavern, one of the quest objectives at the start of Frost Adventure mode. Unlike the other two items that your party is tasked with finding (where nothing happens beyond picking up a plot token item), entering the Tavern results in a battle against a group of Level 1 pirates. The first time that I ever played a game on Frost Adventure, I was thrown off by picking up the other two quest items and had no idea that the Tavern would spark a battle. This nearly got my party killed in that game - thanks for the lack of warning, FTK!  This time, I knew very well what was coming and didn't enter the Tavern until the party was at full strength and everyone had reached Level 1.

The Tipsy Pirates inside aren't too bad as long as the player knows that they're coming. They have no armor or resistance and use mostly physical attacks. Here you can see the results of their first round of combat, which put a pretty good hurting on poor Frost. The good news was that Frost and Ermine had reduced the central pirate down to 10 HP remaining, and Ragnar's stab attack with that Rusty Knife did exactly 10 damage. With only a single Vitality check on the dice roll, I could invest a point of Focus and have 100% odds to succeed here. Similarly, if you can get a stat to 90 or above, a single point of Focus use will guarantee a perfect attack roll since Focus provides a guaranteed success on the first check and then +10% odds on all future dice checks. (This is why most of the game's big attacks have negative accuracy associated with them, as otherwise one point of Focus could instantly turn them into perfect rolls for endgame characters.) Anyway, the pirates weren't too bad and I was able to get through this fight without anyone dying. The team beat a retreat back to Woodsmoke for healing afterwards before continuing on further to the west.

After fighting more of the local inhabitants, eventually my party made their way to the western coast and found the final quest item in the form of the Closed Contest. This allowed my group to pick up a boat at one of the docks along the coast, and one of them was fortuitously located close by. This effectively ended the tutorial portion of Frost Adventure mode, and now I could sail across the northern sea to reach the icy continent where most of the action would take place. I also wanted to highlight Ermine's setup here; her Dull Spear had inevitably broken after I had received more than my money's worth from the item. Rather than swap back to the starting spear, I had Ermine use this lute that had dropped instead. The Barbat was a Talent-based weapon of course, and I had furthermore found some gear that gave additional small boosts to the Talent stat. With them equippd, Ermine was able to reach a score of 75 in the Talent stat, which is roughly the threshhold for making a weapon viable to use on a regular basis. I would have preferred an Awareness-based weapon for her to wield but this would function well enough for the moment. The slow effect on the primary Ritardando attack was especially nice to have, although Ermine would typically need to use a point of Focus to have a realistic chance of landing a perfect roll.
I stayed in the Guardian Forest for a little bit longer after picking up the boat, long enough to get Ragnar up to Level 2 with the rest of the party. I went back and checked both towns to see if they had any healing herbs for sale, and nope, no such luck. With those errands finished, it was time to sail north across the ocean to the continent on the other side. I was looking for a town in the Shivering Woods and had the good luck to find Icy Hollow relatively quickly, located along the coast:

The gimmick in Frost Adventure mode is that the towns outside of the Guardian Forest are under siege. In order to use the resources of the town, the party must break the siege by winning three separate battles against increasingly difficult opponents. Here in the Shivering Woods, the towns are under siege from Goblins that are mostly Level 2 and Level 3 opponents. The player has a chance after each battle to keep going with the next one or stop and move away. I've found that this is typically a good place to use a Tinder Pouch to set up camp and heal before, during, and after combat. Since the Tinder Pouch will last nine total party turns (three full rotations through the order), it allows the party a chance to go into these battles at full strength and then save the cost of healing in the town afterwards. With Tinder Pouches being readily available for purchase in this game mode, there's no need to be overly stingy with them. (In contrast, I had still found only a single Godsbeard herb to date in a random drop after a battle.) I felt comfortable taking on the monsters sieging Icy Hollow:

Frost had finally gotten her hands on an upgrade to a fire-based tome (the Burnt Tome), and here at night in the frozen reaches of the northern continent, the graphical effects were pretty awesome to watch. I rarely use the area of effect attacks in For The King since it's usually better to drop one enemy at a time. You never know when you might get a series of bad dice rolls on an individual attack, and therefore I'm content to allocate "too much" damage to an individual opponent to protect against underrolling and leaving an enemy barely alive. In this situation, I could splurge on Focus with the Tinder Pouch camp next door and use two points to ensure a hit with this attack, putting all of the Goblins into burning status. They didn't last much longer after that.
The combat above had been the second battle outside Icy Hollow, with the first one having gone very smoothly. The third and final combat proved to be significantly tougher:

I don't remember the exact specifics of this fight, only that Frost ended up getting poisoned and then focused by the enemy attacks until she fell down to a mere 4 HP remaining. This was at the tail end of the battle, and I only needed a couple more attacks to finish off the final Goblin Assassin, and yet it was clear that the monster was going to get in at least one more attack before I could defeat it. There was only one realistic option for saving the life of Frost: have Ragnar attempt to Taunt the enemy. Taunt is an attack tied not to any particular class but to shields; anyone who equips a shield can normally use Taunt as an attack. Note that most of the Intelligence-based weapons require two hands, as do lutes and bows, so anyone who wants to go with more offensive power loses the option to equip a shield. Taunt always uses Vitality as its ability check stat, and that means that in practice it's usually only viable for a Blacksmith or Woodcutter to make use of this attack. For that matter, even if a Minstrel or Scholar had the chance to use Taunt, you probably wouldn't want them taking hits anyway.
The default Taunt attack requires two Vitality checks, and does nothing if either of them fails. If it succeeds, enemies will direct their attacks against the Taunt user, who will also get an additional +5 armor and resistance in the process. I've found that you don't want to use Taunt too often as an ability. The party needs the damage output of all three characters to be effective, and you can't afford to waste too many rounds doing something other than killing enemies. (This is also why the "evade up" and "armor up" and so on abilities aren't as useful as they seem; you typically prevent more damage by attacking and killing enemies than by buffing your characters.) However, in a situation like this where it's vital to keep someone alive, Taunt can work like a charm. Ragnar successfully drew the attention of the Goblin Assassin and Frost survived with 4 HP remaining. Whew! Thank goodness that poison decreases stats instead of having a damage over time effect in this game. Frost survived by the slimmest of margins and I kept my one party life intact.
I pasted in an image of a nice Strength-based weapon that had dropped for Ragnar from the previous battle; he had actually been using it in the pictured combat. This Goblin Blade had another Speed bonus on it as well as notably higher damage than his previous dagger. It didn't have the armor piercing property though, and I was hoping to find another weapon with that eventually. The Goblin Blade also had the chance to shatter, although that was very unlikely to happen since it would require three misses in a row (about 1% odds). Far from impossible though. Once Icy Hollow was saved and open for business, I picked up a new Yew Staff for Frost that had the Party Heal ability on it. Even better, this town actually had Godsbeard herbs for sale and I picked up the maximum amount of three. Yay!  I used some more of the gold from eliminating those goblins to upgrade the pipe level of the group. If I could find a few more healing herbs, I'd be in business.

Speaking of party lives, there was a Fountain of Life located just outside of Icy Hollow to the east. The Fountain of Life is an encounter only found in Frost Adventure mode, and outside of getting a party life as a reward from a quest (which happens VERY rarely), this is the only way to get additional party lives in this game type. The ability check for the fountain is Speed, and that made Ermine the one to use here. Since the reward is so priceless and the penalty for failing is a battle, this is a place where you shouldn't screw around. Dump in as many Focus points as required and get that result up to 100% if possible. With Ermine's zippy stat of 86 Speed, this was easily accomplished by investing two points of Focus. Note that Frost also could have gotten this done by using four points of Focus and simply brute-forcing through the dice rolls. That would have been worthwhile to do if no one in my party had much Speed. Focus can be restored at any town using the Meditation option whereas party lives are extraordinarily difficult to acquire. That's an investment well worth making.
With no chaos meter to worry about, the only thing that I had upcoming on the timeline was the appearances of future scourges. I had seen the impending arrival of the Foul Priestess up there, but I had no idea where she was located and figured that I'd have to wait until her ability kicked in to find out where she was hiding. (One nice gesture on the part of FTK is that scourges are revealed on the map when they activate.) By dumb luck, I happened to stumble across the Desecrated Church a few turns later while exploring the eastern coast of the Shivering Woods:

Her ability is a particularly nasty one, with a small chance each turn to destroy the Sanctums protecting your characters. I was fortunate that her lurking ground was so easily accessible from the coastline. In the battle that followed, the Foul Priestess managed to get off one of her annoying Focus-draining attacks. Those can be no big deal if your characters are near a town and can restore them quickly, and a huge pain in the rear when out in the wilderness. This battle wasn't too bad, and although Ragnar was targeted by multiple attacks he managed to limp out of the encounter with 14 HP remaining. No party deaths, no Sanctums lost. I turned the boat around and headed back to the Icy Cellar for healing.
After getting fixed back up to healthy status, I used the one Vision Scroll that I'd found thus far to reveal the interior of the Shivering Woods:

There were several different objects of interest within the revealed area. First of all, I was able to spot the location of the other town in this area. Unfortunately Ravenhook had a horribly inconvenient location, as inaccessible from the southern coast as Icy Hollow was accessible. I wanted to get up there and break the siege of the village to see what it had to sell in the market, but it wasn't a place that I would be visiting very often afterwards. There was also a Sanctum hiding out in the middle of the area in an awkward spot, which I would make a special effort to visit. The gold color meant that it was the Sanctum of Wealth: +20% passive gold generation for the tributer. With no Minstrel or Busker in this party, I had no items equipped with extra gold percentage and it seemed like a good idea to grab this for someone in my party. Finally, I also spotted a Level 3 Snow Cave along the coast a short distance to the north of the Desecrated Church where I had fought the scourge. I headed there next and cleaned out the cave without issue, not needing to use any of my scant healing items while also not finding anything of particular interest inside. It did bring everyone up to Level 4 though.

After returning to heal yet again at Icy Hollow, my party headed for Ravenhook in the hopes of breaking the siege. Every turn ended in the Shivering Woods costs your characters 3 HP of cold damage, which means that traveling on the ship is always preferable to traveling on land. This caused me to sail over to the east where the overland distance was shortest, and then I was diverted further to the east when an enemy Crag Beast blocked the most direct route. This caused me to stumble into a scourge again, although not the one that I was expecting. I thought that I would see the Royal Droll since that was next on the timeline. Instead, it was Deimos in his Ancient Quarry that I had found here, and I realized that I could save myself a lot of time by wiping out this threat now instead of leaving it to fester for later. Furthermore, I was planning to use a Tinder Pouch anyway while breaking the siege of Ravenhook, and I could pair that together with the Deimos fight to heal up from both. Therefore my party went inside to face the scourge:

I've had a healthy respect for Deimos ever since he smashed my party in the Tutorial game. He's one of the few scourges that never has any accompanying minions, and compensates for it by having stout armor/resistance and by using attacks that target the whole party. Pictured above was Deimos rolling a perfect four slot attack that hit everyone and inflicted Shock status at the same time. Fortunately I had Focus points available to counter that status debuff (you can get past the guaranteed miss that Shock causes by using a point of Focus to force it to succeed instead), and I also had enough piercing attacks to shred through the scourge's defenses. While this screenshot might look bad, Deimos wasn't able to get anyone close to death and I won the battle with everyone over half health. I moved over to Ravenhook and used a Tinder Pouch for healing:

This is the message that pops up when the player attempts to break the siege. Clearing the monsters out of Ravenhook was easy, as it was the identical three battles against goblins that I had faced outside Icy Hollow earlier. This has never varied in the several different times that I've played Frost Adventure mode, always the same three battles for each siege in the Shivering Woods. What I wanted to highlight with this image are two things about the tactical setup for this combat. First of all, the weather was raining at the time and that meant that the range of the battle was only a single tile instead of the normal two tiles. I realized that this placed the party members resting at the Tinder Pouch camp outside the range for the fight. As a result, I equipped Frost and Ermine with "support combat range" items to ensure that they could take part in the battles despite being outside the normal range. It's always handy to keep a weapon or item on hand for these situations in each character's inventory, just like holding onto equipment with various status immunities for similar situations. You never know quite when something might come in handy.
I found to my disappointment that Ravenhook didn't have any healing items for sale either. I was able to replenish the Tinder Pouch that I had used outside and that would be it. While I was in the area, Ragnar grabbed the Sanctum of Wealth and equipped the Lucky Coin ring, which together gave him +35% gold generation. This made it a lot easier to stay ahead of my expenses and not have to worry so much about running out of money, always a fear in FTK. I also went through another Level 3 Snow Cave, in large part because my party was spread out and running the dungeon allowed me to group them all together again. I found one item of importance there:

The Sturdy Dagger was the upgraded form of the Rusty Dagger that Ragnar had used at the start of the game. This item basically had everything that he could possibly want in a weapon: good damage for this stage of the game, armor piercing property on the main attack, a single Vitality check that synergized well with his 80 score in that stat, +15% critical strike chance, and then that magnificent +10 Speed. Together with his other equipment, I was able to get Ragnar all the way up to 75 Speed with the Sturdy Dagger equipped. He was almost as fast with his +19 Speed from gear as an unequipped Hunter, heh. Anyway, this was a really nice find for him and if the damage were just a little bit better, I would have happily used it for the rest of the game.
The other weapon that I edited into the above picture was a purchase back in town. I've played FTK enough by now to have particular weapons that I like and dislike, and the Rapier has quickly become one of my favorites. I've used this as an endgame weapon for several Minstrel characters right up to the last boss in the main game mode. The Rapier has many of the same properties as the Sturdy Dagger: good damage, an armor piercing attack (although as a secondary alternate attack on the Rapier), a high crit chance, and a Speed bonus to boot. The only problem here is that I didn't have any Talent-based classes to pair it with. I decided that the weapon was simply too good to ignore though, and had Ermine switch back over to her Talent-based gear. This was enough to get her back to about 75 on the Talent stat, usable if not great. The armor piercing "Precision Stab" attack only had 65% odds on each of the three Talent checks (expected odds of a perfect roll = 27%), which pretty much necessitated using a point of Focus if I wanted to have a decent chance of the attack succeeding. Still, with the Sanctum of Focus in hand that was very much doable in most situations, and the damage was almost double what Ermine had been doing with her previous Short Spear that had 12 base damage. The high Talent stat on the Trapper class is pretty much the only advantage it has over the Hunter, and I figured I might as well take advantage of that.

I knew that I had to deal with the Royal Droll next, my least favorite scourge in the game. The problem had been that I didn't know where the Black Well was located, and I'd been exploring throughout the Shivering Woods without any luck in finding it. It eventually popped up on this island off in the west, in a part of the Frigid Sea that I hadn't visited at all yet. This was the area where the two Ice Shrines were located, the two main dungeons in Frost Adventure mode before heading into the final endgame peak. Both Ice Shields are optional and can be ignored if desired, although completing them will grant the party some useful endgame weapons. I had plans to visit them a little bit later. For the moment, I had to deal with the scourge. I made one serious mistake when I triggered the battle: I forgot to put on my anti-confusion gear. Ack! 

I was able to kill off the two Backup Band members that accompany the scourge at the start of the fight, and then things started to get a little weird. The Royal Droll used his Confusion attack and managed to hit my whole party with the status debuff. Ragnar and Ermine didn't do anything too stupid, but Frost decided to run away from the combat on full health. Argh, that was annoying. At least none of them used important consumable items and wasted them. That left me with only two party members left, and the Royal Droll hit them with a Shock debuff to mess with their attack rolls. The scorge had enough armor that my attacks didn't do very much without landing the armor piercing property, and the Shock debuff was causing some serious problems there. Fortunately I had enough Focus remaining to push through the Shock and land a couple attacks like the one above, after which the evil jester collapsed in a heap. This scourge doesn't have much in the way of health and relies on its various debuffs to confound the party. I really hate dealing with this guy and it's always a relief to eliminate the Royal Droll from the map. Good riddance.
Continued in Part Two on the next page...


