
For my ninth solo venture in FF5, I decided to undertake an in-depth comparison between the game's two offensive magic users by playing out the quest with a Summoner. These mages call upon various legendary creatures to show up and fight for them, and the character class is one of the most popular staples of the Final Fantasy universe, appearing in pretty much every single game since Final Fantasy 3. Some of the later Final Fantasies even based the entire combat system around summons (which was not a very good idea, to be honest...) In this particular game, nearly all of the summons use attack magic of one kind or another, and the Summoner occupies a nearly identical role to that of the Black Mage. By playing out a solo game with both, I intend to evaluate their strengths and weaknesses, figuring out the best job to use in each situation.
The biggest difference between the Black Mage and the Summoner is that the former buys his spells in stores, while the latter has to find and defeat various monsters, who can then be called upon to serve the Summoner. In terms of which makes for more interesting gameplay, the Summoner has the Black Mage beat hands down here - buying spells from stores is lame! Another fundamental difference is the fact that most Black magic spells can be cast either against a single target, or multi-targeted against all foes, with the damage multiplier getting cut in half when choosing to hit all opponents. Most Summon spells automatically hit all enemies at once, with no decrease in damage. So Summon magic is better, right? Well sometimes, but Summon spells also generally cost a lot more magic points to use than Black ones, and if you're only facing one opponent, you're not gaining any benefit, are you? Thus the overall guiding principle for comparing these two classes: Black Mages are generally better at dealing with single opponents, Summoners are generally better at dealing with multiple opponents. That's not always the case, but it works for most situations.
There aren't a lot of great Summoner names outside of the Final Fantasy canon, but I could think of one that came to mind: the Summoner from Diablo II. You know, the guy in the Arcane Sanctuary with powerful spells and extremely low hit points? Those traits suit the FF5 Summoner to a tee as well! Therefore, my character bears the same name in tribute to that individual. Furthermore, Horazon wasn't initially a villain, at least not before Diablo 2 raped the story from the original game. Here's how Horazon is described in the background story from the original Diablo's instruction booklet:
"This jealousy of Man led to harsh, atrocious acts of violence by the demons against the mortal realms. Some men learned of this deep hatred and used it against the denizens of the Underworld. One such mortal, Horazon the Summoner, delighted in summoning demons and then breaking them to his will. Horazon, along with his brother Bartuc, were members of the Eastern mage-clan know as the Vizjeri. This mystic clan studied the ways of demons and had catalogued their lore for generations. Empowered by this knowledge, Horazon was able to take the work of the Vizjeri and pervert it for his demented purposes. The denizens of Hell sought revenge against this bold mortal, but Horazon managed to keep himself well protected within his arcane sanctuary."
OK, maybe not perfect, but close enough for our purposes here. (Bet you didn't know that Bartuc the Bloody was mentioned in the original Diablo's lore, eh? Andariel and Duriel are in there too. Wonder if we'll see the forgotten Lesser Evils, Azmodan and Belial in D3...) But enough of that. Let's get started:

That's Horazon, not "Horizon" or anything like that - darn you, six-character limit on names! Close enough in this case. In comparison to the Black Mage, the Summoner has even less Strength and slightly higher Magic Power to compensate. They are nearly identical on the whole, of course. As it turns out, the Summoner has the lowest Strength of any class in the game! This wouldn't be an issue, except for one thing: you do not get access to any Summon spells until reaching Worus, as Summoner is not one of the game's starting jobs. This means that the solo Summoner must get through Karlabos, the Ship Graveyard, and North Mountain with nothing but a Dagger and a whole lot of courage.
Goddamn it. 
*SIGH* OK, the beginning sections of this run will be the most difficult part of the entire variant. Horazon needed to get all the way to level 15 just to pick up a fourth attack multiplier, which is unbelivably sad. The Monk gets the same damage multiplier at level 5! I then took Horazon up another level, to 16, where he received a "free" bonus multiplier due to a complicated bug in the way that knife damage is calculated. Throughout this lengthy ordeal, I had also done a bit of fighting in the Wind Shrine, eventually picking up 6 Elixirs in drops from the random Wind Mold enemies. With this ridiculous amount of preparation, I could finally face off against the second boss in the game:

I don't think words can adequately express how much I hate the Karlabos encounter. This guy is so ridiculously cheap in every way, it's not even funny. Even with Elixirs on hand to counter his Tailscrew attacks, Horazon still got killed an unbelievable number of times. Tentacle's paralyzing effect had me tearing my hair out. At roughly 80 damage per attack, I needed nine successful hits to defeat the boss. That... was a lot of attacks. I didn't keep track of how long I faced off against Karlabos, but it was quite a while. Over an hour at the very least, each encounter usually lasting 30-60 seconds before Horazon was taken out by a cheap combination of moves. Eventually, after much, MUCH grief, the damn lobster went down. It was not skill, it was due to getting lucky in what moves the boss picked, pure and simple.
Enormously grateful to have that encounter out of the way, Horazon moved on to the Ship Graveyard. The enemies here didn't pose any particular difficulties, and it helped that he was over-leveled quite a bit compared to my normal solo pace. Siren, however, proved to be a real pain. She kept getting off her triple buffs of Haste, Slow (on Horazon), and Armor, which combined to make her 4x faster than Horazon could react, and taking half damage from his physical attacks. That was a bad combination, to say the least!
I did some experimentation with back versus the front row, and determined that it was better to stay in the front row and absorb the extra punishment. The longer the fight went on, the more likely I was to lose; better to gamble and get things over with quickly. (A lot of my solo characters have found that this is the best way to get through tough spots.) By timing Horazon's attacks to hit Siren's human form the instant she changed back, drinking four Elixirs for healing, and fighting the battle multiple times until Horazon avoided getting hit by Slow status, I was able to emerge victorious after some difficult fighting. This took experimentation and skill to pull off with such a weak melee character.
So far, the comparison was tilting enormously in favor of the Black Mage. Fair or not, Black sailed through these bosses by having access to Bolt and Fire spells. I'm going to have to go through something similar with the Time Mage eventually, but that's the last time I endure this early agony!
Horazon picked up the hidden Ice Rod in Carwen, which was important for my upcoming plans. After fighting his way with Dagger through the random critters on North Mountain, Horazon broke out the big artillery for the boss at the end:

Goodbye Ice Rod, and goodbye Magisa! Rather than suffer through another tedious encounter with Horazon's pitiful melee attack, I took the easy way out and broke the rod here. The alternative would have involved farming more Elixirs, and generally suffering through a really tedious grind. No thanks! Now I could take Horazon to Worus, and actually buy some Summon spells for a change. Imagine that, the Summoner actually getting to use magic! 
The three spells available were Chocobo, Sylph, and Remora. Chocobo summons one of the adorable little creatures, who appears and does a non-elemental magic attack of rather weak strength. The magic attack of this spell is 30, or roughly halfway between Fire 1 (15) and Fire 2 (50). Rarely, Chocobo summons the "Fat Chocobo", which deals huge damage to all enemies! Only 8% odds for that to happen though. Sylph has the same magic attack strength as Chocobo, but in addition to dealing damage, it also drains 1/4 of the damage inflicted and uses it to heal the caster. This can be useful in a number of situations. Remora inflicts Paralyze status on the target if it successfully hits, which also comes in handy against some bosses. There are very few Paralyzation attacks that the player can use; the status effect is much more commonly used by the monsters against you. I can only think of the Mediator's whips as another place where that pops up off the top of my head. Anyway, for first-level spells, there's a lot of variety here. Oddly enough, unlike most Summon spells, all three of these summons target a single enemy only.
A mixture of Chocobo and Sylph got Horazon through Worus Tower, and he drained his way past Galura at the top with the help of Sylph. Technically this was easier than Black's venture, as he broke an Ice Rod to get past Galura, but I didn't know what I was doing back then, and could have done the battle strictly with Potion use. Nevertheless, I have to concede that this area was slightly easier for the Summoner compared to the Black Mage.
Horazon walked to Karnak, upgraded his armor, and bought one of each type of Rod. Then I walked him back to Worus Castle, and prepared to grab his first real summon:

Shiva, meet your new master! The Shiva encounter is way too hard for a solo Summoner at this point in the game, so I again took the easy way out and broke a Fire Rod to eliminate all of the enemies. You can't even see poor Shiva there, hehe. The Shiva summon is more powerful than Chocobo or Sylph, with magic attack of 38, and it can be powered up further by equipping an Ice Rod (which bosts damage by 50%). Even better, the spell always hits all foes at full damage. With this spell in hand, I felt as though I had started the variant proper. No more mucking around with Daggers!
Shiva pretty much decimated everything in the Steamship, clearing them all out in one casting. The few enemies immune to Ice element were killed with Chocobo summons. Shiva was weaker than the Fire/Ice/Bolt 2 trio, yet because it didn't lose any strength when multi-targeting, the damage turned out to be roughly the same in most cases. The one place where the lower damage was noticeable came against single targets, like Liquid Flame. I wouldn't say she was hard either, as each casting of Shiva did about 900 damage. Just remember to use Chocobo against the Hand form, which is immune to Ice element! Shiva annihilated everything on the trip out of Karnak Castle, killing everything except the Gigas enemies in one casting, and even they went down in two. I had plenty of time to grab the Elf Cape, Guardian Dagger, and all the Elixirs - plus another five minutes left over afterwards! Nice.
For the first time in ages, I had a ready answer to the bosses in the Ancient Library. First, Horazon was able to summon Shiva to face Ifrit:

Each summon did a little over 1000 damage, so three castings and he was finished. Horazon had to drink a single Hi Potion. This was so much easier than some of my recent solo characters, it was almost unfair... Horazon went back to Karnak to restock Potions, then returned for the engagement with Byblos. Now he could summon Ifrit as well, who was almost as powerful as Fire 2 (magic attack of 45). I made sure to have a Fire Rod equipped, and each Ifrit summon did roughly 1300 damage. Three castings and Byblos was finished - not a single healing item needed! Horazon was seriously under-leveled for these fights as well, compared to my other solo characters, just level 22 and 24 for the battles. Unbelievable.
I used the Steamship to purchase some slightly better armor in Jacohl, but the real action was waiting up at Istory. Ramuh, the next summon, can be found in a random battle in the woods outside Istory. I normally skip this fight with my solo characters, since it contributes nothing of value. Obviously a different story for Horazon. I had him fight a few battles for enough gold to buy a Flame Ring, for improved Magic Defense, and then faced off against the boss:

Ramuh uses all lightning spells (duh), the only dangerous move being Bolt 2. Horazon's best option was to continue summoning Ifrit, even though Ramuh didn't have any particular weakness to Fire element. I had to use one Elixir when Horazon's health dropped into the critical range, but otherwise this was a very straightforward battle. Horazon walked away with his third elemental summon, completing his list of second-level magic.
Unlike Shiva (38) and Ifrit (45), the Ramuh summon (53) is slightly stronger in terms of magic attack than the Fire/Ice/Bolt 2 trio (50). Casting Ramuh while equipped with a Thunder Rod thus became Horazon's default attack, doing the most damage to all foes that didn't resist Lightning. It was particularly useful when fighting in the sea and against some of the machine bosses coming up (e.g. Sol Cannon). As far as this part of the game is concerned, the Summoner and Black Mage are about equal. The Black Mage does have the advantage of healing himself with Fire 2 and a Flame Ring, however - you can't summon Ifrit against yourself!
Ramuh was the answer to pretty much all of the threats that Horazon faced for a while. It got him through the Sandworm, Crayclaw, and Adamantium Turtle battles without any serious issues. I did a bit of leveling before facing Sol Cannon, but not to raise gold for an Angel Ring. Rather, Horazon could kill both of the Launchers in one go, if I pulled him up to level 31:
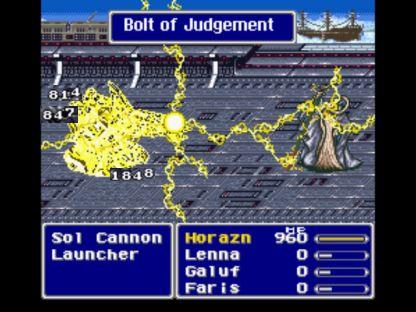
Each Launcher has 800 health, and thus Ramuh killed them both instantly. No need for an Angel Ring if they never get the chance to fire off any Missiles! Sol Cannon itself was also weak to lightning, and went down to a flurry of Ramuh summonings. Horazon had to use one Hi Potion, and that was it.
Most of the enemies in the Lonka Ruins could also be taken out with Ramuh's Lightning element, and the few who weren't susceptible could be hit with Shiva or Ifrit. The only real downside to Horazon's summons was their high magic point cost, which meant break out the Tents every time a save point came up. This revives the other three party members, and killing them off can be a pain. I had gotten too used to characters like Kain, who relied on Potions and didn't need to worry about magic points.

ArchaeoAvis changes between all those different elemental forms, which mandate using different spells. Ramuh's Lightning worked well against the first three forms, but the fourth one absorbs electricity, so Horazon had to swap to Ifrit's Hellfire attack instead. The last undead form is immune to all elements, which meant breaking out the old Chocobo Kick move from the beginning of the game. Hey, it was better than having Horazon attack with his pathetic strength! I was actually fairly unlucky in this battle, and was eliminated a number of different times when Maelstrom hit followed by an elemental attack before Horazon could use an Elixir. Nonetheless, it wasn't too bad, and the do-overs had been caused by chance, not mistakes on my part. I could live with that.
Normally, I focus on the Puroboros when it comes to the miniboss trio, with them being the worst opponent to defeat. For Horazon, it was all about getting another new summon:

Yeah, that's right - Titan becomes another summon spell after you defeat him!  Titan's Earth Shaker not surprisingly is an Earth element attack, which does very high damage (magic attack of 110!) with the one drawback of being unable to hit flying targets. Titan was destined to be Horazon's main form of attack for a VERY long time, until he reached the third world. For the moment though, the damage was spectacular. Horazon cleaned up the Chimera Brain as usual, and then annihilated the Puroborus, with each Titan summon doing 1200+ damage to every opponent! This is the situation where the Summoner shines best, against a large group of foes.
Enter the second world, Galuf saves the rest of the team, yadda yadda. Despite my best efforts, the Gilgamesh fight on the Big Bridge was fairly difficult. Gilgamesh was a big joke before he buffed himself up towards the end of the fight, but doing the final 2500 damage against his Haste/Armor/Shell combo was serious business. Had to use several Elixirs, unfortunately, with Gilgamesh moving three times to every one action of Horazon (ouch!). Although Titan continued to put up big numbers on the damage side, I found myself wishing I could cast Ifrit on Horazon, to heal him with the Flame Ring. I missed that ability which Black had used to good effect at this point in the game.
After returning from the Rugor/Moogle continent with nothing beyond the usual stuff to report, Horazon moved on to the Hiryuu Valley. He couldn't equip the Bone Mail there, but he was able to pick up one of the most useful spells in the entire game:

Golem, yay! Golem's Earth Wall summon protects your party from direct physical damage; Golem will absorb damage equal to (20 + Level) * 50, which at this point in time (Level 36) would protect Horazon from almost 3000 damage. That was a lot! Even better, Golem can simply be summoned again once its protection is canceled out. The protection from Earth Wall is thus hugely useful against bosses, and forms one of the greatest advantages of the Summoner over the Black Mage.
To get Golem, however, you must "save" him in a random battle against a Bone and Zombie Dragon, who stop attacking your party to go after him. One online guide suggested using Hi Potions on the enemies (which are both undead and take damage from healing items), but that didn't work too well. Golem died long before Horazon could kill his opponents this way. Instead, I summoned Ifrit to take advantage of the fact that both dragons were weak against Fire. Unfortunately this damaged Golem as well, so I used an Elixir on GOLEM after two Ifrit summons, allowing him to survive another casting and see the enemies defeated. A bit unorthodox there - it worked though! And well worth it to bring home such an enormously useful summon spell.
I used Golem right away against the Hiryuu Plant, whose Flowers were stopped cold by Earth Wall. Then Horazon started summoning Titan, and that's when the smackdown really began. No class works better at taking out a big old group of enemies than the Summoner! Horazon won without taking so much as a point of damage.

Golem was useful against Gilgamesh and Enkidu as well, pictured above. This battle was a little awkward because Titan would only work on Gilgamesh, and not the flying Enkidu. Still, it wasn't that hard to get the fight done overall. Titan pretty much ruled all comers in the Barrier Tower, although its power against the monsters was beginning to slip a bit as their life increased while Horazon's damage stayed mostly the same. Horazon did my usual slow method against Atmos, killing off the other characters during the fight rather than prior to the battle. This is another area where the Black Mage fares better than the Summoner, as Atmos can be defeated easily using the Sleep spell. Golem is useless against a boss that doesn't use physical attacks!
I now headed off to grab the Shoat summon, another encounter that I usually skip with my other solo characters. Shoat's big move is called Demon's Eye, a petrification attack that causes instant death against many targets. This would be a cinch to defeat if Horazon was able to equip the Aegis Shield. But, unfortunately, as a magely character he couldn't do that:

Any time Shoat took damage, it would respond with Demon's Eye, which had about a 90% chance to kill Horazon instantly. In order to win, Horazon needed to do 5000 damage without getting hit with Demon's Eye. Well, Horazon couldn't do that in one casting of Titan, but with some leveling up, he could do it in two castings. I returned a little bit later and - after getting killed quite a few times - Horazon managed to dodge Demon's Eye and win by doing 2500 damage with each spell. There wasn't anything particularly creative about this approach, but it worked!
Horazon continued to use Titan in the Forest of Mua, and this was a place where Black had definitely had an easier time, as Mua gave him access to the Fire/Ice/Bolt 3 trio of spells. Nonetheless, Titan was still pretty good against most opponents, although there were a few that were flying and had to be dealt with through other means. Conversely, Titan worked extremely well against the Crystals/Seal Guardians:

The Summoner always performs well against large groups of enemies, and this was no exception. Four Titan summons and three of the four Crystals were all dead. The only problem was Titan's earth element failing to affect the Earth Crystal, but once it was the only one left it could be dealt with easily using the Dancing Dirk. As usual, I had Horazon equip the Flame Ring to absorb the fire spells in this battle.
There is another summon spell to grab in Exdeath's Castle, Carbunkle, which casts Wall on all party members when used in battle. I didn't have much of a use for Carbunkle, being able to equip a Wall Ring instead, however I decided to fight the boss anyway on the belief that a true Summoner should learn every spell available. The Carbunkle battle initially had me stumped on how to proceed; the boss starts out in Wall and Float mode, making Titan completely useless. Although other summon spells would go through Carbunkle's Wall, they just didn't do very much damage: Ramuh only did 500 damage when I tried it. Meanwhile, Carbunkle attacks by bouncing spells off its own Wall at the party, starting with Fire/Ice/Bolt 2 and then proceeding to a nasty assortment of Bio, Stop, Charm, Break, XZone, and Doom as it takes more damage. I really did not know how to attack this boss conventionally, since one of those spells was almost certain to kill Horazon before he could plink away enough damage to get the win.
However, Carbunkle actually switches over briefly to a second form during the battle, one which is weak against a lot of different elemental attacks. I saw in the code that this form lacked the immunity to petrification attacks - aha! That meant it was time to call on Shoat:

A single casting and Shoat killed Carbunkle instantly with Demon's Eye. A surprising amount of bosses in this game are vulnerable to status ailments, and knowing who is weak against what makes a huge difference. It certainly did here!
The final Gilgamesh battle was won pretty easily on the first try, Horazon protecting himself with Golem and then spamming the Titan summons until the ending cut-scene triggered. That brought up the Exdeath battle that ends the second world. The one great advantage that Horazon had in this fight was the ability to summon Golem, who absorbed a flurry of normal attacks and Vaccuum Waves from Exdeath without breaking stride. In fact, over the course of the battle, Horazon had to resummon Golem two times after its Earth Wall was broken by Exdeath. Between Golem's protection against physical damage, a Wall Ring to block most magical attacks, and repeated Titan summons banging out the damage, this was a pretty easy fight. Horazon won as soon as Exdeath's Condemn attack missed:

So was this easier for Horazon than it had been for Black? To be honest, no. Horazon may have been able to block Exdeath's physical attacks with Golem, but his Titan summons did significantly less damage than Black's Fire 3 spells, and thus Black managed to take less damage simply by cycling through the encounter at a faster rate. I would rate this boss fight as slightly favoring the Summoner over the Black Mage, but only marginally. Certainly not by as much as I had expected.
The Antlion was a major pain in the behind - surprise! It turns out that this miniboss is actually immune to earth element spells, making Titan useless. Horazon had to wear him down slowly with Ramuh + Lightning Rod while dodging Sonic Waves, which took a long time. I found this situation popping up all too frequently, with Titan unable to affect a fair number of opponents, mostly flying ones. That's the problem with relying on one spell - when it doesn't work, you're screwed!
Horazon grabbed the Chicken Knife and did the requisite running away from battles to power it up to full. The Pyramid was handled with a combination of Titan and the new weapon, with the Chicken Knife contributing mostly in situations against flying enemies. Merugene/Mellusion was another opponent in "Float" status, making Titan once again useless! At least this was an easy battle to do with the Chicken Knife, and equipping a Flame Ring nullifies virtually all of her spell attacks. With access to the airship again, I sent Horazon back to the Pirate Cave from the beginning of the game, to pick up the Syldra summon:

Syldra (also called Hydra in some translations) is an Air element summon that has a slightly higher spell attack (165) than the Fire/Ice/Bolt 3 trio (150). It was great to have another option besides Titan, finally, and I could boost that damage further by equipping a weapon that boosted Air element damage, like the Air Lancet dagger. Horazon had been equipping the Gaia Gear armor for ages now, because it boosted Titan's Earth element damage, and now I could upgrade to the much improved Black Suit. I also took the time to grab the two weapons from Kuzar Castle that Horazon could actually use: the Wizard Rod (which boosts damage for all elements except Water and Holy) and the Assassin Dagger. Along with the usual purchases of Running Shoes, Coral Ring, etc. from Mirage, Horazon was now ready to knock out the rest of the third world dungeons.
I used a combination of Titan and Syldra to get through the Solitary Island Temple. Horazon's magic worked perfectly against Stoker/Stalker, this being another area where the Summoner definitely performed better than the Black Mage:

Five castings was enough to finish off this boss, with Golem protecting Horazon from melee attacks all the while. It was mostly the same story for the remaning dungeons in the third world, as Horazon used a mixture of Titan and Syldra (the Wizard Rod powering both) to defeat random enemies of all types. Minotaur was killed using the Chicken Knife and a whole bunch of Elixirs; even the Summoner, the class with the lowest Strength in the game, can do this without problems. Omniscient has a weakness to Air element, which made the battle just too easy via Syldra. I think it took four summons and that was it, could have done the battle without even equipping a Wall Ring. Titan + Syldra then owned the Great Trench and Istory falls dungeons, taking out all comers including the bosses:

Horazon naturally learned the ability to summon Leviathan by defeating the boss in battle. However, this wasn't as useful as you might think. While the spell attack for Leviathan (195) is higher than that for Syldra (165), there is no item in the game that has the "Magic Up" attribute for Leviathan's Water element. That means that Leviathan is stuck at 195 spell attack, while Syldra can be increased to 165 * 1.5 = 247, plus Syldra costs fewer magic points to cast! Leviathan thus was most useful against foes who had a weakness against Water element, which wasn't very many of them.
Rather than enter the Cleft of Dimension, Horazon had the goal of grabbing the last few summon spells that exist in the third world as option subquests. I headed for Odin first in the Castle Bal basement. This is a really short mini-dungeon accessed by entering the Cave of Jacohl in the third world, and the enemies inside give nonexistant experience points. (As a result, I usually skip this optional area with most solo characters.) Odin himself provides an intriguing battle: Odin attacks and does some light damage throughout, but that's not the real threat. At the start of the fight, a timer begins ticking down from one minute, and when it hits zero Odin uses "True Edge" and instantly kills the party. In other words, this is one battle where speed matters! However, like so many other bosses in this game, Odin has one fatal weakness:

He's not immune to petrification attacks, just like Carbunkle. Horazon summoned Shoat and got Demon's Eye to work on about the third attempt - instant game over for Odin. I don't feel bad about exploiting the boss weaknesses in this game, since FF5 is so ridiculously cheap at other points in time, not to mention brutally unforgiving for solo characters in general.
The other summon spell to go grab was of course Bahamut, who lurks at the top of North Mountain. Oddly enough, the original monsters from the first world are still present in this small dungeon, which never really made sense to me. Why not swap in some tougher enemies, or just do away with the random encounters altogether?  Anyway, Bahamut's attack pattern is heavily scripted in the code, with him choosing different and more dangerous attacks as you do more damage to him. The only one that's really dangerous is Bahamut's trademark "Mega Flare", which he starts doing over and over again when he has less than 10k health remaining. The dilemma for most solo characters when facing Bahamut is whether to equip the Running Shoes for Haste status, or the Wall Ring to reflect his spells back. Horazon could effectively do both!

I went with the Running Shoes for the speed boost, and then summoned Carbunkle to add Wall status on top of that. The results were predictable, as Bahamut reflected his own Mega Flare attack back on himself. (In amusing fashion, this then triggered a counterattack in the code, so Bahamut then immediately used Mega Flare a second time, and hit himself again!) Between Golem and Carbunkle, the Summoner can thus put up an impressive defensive screen against both physical and magical damage. These spells are even better than they seem in this solo report, as both protect the entire party and not just the caster!
With those tasks out of the way, it was now time to enter the Cleft of Dimension. I chose to ignore the final summon spell, Phoenix, as casting it revives the entire party, and that wasn't going to be useful for a solo character! So why not pick up the spell and never cast it? Well, learning the spell would cause it to pop up on occasion when using the "Conjure" command, which randomly picks one of your summon spells and casts it at no cost in magic points. This is the last ability learned by the Summoner class, and it's a darned useful one to have, although a little less so for a solo character like Horazon than in the normal party setting. I didn't want Phoenix appearing by accident, and thus I skipped it and the accompanying optional dungeon.
Into the final dungeon then. The bosses in the Cleft of Dimension were pretty much roadkill for Horazon, as he continued to use Syldra's Air element against all comers. Syldra and Bahamut did essentially the same damage (with Syldra powered by the Wizard Rod), and Syldra (32) cost less than half the magic points of Bahamut (66). Horazon's max MP was about 450 at this point, so Bahamut could only be used a limited number of times before pausing to rest. I had to use a lot of Cabins to restore magic points!

Calotisteri/Wood Sprite and Apanda were defeated easily. Apocalypse killed Horazon twice due to simple bad luck, once using Condemn and the other time casting ???? which always spells instant death for a solo character. The third attempt saw neither of these spells come up, and Horazon won without issue. Catastrophe went down under a hail of Syldra summons. Halicarnassus was actually an interesting fight, as she responds instantly to any summon spells with a "Strong Fight" (this is how it's listed in the code) that did over 6000 damage to Horazon: instant death. I had to fall back on the generic solution that works for all characters, equipping a Wall Ring and sitting around defending until Halicarnassus killed herself with reflected Holy spells. (Use of Carbunkle was out because she casts Dispel right before using Holy.) It worked well enough. And Twin Tania had a weakness to Water element, so I stuck with the Running Shoes, summoned Carbunkle to reflect Twin Tania's Mega Flare counter-attacks, and then pummeled the boss with Big Waves until he croaked. Horazon finished him before he even got off one Giga Flare!
Necrophobia was another encounter where the Summoner's special abilities could be displayed to their full power:

Two Bahamut summons took out the four Barriers before they could even begin to cast their Flare/Holy spells. The Barriers may be in permanent Wall status, but Bahamut and the other summons can't be reflected and go right through those obstacles. For the second half of the battle, Horazon summoned Golem to protect himself from Necrophobia's very powerful physical attack, and then went to work with Syldra summons. Because Necrophobia is weak against all eight elements, Syldra actually did more damage than Bahamut here, about 9500 per casting. The battle was quickly over, and Horazon never took so much as a point of damage. Definitely much easier and less fuss than the solo Black Mage here!
For the final battle, Horazon had to dodge the usual dual threats: the Exdeath Tree's White Hole and Neo Exdeath's Grand Cross. You can control everything else about the last boss, but these two are nothing more than big giant dice rolls, sadly. In fighting the Tree form, Horazon was killed by White Hole eight different times, and in a streak of really bad luck, hit by Condemn three other times as well! Argh. However, eventually I was going to dodge these attacks and get Horazon through to the final Neo Exdeath battle. That was where the real strategy would begin.

My usual tactic is to begin the fight by using an Odin summon from the Magic Lamp to cast "True Edge", which instantly kills Part #4. For Horazon, however, I could simply cast Odin instead, and not have to use the Magic Lamp... right? Or so I thought. When Horazon first made it to Neo Exdeath, I tried casting Odin normally, only to have the summon use its non-lethal "Gungnir" spear attack instead, which deals physical damage to one target. Huh? That had never happened to me before with the Magic Lamp. I tried the same thing two other times, and continued to get Gungnir instead of True Edge, followed by Part #4 obliterating Horazon with a "Delta Attack" petrification move. Well that settled it; for some reason, apparently only summoning Odin via the Magic Lamp will bring about the destruction of the Neo Exdeath part. Why this is the case, I have no idea. Fortunately I had picked up the Magic Lamp earlier out of habit, despite not thinking that I would need it. One random encounter in the Void sufficed to cycle through Bahamut and Leviathan, and then Horazon had the Lamp prepped for use in the final battle.
The second time that Horazon reached Neo Exdeath, I used the Magic Lamp and Odin's True Edge took out Part #4, just like normal. Heh. From there, it was a matter of renewing Golem when Part #1's physical attacks broke the Earth Wall, healing with Elixirs after being hit by Almagest, and using a whole lot of Bahamut summons. This was one occasion where constant Elixir use meant that there was no need to conserve magic points! The only actual threat came from Grand Cross, and on this occasion, Horazon was hit by Darkness status on the first go, and nothing on the second. Neo Exdeath was killed before it could get off a third Grand Cross:

You can even see the Darkness sunglasses in that victory shot. I think it makes Horazon look like a pretty cool customer. 

So what's the final verdict on the Black Mage versus Summoner comparison? As I said initially it's mostly a wash, as both jobs have similar functions and fulfill the same role in the party. The Black Mage is a little better at hitting solo opponents, the Summoner a little better at dealing with groups of enemies. However, for the solo playthrough, I actually think that the Black Mage has a bit easier of a task. Let me explain in a little more detail...
 VS.
VS. The Black Mage gets access to four elements (Fire, Ice, Lightning, Poison) while the Summoner gets six of them (Fire, Ice, Lightning, Earth, Air, Water). So this is an easy win for the Summoner, right? Well, not so much. The Black Mage may have fewer total elements, but he has multiple different strengths on each of them, with Fire 1/2/3 options to play around with in each of his primary three attack spells. In contrast, the Summoner only gets exactly one spell of each element, and the Ifrit/Shiva/Ramuh summons are all but useless by the halfway point of the game. The Black Mage can keep upgrading his spells as he goes, and fares better at the end of the game, with three different powerful elemental spells to choose from. (It also bears mentioning that weaknesses to fire, ice, and lightning are enormously more common in this game than weaknesses to earth, air, or water!) The Summoner is pretty much stuck with just Syldra (Air) and Leviathan (Water) by the third world, and Leviathan is much less useful than it should be because there are no items that give the "Magic Up" property for Water element. That's why I used Syldra almost exclusively with Horazon, as it actually did more damage with the appropriate item setup. Flare vs. Bahamut is of course a wash, as they both do exactly the same amout of damage and have the same magic defense piercing property.
The Black Mage also has a much smoother progression in terms of increasing the power curve over time. The starting Fire/Ice/Bolt spells are a huge help at getting through the early game, and yes I *DO* count that in the Black Mage's favor - trying to fight past Karlabos with no magic was an unbelievable pain! To be fair, the power curve of the Summoner does increase starting at Worus, which is where you first gain access to the Summoner job, but the Black Mage leaps up in usefulness as well immediately thereafter at Karnak, so that's pretty much a wash. The second world is where the Summoner is really supposed to shine, since he has access to the powerful Titan summon, and yet I still found that the Black Mage held up extremely well in the comparison. Black was able to purchase Bio (spell attack 105) immediately at the start of the second world in Rugor, and that was virtually identical to Titan (110) but without Titan's extremely irritating inability to hit flying targets. Then later on in the second world, the Black Mage gets Fire/Ice/Bolt 3 at Mua, and then completely dominates the comparison until the Summoner can get Syldra after the Pyramid in the third world, and even that only pulls the Summoner even with the Black Mage, not ahead. Kick in the fact that the Black Mage can heal himself with Fire spells plus a Flame Ring, and it's not even a comparison: the Black Mage has an easier path for a solo run.
Now that's not to say that the Summoner doesn't have some great abilities too. The Summoner has two excellent utility spells in Golem and Carbunkle that provide powerful defensive protection. Both of these work better in party setting than a solo one, however: Carbunkle can be duplicated for a solo character with a Wall Ring, and Golem can be cast via the Magic Lamp. In fact, that's one of the biggest drawbacks for the Summoner class in general: you can get access to all of the summon spells just by using the Magic Lamp. Odin and Golem are my two favorites to use here. The Summoner has Shoat to kill enemies weak against stone attacks, but the Black Mage has Break, again a wash. And the Black Mage has Sleep, Drain, and Psych, the potential to steal magic points being particularly useful. The Summoner counters with the Conjure ability, which is really good in a party setting where you don't want to waste magic points, and certainly more useful than the Black Mage's MP +30%. However for a solo character, the Black Mage's extra magic points are actually probably the better of the two. I almost never used Conjure with Horazon, as I needed the enemies to be dead right away.
So again, not to repeat myself, but it's pretty even on the whole between these two classes. I go through all this stuff to prove that the Black Mage gets an unfair reputation online, where most of the FF5 message boards act like the Black Mage is trash and the Summoner is godly. That's just not true, as the Black Mage performs just as well as the Summoner throughout the bulk of the game, and unquestionably better in many, many situations. I suspect the main reason is that the Summoner has a slightly higher Magic Power stat (57 vs. 55), and for those who like to max stats at level 99, the Summoner will do a tiny bit more damage. Ultimately though this makes very little difference. The Black Mage is just as good as the Summoner, and you shouldn't believe otherwise! 


