
Been a while since I played a solo character in Final Fantasy 5, and I decided that I wanted to get back to some of the jobs that I hadn't tried yet. Starting with the ninja, one of the coolest and most powerful classes in the game. iLikeSwords' Straight Character Challenge FAQ describes the ninja thusly:
"Facts: I couldn't think of anything to add here, so I rounded up some facts on ninjas from the internet.
1. Ninjas are mammals.
2. Ninjas fight ALL the time.
3. The purpose of the ninja is to flip out and kill people."
Well said! To be a little more specific, the main advantage of the ninja is an innate ability known as "2-handed", which allows them to equip a weapon in each hand. This is identical to the Genji Glove relic from Final Fantasy 3/6. Two weapons naturally mean twice as much damage, allowing the ninja to dish out some serious hurting! Of course you can't equip a shield when using both weapons, however ninjas can't equip shields anyway (and therefore it's a moot point for a solo game like this one), and besides I've generally found that it's better to go for overwhelming offense to kill bosses quickly in this game, rather than take it slow and steady. A ninja at the end of the game can even get around the Thief Knife's Flee effect simply by equipping it in his or her left hand, which is an easily exploitable minor bug!
Ninjas can also throw weapons and ninja scrolls at their enemies, reprising the ability of the ninja Edge from Final Fantasy 2/4. (No "Spoon" to toss in this game, sadly!) Throwing weapons does a very large amount of damage, although it destroys the item in the process. Ninja scrolls are relatively easy to come by, and allowing the ninja to deal fire, ice, or lightning elemental damage to a group of enemies. This is a major reason why the ninja is so versatile, as he/she can mimic the mass targeting and elemental damage of a black mage with a little preparation ahead of time. Very useful against those bosses with an obvious weakness, like Liquid Flame or Sol Cannon.
And as if those two abilities weren't enough, ninjas also learn several useful secondary commands. "Smoke" gives the ninja a guaranteed run from random encounters, highly desirable against a couple of nasty opponents. "Image" duplicates the white magic spell of the same name, granting the ninja a 100% successful dodge of the next two physical attacks. The ninja even learns an innate ability ("Pre-Emptive") that grants a higher rate of pre-emptive encounters, doubling from the natural chance of 1/8 to 1/4. Not to mention, the Ninja has the second-highest Agility in the game, beaten out only by the Thief, so the Ninja will attack quickly and often in battle. Plus, there's some very strong ninja-only weapons, like the Hardened Dagger legendary weapon. Do I need to keep going on?
I named my ninja after Shadow, the ninja of few words but a deep backstory from Final Fantasy 3/6. (There are about a gazillion ninjas out there in pop culture, especially in the world of anime, but I would sooner stab myself in the eye than use a Naruto reference here.) I completed the events up to the Wind Shrine, and the game began from there in earnest:
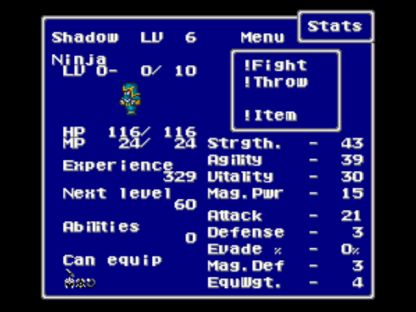
Out of the various jobs I've played before, the Ninja's stats are probably closest to the Hunter's. The Ninja has very good Strength, just a little below the pure melee Knight/Samurai jobs, and extremely high Agility. As stated in the introduction, only the Thief has better speed than the Ninja. To balance this out, the Ninja's Vitality is significantly lower than the other melee classes, although still a good bit better than the magely ones. (And fortunately, vastly higher than the poor Dancer class!) As with all melee classes, Magic Power is very low. Now this doesn't matter one bit for other melee jobs, yet for the Ninja the Magic Power stat actually does factor into the calculation for damage from throwing ninja scrolls, so this number is not entirely irrelevant. Overall, the stats reflect the idea of a lightly-armored warrior that makes a living through speedy moves instead of brute force.
Shadow found himself wielding a Dagger (14 damage) and Knife (7 damage) in both hands to start the game. Unfortunately there was only one Dagger available! That was still enough to inflict a lot of pain on the starting enemies, killing pretty much everything in one hit. I took Shadow up to Level 11, by which time he had gained enough Ability Points to open up both the "Smoke" and "Image" abilities. I didn't need Smoke for the moment, however Image was going to come in extremely handy against Karlabos:

Image creates a pair of illusionary clones that stand behind the Ninja and take the blows for him or her; more precisely, it causes the next two physical attacks to miss the Ninja. This is exactly the same result as the White magic spell of the same name. The net effect against purely physical bosses such as Karlabos is to make the Ninja completely invincible!  Shadow was as fast as the big lobster, so I could alternate Fight and Image without ever taking so much as a point of damage. Easy stuff!
The highlight of the Ship Graveyard was getting another Dagger to drop from one of the random encounters, giving Shadow equal striking power with both hands. Now he could do roughly 100 damage with both hits, excellent power for so early in the game. Siren was a matter of attacking against the Human form, and using Image to defend against the Undead form. It didn't hurt either than Shadow's attacks were doing enough damage to kill Siren in five hits! Shadow won this battle on the first try and barely took any damage at all.
North Mountain was entirely routine, using a solo character that had enough power to kill all of the random enemies with a pair of dagger cuts. Against the boss at the end, Shadow began by using Image and then proceeded to defeat Magisa with three straight normal attacks. Then I had Shadow alternate Image/Fight, Image/Fight until Forza was eliminated as well. The only damage taken by Shadow was minor burns from Magisa's magic spells.
I reprised the path taken by Spoony the Bard in Worus Castle, looting the Elf Cape in the basement by slipping past the dangerous Garkimasra enemies:

These guys are essentially impossible to kill at the start of the game, and always trigger attacks from behind, yet Shadow could use his "Smoke" ability to get an automatic escape from battle before he was horribly killed. Essentially this meant that I had access to an Elf Cape accessory a little earlier than normal, and it was a nice piece of equipment for a stealthy ninja! Don't overlook the Ninja's Smoke and the Bard's Hide abilities - there are a number of places where an automatic retreat from battle can be very useful.
Worus Tower was more smooth sailing through calm waters. Shadow owned all of the random encounters, and Galura's damage is entirely physical in nature, which meant that Image once again ruled the day. Between Image and Shadow's new Elf Cape, he was dodging just about everything in this boss fight. Easy stuff.
From there it was on to Karnak, where Shadow equipped himself with a pair of shiny new Mythril Daggers, and that made a noticeable increase in his attack power. Damage increased from a little over 100 to 200+ with each strike. Then Shadow found an even better weapon inside the Steamship, the rare Full Moon:

The Full Moon can only be equipped by the Ninja and Thief classes, and it has the special property of doing full damage from the back row. Of course Shadow's other dagger didn't have that property, so I kept him in the front row for now, but the increase in attack power was a pleasant addition. Now Shadow was doing ~350 damage with one hand, and ~200 with the weaker Mythril dagger - really good stuff for so early in the game!
Liquid Flame was a matter of following the normal strategy and healing up while the Tornado form was in use. Shadow had the extra bonus of Imaging up while facing the Tornado, storing some extra protection ahead of time for use against the other forms. I was able to neutralize the Hand form as well by alternating Fight/Image, as that form is completely physical in nature. Only the Human form posed any danger, since it could use the "Flame" spell. I made sure to finish off Liquid Flame in the Human form, resulting in the automatic drop of a Flame Scroll for use later on.
While racing out of the burning Karnak Castle, Shadow made use of his "Throw" ability for the first time:

Because Shadow was attacked from behind in this encounter, I didn't want to waste the time to swap rows. Instead I had him throw the Katana weapon that Shadow picked up in Tycoon Castle, which did predictable mass damage. Each weapon in this game actually has a "Throw" damage value which varies from one item to another, although generally speaking stronger weapons do more damage when thrown. Only edged weapons can be thrown though; no rods or staves or whips or anything like that will work. Unlike most solo games, where I sell off tons of unequippable junk weapons, Shadow would wind up saving all kinds of odd gear to be thrown when needed.
Anyway, it turned out that there was plenty of time to loot all of the Elixirs in Karnak Castle, along with an extra Shuriken in one of the chests that I usually skip. Shadow picked up the Guardian dagger too (attack 36), and that made an excellent partner for the Full Moon (attack 35). The Guardian/Elf Cape combo had Shadow dodging half of all physical attacks, and I could still use Image against really nasty physical threats. This was almost a little TOO easy! 
The battle against Ifrit in the Ancient Library was the first one that caused some problems for Shadow, albeit rather minor ones. Most of Ifrit's attacks were fire-based spells, making Image ineffective for this fight. The easiest way to do things was to hack away at the boss, trying to kill Ifrit before he could do too much damage to Shadow. This required the drinking of both Hi Potions Shadow had found, but it proved effective on the second try.
Ifrit always drops a Flame Scroll upon defeat, and Shadow had a second such scroll from having beaten Liquid Flame earlier. I was planning on using them against Byblos, but I estimated that I would need a third Flame Scroll to defeat the evil book. Fortunately, there was an enemy that drops them in random encounters, so Shadow went back to the Ship Graveyard and fought a series of PsychoHead monsters until one of the desired items dropped. Then it was a long hike back to the Ancient Library, to face off against Byblos:

Look at that incredible animation! The effects programmer really did great stuff here, especially for a skill that rarely sees use. The Ninja's three scrolls (flame, water, and thunder) are essentially magic-based attacks, using the same damage formula as black magic spells. They are all quite strong, with a spell attack of 120, about halfway between Fire 2 (spell attack 50) and Fire 3 (spell attack 185). The only real drawback is that the damage formula for the ninja scrolls is based upon Level and Magic Power, which means that the damage increases very slowly over time because the Ninja has such a low Magic Power stat. For the moment, however, the damage was extremely good. Byblos took about 1300 damage per Flame Scroll, and he went down easily in three such uses. Victory!
With the Ancient Library out of the way, Shadow now had access to travel by ship. I took advantage of this to fight some random encounters in the sea, especially against the Thunder Anemone enemies:

See those weird, sponge-like creatures on the right? Those Anemones always drop a Thunder Scroll upon being defeated, making it easy to farm them for free drops. I had Shadow fight about two dozen battles in the ocean, until he had accumulated close to a score of Thunder Scrolls. Those would be highly useful in the upcoming battles against the machines of the Lonka Ruins.
You lose the ship almost immediately in this game due to a story event, which was why I made sure to stock up on Thunder Scrolls when I had the chance! However, you do gain access instead to a black chocobo, which allows travel to the isolated village of Lix for the first time. This is the hometown of Butz/Bartz in the storyline, and there is an item shop in the village that sells ninja-only gear: shurikens and all three types of scrolls! Although I had enough Thunder Scrolls from fighting in the sea, I made sure that Shadow loaded up on a dozen Flame and Water Scrolls to cover enemies with those elemental weaknesses. This is another reason why the Ninja is such an amazing class, the ability to target all enemies at once with three different elements, giving him/her mass damage capabilities at least equal to a Red Mage, if not better. And remember, this is still on top of all the other amazing abilities we've already covered!
The next encounter of note was against the Sandworm, who has an elemental weakness to water spells. Well, you can probably see where this is going...

Unfortunately, the Water Scroll hits all enemies on screen, meaning it targeted the empty "Holes" as well! Since the Holes respond to attacks directed against them by casting the spell "Demi" and halving hit points, Shadow did best by wearing down the Sandworm with normal attacks, and then finishing off the creature with a 1300+ damage Water Scroll at the end.
The next couple of bosses were relatively easy to defeat. After brushing through the random encounters in the Quicksand Desert, Shadow made short work of Crayclaw with a pair of Thunder Scrolls. Each one did well over 1000 damage, and since Crayclaw only has 2000 hit points, Shadow faced only one attack in the whole battle. The Adamantium Turtle was a little bit harder, if only because its high defense and permanent Shell status dragged out the fight much longer. I threw Water Scrolls at this boss, only realizing after the battle that Adamantium has a weakness to Ice element, not Water! No wonder those scrolls weren't doing much damage... Fortunately, Adamantium is another 100% physical boss, meaning that Image rendered Shadow essentially invincible (so long as I didn't screw up the timing). In retrospect, there was no need to use any scrolls at all, as Image eliminated all danger. That really wasn't my best fight from a tactical standpoint there... 
At this point, Shadow was ready to take on the series of short battles leading up to Sol Cannon. A Flame Ring from Istory made short work of the Flameguns, and de-equipping Shadow of his weapons and tossing Thunder Scrolls killed the Rockets in two rounds of combat. Quick and easy. I prepared to do the same with Sol Cannon:

Thunder Scrolls did a nice ~1400 damage to Sol Cannon, taking advantage of its weakness to lightning magic. I expected it to kill the Launchers in one hit, as they each have 800 hit points, but I found to my surprise that the Launchers are NOT weak against lightning! Huh, go figure - never noticed that before. It would take two rounds of combat to eliminate the pair of them, which meant that the Launchers would get a chance to fire off their missile attacks and inflict Aging status on Shadow. Whoops - I skipped buying an Angel Ring because I expected not to need it. I guess I could have slugged through the battle despite getting hit with Aging condition, however that would have involved wasting a ton of Elixirs, and I would need to buy an Angel Ring later on anyway. It seemed easier just to grind out the necessary 50,000 gold to purchase an Angel Ring right now.
So Shadow gained six levels (from 28 to 34), saved up the needed money, and took down Sol Cannon on the first try with his new Angel Ring. Only had to use two Elixirs by doing things the smart way. As I've said before, I don't go out of my way to level the solo characters, but sometimes you don't have much of a choice, especially surrounding the Sol Cannon battle.
I swapped in the Smoke ability for Image during the Lonka Ruins, since there are a couple of difficult random encounters in there that give poor experience. The auto-run function was handy when they popped up. As for the ArchaeoAvis boss at the end, the great danger there comes from his melee attacks, which can cause a number of nasty status ailments. Therefore I usually go with the Guardian Dagger/Elf Cape combo for solo characters, to give them the maximum opportunity to dodge those blows. However, Shadow could render himself completely impervious to physical damage with the use of Image, so I equipped a Flame Ring instead to defend against ArchaeoAvis' Flame and Blaze attacks.
This worked quite well for the first four forms. When it came to the final undead form, I decided to use one of the five Shurikens I had turned up:

Look closely and you can see the Shuriken embedding itself in the boss. More importantly, check out that damage - wow! This final form only has 2500 hit points, so that was practically a one-hit kill. Shadow polished off the boss on his next attack, and that was that. ArchaeoAvis only lived long enough to attack a single time! Have I mentioned that the Ninja class is totally awesome?!?
The meteor miniboss trio went very smoothly as well. A Flame Ring and Image defended against every move that the Chimera Brain could use other than Aqua Rake, and Shadow won very quickly (even though he missed a ton of attacks due to some bad dice luck). Titan was even more pathetic, as he's 100% physical until his final use of Earth Shaker right before dying. Gotta love that Image ability. Finally, the Puroboros would have been extremely difficult if Shadow didn't have access to Ninja Scrolls... but he did have access to Ninja Scrolls! 

Two tosses of any scroll (pick your choice, since the Puroboros have no elemental strengths/weaknesses) and they were down for the count. I stocked up on a few more scrolls before leaving the first world, enough to have two dozen of each type, and then plunged into the portal to the second world.
The first couple of areas there were routine. Galuf went into Samurai form to take down Gilgamesh in the solo battle, and then control passed back to Shadow again. I found that Shadow could kill all of the enemies on the Big Bridge in one attack, however he was taking some serious damage back in return. I was burning through the Potions extremely quickly between battles; thank goodness that Hi Potions would be available to purchase in the next town! The second Gilgamesh fight on the bridge involved Shadow using Image to defend against physical attacks and fighting normally until right before Gilgamesh went into his AI change. Shadow threw a Shuriken for 2000+ damage and then dealt the last blow, barely having to face the Armor/Shell/Haste form of the boss.
Shadow upgraded his weapons to a pair of Orihalcon daggers in Rugor, and also had to purchase some Revivify items for anti-zombie purposes. Because I wasn't selling as many items with Shadow (saving them to be Thrown at monsters), I was in a bit of a cash pinch here, and could only afford three dozen Hi Potions. Shadow found once again that he could kill the random encounters with ease in the underground cave leading up to the Moogle Village, however he tooks tons of damage in the process. The light armor of the Ninja is probably the one weakness of this class.
I had the option at this point to equip the Dancing Dirk with Shadow, but ultimately opted not to do so. For most jobs the Dance effects (which kick in 50% of the time) are a welcome addition. Not so much for the Ninja, however, as BOTH attacks get canceled out when Jitterbug Duet, Tempting Tango, and Mystery Waltz come up. Now when Sword Dance would come up it would dish out the 4x damage bonus with both weapons, for truly insane damage, but that just didn't happen often enough to be dependable (only 1/8 of the time). I decided to have Shadow equip a pair of Ninja-only Kodachi daggers instead, which worked very well and were more reliable.
The Hiryuu Valley contained equipment that solved Shadow's defensive weakness:

Ahh, the Bone Mail! Always a great choice for a solo run, between its status protection and massive defensive value. Just look at what it did for Shadow, all the way from 12 to 33 total Defense! You'd better believe that practically tripling his defensive value made an immediate and very noticeable difference. Between the beefy new digs and Shadow's two-handed offensive knifework, the enemies started going down in a real hurry.
The Hiryuu Plant and Flowers are easy for a character who can dish out mass damage to all targets. Throwing the Ninja scrolls didn't do all that much damage with each use, roughly 500 per toss, yet it took out the Flowers every time and made sure that Shadow didn't take so much as a single point of damage. Gilgamesh and Enkidou required no special planning or strategy, simply a matter of equipping the Bone Mail and hacking away until they both were dead. Shadow had to redo the fight one time when Death Claw popped up (pretty much instant death for a solo character).
I tried my best to take on Atmos normally:
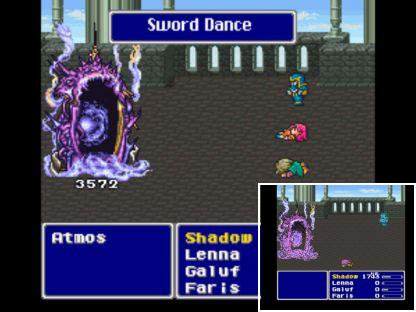
And Shadow could indeed have done this fight without making any special adjustments; Shadow could get off three attacks before Atmos started casting Comet, and a successful attack with Sword Dance would do ~7000 damage between the two hands. However, at 1/8 odds of Sword Dance appearing on each round of combat, the odds of this appearing naturally were only 1/512, or .0019 (that is 0.19% or roughly 2 out of 1000). I didn't have the patience to go through that, so I did my normal thing of killing off the other three characters one at a time during the battle, and that worked out just fine. As I have said many times, the Atmos battle is broken for a solo character, and I don't lose sleep over this one. Not going to level up to 60+ just for this one fight.
Mua offered Shadow another improved pair of daggers, the Air Lancets, and some slightly improved armor as well. I found to my delight that Shadow did just enough damage to kill all of the random enemies inside in one attack; the Mammon (evil tree) enemies have 1700 hit points, and Shadow was doing slightly over 850 with each of his two daggers. Perfect! Shadow mowed them all down like kindling and picked up some very nice gold and experience in the process. The Crystals/Seal Guardians at the end were a breeze with a Flame Ring equipped, as usual. Shadow did have to de-equip his Air Lancets against the Wind Crystal though - good thing I save lots of old weapons for such occasions!
Exdeath's Castle offered up a unique new weapon near the top: the Double Lance.

The Double Lance is another piece of gear that can only be used by Ninjas and Thieves. It has attack power only very slightly higher than the Air Lancet, but the Double Lance has the unique property of striking twice! Combined with the other weapon in Shadow's left hand, he was now getting a total of THREE attacks each round. This was really good stuff, although it took a while for the damage to print out three straight times. Added together, Shadow was now banging out 2500+ damage each round, more than enough to kill almost all of the random enemies in one hit. And I could furthermore use Smoke to run away from the unpleasant double Yellow Dragon encounters that pop up occasionally in Exdeath's Castle. Very nice.
The last Gilgamesh encounter was a simple matter of attacking five times before he managed to cripple Shadow with some of his nasty status ailments. Shadow pulled it off on the third try; I could have probably won on the first go, yet opted to preserve Elixirs and simply try again.
I had no intention of messing around with Exdeath, and simply wanted to get into the third world as soon as possible. I stuck Shadow in the back row, with the usual Wall Ring, and opted to Throw some of my accumulated pieces of gear at him. Shadow had come across a single Pinwheel in Exdeath's Castle, which is a beefed up version of the Shuriken, and I began with that:

Holy moley!  Look at that damage! And the graphic of that huge windmill shuriken is just EVIL-looking... Very impressive to say the least! Then I went ahead and had Shadow throw the fake "Excailber" that Gilgamesh drops, which is hopelessly weak when equipped but does throw damage equal to the real Excalibur. This second toss did 5500 damage, and Shadow was really in business from there on. I had him toss the Epee sword and a single Shuriken, which did another 5000 damage combined and dropped Exdeath below 16k health. From there Exdeath went into his less-dangerous AI routine, reflecting lots of spells off of Shadow's Wall Ring and injuring himself in the process. I concentrated on having Shadow put up an inpenetrable physical screen of Images to defeat against Vacuum Wave, and attack only when it was safe to do so. Exdeath went down rather quickly, with little fuss or muss. This wasn't a total cakewalk, but it was one of the easier times I've had against him with my solo characters. As a sign of how strong the Ninja is, Shadow was only level 46 at the time, which is probably the lowest any of my characters have been at this point in the game.
Shadow now entered the third world, and that meant grabbing the awesome Chicken Knife as soon as possible. (After disposing of the Antlion mini-boss, who lasted all of about ten seconds against Shadow!) Shadow had to spend a little while running away from battles to power it up, but of course the Chicken Knife was more than worth the effort.
I suppose that I could have had Shadow toss some Ninja Scrolls at the Gargoyles guarding the Pyramid, however it turned out that there was no need. With the Chicken Knife's +5 Agility bonus, Shadow was so fast that he could kill them both before they had the chance to revive one another (wow!) Between the Double Lance's dual attacks and the Chicken Knife's mass damage, Shadow went into lawnmower mode inside the Pyramid and cut everything down to size. Even the Machine Head robots couldn't stand up to Shadow, falling in a mere two rounds of combo. Shadow was so fast that they only got to act once before dying, removing the Missle/Surge Beam instant death combination!
Merugene/Mellusion was lol-worthy. The instant she dropped her barrier, Shadow did a pair of full-damage attacks that inflicted more than 10,000 points of pain. Very short battle.
With the airship in tow, Shadow could now run to Kuzar Castle and Mirage to trick himself out with the top gear possible. Here was the setup I ended up with:
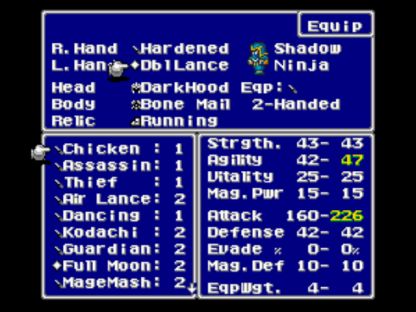
On the ride side of the screen you can see the stats that Shadow ended up with, including that insane Agility. Only the Thief is able to top this and crack the 50-point barrier... but a Thief would have almost 20 points fewer in Strength, and that's a poor tradeoff indeed! In terms of armor, we have the usual Running Shoes and Bone Mail combination, with Shadow swapping to the Dark Suit in situations where the Bone Mail's inability to use healing items made it impractical. For weapons, Shadow equipped the Hardened Dagger (also known as Sasuke's Katana) in one hand and the Chicken Knife in the other. The Hardened Dagger is a Ninja-only weapon that not only deals great damage (99 base damage, only slightly lower than Excalibur's 110), but also has the same "weapon block" property associated with the Guardian. In terms of pure damage, this is the best combination for the Ninja in the endgame.
Or is it?! Remember that the Double Lance (61 damage) strikes twice in combat, which makes it a tough call in terms of effectiveness against the Hardened Dagger (99 damage). Against enemies with low Defense, the Double Lance actually does considerably more damage! The Hardened Dagger's weapon block property would still be enough to make me give it preference, except for one very important factor: when equipping the Double Lance in the right hand and the Chicken Knife in the left hand, the Chicken Knife's Flee effect will NEVER kick in! I had no idea that this was the case, and discovered it purely by accident. Apparently something in the two strikes carried out by the Double Lance causes the game to ignore the Flee check that normally gets rolled when using the Chicken Knife. (I have no formula to show this, just the empirical evidence of hundreds and hundreds of rounds of combat.) When using the Hardened Dagger, or any other weapon for that matter, one-fourth of the Chicken Knife attacks will be uselessly canceled out. This makes the Double Lance/Chicken Knife combo by far the best for the Ninja to employ in the endgame. The pure numbers don't always tell the whole story!
In the Solitary Island Temple, Shadow squared off against his fellow ninja:

Invisible is sort of a mini-boss that guards a treasure chest containing the Rising Sun weapon (a nice piece of equipment, by the way, but already outdated by this point). Invisible uses the Image skill as well, forcing you to kill both of his images before he bites the dust. While I love that awesome sprite graphic, this wasn't a particularly tough encounter. Shadow attacked twice to every action of the enemy, and the Chicken Knife carved up Invisible in rapid time.
Of course, that description could be applied to pretty much every foe in the third world. A permanently-Hasted Shadow was totally unstoppable, getting two and even three rounds of combat to his opponents' one. Shadow also landed lots of Pre-Emptive attacks due to his innate Ninja ability, and those random encounters were just sick. Shadow actually managed to attack and kill all FIVE Mercury Bats (in Istory Falls) on a Pre-Emptive attack before any of them had a chance to act. Five enemies moved down, just like that. It was... impressive.
None of the bosses proved particularly challenging. Stalker required minimum guessing to find the right target; I think four succcessful attacks were enough to do him in. Omniscient reflected himself to death with his own spells, and the Minotaur was a total joke. (Hint: use Image against a physical boss!) The Great Trench actually made things rather interesting, as Shadow was unable to kill the Unknown blobs in one hit, and thus had to run away to avoid their instant death attacks. I suppose I could have thrown some ninja scrolls or shuriken, but that was more effort than it was worth. The Triton/Neregeid/Phobos trio was worn down with standard melee attacks, and then finished off with a Bahamut summon from the Magic Lamp, as is my usual plan. I had a little difficulty with Shadow doing so much damage that he accidentally killed off one of the three before I was ready!
Istory Falls was unbelievably easy. Shadow used a total of seven Hi Potions to get through. Seven. And Leviathan...

Well, Image + Coral Ring nullified everything that he could do aside from a weak Aqua Rake, and Shadow laughed that off as Leviathan's own Tidal Waves healed him back up to full. Not much to say here, just a whole lot of Ninja asskicking.
There was nothing left to do but send Shadow into the Cleft of Dimension and get started with the final dungeon (the Odin, Bahamut, Phoenix, and Gogo sidequests not holding any real appeal for this character). I gave Shadow the Smoke ability again in order to run away from the truly dangerous random encounters, and proceeded to annihilate everything else. Wood Sprite never has any chance against a character equipped with the Bone Mail, much less one wielding the Chicken Knife. Apanda was a little bit messier, as he cast Armor and beefed up his defenses, yet he still fell with relative ease. Against Apocalypse, Shadow was so fast with his agility plus Running Shoes that the boss only got to attack twice before dying! Basically, Shadow attacked six times (doing roughly 5000 damage on each go) before Apocalypse managed to get off his third move. That's some serious speed, folks!

Outside the Dimensional Castle, Shadow faced off against some enemy Ninjas and showed them what it meant to be a true shinobi. They actually fought back better than most enemies, with their high Evade, but that wasn't enough to save them from Shadow's relentless fury.
The Smoke ability continued to help out immensely in the Dimensional Castle, allowing Shadow to skip difficult encounters against Death Claws and Iron Giants and the like. The Catastrophe battle was an ugly slugfest, both sides pounding away at each other until one keeled over. Shadow's speed earned him the edge in that matchup. I gave up the Running Shoes against Halicarnassus in order to equip a Wall Ring; this did work out correctly, with a reflected Holy spell doing in the boss, however I probably could have also won by sticking with Haste status and simply going apewild on the attack. Almost always multiple ways of doing things in this game, remember. Twin Tania was a bit of a problem, because his Giga Flare attack did just over 3000 damage, and Shadow only had ~3050 max hit points. I fought the boss at Level 53, and Shadow died instantly when Giga Flare did 3090 damage! But Shadow was very close to another level up, so I fought a couple of battles to put him up to Level 54, and that made a real difference:

Survived this time with under 40 health remaining - Shadow would have died again at the lower level. Now, there were other ways of doing this battle at a lower level (throwing some high-damage weapons, equipping a Wall Ring and giving up the Coral Ring) but they all involved using up Elixirs or throwing items that were difficult to replace. Far easier just to grab a few more experience points and have enough health to survive the Giga Flare move.
The Void was a breeze, as Shadow skipped all the fights with the use of Smoke. There's no reason to fight these battles, as they give no experience points, just ability points (useless for these solo variants) and gold. I did make sure to open all the treasure chests, most of which have "Pinwheels" inside. Recall that Pinwheels are an upgraded version of the ninja Shuriken, and I had stocked up on lots of them earlier in Mirage village, at a pricey 25k each! For most solo characters these Pinwheel chests are useless, not so for Shadow.
Necrophobia was easier for Shadow than most of my other characters, solely due to the marvelous Image ability. Once the magic-casting Barriers were eliminated (easy), Shadow kept attacking and maintaining his double Images. This made him impervious to Necrophobia's physical blows, and even the cheese Hurricane/Vacuum Wave combo couldn't manage to do in Shadow! I won on the first try and Shadow was never in any real danger.
This brought Shadow to the final battle against Exdeath. I was uncertain whether to go with normal attack or ninja throwing weapons for this encounter, and resolved to test it out through experimentation. Shadow's triple attack did roughly 5000 damage against the boss, which was excellent stuff. Then I hurled one of those carefully horded Pinwheels:

Wow, 8600 damage!  Amazing. Guess we know what Shadow's going to be using for this battle! The reason why Throw damage is so high is due to the fact that it gets a bonus damage multiplier; in addition to the usual Strength * Level calculation, Throw damage also gets a multiplier for Agility * Level, and with the Ninja's high Agility that was a lot of extra damage! I resolved to have Shadow throw Pinwheels and other high-damage weapons until he ran out, and then fall back on normal attack for whatever remained of the final boss after that.
The Exdeath "Tree" form went down quickly enough, to a barrage of Pinwheels. (Shadow had 16 in inventory, and at roughly 8000 damage each he could defeat the starting boss in 6 or 7 tosses.) For Neo-Exdeath, Shadow had a neat counter to every single move that the boss could pull off: Magic Lamp's Odin summon to remove Part #4, Image to eliminate the physical attacks from Part #3, and a large supply of Elixirs to heal the infrequent Almagests from Part #2. The only move that Shadow could not defend was the Grand Crosses from Part #1, and thus I went after that appendage first. This was where Shadow's fabulous speed and massive Pinwheel damage pulled off some incredible stuff. Part #1 starts with 55,000 health and Shadow quickly began whittling that away. Right before a Grand Cross was about to appear, Shadow hurled his fourth Pinwheel, dropping Part #1's life below 30k, and initiating a new AI routine! This essentially reset Part #1's move list, and right when it was about to use Grand Cross again, Shadow dropped it below 10k and triggered a THIRD new AI routine! Then he tossed the last two Pinwheels and killed Part #1 before it could act again. Not a single Grand Cross triggered in the whole Neo Exdeath battle. That's the central ethos of the Ninja class right there, unbelievable speed and max damage all in one neat package!
Shadow was thus able to remove the giant Grand Cross dice roll from the final battle, and from there on out it because a matter of correct tactical execution. Shadow had to wear down the last two parts (with 50k and 55k health) while maintaining Image status to defend against the frequent physical attacks of Part #3 and use Elixirs to heal the damage caused by Part #2's Almagests. The two parts would often move at the same time, making things tricky, although fortunately Almagest has a long charge-up time and didn't appear all that much. My one surprise came in the middle of the battle when one of the parts cast "Dispel", which I found to my dismay removed Image status! Part #3 got in one normal attack, and it did a brutal 1300 damage; a Vacuum Wave would have done twice that, 2500 damage! Since Shadow only had 3100 max health, I definitely had to maintain Image status, or he would be dead very quickly. I kept a very close watch and managed to survive two more Dispels, re-establishing Shadow's Images both times before disaster could strike.
This was one of the most entertaining Neo-Exdeath battles I can remember, because outside of Dispel, all of the random luck factors had been eliminated. It was just Shadow versus Neo-Exdeath, and the question of whether my tactical execution as a player would be up to par. Unfortunately, I couldn't remove the luck factors from the first half of the battle: Meteo killed Shadow on the first attempt (at 1/3 odds to appear), and White Hole petrified Shadow immediately on the second try. But the third attempt got past the Tree form, and I defeated Neo-Exdeath perfectly on the first go:

It could not have gone any more smoothly; I would pretty much consider this a flawless final boss run. There's nothing you can do if one of the insta-death cheese moves comes out!

Shadow finished the game at Level 54, my lowest solo character yet, although only by one level better than Horazon the Summoner. I'm sure it could have been done even lower, but I just play the game and fight the enemies that appear, not trying to turn this into a competition or anything. Shadow was one of the most exacting killers I've yet seen at the end of the game; if I could have turned him back into the Bare job and combined 2-handed and Image with weapons like Excalibur and the Brave Blade... well, you can image how ridiculous it would have been!
I knew all about the power of 2-handed and Throw going into this variant. The great surprise was Image, which locked out all physical damage against many different nasty bosses, up to and including Neo-Exdeath himself. For a solo character this is actually better than the Knight's Guard ability, although for a party setting the Knight's Cover/Guard combination can lock out physical damage against the whole party. For Shadow though, the ability to "fire and forget" with Image let him maintain perfect defense and go on the offensive at the same time, which was good considering the very light armor that Shadow was wearing! Interestingly, I checked and found that the Japanese term used for Image is actually "Bunshin", which the anime/Naruto fans will note with some amusement.
That was a relatively easy solo challenge, so look for something a bit tougher next. 


