
Time for another solo run for Final Fantasy 5 as we finish up with the last few jobs. I wanted to turn next to the Necromancer class, which is an unusual twist on a spellcasting job. The gimmick behind the Necromancer is the fact that your character essentially becomes a Lich; that is, an undead mage who can't be healed normally. Potions and Elixirs will decrease your character's health, making long drawn-out battles impossible to win. This is very similar to wearing the Bone Mail, and I had a lot of practice in these situations from other character runs. Fortunately the Necromancer gets to compensate for this crippling weakness by having very strong offensive output, a series of spells that hit with the same strength as Fire/Ice/Bolt 3 and also inflict status ailments at the same time. The Necromancer might not be able to hold in a fight for very long, but he sure can dish out the pain train before he drops.
The signature ability of the Necromancer is the skill known as Dark Arts, which is essentially a form of Black magic only available to this class. Just as getting additional job ranks in the Black Mage class unlocks higher levels of Black magic, most of the job ranks in the Necromancer open up more spells in Dark Arts. They are therefore irrelevant when playing a solo character who never changes classes, since the Necromancer always has access to all levels of Dark Arts as an innate skill. The biggest drawback to the Dark Arts lies in their means of acquisition: much like Summon magic in Final Fantasy 5, they can only be discovered by defeating certain enemies in battle. About half of the Dark Arts can only be found in the Gameboy Advance bonus dungeon that unlocks after beating the main game, making them unavailable at all for this playthrough. Of the ones that can be found elsewhere, the very first Dark Arts can be obtained starting in the early stages of World 2. That meant no Dark Arts at all for the entire first world, on a charcter who had no means to heal! 
Fortunately there's another Necromancer skill that fills this hole. Oath is an ability that unlocks cheaply with only 15 ABP and produces one of four different effects: a skeleton appears and casts Bolt 2, an undead dragon appears and casts Zombie Breath, something called a Rajiformes appears and casts Aqua Rake, or a flaremancer appears and casts Flare. All of these effects deal decent damage, especially the Flare spell, and they're enough to get the player through the early stages of the game. The biggest drawback to Oath is that the effects are random and there's no ability to pick which one appears. It was very reminiscient of the Catch/Release skill of the Beastmaster class, and I suspected this might use the exact same coding. In places where Oath fails, the Necromancer can also fall back on breaking rods, which makes certain battles that would otherwise be impossible (e.g. Byblos) into smooth sailing.

The character name for this playthrough was easy. The Necromancer is an undead Lich, and the obvious reference for me was my favorite champion from League of Legends: Karthus. There's even a gameplay rationale for making this comparison, since the Necromancer in Final Fantasy 5 is known for using Dark Arts spells that hit all enemy targets, while the ultimate for Karthus in League of Legends is Requiem, an ability that deals heavy magic damage to all enemy champions. It's too bad that the Karthus rework changed his spell particles from red to green and removed the skull-like visage from his character portrait, which I understand was done to appeal more to Chinese sensibilities. While I can respect those decisions (especially given how much of League's audience is located in China), I did prefer the original graphic design. Anyway, here's the familiar picture of character stats after going through the Wind Shrine and class changing at Level 6:

Final Fantasy 5 only allows space for six characters in each name, and thus "Karths" is as close as I could get. As for the stats, the Necromancer as a class has outstanding numbers across the board. Strength of 32 makes this class comparable to the Dancer, which is a bit of a waste since the Necromancer never has to do much in the way of melee fighting. It's a lot better than the 19 Strength on the Black Mage and the 18 Strength on the Summoner, who actually do need to engage in melee combat at a few points. Agility is average at a score of 26, and then the real surprise is the Vitality/Stamina stat at 48. That's absolutely incredible for a spellcasting job: higher than the Samurai, higher than the Dragoon, higher even than the Knight! Only the Monk and the Berserker exceed the Necromancer among the default classes in overall health and HP growth. This is probably necessary given that Necromancers have such difficulty healing themselves in battle, and it certainly is appreciated. 150 HP at Level 6 was awesome. Finally, Magic Power is about what one would expect, very high and sitting just below the Black Mage (56) and Summoner (58) for tops in the game, although I believe the Oracle has an even higher Magic Power stat (59) here in the Gameboy Advance version. Overall, the Necromancer would be a great class to master simply for the purposes of passing on these stats to the Bare/Freelancer job, or at least it would be if it didn't unlock so obnoxiously late in normal play. There's nothing else that has such high Vitality and Magic Power combined together into the same job.
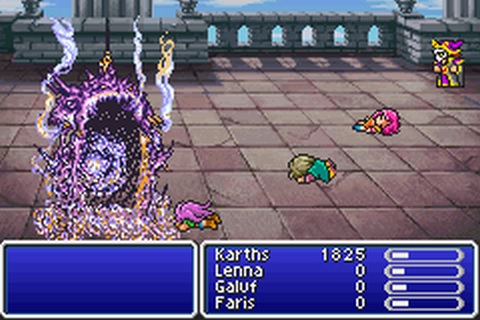
My first priority with Karthus was getting past Karlabos in the very short Torna Canal dungeon. That was going to require the Oath ability to have any hope of succeeding, and Karthus therefore needed to do a little bit of fighting to unlock the required 15 ability points. Normally I will have my characters gain a few levels by running random encounters in the Wind Shrine, since the Wind Mold enemies there have a chance to drop Elixirs and they can be very useful against the big red lobster. Karthus had no such need since Elixirs would be virtually useless for him. I could use them to restore HP and MP out of battle, but using an Elixir during combat would drop his health to near-death status. Instead, Karthus fought the aquatic monsters in the canal itself, which would never attack him since they only attack female characters. In a few minutes he had gained a couple of levels and picked up Oath. Then it was time to fight Karlabos:

I was hoping to pull either the Skeleton ability for Bolt 2 or the Flaremancer for Flare. The former would get the kill in two hits (since Karlabos is weak against lightning) while the latter would be a one-shot termination. Karlabos refused to play along though, repeatedly paralyzing Karthus with Tentacle and then using Tailscrew to knock his health into the critical zone. Since Karthus couldn't heal himself, the next attack would cause instant death. He couldn't even get an action off to use the Oath command! Finally on about the fourth try Karlabos used his normal Attack, and that allowed Karthus to get off a pair of Skeleton moves and win out. This was more annoying than I expected for a character that had such a ready solution to Karlabos.
Since Karthus would be using Oath so much throughout the first world, let's look more closely at how it functions:
| 3/8 | Skeleton | 50 | 4 | 2/8 | Rajiformes | 75 | 4 |
|---|---|---|---|
| 2/8 | Flaremancer | 254 | 5 |
| 1/8 | Zombie Dragon | 10-100 | 5 |
This is the table for the Oath skill listed in the updated Algorithms Guide for the Gameboy Advance version. Much like the similar table for the Cannoneer's Open Fire skill, there were no table headings and it was somewhat unclear to me what some of these numbers meant. The first column was clearly the chance for each of these attacks to appear, with Skeleton being the most likely at 3/8 and Zombie Dragon being the least likely at 1/8 odds. I quickly figured out that the third column was the attack value of that particular spell, easy to determine since the spell attack of Bolt 2 is 50 and the spell attack of Flare is 254. Aqua Rake on the Rajiformes also matched up, as did the highly variable 10-100 attack value of Zombie Breath (which is normally a monster-only ability). The last column had me puzzled at first though. What were those 4 and 5 numbers supposed to mean? This is a good lesson on why you should always label your column headings in Excel! I would have to experiment and figure it out through more testing.
The Ship Graveyard was an amusing area because most of the enemies inside were undead and immune to the poison element on the Zombie Breath attack. The UndeadRusks were also immune to lightning, and that meant that Karthus needed to pull either Rajiformes or Flaremancer to defeat them, which sometimes could take a little while. Siren proved vulnerable to a mixture of different Oath effects; Karthus did not pull Flaremancer here for the one-shot kill. The best of the four attacks at the moment was Rajiformes:

It would hit all opponents on screen at once for roughly 300 damage apiece, and that was enough to kill everything in the early stages of the game. Zombie Breath was the other area-of-effect spell in the group, however it was unreliable since it had such a wide swing of potential damage, anywhere from 10-100 on the base spell attack. Sometimes Karthus would pull Zombie Breath and it would do little more than tickle the monsters. The poison effect could be useful though, especially against bosses who had no immunity to the ticking damage. Skeleton was the weakest of the four effects, hitting a single target for about 200 damage per casting. Karlabos had taken 400 only because of his weakness to lightning element. By the time that I reached Worus Tower, Karthus was already facing opponents who could survive a Bolt 2 spell without dropping and its usefulness was on the wane. Finally, Flaremancer was another single target spell that did amazing damage against one opponent:

It seemed to do 1200-1300 damage per use, which was more than enough to kill anything at this stage of the game. Since Flare deals non-elemental damage and pierces magic defense, there was nothing that monsters could do to stop this ability when it appeared. Both Siren and Galura were one-shotted with Flaremancer appearances, the former without having any chance to summon Forza. This is where the Oath ability is similar to things like the Gladiator's Finisher command and the Cannoneer's Open Fire, attacks that are extremely overpowered for the beginning stages of the game. Obviously the player is not supposed to have access to these abilities against the first couple of bosses. Oath was a bit weaker in comparison to the other two abilities from the GBA jobs, mostly since it was random as to which of the four spells would be cast and random as to which enemy would be targeted. I felt a little bit like I was playing a Berserker again, unable to target specific enemies and unable to heal in battle. At least Karthus could use items and run away if things were going poorly, even if those items couldn't include Potions or Elixirs.
I picked up a Thunder Rod for Karthus in Karnak village, with the intention of equipping it for the time being at least until he could reach the Guardian dagger. Skeleton was appearing often enough from Oath that it was worth boosting the Bolt 2 spells with 50% additional damage. The following Steamship dungeon usually tends to be easy for most solo characters, but Karthus had a bit more trouble inside. The Crew Dust and Poltergeist monsters were immune to both lightning and poison damage, causing Karthus to waste many rounds of Oath usage with no result. Flaremancer would instantly kill whatever was hit, but its single target nature made for slower battles. Rajiformes was the biggest winner here, with just barely enough damage to continue getting instant group kills. I had noticed that the damage of these Oath spells didn't seem to be increasing, and I wondered why that was the case. Were they using some kind of unusual formula for the magic damage multiplier? It wasn't the standard magic multiplier (Level * Magic Power / 256) since Karthus had already gained enough levels for that to show a difference. I kept experimenting and trying to figure it out.

The next couple of major bosses were targets for rod-breaking. While I prefer to avoid that wherever possible, Karthus didn't have enough health to work his way through opponents like Liquid Flame and Byblos unless I was willing to redo the battles endlessly for perfect RNG luck, and I wasn't interested in doing that with such a ready solution available, assuming it was even possible in the first place. A single Ice 3 spell out of a broken Frost Rod was enough to take out 2960 of the 3000 HP on Liquid Flame, and Karthus followed that up with a Flaremancer from his first Oath to get way more damage than necessary to secure the kill. That was one of the very few times I can recall defeating Liquid Flame without her ever shifting into the Tornado form at all. During the escape afterwards, I took the time to grab all of the Elixirs even though they weren't very useful for Karthus. There was time enough so why not. Death Claw at the end had the possibility of causing problems, since Karthus couldn't target his Oath ability to prevent the second form of the miniboss from showing up. In a stroke of dumb luck, the boss tried to use his Death Claw ability three different times... and failed all three of those times. Wow, thanks RNGesus!  I was happy to take that bit of luck.
Ifrit and Byblos were both defeated through the use of breaking rods. The Ice/Fire 3 spells that came out of thos smashed rods did right around 3000 damage, and virtually any of the Oath spells were enough to land the kill on the next turn from Karthus. He pulled off the most stylish version of this process against Byblos, pulling an initial Flaremancer and then breaking the Fire Rod to get around the possibility of a Drain spell. After picking up the ship at Karnak, it was off to Crescent:

This was an unpleasant small discovery. I had thought that the Necromancer class would absorb poison element damage, only to find that the Bio spell from these enemies still dealt normal damage. This was a mistake on my part: it's the Bone Mail that provides protection against poison element, not the Necromancer class itself. Since the Bone Mail has such high defensive value and offers no tradeoffs for the Necromancer, there's very little reason ever to wear anything else once it becomes available, but Karthus hadn't reached that point of the game as yet. This was also about the point in time when I realized that the damage from Oath still wasn't increasing at all, and it now seemed clear that it would never increase. When I looked back at the table in the new Algorithms Guide, it suddenly hit me like a slap to the face: the numbers in that last column represented the multiplier for each spell! D'oh - I can't believe I didn't spot that sooner. As a result, the Skeleton's Bolt 2 spell is permanently locked at a multiplier of 4, and the Flaremancer's Flare spell is permanently locked at a multiplier of 5, and so on. Oath will never increase its damage over time no matter what the player does. This makes it vastly weaker than Open Fire or Finisher or the other starting skills that the other GBA classes get. It wouldn't even be enough to get Karthus through the first world if he wasn't able to fall back on rod breaking against foes like Byblos and Sol Cannon. Not a very good ability at all.

I had been worried slightly about the Sandworm since Oath wouldn't allow Karthus to choose his targets, and my experience with the solo Berserker has left me permanently scarred with regards to this boss. Fortunately the 8x damage bonus from Aqua Rake against desert enemies was still in effect here, and a pair of Rajiformes did the trick. Karthus needed to land them very quickly because those Demi spells from the Sandworm would otherwise flatten him in a hurry. The random monsters in the Quicksand Desert were a lot of fun to encounter, since a single Rajiformes would wipe them out instantly. This would have been a pretty good place to level Karthus if I had remembered to go back there. Interestingly, the 8x damage bonus from Rajiformes did not work against the Dragon Chimeras when Karthus tried fighting one, and did normal damage instead. For whatever reason, that hidden miniboss gets coded differently from the battles in the Quicksand Desert.
There was one positive side to Oath as an ability: it didn't matter if Karthus had his level reduced by an enemy.

When I needed to raise money for a Flame Ring, this was the place for Karthus to go. The Black Flames can be encountered on the little teardrop-shaped island to the north of Crescent, and they only use a weak physical attack and "Dark Shock", which cuts the target's level in half. That was irrelevant to Oath, and two Rajiformes would wipe out all of the opposing monsters in one go. Interestingly, the Black Flames absorbed lightning and poison elements, which meant that half of the Oath spells were hurting them while the other half were healing them! This encounter of five Black Flames appears every single time at that particular little island, and it's worth a ton of gold and experience, making this a great place to grind out additional levels. Karthus needed a Flame Ring for safety's sake in some of the upcoming boss fights, and this was the best place to get the cash for it. He picked up a half dozen levels here as I prepared for the Sol Cannon sequence.
I always try to avoid breaking rods as much as possible and the next few opponents were weak enough that the cheese solution could be skipped. Adamantium was countered by equipping the Guardian dagger and the Elf Cape, then hoping to pull lots of dodges from the physical-only boss along with Flaremancer spells from Oath. Karthus enjoyed good luck here on the dodging, and eventually cycled through enough Oath spells to win before his health ran out. Ticking poison damage from Zombie Dragon contributed a lot of the total damage dealt here. Karthus equipped a Thunder Rod for the Crayclaw battle to boost the damage output of the Skeleton's Bolt 2 spells, since the boss is weak to them. This took a few tries to succeed until Karthus managed to line up a couple of Bolt 2s together with a Flaremancer. The Flameguns and Rockets were both easy for Karthus to defeat, taking the Flame Ring into each battle and then equipping a Knife to prevent self-damage while using Oath repeatedly. The Flame Ring could have been skipped here by rolling Rockets for each encounter; I wanted it on hand just in case for future use.

With Sol Cannon itself, there was never any choice other than breaking rods. This battle functions on a strict time limit, the same one that the Beserker had confronted in my horrible solo run of that class. The first Surge Beam will take out half of your character's life and inflict an HP Leak status, which means the second Surge Beam is a guaranteed death. If your character can't heal, the battle must be won before that second beam goes off. The notion that Karthus could win this setup by hoping to roll eight or nine Flaremancers in a row would have been ridiculous. Karthus was a high enough level that he could take out both of the Launchers with a broken Thunder Rod immediately, and he even had the good fortune to dodge both of the initial missiles on the first attempt at this battle. Then it was down to shattering more Thunder Rods, which were able to hit the elemental weakness of the cannon and get another doubled damage multiplier for no longer having to multitarget. At close to 4000 damage per Thunder Rod once the Launchers were gone, that made for a very fast battle indeed. Karthus defeated this boss before the first Surge Beam went off, let alone having to worry about the second.
The enemies inside the Lonka Ruins were tough opponents, with even the Flaremancer spell only barely doing enough damage to kill them in one shot. The Skeleton and Zombie Dragon moves were now mostly ineffective, and even Rajiformes was really starting to fall behind the curve of monster health. Needing to pull three Aqua Rakes to defeat monsters was a pain in the rear. Given his inability to heal in battle and the hard limit of 99 Potions in inventory, Karthus would end up running from some of the tougher fights rather than trying to grind them out for experience. At the end of the ruins, Archaeoavis required a slightly different strategy than normal:

The main danger from this boss for solo characters is typically its status effect physical attacks. The fourth form of Archaeoavis can inflict paralyzation and the last form can inflict confusion. Both are obviously very bad for solo games. There was an additional danger for Karthus in the form of Maelstrom, an attack that Archaeoavis pulls out in its final form that drops the whole party down to critical HP. Most solo characters solve this by using an Elixir... which was no option for poor Karthus. On top of that, Archaeoavis keeps using elemental attacks that deal 1/4 of max HP in damage, each one attuned to whatever form that boss is currently using. With no ability to heal, those could simply wear down Karthus' health pool over time and defeat him regardless of any other considerations. And the final form of Archaeoavis is immune to all of the major elements, which meant it was going to have to be Oath and not rod-breaking to get past that last form. This could be a tricky situation.
I went into this battle using the standard Guardian dagger for physical evade, but with the Flame Ring equipped instead of the Elf Cape. Much as I hated to open up a greater possibility for those paralyzation/confusion attacks, Karthus desperately needed a way to protect himself from some of the elemental damage used in this fight. The Flame Ring neutralized the ice element on the Blaze ability in Archaeoavis' second form, and it allowed Karthus to heal off of the Flame ability in the third form. This would allow Karthus to heal back up to full in mid-fight, and then only have to get through the final two forms before his HP hit zero. There would even be a small possibility to heal during the last form if Archaeoavis pulled out Flame again, which he has a chance to do in some rounds of his AI script.
The first three forms of the boss were therefore not very dangerous. I had Karthus use Oath here and simply paused to heal up during the third form. The ability to sit in the back row, combined with Karthus' healthy max HP total, meant that physical attacks themselves were not threatening. It was only the status component that some of them carried that I feared. The fourth form of Archaeoavis is attuned to lightning, and I wanted to move through this form quickly due to the danger of paralysis and 1/4 max HP lightning attacks. Karthus broke an Ice Rod and immediately ended that threat. For the last form, there was nothing to do but use Oath and pray for Flaremancers to appear. Two of them would be enough damage to secure the kill, and fortune smiled on Karthus as he managed to roll a pair of them in his first four uses of Oath. No Maelstroms appeared and Karthus won on the first attempt. This could have been a much worse battle - whew. 
The meteor miniboss trio was nice and easy this time around. Oath was enough to take down the Chimera Brain and Titan with the proper defensive equipment set up ahead of time (Flame Ring and Elf Cape respectively). I attempted to try using Oath against the Puroboros as well, under the thinking that if I could land two or three Rajiformes in a row I might be able to knock them all down into the critical range and have them explode harmlessly to their deaths. This tactic completely failed and Karthus broke two more rods to destroy the lot of them. Good riddance.

Both the Gladiator and Cannoneer had been able to use their class ability to get solo Galuf a kill against Gilgamesh at Level 1. I was going to try the same thing again here with Oath, since a pair of Flaremancers would have done the trick, only to remember that the Necromancer class doesn't start with Oath as an innate ability. It takes 15 ABP and I wasn't going to stop and grind that out for a throwawy gimmick battle. As a result, there's no invisible solo Galuf using Oath here, sorry. The standard Samurai GilToss cleared the way forward.
The monsters on the Big Bridge were nearly strong enough to kill Karthus in a couple places. The Mustard Bombs out of the little chariot enemies did around 300 damage, and even with his high Vitality he couldn't take many of those hits. The worst was the situation where Karthus was forced to fight two scripted encounters back to back, leaving him no time to heal in between. Oath was also pretty terrible at this point, dealing weak damage when anything other than Flaremancer appeared, although Rajiformes was still useful because of its mass targeting property. Karthus needed a damage upgrade in the worst way. He had no choice but to break rods in the Gilgamesh #2 battle, and when the Gilgamesh Haste/Armor/Shell buffs went off together near the end of the battle, he barely managed to win even with that crutch. I have the victory picture above with Karthus surviving with a mere 108 HP remaining. He likely would have died to the next Gilgamesh attack, and that was with me selecting "Break Rod" as a command four times in a row. This was cutting it too close - the first Dark Arts spell couldn't arrive soon enough.

Fortunately the worst was over now and Karthus only had to make it through the Underground Waterway dungeon before he would finally gain access to his Dark Arts. This is an area where most of the enemies are weak against lightning element, and I tried equipping the Thunder Rod again to buff the Skeleton's Bolt 2 spell. I concluded that this wasn't worthwhile, since it was Flaremancer that was doing most of the killing and the Guardian dagger was more important to lock out additional attacks in this mostly physical dungeon. The Blood Slime enemies down here were a hoot though. They start each battle poisoned and then try to steal life from your characters with the Vampire spell. That was useless against Karthus, since his undead nature caused any such drain spell to heal him instead. Whoops. They probably should have thought that through before trying to suck the blood out of an undead lich. 
With that diversion out of the way, Karthus reached Bal Castle and could finally pick up his first real spell:

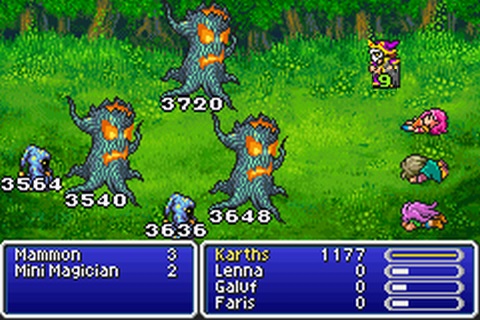
Down in the basement is a sealed area where all of the encounters are against these statues. This is a bit of a loophole area since it actually leads to the optional Odin summon, and the players aren't supposed to be fighting down here until much later on in the third world. Still, nothing prevents the player from fighting these battles right now, and defeating one of these groups unlocks the first Dark Arts spell. Karthus had to break two Thunder Rods to pull it off, since these monsters were much stronger than the normal random encounters in this part of the game. Now he had access to Hellwind, an air element spell that hit all enemies on screen for sickenly high damage. How much damage? The spell attack for Hellwind is 190, which is slightly higher than the spell attack of 185 on Fire/Ice/Bolt 3. Like almost all of the Dark Arts spells, Hellwind also hits all opponents and doesn't lose damage for being multi targeted, making more akin to a Summon spell than a Black magic spell. The biggest tradeoff was its cost: at 38 MP per casting, Karthus could only use Hellwind a handful of times before he ran out of juice. This was still an enormous upgrade over Oath though, and the path forward was about to get a whole lot easier.
Here's an image of the Hellwind spell in action:

A wave of dark gray wind blows across the screen from right to left and hits all enemies. In addition to dealing air element damage, Hellwind also has a chance to inflict petrification status which serves as an instant death effect. This would come in handy against certain opponents; for example, the Zombie Dragons in the encounter pictured above were vulnerable to being turned to stone and frequently died in a single casting. The Zombie Dragons were also noteworthy for unlocking the second Dark Arts spell after being defeated: Evil Mist. This also has the same spell attack value of 190 and hits all enemies, but Evil Mist is attuned to poison element and has a chance to inflict the poison status for extra ticking damage over time. Because Karthus could equip the Venom Rods sold in Kelb Village to give the Magic Up property to poison element, it was usually better to use Evil Mist for the moment to get the +50% damage bonus. Of course there are lots of enemies who are immune to poison damage while hardly anything is immune to air element, which meant that Hellwind continued to see regular use.
The Necromancer is one class that has a ready answer to the Hiryuu Plant boss. Repeated castings of Evil Mist wiped the floor with the little flowers and prevented any of them from ever attacking. Karthus had just enough magic points available to get the kill before he ran out. The expensive cost of the Dark Arts spells made for an interesting symmetry with the inability of the Necromancer class to heal in battle. Karthus couldn't stick in a fight for very long before his health ran out, and similarly, he couldn't stay out in the field for too long before all his MP were eaten up by costly Dark Arts spells. For the time being, Karthus could only cast Hellwind or Evil Mist about seven times before he was out of magic. Now this wasn't as dire as it might sound, since Karthus could fall back on Ethers or even Elixirs if needed outside of battles, but those items are very pricey and I tried to conserve them. This was a unique aspect of the Necromancer class though, incredible power at the cost of needing to win really fast in each encounter. No other class played out quite like this.

Here's Evil Mist in use against Gilgamesh and Enkidou in the encounter on the ship. A green cloud meanders underneath the enemies on screen and then envelops them in poison. The Necromancer is one of the few places where the GBA version creates new graphical effects, and the Dark Arts spells look pretty neat. As far as damage was concerned, the picture above provides a good indication of the punishment that Karthus could dish out with a Poison Rod equipped for the damage bonus. 3000+ damage was easily enough to one-shot everything that wasn't a boss at this stage of the game, making random battles trivial. The biggest problem continued to be running out of juice to cast spells due to the heavy MP cost. Gilgamesh and Enkidou were easily defeated this way, with Gilgamesh trying one Death Claw that missed.
This was one class that had the tools available to make grinding out a Wall Ring easy. A single casting of Evil Mist would flatten every monster group, and the Reflect status of the Wall Knights apparently didn't apply to Dark Arts spells. Karthus didn't have to worry about his spells bouncing back in his face, again similar to how Summon magic operates. Of course, given a character that could easily defeat a long sequence of these opponents, naturally Karthus picked up a Wall Ring from the second battle that I fought. It figures. He did get a piece of equipment that was genuinely useful here though: the Gold Hairpin helmet offers nothing in the way of stats but reduces MP consumption by half. This was perfect for random encounters, dropping the Dark Arts spells down to 19 MP and making them much more viable for continuous use. Karthus would typically wear this helmet most of the time and then swap back to a standard helmet for boss fights to get the maximum possible magic multiplier.
I tried to have Karthus do the Atomos battle with all of the other characters dead at the start. That only left enough time to get off four Evil Mist castings before they were all sucked up and the Comet barrage began, and at 3500 damage per casting, that left Karthus a good bit short of enough damage. So I fell back on my normal procedure here, beginning with Faris dead and then killing off the other characters one by one during the fight. For whatever reason, doing this caused Atomos to go through his sucking animation more slowly, and Faris still hadn't been eaten by the time that Karthus landed his sixth Dark Arts spell and nabbed the kill. I think that Karthus could have done this legitimately by about Level 50, with enough health to survive a few Comets and damage over the 4000 mark to reduce the total number of castings needed down to just five. Since I wasn't keen to do that much grinding in the Barrier Tower, my hypothesis will remain untested for now.
Guido/Gheedo's Cave was kind of fun for a change. The Metamorphs are weak to air element, and when that was combined with a quick jaunt over to Mua village to pick up an Air Knife for its Magic Up Property, Hellwind was left pounding out 7500 damage for one-shot kills. Those things aren't nearly as annoying when they're dying in a single blow. Too bad they still gave nothing in terms of gold or experience for defeating them. I really wonder why the developers set them up that way; did they forget to add a zero at the end of the rewards or something like that?
The Forest of Mua tends to be an easy area, and it was even easier for Karthus. Because the GajraGajri monsters are immune to poison damage, Hellwind was back to being the spell of choice here. It blew away everything in a single casting, and the little Mini Mages actually restored some of Karthus' MP by trying to cast Psych/Osmose. That backfired of course, and they drained magic points out of themselves in the process. The biggest danger here came from status ailments, in particular the Confuse spell that the Imps would use. Normally that gets blocked by the Bone Mail, but I had discovered back in the Hiryuu Valley that the Necromancer cannot equip the Bone Mail! What?! It's one of those things that makes sense from a mechanics perspective, if not from a theming one. The Necromancer uses the "light" armor set common to all mages and the Bone Mail can only be used by classes that equip the "heavy" or "medium" armor sets. As a result, the one class that would be perfect for this thing can't use it. What a disappointment.

I felt the Bone Mail's lack keenly in the boss fight at the end of the forest against the Crystals. This battle consists of two phases: first a series of physical attacks, then followed by an elemental attack attuned to the element of each Crystal when they drop below 3000 HP remaining. Ordinarily the physical attacks are a mere nuisance, but the weak armor on Karthus combined with his inability to heal made them a serious threat. I found that they would kill him in about three rounds of combat if Karthus didn't do something to change the situation. The normal strategy for getting past this boss fight with a solo character is to damage the Fire Crystal (the one at the top) to the point where it will start casting Fire 3, and then rely on that for healing with a Flame Ring. Karthus would lean heavily on that tactic here as well.
My initial thought was to attack some of the Crystals with his physical weapon to deal chip damage before turning to the Dark Arts. That plan went immediately out the window; the physical attacks from the Crystals were too strong. Evil Mist was out of the question here as all of the Crystals are immune to poison damage. Therefore it was going to have to be Hellwind, and I had Karthus use it immediately at the start of the battle. That knocked three of the four Crystals into the damaged area, where they swapped over to using their elemental attack script. Critically, it did not damage the Air Crystal at all, which continued using physical attacks instead of casting Aero 3. That gave Karthus the space he needed to start using the Dancing Dagger to eliminate the Earth Crystal and Water Crystal as the Fire Crystal continued to heal him with Fire 3s. I could not use Hellwind a second time or else the Fire Crystal would die and that would remove the all-important healing. So Karthu defeated the first two Crystals, then slowly killed the Air Crystal in the back with more dagger attacks, and then finally used an ending Hellwind when only the Fire Crystal was left. Whew, that was tricky. I don't know how Karthus would have made it through here without a Flame Ring.

Exdeath's Castle meant more of using Hellwind against everything in sight. None of the monsters in this area had an immunity to air element damage, and the Magic Dragons shown here were weak against it. Hellwind made normally difficult encounters like this into easy victories. Karthus was even able to claim a win against the dreaded triple Blue Dragon battle; the Blue Dragons have a weakness to petrification attacks, and each casting of Hellwind eliminated one of them. Three castings meant 7500 XP and a somewhat dangerous victory. The hardest opponents proved to be the little Arage rabbits, listed as "Hellraiser" in the GBA translation. They will sometimes cast Life 2 (Arise) as a death reaction, and that would bring defeated enemies back to life again... thus forcing more castings of Hellwind and necessitating more magic points! Even with the Gold Hairpin helmet Karthus had to watch his MP spending. There was enough to make it from one save point to the next, but not enough to get much further than that. I found myself using more Cottages with this character than I had in ages. Annoyingly, this also brought all of the other party members back to life each time, and with this being the GBA version, I didn't know the cheat code to keep them all permanently dead. Repeatedly killing off those poor saps could get a bit tedious at times.
The last Gilgamesh encounter was as easy as expected. Hellwind, Hellwind, Hellwind, etc.

Exdeath was not an easy encounter at all, and proved to be the first true roadblock boss of the variant run. For once, the problem wasn't struggling with a low-offense character and needing to work around that Condemn at the start of Exdeath's AI script. Karthus had plenty of offense at roughly 4000 damage per casting of Hellwind, and he could always put out enough hurting to reach the second half of Exdeath's AI script before the second Condemn would come back around again. No, the problem here was surviving long enough to win the battle before Karthus ran out of health and kicked the bucket. Exdeath has a monstrous 32,768 HP and Karthus had to remove all of that before his own much smaller health pool ran out. Even in a best case scenario, Karthus was going to need to cast something like eight or nine Hellwinds to win the battle, and that meant living through more than a dozen Exdeath attacks. There was no way to do this without getting creative and finding ways to stretch the health total on Karthus.
I first tried Exdeath when Karthus reached him at Level 44. That went poorly, and it became clear that Karthus needed more overall HP as much as he needed additional damage. I decided to target Level 49 as a realistic goal for the boss, as that would add about 600 additional health and grant Karthus another magic damage multiplier. The key to this battle was following the same strategy that Karthus had employed against Archaeoavis and the Crystals: equip the Flame Ring to pick up some healing in mid-fight. Exdeath uses an ability called "Flame" about halfway through his initial AI script which deals 1/4 of max HP as fire damage. This would be huge if Karthus could see that ability appear, as it would restore about 800 HP instead of Exdeath using another attack that would inflict 400-700 damage. Unfortunately it only had 1 in 3 odds of appearing, and I didn't see it show up on the winning attempt. The Flame Ring was actually more important for the second half of Exdeath's AI script. Normally, this is the time when solo characters hide behind a Wall Ring and keep healing with Hi Potions while Exdeath slowly kills himself with reflected spells. Karthus had no such luxury, and the goal was instead to cross his fingers and hope for Fire 3s to pick up some healing, or barring that some Ice 3s which were neutralized by the Flame Ring and did zero damage. The bad options were Bolt 3s that did full damage, or either of Exdeath's two types of physical attack. Without getting some HP back via the Flame Ring, Karthus simply didn't have enough health to survive long enough.
This was another exercise in repeatedly running the boss battle and hoping for the luck factors to line up correctly. That stupid opening Condemn move instantly took out 2/3rds of all attempts, one of the eternally frustrating aspects of this fight for solo characters. I've gotten Condemn as many as 13 times in a row with some characters before, although the longest such streak for Karthus was only six. Other attempts at this battle were foiled by too many physical attacks landing, or the accumulation of damage over time. If Exdeath's Hurricane were to land, that was pretty much grounds for an instant reset too. Twice Karthus manage to get off seven castings of Hellwind and died with the action bar about to fill up for the eighth casting. On one occasion, he actually died from an Exdeath physical attack and then was revived from an immediate subsequent casting of Fire 3. It would have been awesome if that had been the winning run, but it proved not to be. When I did finally win out, it took place on an attempt where Exdeath cast Fire 3 twice and Ice 3 once. That left Karthus with just enough health to get off his eighth and final casting of Hellwind:

Karthus was barely still standing with 262 out of about 3500 max HP remaining. Karthus might have been able to get off another spell but it would have been pure luck. He couldn't have survived another physical attack and would have needed to pull more Fire or Ice 3s out of Exdeath. I'd say that this took about three dozen total attempts to pull off. While not as bad as the horror stories of the Dancer or the Geomancer, this was still pretty rough for a solo character. Definitely the hardest battle of the run to date for the Necromancer.


