
Marcel was stalled at the end of the first world for a long time, several years in fact. This was a report that looked like it would never be written for a very long time. Eventually I was motivated to go back and finish this character, in part because I was quite proud of the writing that I did in the first world, and in part because I didn't want to leave the last solo character report unfinished. We continue at the end of the first world:

This screenshot is from the discussion following Exdeath's escape, right before Galuf heads back to the second world. There are several different kanji employed here that are worth pointing out. One of them is right at the beginning of the second line: 暁 has the little helper hiragana next to it, which indicate that this transliterates as "Akatsuki" and means "Dawn" in English. I knew this word but I didn't know the kanji for it previously. Right next to it is a number 4 and then this kanji: 戦. I looked this one up (always a bit of an adventure to do!) and apparently it means "war", "fighting", or "battle". From the context of the conversation, it's clear what this means: this is a reference to the Four Warriors of Dawn, Galuf and Dorgan and the rest. The next line even states クリスタルの力 = "Kurisutaru no Chikara" = power of the crystals, which is a phrase used frequently in the game's text. Finally, there's another kanji that I do recognize at the beginning of the fourth line: 封, which transliterates as "Fuu" and means "Seal" in English. This is clearly a reference to Exdeath being sealed away by the crystals 30 years previously. This is another screen where I can work backwards and get a surprising amount of the text, aided obviously by knowing the English dialog ahead of time.

One small detail I picked up from the dialog surrounding the meteor miniboss trio is that the Adamantium ore / plot device is officially called アダマンタイト = "Adamantaito", or Adamantite. Very slightly different wording there. The first miniboss had the name キマイラブレイン = "Kimaira Burein", so Chimera Brain actually is the correct translation. A mixture of stabbing with the Guardian dagger and healing with the Healing Staff (along with equipping a Flame Ring to block its Blaze attacks) worked out just fine. The main damage source was アクアブレス = "Akua Buresu", which looks closer to "Aqua Brace" than "Aqua Rake". Perhaps this was caused by confusion on the part of the Japanese designers back when this game was originally made? While "brace" is an English word, it doesn't make sense in context here.
Titan's name was exactly what one would expect: タイタン = "Taitan". This is one Western word that converts easily between languages. Marcel healed as needed and had enough health that the Earth Shaker (アースシェイカー = "Aasusheikaa") attack was no danger. I didn't have anything fancy planned for the Puroboros (ピユロボロス = "Piyuroborosu") either; breaking rods did about 700 damage apiece to them, and so I had Marcel smash two of them and knock all of the bombs down into the critical range. From there, I defended and let them use Exploder for ~100 damage to Marcel, which was no threat. I make sure to purchase a full set of rods from Karnak before leaving the first world, ten of each type of rod for 30 total. I would need them for Atmos at the very least, and potentially other tight spaces for the Mimic.
On a sadder note, the party wishes Cid and Mid goodbye at the end of the first world by using "Sayonara", which is a formal way of bidding someone farewell. This indicates that the party never expects to see them again, something that doesn't come across quite as well in the English translation.

In the Abductor encounter, the monster immediately hit Marcel with Hurricane and dropped his health to critical, then was unable to land the finishing blow in seven or eight following attacks. Marcel's excellent physical evade allowed him to survive this plot-driven little battle. Opening the "treasure chest" afterwards prints an amusing message: ガスだ! = "Gasu Da!" or "It's Gas!" That's a mixture of katakana particles on the "gas" part, borrowing the word from English, combined with a hiragana grammatical particle at the end. And apparently this also deserved double exclamation marks because it was just that surprising that the chest had crazy purple knockout gas inside. Heh.  (As a Livestream viewer pointed out, why don't all the treasure chests have gas in them? This one seems to have been pretty effective.)
After more "Fua Fua Fua" mugging from Exdeath, we find out that Galuf's soliders are attacking the Big Bridge. And yes, it's called the Big Bridge in this version as well: ビッグブリッジ = "Biggu Burijji", which probably sounds cooler in Japanese than it does in English. Gilgamesh is also introduced here, with a direct katakana transliteration for his name (ギルガメッシュ = "Girugamesshu"). Unfortunately, I missed Gilgamesh's in-battle dialog because it flew past on the screen so quickly. I'll have to pause each line of text as it appears from this point forward.

The random encounters on the Big Bridge were straightforward, with Marcel attacking with his dagger and using the Healing Staff as needed to keep up HP. To deal with Gilgamesh in the party's second encounter with the recurring boss, I planned to run him out of magic points by moving to the back row and repeatedly mimicking the use of the Healing Staff. This was much easier for Marcel than it would be for another class, as I could simply hold down the A button rather than needing to select a self-attack over and over again. Gilgamesh has 1000 MP, and his only spell that uses them is Aero 2, which I've screenshotted above with its official name of エアロラ = "Earora" with the "-ra" ending to indicate that this is the stronger version of the air element spell. Aero 2 costs 10 MP, which meant 100 castings exactly to run Gilgamesh out of his magic points. I ran the emulator on Fast Forward for a bit, and this worked out without too much trouble. After that it was a long series of attacking and healing with the staff, with Gilgamesh unable to buff himself with Haste/Armor/Shell statuses. I had to be a little careful when Gilgamesh started using his Jump attack since it did about as much damage as the Healing Staff could recover, but my health regen exceeded his ability to damage Marcel, and that meant the battle was a guaranteed victory with enough patience. No need to break rods here, just use the proper tactics.
In Rugor Village, Marcel was able to pick up the Orihalcon dagger for slightly more attack power. Because I had purchased all those rods for breaking purposes, I wasn't able to get any Hi Potions yet due to lack of funds. Fortunately they were less important for this particular solo character due to Healing Staff usage. The Underground Waterway was fairly uneventful for the most part, more attacking with dagger and healing with staff. The most difficult customer proved to be the Radiator enemies: ブラッドスライム = "Buraddo Suraimu", which translates as "Blood Slime" and makes much more sense due to their constant Vampire spells. Marcel was unable to do enough damage to break through their high defense and endless self healing. I could have beaten then by running them out of MP, but they have 1000 MP and Vampire only costs 2 MP per casting. A random encounter wasn't worth several hours of Fast Forwarding, so I just ran away.

The Japanese names for Moogles is モッグリ = "Mogguri", although I think a lot of people out there probably know this already. And yes, they do say "Kupo" in the Japanese version as well (although at one point they say "KuKuPoPo" another another point they say "KuPoPoPo"; I don't recall that many different phrasings in the RPGe fan translation). The boss at the end of this area had the name タイラザウルス = "Tairazaurusu" which I'm pretty sure is meant to be "Tyrannosaur", although converted between languages in a very strage fashion. I used a Phoenix Down (フェニックスのお = "Fenikksu no O") to get the kill as usual, since the Tyrannosaur can easily pull one-hit kills against solo characters with its ???? attack and there's no save point anywhere nearby. The most important gameplay element in this part of the game was picking up the Dancing Dagger, which is indeed called the Dancing Dagger in the original: ダンシングダガー = "Danshingu Dagaa". I mean, it's literally a dagger that makes your character take the Dance action, I'm not sure what else the thing would have been called.
In Bal Castle, all of the soliders refer to Galuf as "King Galuf" (ガラフ王 = "Garafu Ou") which is pretty much what I was expecting. Interestingly, when Galuf laughs in one of the dialog scenes, he uses ハハハ = "Ha Ha Ha" instead of Exdeath's "Fua Fua Fua" cackling, which appears to be reserved for villains. Apparently it's easy to tell the good guys apart from the bad guys in this world: just listen to how they laugh!  The Mimic can also wear the Angel Suit hidden in the castle, which is called テンシのはくい = "Tenshi no Hakui" in Japanese, which was helpful since I did know that "angel" translates as "tenshi" in Japanese. Unfortunately, this is no better than the standard armor available at this point in the game, so I held on to it for potential use if Marcel needed immunity to poison or extremely high magic evade (25%) somewhere ahead. Too bad the +5 Vitality on this item doesn't actually result in higher HP like it should. One more note from Bal Castle: the Epee is another one of those misnamed items from the RPGe fan translation. It's actually the グレットソッド = "Guretto Soddo" or Great Sword. I wonder why they rendered this as the Epee in their translation (?)

As best I can tell, the fan translation is an accurate rendering of the conversation that takes place in Kelb Village. The snippet I have pictured above comes from the moment when Bartz casually tosses out that Dorgan is his father, causing the other characters to gasp in shock. Galuf's line reads まさか = "masaka", roughly "unbelievable" or "no way". Kelgar (officially ケルガー or "Kerugaa") states ドルがんの息子 = "Dorugan no Musuko" or "the son of Dorgan", with the last two symbols being kanji that I had to look up. This is a pretty simple scene to translate of course, but I still enjoyed the rare occasions where I could get the entire meaning of a small section of dialog. Another small detail worth noting: Bartz refers to his father as "Oyaji" throughout this whole scene, which is a very familiar or slang term, roughly equivalent to "Pops" or "Old Man" in English. There's a real difference between the formality of speech used by Lenna and the casual offhand language used by Bartz in this game that doesn't necessarily come across in English.

Marcel had the Dancing Dagger equipped while venturing through the Hiryuu Valley, giving me a chance to see the names of all four of the Dances that could pop out. Mystery Waltz remained almost exactly the same, appearing as ミステリーワルツ = "Misuterii Warutsu" in katakana. Tempting Tango was more confusing, appearing as みわくのタンゴ = "Miwaku no Tango", with a mixture of hiragana and katakana particles. I looked up "miwaku" and it apparently translates as "attraction" or "bewitched"; that looks like a good fit. I figured that Jitterbug Duet would be something different entirely, but I was wrong. It appeared as 二人のジルバ = "Futari no Jiruba", although it used hiragana particles instead of kanji for the "futari" part. "Futari" refers to two people, which covers the duet, and a search online revealed that "jiruba" actually does mean "jitterbug". Huh, imagine that. Then there's good old Sword Dance pictured above, つるぎのまい = "Tsurugi no Mai", and both of those are words that I did know already in Japanese, with "tsurugi" meaning "sword" and "mai" meaning "dance". This is indeed as literal as it gets, and an easy translation.
In terms of gameplay, I used the Dancing Dagger from the safety of the back row against anything that wasn't undead. Sword Dance put up the predictable huge damage (2000 from the front row and 1000 from the back row) when it showed up, and most of the other Dance options were pretty decent too. Against the Zombie Dragons that pop up so frequently here, I had Marcel use the Healing Staff as an offensive weapon, something I've done with past solo characters as well. Hey, those Cure2s did about 350 damage from the safety of the back row, which was more than standard weapons were doing! Rinse and repeat while self-healing Marcel as required. The Angel Suit was genuinely useful here, neutralizing the poison breath from the Zombie Dragons while still allowing for self-healing that the Bone Mail (another literal katakana translation rendered as ボーンメイル = "Boon Meiru") would have locked out. Progress was slow but steady through this area.
The Hiryuu Plant posed an unexpected challenge for Marcel. I thought that I could break a couple of the rods saved up from the first world, and flatten the plants with Fire/Ice/Bolt 3. However, this didn't work in practice; breaking one of those rods only did about 350 damage to all of the enemies, and while that could work in theory, I didn't want to use up every single rod here. Why was the damage so low? Two reasons: first, Marcel's Magic Power stat was much lower than the pure caster classes at only 25, giving him a smaller multipler for his spell damage. Second, the Hiryuu Plant and its flowers have very high magic defense, with 40 on the plant itself and 50 on the flowers. That was cutting into the base damage of the spells, which was then cut further by Marcel's low Magic Power and the penalty for multi-targeting all opponents at once. I needed a different answer here.

The solution was to take a page out of the Necromancer's playbook. I headed back to Kelb Village first and sold all of the Dragon Fangs that I had picked up to purchase Venom Rods (ポイスンロッド = "Poisun Roddo", obviously Poison Rod in katakana). I ended up with about 50 of them, and descended back into the Hiryuu Valley once again with the new rods in tow. When I reached the boss, I equipped the Bone Mail, Lamia's Tiara, and the Elf Cape. The Bone Mail famously locks out Aging/Old status, Poison status, and Darkness status from the first three Hiryuu Flowers, while Lamia's Tiara removed the possibility of being Charmed from the last flower. That left only the paralyzation flower, and I made sure to kill that every time it appeared. My offensive plan was to break Venom Rods for castings of Bio against the Hiryuu Plant, each of which did about 800 damage. Normally, the problem with the Bone Mail is that your character will run out of HP before the Hiryuu Plant can be destroyed, and the Bone Mail prevents your character from healing. However, Marcel had the rare combination of being able to equip the Bone Mail and rods at the same time, allowing him to break Venom Rods on himself for healing. That made this battle a cinch, and I slowly wore down the Hiryuu Plant until it was exterminated. It took 22 Venom Rods, an investment well worth the expense.
Then on the walk back from the boss to the nearby save point, Marcel ran into two Bone Dragons in a back attack encounter. One immediately dropped his HP to critical while the other one attacked and missed. (Good thing I had made sure to equip the Guardian dagger for slightly more evade while walking to the save point!) I started running immediately, but I could see the monsters were going to get off another round of attacks first, so I quickly swapped to the Healing Staff and got in a self-healing attack, a split second before one of the Bone Dragons smacked Marcel in the face. Whew.  That saved me from having to redo this boss fight a second time, and Marcel skedaddled out of there in a hurry. This was a nice little example of micromanaging the small details that can save you a lot of time and effort on these solo runs.
In the resulting scenes at Bal Castle, the turtle sage is introduced for the first time, and the name is rendered here as ギード = "Giido". Both of the fan translation's "Guido" and the official translation's "Gheedo" are roughly accurate, with a slight edge to the official version. I'll also note that when Lenna starts eating the Hiryuu plant in her second act of self-poisoning, there's a text line that reads モグモグ = "Mogu Mogu", which appears to be the Japanese equivalent of "munch munch" or something to that nature. Also Cara keeps referring to Lenna in this scene as おねえちゃん = "Oneechan" which means "older sister" and indicates that the party is now essentially part of Galuf's extended family. Awww. It's very touching.

Next up was the ship battle against Gilgamesh and Enkidou, the latter of which is spelled exactly the same in Japanese using katakana. This can be a tricky obstacle for solo characters due to the lack of obvious weaknesses on the two bosses (no elemental weaknesses and few statuses to exploit) combined with Gilgamesh's use of Death Claw for the instant gameover pairing of HP critical status + paralyzation. My initial reaction was to head in swinging with the Dancing Dagger and hope to pull enough Sword Dances to win before bad RNG on Death Claw killed me. I could actually wear the Bone Mail for defense against Enkidou's Vampire attack and still break Venom Rods for self-healing if needed. However, after getting wiped out by Death Claw four or five times in a row, I realized that I could play this a bit smarter.
Death Claw has base 66 percent odds to hit, and since Marcel had a slightly higher level than Gilgamesh, those odds dropped to about 60 percent. I realized that I could drop these odds much lower by wearing the proper defensive equipment, in particular the Angel Suit and its massive 25 percent magic evade. Combined with Lamia's Tiara (10 percent magic evade) and an Angel Ring (another 10 percent magic evade), I could get a combined 45 percent magic evade. Apply that to the base chance of the spell hitting, and the odds of Death Claw suceeding were reduced to roughly one third. I also opted to drop the randomness of the Dancing Dagger in favor of breaking rods, as getting a consistent 800 damage was better than dealing 2000 damage from a Sword Dance at 1/8 odds. This was immediately more effective, and I won the battle on my second try with this new approach.

Here's a picture of Death Claw being cast and missing on the winning attempt. Death Claw (デスクロー = "Desu Kuroo") and other spells that fail to work are difficult to screenshot, as they pop up on the screen for about 0.5 seconds before disappearing. Marcel actually managed to dodge four Death Claws on the victorious try, although that was only because the battle was extended due to being Slowed by Enkidou. It just proved once again that Death Claw is the one real danger in this fight, and doing what I could to minimize the odds of being hit was the best approach. Too bad the Angel Suit and its magic evade are unavailable for so many other classes.
Galuf's swordsman friend has the name ゼザ = "Zeza" in the Japanese version, which seems to be translated the same way in English, with "X"s sometimes replacing the "Z"s depending on the translation. I think the RPGe fan translation uses Xeza, and that's more or less accurate. He still looks like Krusty the Klown to me. From what I could gather of the dialog, the objective for the party is to attack the "Antenna" at the top of the Barrier Tower, and I believe the English translations use the same word for that. Gameplaywise, Marcel turned up a Wall Ring (officially リフレクトリング = "Refurekuto Ringu", so the official GBA translation is more correct here) very quickly after only about five eligible battles for the drop. The Red Dragons were the most interesting opponent, and equipping the Flame Ring ahead of time limited the damage they could do. Some timely Atomic Rays allowed Marcel to win these encounters.

There's often been a lot of confusion as to whether this boss should be named Atmos or Atomos. Well, the original name in Japanese is アトモス = "Atomosu" which seems to favor the latter version, although either one is a serviceable translation. Marcel went into this battle by dropping his shield to shed some equipment weight, while picking up the Angel Suit and Angel Ring again to boost his magic evade. The boss can cast Slow2 and Old spells, and I needed to avoid those. The offense was carried again by breaking rods, finally using those saved up Fire/Ice/Bolt Rods from back in Karnak. They did about 1400 damage each when broken, and by following my standard pattern of killing off the other three characters one at a time, this was plenty of damage to take me past Atomos. It was too bad that Marcel didn't have any way to inflict Sleep status on the boss, which would have made this a very easy battle.
Now I could head to the sage's underwater cave, but I decided to make a pit stop in Mua first to purchase the new weapons and armor available for sale. Let there be no mistake: the name of this village is Mua, not Moore or whatever they used in the GBA translation:

The text clearly reads ムーアの村 = "Muua no Mura", which is definitively "Town of Mua". There's no other reading possible here. Changing this to "Moore" village is more of the SquareEnix revisionism that we've already seen speckled through the GBA translation. Anyway, the Air Knife (hilariously written as エアナイフ = "Ea Naifu" in a bit of awesome Engrish) was particularly useful since a lot of the upcoming monsters were weak against Air element. I also purchased all three sets of armor for Marcel, as there were times when I would want to emphasize different stats for him depending on whether I wanted to utilize physical or magical attacks. The Mimic is almost as flexible as the Bare job in that regard.

Marcel had to venture down into the sage's cave next in order to advance the plot. Watching the action play out between the characters, it's clear that the RPGe fan translation is a lot closer to the original in this particular scene. The interactions of Bartz with Sage Guido/Gheedo are played off here as a comical misunderstanding; the turtle sage quickly brushes the whole thing off and immediately begins telling the party about the threat that Exdeath poses to the next dungeon, the Great Forest of Mua (ムーアの大森 = "Muua no Dai Mori", using two kanji that I actually do know for "big" and "forest"). There's no indication whatsoever that the turtle holds a grudge against Bartz, and none of the sarcastic insults of the GBA version are present. I suspect that was added by one of the writers at SquareEnix at the time of the GBA remake because they wanted to jazz up this scene for a more modern audience. In any case, it confirms that this was a later change to characterization, as I long suspected.
There's not much to describe about the gameplay in this area, which consists of endless battles against the same Metamorpha monster over and over again. They have the Light Staff as a rare drop (ひかりのつえ = "Hikari no Tsue") which casts the Holy spell when broken, and I knew that I'd need to come back here for a few more to deal with Exdeath at the end of the second world. Picking up one during my actual plot-driven run through the place was a nice break of luck.

The Forest of Mua was a relatively easy area, as it normally proves to be for solo characters. Marcel equipped the Bone Mail and other pieces of the heavy armor set, then whacked away at the enemies with physical attacks. Between his physical evade from shields + Elf Cape and the mostly physical attacks in this dungeon, he was rarely in any danger for his life. On the few occasions where it looked like Marcel was in trouble, I had him break more Venom Rods for a Bone Mail friendly infusion of 800 HP. This is one of the very few characters that's been able to wear the Bone Mail and also get a version of self-healing at the same time. At first Marcel used the Air Knife from the front row; later on, he upgraded to the Morning Star (モーニングスター = "Mouningu Sutaa"), allowing him to dish out roughly the same damage from the safety of the back row. The only penalty was the 10% chance to miss while attacking with the Morning Star, but I could live with that. A non-White Mage using the Morning Star for damage this late in the game?! Very strange. Even stranger, Marcel also picked up the Aegis Shield here (イージスのたて = "Eejisu no Tate", with the "Aegis" part rendered in katakana and the "Shield" part remaining in hiragana) which had him wielding a staff in one hand and a shield in the other. Like I said, very odd indeed.
The presence of the Flame Ring eliminated most of the danger from the Crystals boss fight. I had Marcel damage the Fire Crystal into the critical range, and then relied on the endless healing via enemy Fire3 spells for safety. The first time that I did this battle, the Air Crystal killed him by landing two Aero3 spells in a row. The danger comes from the fact that the Air Crystal is faster than the Fire Crystal, and could sometimes line up two spellcastings in a row. Even worse, Marcel was wearing the Aegis Shield at the time, and it was randomly blocking some of the Fire3 spells that I was counting on for healing! When I tried the battle a second, I swapped back to the Diamond Shield and equipped all of the equipment that had the highest magic defense value possible. This slightly lowered the damage from Aero3, enough so that it was just short of doing enough damage to kill Marcel in two consecutive hits. That meant he would never die before the Fire Crystal could get off a life-infusing Fire3 spell, and the battle was a cinch from there.

I found some interesting details in the dramatic confrontation against Exdeath that follows the boss encounter. For starters, Exdeath repeatedly states that he wants the party to die; he yells 死ねい! = "Shinei!" several different times, which means "Die!" when translated. Not "I will destroy you!" or "I will knock you down!", it's a direct statement that he intends to kill the party. This feels a bit more brutal and direct in the Japanese version. When Galuf has his cutscene battle against Exdeath, the text box at the top of the screen has a lot more "...." spaces than in the English translation. Perhaps this is because Roman letters take up more space than Japanese hiragana particles, and the English translators needed to fill up the text box to get the same meaning across. In this version, all of those dots and pauses in Galuf's speech makes it much clearer that he's slowly dying while clashing with Exdeath. Some of this was lost in the need to switch to a very different Western alphabet.
The scene above is even more heartbreaking when viewed untranslated. The increasing grief and denial coming from Cara are conveyed using Japanese particles of speech that don't exist in English. I believe this is rendered as something along the lines of "Grandpa! No! Noooo! You can't be dead!" but it's not the same thing as going from いやー! to いやだよー! to 死んじゃいやだよー! Combined with the animation of her little sprite falling to the ground in the same place where Galuf's body just disappeared, this is a genuinely moving cutscene, especially one using the limitations of SNES sprite graphics.  FF5 has a nonsensical plot for the most part, but this was well done.
After this dramatic moment, it was time to... go farm more Light Staffs in Sage Guido/Gheedo's cave again. Somewhat anti-climactic, but I needed those staves, so I went ahead and grinded them out. My target was five total Light Staffs, since my solo Red Mage had used four against Exdeath, and Marcel had a lower Magic Power stat for a smaller multiplier and slightly less damage. I found the second and third Light Staffs quickly, then ran through a dry spell of 50 or 60 battles without getting one, followed by the fourth and fifth dropping in rapid succession. Randomness at its finest there.

Exdeath's Castle was a bit more dangerous than the last few areas that Marcel had passed through, and he was wiped out a couple times by nasty random encounters. I mostly kept him in the back row and continued to fight with the Morningstar, using the Bone Mail to protect against physical attacks while retaining Venom Rods for emergency heals. I had gone back to Kelb and restocked on a few dozen of them, and there was no worry about running out. They only healed for the same 800 health though, and that was less than half of Marcel's max HP now. I had Marcel equip the Flame Ring in the parts of the castle where the Red and Blue Dragons roam, as that protected against both of their elemental attacks, and I kept on the Diamond Helmet to resist the lightning damage from the Yellow Dragons. This worked reasonably well overall. Marcel gained a major damage increase when he picked up the Double Lance (ツインランサー = "Tsuin Ransaa" or Twin Lance), which effectively doubled his damage output if he was willing to move up to the front row. Mimics are one of the very few classes that can use the thing along with Thieves and Ninjas, and it was appreciated here during the brief period before I would pick up the Chicken Knife.
I didn't pull anything of note out of the text surrounding the final Gilgamesh battle. It appears to follow the same script as the two English translations as best I can tell. In gameplay terms, Marcel continued to use the Double Lance along with the Bone Mail, Aegis Shield, and Elf Cape. That gave him excellent physical defense and high physical evade, along with protection against many of Gilgamesh's status attacks. Normally this won't work for your average character because they run out of health before the end of the fight and can't heal themselves with the Bone Mail. Marcel could get around this issue by breaking Venom Rods for self-healing, and I would break three of them before this battle was over. It all took minimal fuss and Marcel emerged victorious on the second try.

I selected Marcel's equipment with great care for the showdown with Exdeath. He would be breaking Light Staffs for the first half of the fight, and then swap over to the Guardian dagger for more physical evade in the second half. Naturally I wanted the Aegis Shield in his offhand, then the Diamond Helmet for lightning defense in that slot, along with the Angel Suit for maximum possible magic evade and immunity to poison element. Rounding this out was the Wall/Reflect Ring, as usual in the last equipment slot. I wasn't exactly sure how much damage a broken Light Staff would do, and was pleased to see it come out right around 4000, sometimes slightly higher and sometimes slightly lower. Marcel broke four of them in succession, needing to get Exdeath below 16k health remaining to trigger his second and less dangerous AI routine. After breaking four staves, Exdeath had about 16,600 health left (since he starts with 32,768 HP) and rather than try to fool around with attacking, I had Marcel break the fifth and last Light Stave for another 4k damage. That swapped Exdeath into his second AI routine, where Marcel equipped the Guardian dagger for 50% total physical evade and concentrated on healing himself while Exdeath slowly committed suicide via reflected Fire/Ice/Bolt 3 spells. I was actually Mimicking the drinking of Hi Potions for long turns on end, therefore getting free healing without even needing to consume my items! It was a strange and tensionless ending to what's normally a very dangerous battle. For the curious, Exdeath's signature Vaccuum Wave attack is written as しんくうは = "Shinkuu Ha", which an online search translates as "Empty" or "Hollow" or "Vaccuum" wave. Pretty much as expected there, although I think the meaning leans a little bit more to the "emptiness" side in Japanese rather than the "lack of air" side.

There's a lengthy series of cut scenes at the opening of the third world, and it took quite some time for me to watch all of them play out. Frankly, there was too much information for me to absorb, and I'm sure that this only captures a portion of what was taking place. I'll mention first of all that the name of the villain from 1000 years in the past remains the same: エヌオー = "Enuo", just as rendered in the English translations. I've also circled one particular kanji in this above screenshot: 無 = "Mu", which translates as "a complete absence of anything" in the reference that I found online. It's the kanji used to refer to the Void, and it starts popping up repeatedly in the dialog here in the third world. For whatever reason, whenever this kanji appears it always has those two quotation marks around it, which doesn't happen for any of the other symbols. I guess that the writers were trying to make the idea of the "Void" stand out, like I just did with quotation marks there. Interesting.
Exdeath soon shows up again to engage in more "Fua Fua Fua" cackling and twirl his villain mustache. He might as well put on a top hat and monocle while stroking the fur of a white cat. I was slightly disappointed that the line in the RPGe fan translation where Exdeath shouts, "Damned Turtle!" is rendered here only as "Turtle!..." But that does make sense, as the fan translation inserts some swearing that's not present in the Japanese original. One other thing that I noted here is that the use of kanji and hiragana/katakana particles allows the Japanese text to be displayed in notably fewer screens than the English translation. For example, when going through the location of the Sealed Tablets in the third world, the Japanese original lists two tablets per screen, while each one requires its own separate screen in the English translations, just because the Roman characters used for letters take up more space. This is the reason why speedrunners so often use the Japanese version of a game to shave off a few seconds of time. It's very noticeable here how the same information can be conveyed in fewer total screens of conversation. I imagine this causes some real problems for translators when they have to work around cut scenes that contain timed events or musical queues synched with the speech.

Marcel made sure to grab the Chicken Knife (チケンナイフ = "Chiken Naifu") and run from enough battles to power it up to full. I planned to weaken the two Gargoyles into the critical range and then break a rod to finish them off at the same time, only they both used Fusion and destroyed themselves before Marcel had to do anything. OK, that works too. Within the Pyramid, I found myself equipping the Double Lance over the Chicken Knife most of the time to avoid the flee effect. Marcel was sturdy enough that he could win most random encounters without trouble, he simply needed to avoid running away prematurely. The Cursed Ones (のろわれしもの = "Norowareshimono", and I have no idea what that means) were a different story. They appear over and over again as a group of four in trapped treasure chests, and while the Chicken Knife could kill them easily, Marcel would keep running away and resetting the battles. Eventually, I figured out that I should go into the battle with the Cursed Ring equipped to buff Marcel's defense, and use the Chicken Knife to attack the first two. If he ran away, I would restart the battle again. If not, I would switch back to the Double Lance to finish off the last two, with time to spare before the ticking doom clock ran out from the Cursed Ring. Other battles involved some creative solutions; I broke a Fire Rod against the mummy trios to stop them from using Dance of the Dead when there was only one remaining, and broke a pair of Thunder Rods to take out the five-pack of Statues guarding the one treasure chest where they appear. The MachineHead robots were prey to a lot of stabbing with the Chicken Knife, and weren't terribly difficult.
Merugene was a total joke. Marcel equipped the Bone Mail, Ice Shield, Flame Ring, and Diamond Helmet. That reduced damage from her physical attacks to zero, cut lightning damage in half, and absorbed fire and ice elements. Merugene was completely unable to hurt Marcel at all, outside of 300 damage Bolt 3 spells when they appeared. However, her Fire/Ice 3 spells each healed Marcel for 700 HP, and as a result he spent the whole duel sitting on max health. The random encounters in the Pyramid were significantly harder than this boss battle.

At Kuzar Castle, I took the only three Legendary Weapons that Marcel could use: the Assassin Dagger, the Wizard Rod, and the Sage Staff. The first two have the normal English names as translated through katakana, but the Sage Staff is listed as けんじゃのつえ = "Kenja no Tsue". When I looked this up, it does translate as "Sage Staff" only using hiragana instead of katakana and relying on native Japanese words instead of English replacements. I wonder why this item is different from the others? I also finally managed to understand the whole issue surrounding Gilgamesh and his fake Excaliber versus the real one. The actual Excaliber pictured above has the name エクスカリバー = "Ekusukaribaa" while the fake one that Gilgamesh wields is named エクスカリパー = "Ekusukaripaa". As expected, the whole thing is a pun with the last katakana particle being "PA" instead of "BA". The official GBA translation cleverly renders the Gilgamesh sword as the "Excalipoor", which captures the intention here quite well.
I made my usual stop at Mirage Village as soon as the airship was available, and purchased a full set of all the endgame armor for Marcel: heavy, medium, and light types. There was no telling when I would want to swap his configuration around depending on the circumstances at hand, and the Mimic class is almost as versatile as the Bare class in this regard. By now, I was carrying around a ton of equipment, in part because I was worried I would sell something important due to misunderstanding what it was named! I also picked up the Running Shoes and Coral Ring here, neither of which had an easy name to remember. The Running Shoes are エルメスのくつ = "Erumesu no Kutsu" while the Coral Ring is さんごのゆびわ = "Sango no Yubiwa", neither of which was helpful. I mostly identified these items based on the stats that they provide, which I have memorized after so many playthroughs.

There was one other item I decided to pick up that I haven't used before with previous solos. These Isteritos enemies have the Staff of Judgment as a rare steal, an item that casts Dispel when used as an item in battle. That seemed like it could potentially be useful, and I decided that I would go hunt it down since Marcel was able to use staves. These enemies can be found near Rugor Village in the third world, and using the Thief Knife, I eventually managed to swipe one. The rare steal only pops up 4 percent of the time as compared to 96 percent of the time for the common steal, so I ended up with a couple dozen Antidotes from the common steal before landing what I wanted above. Half the trouble was figuring out what the text printouts at the top of the screen were telling me - which ones were successful steals and which ones were failures? I sorted it out in time though. The Staff of Judgment is officially さばきのつえ = "Sabaki no Tsue", and by now I was well familiar with the fact that "Tsue" means "Staff" in Japanese. While this probably wasn't necessary for the run, I enjoyed finding something a little different for Marcel to play around with.

The Solitary Island Temple was smooth and straightforward. Marcel used the Double Lance to stop himself from running away and had no difficulties grinding through the random encounters along the way. The most unusual thing was failing to run into even a single Tote Avis. Oh sure, now I fail to see any of them! Would have been nice for some of my Brave Blade runs. Anyway, I'll note here the name of the boss at the end since there's been much confusion over this guy. The untranslated name is ストーカー = "Sutookaa", which I suppose literally translates as "Stoker" but is very clearly intended to be "Stalker". The GBA translation gets the one correct, while the RPGe fan translation winds up being overly literal and results in a name that makes no sense. The horrible Playstation translation comes up with "Wendigo", which is a pure invention that has nothing to do with the actual name at all. "Stalker" is definitely the answer here. The battle itself was a non-issue, with Marcel using the Chicken Knife and never even needing to break Venom Rods for healing.
Up in Fork Tower, Minotaur was handled as easily as ever with the Chicken Knife. The boss on the other side of the tower was the fun part for Marcel:

For starters, Omniscient is named すべてをしるもの = "Subete wo Shirumono" which apppears to translates roughly as "One Who Knows Everything", or in this context a mage who knows every spell. It's a fitting name since Omniscient has such a wide variety of spells at his disposal. I could do this battle very easily by running Omniscient out of magic points by equipping the Bone Mail and Wall Ring as usual, or even Mimic drinking Elixirs endlessly until the boss ran out of MP. There was a better plan though, and that was to go deep into some item twinkery to get around Omniscient's various status buffs. I planned to use the Staff of Judgment to cast Dispel, which would remove Omniscient's Armor, Shell, and Regen statuses. He will refresh the Regen status throughout the battle, but he doesn't ever cast Armor or Shell. In order to do this, I needed to Mute the boss via a reflected spell cast through the Mage Masher dagger. Experimentation revealed that I could only get this to work if Marcel was in Haste status and Omniscient was in Slow status. Otherwise, there wouldn't be enough time to self-attack and get the Mute spell off, then follow it up with another command. However, once I figured this out, I was able to use the Staff of Judgment as pictured without Reseting the battle.
From there, Marcel could go to work with the Chicken Knife. He would self-attack with the Mage Masher until getting off a Mute spell successfully, then swap to the Chicken Knife with enough time to get off exactly one attack before Omniscient would be unMuted and the process would have to start all over again. This was frustrating when I would get the "Can't Run!" flee effect out of the Chicken Knife, but there was nothing to do about that. Shorn of his Armor status, a successful attack did 3300 damage to Omniscient, and that was a huge chunk of the 16k total health of the boss. After Omniscient had eaten four such attacks, he refreshed his Haste status and I was forced to wait until he Slowed himself again. However, without Shell status to reduce the damage taken, Omniscient's Regen was no longer sufficient to nullify the damage he was taking from spells reflected off of Marcel's Wall Ring. Bio spells in particular were doing 850 damage apiece, and that was far too much for Omniscient's 175 HP ticks of Regen status. I watched in amazement as the boss dropped his life below 4k remaining, at which point in time he began casting Fire/Ice/Bolt 3 spells, further savaging his own healthbar. The final Flare did 2000 reflected damage, and that was it. I've played close to 20 solo characters now, and never had an Omniscient battle quite like that one. What a blast! 

The Great Trench was not a fun dungeon for Marcel. All of the Unknown enemies down there have some kind of reaction to use of the Fight command, and Marcel had no other way of inflicting damage outside of breaking Rods, which wasn't practical for random battles. (I wasn't going to mass Phoenix Down the undead enemies either.) While I could use the Staff of Judgment to Dispel the Armor status that these monsters start out with, Marcel still fell short of enough damage to kill the Blob opponents in a single hit, which meant running from them to avoid the risk of dying via Possession. The Skeleton Unknowns were also not worth fighting due to their Condemn spells, and that left only the Worms and Fish, which were long and tedious encounters where Marcel would have to Dispel each one, then slowly wear them down via the Double Lance. I ended up running from most encounters.
By contrast, the piggy trio at the end was a joke. The Bone Mail and Flame Ring combo nullified all of their magical damage, and the Aegis Shield kept Marcel from dying to Delta Attack if he accidentally killed one of them. Any physical damage that he took was healed away the next time a Fire 3 or a Bio attack landed. I had Marcel wear them down with the Chicken Knife - 4 attacks for the one in front, 8 attacks for the two in the back row - and then finish them all off together with a Bahamut summon from the Magic Lamp. That particular item is named まほうのランプ = "Mahou no Rampu" which is indeed a hiragana/katakana mashup of the words for "Magic" and "Lamp". I figured this method was a little bit more stylish than using Odin for the instant kill. Another small note: the pigs don't say "Oink Oink" in Japanese, they say ぶいぶい = "Bui Bui" instead. Every language has its own way of translating animal noises into human speech.

After that ordeal, Istory Falls was a breeze. The monsters in random encounters were easily killable and handed out nice rewards in terms of gold and experience. Just as I never saw a Tote Avis in the Solitary Island Temple, I never ran into a Tonberri here either. Leviathan was legitimately dangerous though, since his attacks could do roughly 700-800 damage and Marcel still had just under 3000 total health. I equipped a Coral Ring for protection from the Tidal Waves of the boss... well, I died the first time because I picked the wrong item, not remembering what "Coral Ring" was in Japanese. Heh. The second time I fought this battle, Marcel had the Coral Ring as planned and used it to heal from Leviathan's signature attack. Even with the Chicken Knife, this was slow and tricky going, requiring 16 successful attacks to defeat the boss. Marcel kept the Bone Mail on and broke a lot of Venom Rods for healing in this fight, almost ten of them in total. It did work though, and eventually Leviathan keeled over.
I also have to type out another amazing Engrish translation. Leviathan's attack is formally タイダルウェイブ = "Taidaru Weibu" for "Tidal Wave". I love it. 

Rather than purchase Elixirs, Marcel used his accumulated gold on a whole bunch of rods for potential breaking in the final dungeon. In the Cleft of Dimension, I found Marcel getting some good use out of the Wonder Rod's ability to cast Reset when used as an item. I had forgotten about that earlier and only remembered it when trying to cycle through the list to Shell. This saved me from a certain gameover in a couple of situations, especially with the Land Crawls in the desert area. Hate those things. The Lonka Ruins section was pretty easy to traverse, as the Roulette spells would heal Marcel to full HP thanks to the Bone Mail. I used rod breaking to get past some of the large mobs in the forest area, as it was the one tool Marcel had for getting area of effect damage. Calofisteri was as easy as ever, failing to inflict any damage at all and healing Marcel with her attempted Drain spells. I ran away from the random encounters in the Waterfall section, then broke Fire Rods against Apanda for 4000 damage apiece. The book monster responded to them by casting Armor, which is interesting because that's his triggered response to physical attacks, not magical attacks. I guess the broken rods were considered a type of physical attack and not a spell. Apanda hit Marcel exactly one time, and was possibly even less of an obstacle than Calofisteri.
The monsters in the Sky portion of the final dungeon were too difficult to kill easily, and Marcel mostly ran from these encounters. As far as Apocalypse went:

The first surprise is that the boss is, in fact, named Apocalypse: アポカリョープス = "Apokaryoupusu". The whole "Azulmagia" name used in the GBA translation, which is logically appriopriate given this opponent's stance as a Blue Mage, was a creation of the remake. I thought the fan translation was wrong, but nope, it's a revisionist change in the remake. Huh. As far as the battle was concerned, Marcel geared up with as much magic evade as possible and set to work breaking Venom Rods. While they didn't do that much damage, they were still better on the whole than attacking with the Chicken Knife, especially give the boss weakness to Poison element. Apocalypse tried a bunch of different spells with no luck, all of them failing to hit Marcel. The only Level spell that had the potential to land was Level 5 Doom (Marcel was Level 55), which was covered via the Bone Mail. My favorite moment of this battle was when Apocalpyse broke out Mighty Guard to boost his defenses... and then Marcel immediately Dispelled it away with the Staff of Judgment! Ha, it was totally worth it to find that thing earlier! Marcel won on the first try and never took even a single point of damage.
Catastrophe was a slugfest on each side, since I was trying to save Elixirs with the new save point located right next door. The Aegis Shield protected Marcel from being petrified, but his health kept running out from repeated Earth Shakers without a Float spell for protection. Eventually I managed to make it through this ugly battle with only a single Elixir used, the maximum that I was allowing for this engagement. As for Halicarnassus:

Marcel used the Staff of Judgment again to Dispel the Shell status that Halicarnassus tried to erect, then watched as the boss slammed reflected Holy spells off his Wall Ring. ("It's over 9000!") Halicarnassus dropped after three of those spells, and Marcel barely even had time to do any attacking with the Chicken Knife.

I gained one more level with Marcel, up to Level 56, to ensure that he would have enough health to survive a casting of Giga Flare. As the image indicates, his health total was just barely sufficient to make it through intact. I equipped the Coral Ring for this battle to nullify the Tidal Wave counters (not that I saw very many), and the Chicken Knife slowly carved apart Twin Tania 2600 damage at a time. I was able to save some Elixirs by drinking one right before Giga Flare went off and then Mimicking it immediately afterwards for the full heal without consuming a second item. While Marcel could have used the Assassin Dagger and gone for the easy kill during the vulnerable chargeup phase, I've done that too many times in the past. I went for the legitimate victory instead, and Marcel earned it at the cost of 5 Elixirs without any real danger.
The Void section presented no problems for Marcel; I put him in the back row and used the Chicken Knife to flee from these encounters that offered nothing in terms of experience points. This quickly brought Marcel to Necrophobia:
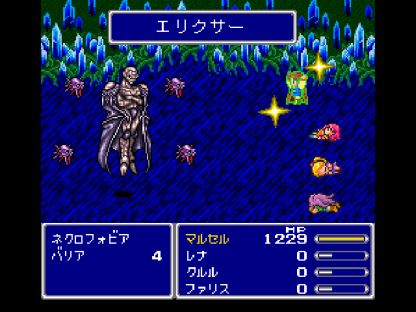
I always wondered why the Algorithms Guide referred to this boss as "Necrofobia", and now I know why: that's the name in Japanese. Marcel began the fight by giving himself Shell status out of the Wonder Rod, and then drank an Elixir to heal from the first quartet of Barrier spells. He kept right on Mimicking that same Elixir over and over again until the Barriers ran out of magic points. This "bottomless cup" strategy is something that ends up working similarly to the Bard's Hide ability, albeit a little bit weaker since Marcel was still targetable while healing endlessly. It's one thing that the Mimic can utilize that's completely unique to the class. The Barriers only have 300 MP apiece and soon ran out, which allowed Marcel to cut them down with the Chicken Knife in complete safety. For the second half of the battle, Marcel stayed in the back row and broke Fire Rods to explain Necrophobia's elemental weakness. The boss has high physical defense but is weak to all eight elements, and even with Marcel's modest Magic Power stat he was able to break Fire Rods for about 4000 damage apiece. Shell status gave excellent protection against potential Hurricanes, and I never saw one pop up. Marcel won this fight without any real difficulty on the first encounter. Sadly, he was unable to steal the Genji Armor from Gilgamesh in three tries during the following cutscene, and while this battle had been fairly easy, it wasn't so easy that I would retry it just in the hopes of stealing that armor. Too bad, since Marcel was one of the few solo characters who could actually equip it.

That just left the final boss himself. The "Tree" form of the battle was insanely easy, possibly the least dangerous of any solo class I've ever played. Marcel went into this showdown with the Aegis Shield equipped, and that locked out White Hole from ever hitting. For safety's sake, I replicated the same endless Mimicking of Elixir drinking, determined to run Exdeath out of magic points. White Hole (ホワイトホール = "Howaito Houru") burns through them very quickly at 99 MP per casting, and it took about five minutes on emulator Fast Forward to get through all 30k magic points in Exdeath's starting allotment. Once that was done, the entire battle was effectively over. White Hole could never hit Marcel, and without magic available, Exdeath could no longer use Holy, Flare, Condemn, or Meteor. The boss was forced to fall back on physical attacks, which Marcel blocked 1/3 of the time with the Aegis Shield, and which were further reduced in damage by Marcel standing in the back row. I used the Chicken Knife for offense, even though it was doing all of about 1300 damage per swing. But Marcel was in zero danger himself; any time his health fell below 1500 HP, I would Mimick drinking Hi Potions until he was back to full again. This limited Elixir usage to just the one drink at the start of the battle. Overall, this wasn't a fast process but it did work, and I never suffered any defeats at the hands of this initial form.

Neo Exdeath was significantly harder, and entirely due to the presence of Grand Cross. If I could remove it from the battle somehow, I could use the same bottomless cup strategy to run the other parts of out magic points, and then it would be trivial to down them in the same fashion. But Marcel still had to reach that point first. I started the battle by killing Part #4 with the Magic Lamp as always for my solo characters, then set to work trying to destroy the Grand Crossing Part #1. My preference was to attack with the Chicken Knife from the front row, which would deal about 2800 damage per swing. Unfortunately this also increased the danger level for Marcel to unacceptable levels; he would take 1100 damage from a normal physical attack up there, and 2300 damage from a Vaccuum Wave (しんくうは = "Shinkuu Ha") attack. With Marcel having only 3200 total HP, this forced way too many uses of Elixirs, even with Mimicking to save the stash somewhat by repeating Elixir usage before and after Almagests. After dying a couple times, I realized that I needed more total health to make this battle workable, and took Marcel from Level 56 to Level 61. That pumped up his health to a "robust" 3800 HP, which gave me noticeably more room for error.
It still wasn't enough though. Marcel had to heal after every Vaccuum Wave and I only had about 20 Elixirs to work with. Inevitably, I would also mistime the use of Marcel's healing items and wind up dying. The front row was simply too dangerous. If only I could have used Armor status to protect him; my only source was the one use out of the Wonder Rod though, and it would have been Dispelled immediately by Neo Exdeath. So Marcel moved to the back row, where his best offensive attack was broken Venom Rods for castings of Bio that dealt *gulp* just under 1300 damage apiece. That's considerably less damage than any attack I've ever used to try and down Neo Exdeath, but Marcel did have the Aegis Shield, and that protected against many of the potential statuses from Grand Cross. And under this tactic, Grand Cross was the only thing that was ever going to kill Marcel, as I had plenty of time to work around the damage from reduced physical attacks and Almagest. Slowly, slowly Marcel worked his way through the 55,000 HP that Part #1 possesses, one broken Venom Rod at a time. He survived one Grand Cross, then two, three, and four. I needed him to break a total of 43 Venom Rods to make this work, and every time Grand Cross popped up, the tension was high. I did not want to have to do this more than once if at all possible. Finally, Marcel survived his fifth Grand Cross without issue (having been poisoned, turned into a toad, hit by a weak attack, and gotten nothing from blocked statuses twice), followed by the breaking of the final Venom Rod, and that was it for Part #1.

At this point, the battle was already over - the game just didn't know it yet. Marcel was down to only 9 Elixirs remaining, and I knew that I would run out of them if I tried to fight the remaining two parts normally. The answer was to go back to the Elixir Mimicking setup one more time, to run the last two Neo Exdeath parts out of magic points. Without Grand Cross, these two parts would never kill Marcel under any circumstances so long as he kept endlessly drinking Elixirs on each round of combat. I put a clamp on the A button, set the emulator on Fast Forward, and stepped away for a while. Part #2 ran out of magic points for Almagest fairly quickly, after about an hour's worth of Fast Forward time. That's wasn't the end though, since Part #3 was still occasionally casting Dispel, and I wanted to wait until that was finished as well. Part #3 has 65,000 MP and Dispel costs 12 MP per casting. That's... 5417 total castings of Dispel ( ), and it doesn't appear very frequently in Part #3's AI routine. How long would that take? Well, I don't know exactly but the boss was still casting Dispel after five hours of Fast Forwarding, and that's when I headed to bed. I let the emulator run all night, and by the morning the boss was finally out of juice. That's probably would have been over a week of real world time - there's a reason why I do these solo games on emulators.
Now Marcel could break out his last trick, and use the Armor spell that I'd prepped in the Wonder Rod and saved all this time. The Armor could not be Dispelled away, and that meant all physical damage was reduced by 75 percent. Vaccuum Waves were down to a mere 500 damage, normal attacks only 300 damage. Marcel could Mimic Hi Potions whenever his health dropped below 2000 HP, removing all danger from this fight... or so I thought. I was trying to run Part #3 down to just a few hundred health to finish off the last two parts at the same time with a broken Fire Rod, only I hadn't been tracking the exactly health of that part and accidentally killed it. Whoops. I always try to avoid that because if you leave only one of the Neo Exdeath parts alive, it will swap over to a new AI routine that contains lots of Meteor spells, which is death for a solo character. I flubbed this up... and it didn't matter one bit. The last remaining Neo Exdeath part had no magic points, and thus couldn't cast Meteor! Or Almagest, or Comet, the other spells in that changed AI routine. The boss did cast Maelstrom once, because I guess it had enough MP left for that one spell, and then that was it, nothing else but a lot of failed spells and the occasional physical attack. It was amazing to reach this point where the big endgame boss was going into its final frantic AI routine, and absolutely nothing was happening due to lack of magic. Marcel was essentially impervious to physical damage, and he slowly killed the final part with the Chicken Knife in 1300 damage chunks. It was my longest Neo Exdeath battle ever, not even counting the time with the emulator on Fast Forward. Marcel achieved a true victory due to his mastery of the mechanics of this final showdown:

As the boss dissolved into mist, I took a moment to reflect on the completion of this challenge. I was glad that I managed to find the time to finish this run, and especially glad that I chose to undertake the extra challenge of playing the game in Japanese. The Mimic class did have its moments, especially in the final boss battle where Marcel came up with a unique strategy all his own. However, for the most part this was a crippled version of the Bare class, with the same lack of abilities but without the weapon versatility (and Ribbons) of that class. The Mimicking itself played little role in this game for the most part. It was the ability to equip nearly every type of armor, along with the ability to equip both Rods and Staves, that saw Marcel through to the finish. Don't underestimate Rods and Staves, together they carried Marcel through innumerable dangers all on their own - and not just due to rod breaking.

The endgame credits run with no input from the player, which prevented me from doing the slow readthrough that I did while playing normally. While I suppose I could have used the emulator's pause feature to stop and read everything, I was too tired and happy to be done with this long project to put in that extra time. I'll note that the scrolling text that appears on the screen immediately after defeating Neo Exdeath shows up in Japanese, however the actual credits themselves appear in English for some unknown reason. I've noticed this in other Japanese games too - why do they do this? Is this to help with porting to international markets later? It seems particularly strange since Final Fantasy 5 never saw a release outside of Japan at the time, yet there's the "Sound Effects" message right there in English. I chose to take this image in the one place in the credits where the emulation always glitches a bit. Those black splotches on Bartz and Faris always appear every time I beat this game in this one scene, and it must be something that the emulation fails to capture correctly. Either that or someone failed to clean up the textures properly in the Super Famicom version of this game!

Marcel's final stats. This was by far the longest of any solo game that I undertook, both in terms of the writing and the length of time required to play. I started this undertaking in early 2013 and didn't complete it until almost five years later, with many long gaps in the middle. Needing to work my way through the Japanese text and then write about it was a difficult task, and it was hard to motivate myself at times to continue this. I give a lot of credit to my Livestream viewers for consistently pushing me to complete this solo game, even though none of them knew about the special twist that I was playing under. This would have been done many years ago if it had been a normal variant without the translation stuff. I hope the delay was worth it. Marcel, or more properly マルセル, bids you a fond farewell. 


