
Welcome back to a fresh new solo run for Final Fantasy 5! At this point I had finished all of the jobs in the original Super Famicom game (even the long-delayed Mimic), but that still left a few of the new jobs created for the Gameboy Advance remake. These jobs are not supposed to be unlocked until after the main game is essentially over, and they all have abilities that can break apart some of the earlier areas when unlocked with an All Jobs cheat code. I played through the Gladiator job earlier, and that report demonstrates how the Finisher ability destroys most of the game's challenges. Still, are these classes really all that different than using a Samurai or Ninja or Chemist from the main game? All of those classes can smash FF5's gameplay without much in the way of danger too. I figured that as long as I was still enjoying playing these characters and writing about them, I might as well keep going until I finished out the full set.
The Cannoneer is a strong class that combines together a weaker version of the Chemist's Mix ability with a ranged form of cannon shot. The signature Cannoneer ability is Combine, which functions in identical respect to the Chemist Mix ability. The Cannoneer selects two items together from the menu screen and uses them to generate a variety of unique attacks. The gimmick here is that all of the Cannoneer combinations require using "Buckshot", "Blastshot", or "Blitzshot", forms of ammunition that don't become available for sale until after clearing all four of the main dungeons in the third world. That's extremely late in the game, and it means that Combine can only be used for the final endgame dungeon (and the postgame bonus dungeon, but that's a tedious grindfest and I had no plans to head there). When Combine finally does become available though, the various shots are powerful indeed, dishing out massive damage and a whole bunch of status ailments. They lack the versatility of the Chemist Mixes, but come close in raw power.
For most of the game though, the Cannoneer will be relying on another ability that comes innately with the class: Open Fire. This is another very useful ability that fires one of four different types of shot (chosen randomly) and can inflict four different status ailments. The damage from Open Fire is balanced for when the Cannoneer appears in the third world - and super powerful if used from the game's outset. I would be relying heavily on Open Fire for this playthrough. There's one other passive ability that the Cannoneer unlocks: Experience Up, which grants the user 50% additional experience points. That would be highly useful, and there would be no reason not to employ it throughout the run. Several of the new GBA jobs have grinding-centric abilities like this, and the Cannoneer gets the best one for a solo game.
There aren't a lot of direct choices for a character name here. I went so far as to look up the names of famous artillery officers, and I didn't see anything that fit particularly well. Because the sprite design for the Cannoneer looks like a navy admiral, I decided to call my character Nelson instead, named after the hero of the Battle of Trafalgar. It also was a name with exactly six letters, which always fits well given the strict character limit. After going through the usual path up to the Wind Shrine, here was a picture upon changing classes at Level 6:
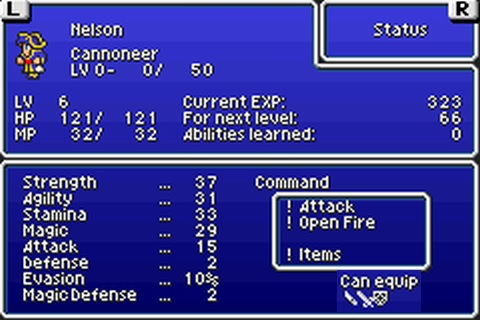
This class has mostly average stats across the board, without anything standing out too much in any one direction. Strength of 37 would be decent if Nelson needed to engage in melee at some point, although Open Fire would hopefully mitigate the need to do too much of that. Agility was slightly above average, and Vitality was enough to provide a decent HP pool without being a true frontline tank. Even Magic Power rated pretty decently; I was unsure if any of Nelson's abilities would make use of this stat though. As far as I knew, none of them did. There was more good news on the weapons front, where Nelson had access to the non-Knight swords and shields along with the default knives. Shields are extremely helpful to have in this game, as any character lacking the Aegis Shield has found out in the final battle. Even better, I also discovered that Nelson was able to equip both the "medium" and "light" armor sets, giving him more versatility in this regard. Only the heaviest armors were off limits.
I knew that Open Fire would dominate the early gameplay for this class, and it put up the predictable numbers:
This came at a time when melee attacks were doing about 50 damage, and monsters had comparable HP to match. Ten times that damage from Open Fire? Yeah, it was a little bit broken. Because Nelson would end up using this ability so much, let's go into more detail about how it works. The incredible Algorithms Guide from J.L. Tseng sadly does not include anything about the GBA remake classes, but a similar guide was posted by redwolf and mog07 at Gamefaqs with the intention of expanding the original document and incorporating the new content. The new algorithms guide is not as comprehensive or well written as the original, but it's better than nothing. Here's what it has to say about Open Fire:
| 104/256 | Black shot | Darkness | 115 | 62 /256 | Purple shot | Poison | 115 |
|---|---|---|---|
| 60 /256 | Red shot | Confusion | 175 |
| 30 /256 | X shot | Death | 215 |
And... that's it. It doesn't even have table headings, although they're pretty easy to figure out in context. The number on the left is the probability chance of each one of the four effects activating from Open Fire, expressed as an eight bit fraction. When using Open Fire, the player has about 41% odds to get the "Black shot", 24% odds to get the "Purple shot", 23% odds to get the "Red shot", and 12% odds to get the "X shot". I should also point out that these are unofficial names, and the four shots don't have accompanying text to distinguish them, only visual effects. I'll use these names for lack of a better alternative. The third column has the status effect that can be inflicted with each shot, and then the final column has the Attack value of the shot. They are all quite high, even the Black and Purple shots - the Legendary weapon Excaliber has an attack value of 110, by way of comparison. Damage dealt by Open Fire is a simple Attack minus enemy Defense, then multipled by a multiplier (M).
The critical missing information here regards that multiplier: how is it calculated? The incomplete new algorithms guide provided no answer, and I resolved to figure it out empirically through trial and error. It was clear at the start of the game that the default multiplier was 4, with the Black/Purple shots dealing (115 * 4) = 460 to 500 damage on each appearance, and the other two shots dishing out a little over 700 and 850 damage respectively. I saw almost immediately that Open Fire did not use the basic weapon attack multiplier, which is Strength times Level divided by 128. It wasn't the default magic multiplier either, as even with Nelson's modest Magic Power stat, he would have seen an increase in the damage fairly quickly, and I continued to see the same damage rolls over and over again. What was the multiplier formula for Open Shot?
Eventually I was able to figure out that Open Fire uses the same multiplier formula as Combine, which does have an explanation in the new guide. The multiplier is M = (Level * Level) / 256 + 4. This is very similar to the normal magic damage formula, except that it uses Level * Level instead of the standard Level * Magic Power calculation. This has some very interesting properties, most notably the fact that both Open Fire and Combine are completely independent of Strength and Magic Power for damage. These stats are almost pointless for the Cannoneer, and I can't think of any other job where that's the case. You may as well itemize the Cannoneer around Agility, physical and magic defense, and any other properties that equipment might have (like weapon block on the Guardian dagger) since the attack value of weapons and Strength/Magic Damage boosts are irrelevant. The multiplier formula including Level * Level in it also means that Open Fire and Combine scale very hard with additional experience gain. I wouldn't see the first multiplier increase until Nelson reached Level 16, but that squared formula meant that more levels would start to increase the multiplier rapidly. For someone doing the postgame bonus dungeon, these abilites on the Cannoneer would scale up very quickly with all that extra experience, and I'm sure that was the intent. Very unusual mechanics here - none of the other abilites in the game work quite like this.
Open Fire completely destroyed all challenges in the early stages of the run. The bosses simply had no chance, and random encounters were more like speedbumps:

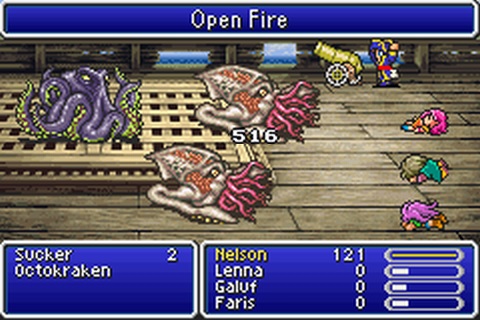
Karlabos took an initial Black shot, then proceeded to follow that up with Tentacle (Feeler in this translation) about ten times in a row. When he finally used Tailscrew instead and gave Nelson a chance to respond, a second Black shot finished him off. Siren was more amusing, taking two Purple shots and getting poisoned... and then dying to a tick of poison before she could even swap into her undead form. Ha! Magissa absorbed an initial Black shot, follow by Nelson getting lucky and rolling an X shot that dished out 900 damage for way more overkill than necessary. Forza never had a chance to show up. Galura took one Red shot that inflicted Confuse status, then stood there doing nothing as the second shot finished it off. For that matter, I still hadn't had an opportunity yet to see if the "Death" status even worked, since everything was falling to the pure damage from X shot anyway. Oh, and I also quickly discovered that Open Fire does full damage from the back row. Guess where Nelson was standing for all these boss encounters? It's even better than that, because it not only dealt full damage from the back row, Open Fire also dished out damage independent of row positioning, like a magic attack. Nelson could shoot at monsters in the back row without penalty, while they couldn't do the same back to him, at least with physical attacks. This was bordering on GilToss-level overpoweredness as an early game ability.
In the Steamship, I was trying to capture a picture of the X shot in action to demonstrate the animation. I was hovering over the screenshot capture on my keyboard every time that Nelson used Open Fire, and it kept failing to appear. I ran the entire dungeon from start to finish without it showing up, only for the 12% odds to finally trigger against the boss at the end:

The LiquidFlame battle was a complete farce. The boss attacked first and missed, blocked by Nelson's shield. The initial Open Fire pulled a Red shot that did about 800 damage and knocked the boss into Confuse status. That's why Liquid Flame is facing the wrong direction in the picture above. Nelson followed that up with a Black shot, which did not remove the confused status from the boss, and then an X shot that dished out 1100+ damage and finished her off. Zero damage taken, no form shifts at all. I can't remember anyone else owning Liquid Flame so thoroughly in all my previous solo games. Nelson never even reached the Tornado form, sheesh! This also confirmed for good that Open Fire is treated as a magical attack and not a physical form of damage, with the repeated shots failing to trigger form shifts and keeping the confused status active. I had suspected that based on the way that Open Fire damage was independent of row positioning, but it was helpful to see it confirmed.
In the Karnak Castle escape sequence, I went out of my way to have Nelson pick up all of the treasure chests, and I mean all of them, including the ones with the Ribbon and Shuriken and so on that he couldn't actually use. Normally I will skip these to save time, however Nelson could easily crush everything in his path, and he had another reason to fight these encounters: more ability points. Every trapped treasure chest was worth 3 ABP, bringing him closer to his Experience Up and eventual Combine abilities. I also had a totally insane battle that yielded this screenshot:

What's going on here?! For starters, Nelson had gone through the entirety of the Steamship in Darkness status, as I found that it didn't affect Open Fire at all. Might as well save the eyedrops as a result. This battle had been fought against two Sorcerers, and while Nelson killed one of them immediately, the second one turned him into a toad. I decided to check if Toad status would affect the damage from Open Fire, and yes, it did, with the Open Fire doing only 15 damage. I really wonder how this works in the programming, with Nelson able to still use the ability but all the damage cut to nil. Interestingly, Nelson had pulled a Red shot on that weak 15 damage attack, and it still put the enemy Sorcerer in Confuse status. Then she cast Mini on herself, leading to the screenshot above. A tiny frog wearing sunglasses ABOVE ITS HEAD facing off against a confused and shrunken opponent. A true comedy of errors! 
The bosses that followed were also easy prey to Open Fire's raw damage. Ifrit started out the battle with a Flame ability and a Fire 2 (Firara) spell, but then Nelson pulled out an X shot on his third attack and Ifrit doesn't have any protection against instant death attacks, so that was that. Byblos was a slightly different story, as the demon book cannot be hit by most status effects. Byblos is protected against Darkness, Confusion, and instant death abilities. However, Byblos does not have any protection against poison, and a Purple shot quickly put him in the anti-regen status. The poison ticks always deal 1/16th of max HP in this game, and for Byblos that meant a non-trivial 225 damage with each appearance. Even better, using Open Fire did not trigger a counterattack from Byblos; I think it would have prompted his Toad spell, but I never saw anything appear. Open Fire easily did enough damage to overcome Byblos' Drain spell, and a tick of poison actually finished off the boss. Nelson was able to win on the first try despite getting put in Slow status immediately.
Nelson gained enough ability points to unlock Experience Up just after completing the Ancient Library, and wow, what a difference that made. Obtaining 50% more XP from every battle had him shooting up levels like crazy. Once I had the Black Chocobo, I went back and picked a fight with one of the first world's strongest foes:

The Garkimasras/Jackanapes in the basement of Worus Castle have a defense of 50 and high physical evade, which normally makes them invincible in combat. Nelson had reached Level 23 by this point for a total multiplier of 6 on the Open Fire damage, which allowed him to kill these enemies with either a Red shot or an X shot. If Nelson rolled a Black or Purple shot instead, he would fall short of enough damage for the kill and would then be Berserked via Moon Flute. I would then need to have him run away, which Nelson could do without much trouble due to his very high physical evade from Guardian dagger + Elf Cape + shield. Naturally I did not need the second Elf Cape down there, having already picked one up in Karnak Castle, but there's also 2000 gold hidden in the pots down there, plus I savored the chance to get some revenge on these jerks for past characters. Killing one of the Garkimasras resulted in... one single gold, no experience, no ability points. OK, not exactly worth it. It was the principle of the thing though!
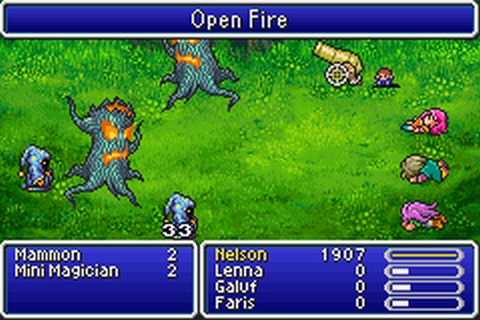
The Sandworm was easy prey to a series of Open Fire shots. Crayclaw ate an X shot on the first attack and died instantly, with no protection against instant death attacks. At this point I was still short of enough gold to purchase either a Flame Ring or an Angel Ring, much less both, and I decided that I would do a bit of fighting to be able to pick up at least one of them. The best place as usual was on Crescent Island, where the monsters have a chance to drop Doom Axes (Death Sickles) that sell for just under 3000 gold apiece. Once I had enough saved to purchase a Flame Ring, I was also able to fight and win this battle:

The five Minidragon encounter takes place near Istory Village, and they represent a kind of hidden miniboss in the first world. With a Flame Ring to nullify their fire attacks, plus back row protection and tons of physical evade, Nelson could defeat them with ease. The XP payout with Experience Up ability was absurd; this would be a good result in the final dungeon, and was nothing short of crazy for this point in the game. I fought one or two of these encounters for fun, and then returned back to the main plotline again.
The Flameguns were easily defeated through equipping the aforementioned Flame Ring. The Rockets could be overcome just as easily, through equipping a very weak weapon that would block self-harm and then using Open Fire for offensive output. Against Sol Cannon, I made sure that Nelson was Level 32 to reach a total attack multiplier of 8. This allowed Open Fire to do enough damage to one-shot the Launchers, and I loaded up on the maximum amount of Magic Evade possible to avoid getting hit with one of the Old-inducing missiles. By combining the Plumed Hat (5%), Bard's Clothes (17%), and the Elf Cape (5%), Nelson was able to get fairly decent odds of avoiding one of those missiles, right around 1/3 odds after running through all of the math. On my first attempt at the Sol Cannon battle, Nelson immediately killed the first Launcher, and then never saw a missile from the second one. He must have successfully dodged the missile since I didn't see the animation play out, and Nelson killed off the second Launcher before it could fire again. Then it was just a matter of continuing to use Open Fire repeatedly while healing between the main cannon's Surge Beam (Wave Beam) attacks. Nelson made it through here at the cost of 2 Hi Potions and 2 Elixirs. Kudos to T-Hawk for developing this strategy and avoiding the need to grind out enough gold for an Angel Ring purchase.
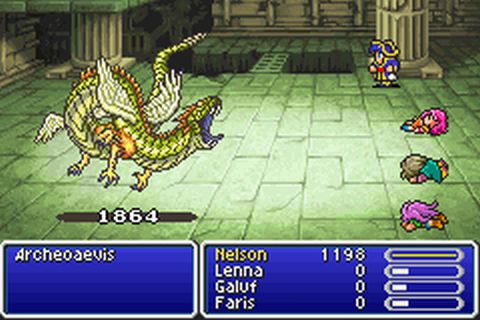
The enemies in the Lonka Ruins can often be difficult to defeat for solo characters. Not so for Nelson, who continued to blast away all comers with Open Fire. I was impressed at how well the damage was scaling up over time, as the default Black/Purple shots that appeared about 75% of the time had gone from roughly 500 damage at the start of the game to just under 1000 damage by this dungeon. Monsters were still being one-shotted almost all of the time. The rare Hydra enemies fared little better than the common critters, requiring only a second shot to be defeated. For Archaeoavis, the strategy of remaining in the back row and continuing to use Open Fire remained in effect. Nelson had 60% physical evade from the Gold Shield, Guardian dagger, and Elf Cape, leaving elemental damage as the main threat. His Open Shots did enough damage to kill each form in two hits, with the exception being when an X shot would appear like in the screenshot above, and take out a form instantly. Nelson was confused only one time against the final form, and he knocked himself out of that right away. Otherwise there was no danger at all, and this was an easy victory on the first attempt, no healing items required.
The Archaeoavis encounter also verified that Open Fire deals magic damage, as I had suspected from earlier. The first form of Archaeoavis starts with high physical defense and low magic defense, then they gradually swap over time until the final form has low physical defense and high magic defense. The Open Fire shots were doing less damage with each new form, which made it clear that they were indeed a form of (non-elemental) magic damage. Finally, I felt like I had a firm understanding of how the mechanic worked by the end of the first world.
Against the meteor miniboss trio, the Chimera Brain and Titan were easy pickings for Open Fire. As usual, the Puroboros were the tricky obstacle:

Nelson's one weakness was a lack of any multi-targeted damage. Open Fire would only hit one enemy at a time, and while Nelson was almost impervious to physical damage, he could fall prey to magic attacks even in the back row. In the Puroboros battle, Nelson would attack each of the little bombs one at a time, and he could get off three shots before they had a chance to respond. A Black or Purple shot would do right around 1000 damage, and that was a good outcome here. A Red shot would deal either just over or just under 1500 damage, which coincidentally is how much health the Puroboros each have. I preferred to roll just under 1500 damage, which would keep the targeted individual enemy at near-death status and would render their Explosion (Self-Destruct) move harmless. It deals damage equal to how much health they have remaining, for anyone who hasn't played this game. An X shot would deal over 2000 damage, and that was bad because it would kill off any Puroboros hit and trigger their Life 2 (Arise) spell in response. Nelson wanted to avoid that if possible.
The problem was that Nelson could only attack three of the six bombs before they had a chance to react, and that would leave the other three Puroboros at full health ready to one-shot him if they chose to self-destruct. Nelson could not absorb a full strength 1500 damage attack, as pictured above. I had to run this battle about five times before the backline Puroboros all failed to use Explosion. Once the luck factors lined up my way, it was simple to damage the remaining Puroboros and sit back, waiting for them to blow themselves up (which does not trigger their Life 2 spell). The last one waited for long minutes on end before finally self-destructing. Nelson had to use a couple of Hi Potions, but made it through here without too much trouble. Still the hardest battle yet encountered, which said something about how easy it had been thus far.
The Cannoneer was one of the few classes strong enough to defeat Gilgamesh in the solo Galuf duel:

Like the Gladiator, there is no Cannoneer sprite for Galuf because he's no longer part of the party by the time the job is unlocked normally. Watching an empty shadow fire the cannon was pretty weird.  Galuf was able to equip the same shield + Guardian dagger + Elf Cape combo that Nelson had been using, and that gave him enough physical evade to make it through this without too much trouble. I think that the first try at this battle was a loss, and then the second one saw the dodges that Galuf needed to be victorious. Very entertaining stuff.
On the Big Bridge, Nelson continued to use his bread and butter attack to trounce all challengers. For the second Gilgamesh battle, I had Nelson break out the Ancient Sword and inflict Aging/Old status. This is fixed in the Gameboy Advance version and correctly drains away enemy Strength (in the SNES version it's bugged and only drains Agility), making the encounter much easier. I didn't try to land the Mute spell on Gilgamesh to stop his triple Haste/Armor/Shell buffs, deciding to see if Nelson was strong enough to win despite the additional challenge. That strategy looked like a mistake when Gilgamesh started out by using Jump three straight times, which dealt full damage to Nelson in the back row. Then Gilgamesh wasted time attacking, which was pointless given that he was in Darkness status from an earlier Black shot, and that was enough to land the remaining shots for the victory. No Elixirs needed here, just the remaining two Hi Potions in Nelson's inventory. Nelson would finally be able to stock up on them in the next village.

The enemies in the Underground Waterway that followed were mostly physical attackers, and they had no more luck against Nelson than their earlier breathren. I found that Open Fire was doing just barely short of enough damage to kill these monsters in a single hit. Halfway through the small dungeon, Nelson leveled up to 36 and picked up an additional attack multiplier, and that ticked his damage over the threshhold needed to start one-shotting everything again. Of course, I could have done all of this with significantly less in the way of offense. I've done that with quite a few previous classes, and the Cannoneer was much much stronger than the Mimic that I had used on my previous run. Nelson was powerful enough to walk right through the desert instead of following the path traced by the wandering moogle, taking on opponents like the Sandcrawler above that are supposed to kill off the party. A Red shot dropped the monster into confused status, followed by Nelson pouring in more shots for the kill. Since Open Shot is a magical attack, it doesn't disrupt confusion or sleep statuses - something that was about to become very useful indeed.

The enemies in the Hiryuu Valley served as additional training dummies for Open Fire shots. This area is usually a good place to pick up additional experience and gold for solo characters, with the Zombie Dragons dropping Dragon Fangs that can be sold for 2500 gold apiece after each battle. Nelson preferred to save them for future uses of Combine, but the experience was quite nice with his extra ability kicking in the 50% bonus. While you might think that Experience Up would cause Nelson to be far out in front of the usual solo game curve, that wasn't the case at all. Because the experience required for each level keeps increasing, Nelson consistently found himself sitting about two to three levels ahead of my other characters. T-Hawk has pointed this out in his reports as well, that grinding out a bunch of additional levels in the first world will become a drop in the bucket by the time the second world is halfway over. The gameplay tends to be self-regulating in this regard, barring something truly crazy like the poor solo Berserker.
Nelson took advantage of the Hiryuu Plant's weakness against instant death attacks to land the kill with an X shot. He probably could have defeated it by running it out of HP even without that vulnerability; X shot was doing well over 2000 damage when it appeared, and the other more common shots continued to scale up in power as well.

Gilgamesh retains the same weakness to Darkness and Aging/Old statuses in the Ship battle, and Nelson made sure to inflict both of them here. This is one area where the GBA version constitutes a significant departure from the SNES version, since Gilgamesh will do zero damage when attacking physically against a character with the Bone Mail equipped after he's had his stats drained away by Old status. This is the difference between living and dying for a solo character when Death Claw appears. None of that concerned Nelson though, who had enough damage to plow through this encounter quickly. Enkidou was dropped by a trio of Open Fire shots, and then Gilgamesh was hit by a timely X shot. Neither one of them has protection against instant death attacks, causing the battle to end in an instant. That caused a weirdness in the cut scene above; Gilgamesh is supposed to be standing there while delivering these lines, not fade into the normal purple mist. Instead, Nelson was left with a situation where no one was talking at all! Very odd.
Nelson turned up a Wall / Reflect Ring in a moderate amount of time, probably about the 16 battles that exected odds would suggest to get the 1 in 16 odds of the drop appearing from the enemy Wall Knights. The Flame Ring + Bone Mail combination was enough to handle the dreaded Red Dragons with ease in the two trapped treasure chests. Interestingly, Purple shot was able to poison them and tick some extra damage even though the Red Dragons are technically undead. They were immune to the other three statuses that Open Fire can produce. As for Atomos:

The Slumber Sword was able to hit him in his one weakness, ending the battle as soon as it appeared. The first time that I tried this boss with Nelson, the Sleep effect failed to go off and he died in a hail of Comets. I was pretty sure that that had just been a spot of bad luck, and sure enough it worked perfectly fine on my second attempt. The Cannoneer was therefore another one of those rare classes that could get a "true" solo victory against Atomos, with the other three characters dead from the start of the battle. Getting hit with a Slow spell didn't even matter, since Open Fire deals magic damage and would never break the Sleep status. Nice and easy.
After the tedium of passing through Guido/Gheedo's Cave, Nelson continued his rampage through the Forest of Mua/Moore. This particular trip was remarkable for how little danger the enemies managed to pose. Nelson fought every random encounter that came along, and wound up using a grand total of four Hi Potions before reading the end. Only four of them! I doubt he was even breaking a sweat. The Bone Mail and lots of physical evade were locking out physical damage, and there were few sources of magic damage to threaten Nelson here. Open Fire killed about half of the enemies in one attack and the rest in two shots, while always landing on the target and avoiding the high physical evade of some of the monsters. The biggest obstacle here was Mini status from the little magicians, which would drop Open Fire's damage output to nil. In the picture above, the transformed tiny Nelson could only deal 33 damage; I guess he was too small to load the cannon properly! It was strange how Toad and Mini would crush the damage from Open Shot, while Darkness had no effect at all. Nelson gained four more levels in here while looting the treasure chests, picking up the Aegis Shield in the process.

With the Bone Mail and Flame Ring equipped, the physical attacks from the four crystals could not penetrate Nelson's defenses. They all did zero damage and left him at full health. I had taken the Aegis Shield off to ensure that it wouldn't block any incoming magical attacks, planning to rely on the Fire Crystal as usual for free healing. Fortunately I managed to injure it into low health range without pulling an X shot out of Open Fire; technically I probably should have attacked physically to rule out that possibility, but oh well. Then Nelson went to work on the other three crystals, which shared the vulnerability to instant death attacks. Nelson pulled an X shot against the Earth and Air Crystals, with the latter one captured in the above picture. Nelson had enough HP to survive two castings of Aero 3 (Aeroga) in a row, which meant that he would never die in this battle. The Fire Crystal would always get off a Fire 3 for 1500 points of healing before the Air Crystal could finish him off. Landing a lucky X shot ensured that I didn't even need to worry about that, with the Air Crystal dying before it could even reach its spellcasting phase. This was about as easy as this battle ever gets.
In the cut scene that followed, it was time to break out the invisible Cannoneer again:

I had never changed Galuf back to the Bare/Freelancer job following his earlier duel with Gilgamesh. Open Fire was a good way to deal the damage needed to advance this cut scene to completion, and the invisible Galuf ate Exdeath's Holy and Flare spells like a champ. My favorite was watching this casting of Meteor that did close to 10,000 damage against an apparently empty room. Galuf was taking lessons from John Cena on not being seen.  Soon enough the silliness was over and I could continue Nelson's quest.
Exdeath's Castle continued the smooth sailing through calm waters for Nelson. About half of the enemies could be defeated in a single shot from Open Fire, and almost everything else fell in two shots. I equipped the Flame Ring over the Elf Cape on the upper floors to defend against the appearance of Red and Blue Dragons with their fice/ice damaging abilities. Most everything else was unable to get through Nelson's strong defense and heavy physical evade. He was wiped out once by a double Yellow Dragon battle where both of them repeatedly used Thunder before Nelson could retreat, but that was basically it. Monsters of all stripes continued to fall before the might of Nelson's cannon skills, and the experience kept piling up. Nelson reached Level 49 by the end of the castle without any grinding on my part, once again slightly above normal for a solo class.
Gilgamesh's only real danger was the potential appearance of Sonic Wave (Dischord) to reduce Nelson's level, and that ability didn't appear until after Gilgamesh was already in his postvictory dialogue sequence. This was a straightforward win on the first attempt. Exdeath himself would be a more significant challenge:

I carefully selected Nelson's gear for this encounter, choosing to go with the Guardian dagger for additional physical evade, the Aegis Shield, the Wall/Reflect Ring, and then the best non-Bone Mail defense that I could get in the helmet and armor slots. By sitting in the back row and having the Guardian/Aegis combo, Nelson was dodging half of all physical attacks while cutting damage to about 350/700 depending on whether Exdeath used his normal attack or his Vaccuum Wave specialty. This reduced the need to waste rounds using Elixirs for health restoration, and Nelson had a solid HP pool to work with, certainly much more than some of the solo classes I've taken through here. The great danger in this battle came from Condemn (Doom), as it inevitably always does for solo characters. That ticking death clock means an instant game over when it appears, and it can't ever be dodged through magic evade or blocked via the Aegis Shield. I've often wondered why Condemn functions differently than most other spells in that regard. I can only guess that the designers never imagined that someone would be trying to play through the game with only one character, and wanted to make Condemn a more serious threat.
Exdeath has 2/3 odds to use Condemn as his first action, and as a result most every attempt at this battle started out with a reset. Nelson's damage output from Open Fire was quite good here, if a little lower than some of the other true powerhouse classes, with the ability to use it from the back row making up for some of that deficit. The basic Black and Purple shots were dealing about 1300-1400 damage, and I used this as the baseline for my estimates of how long the battle would take. The Red shot was much better at roughly 2000 damage, and the rare X shots did the damage in the above screenshot. I needed Nelson to inflict 16,876 damage to trigger the shift over to Exdeath's second AI script, which is much less dangerous to solo characters and would mean an eventual victory. With some extra damage from the Red and X shots, I estimated this would take about ten total shots to achieve. That meant that I would need to survive a second casting of Condemn when Exdeath cycled all the way through his initial AI script, as Nelson wouldn't be able to do 16k damage on the first run through the AI script. Luck was with me in this regard: my second attempt at the boss that got past the opening Condemn saw Exdeath skip the second Condemn as well at 1/3 odds. As a result, Nelson had enough time to finish banging out the required 16k damage, and once the second half of the battle was underway, he spent most of his time healing with Hi Potions while Exdeath slowly killed himself with reflected spells off the Wall Ring. While I wouldn't call this precisely easy, Nelson made it past this roadblock opponent in about a dozen total tries, and only two total attempts that didn't get wiped out with the initial Condemn. Many of my other solos have fared much, much worse here.


