
Alright, you know the drill by now. Another job class, another Final Fantasy solo report. This time I would be exploring one of the game's stranger classes, one that focuses on catching and releasing enemy monsters to fight for you in battle. First, a word about the job's name itself. The RPGe fan translation that I normally use refers to this class as the "Mediator" job, which is probably a direct transliteration but has nothing to do with its function. Mediators resolve disputes, not catch wild animals! The Playstation port translated this job as "Trainer", which is a little bit better. However, the Gameboy Advance port of Final Fantasy 5 has the best version, and goes with "Beastmaster", which I'll be using throughout this report. The rest of the terminology will be drawn from the RPGe translation as usual.
The Beastmaster has two special commands that throw this job into the oddball category. The first of these is "Control", which allows him or her to take possession of an enemy monster and then have them fight against the other baddies. This is different from simply Confusing the enemy, as you actually get to select commands from a menu rather than having the monster fight on its own. Some of the best Blue magic spells in the game are best achieved by Controlling an opponent and then having them cast the desired spell on your Blue Mage. The base chance for Control to work is 40%, making it rather unreliable, however there is an item in the second world that increases this to 70% and makes Control much more user-friendly. Naturally, there are also many enemies that can't be Controlled - including nearly all bosses.
The other unique feature of the Beastmaster is "Catch", in which he or she captures a monster, literally removing them from the battlefield. The Catch command is then replaced with "Release", which sets the enemy free and sees them perform some sort of special attack. Capture won't work unless you damage the enemy first, and there are some opponents against which it won't work at all (like bosses). Hmmm.... weakening enemies, capturing them, having them fight for you... all sounds a bit familiar, doesn't it? But before you accuse this game of being a Pokemon rip-off, bear in mind that FF5 came out three years prior to the first Pokemon games! (If the Beastmaster class is derivative of anything, it's the game Dragon Quest 5, made by Square's one-time rival and now partner Enix. That forgotten game was also based around capturing monsters and getting them to fight for you, and it came out three months before FF5 in 1992.) Catch allows the Beastmaster to have access to some unusual monster abilities, and a creative player can find all sorts of nifty ways to take down bosses. This was going to be fun!
Naming this character was easy. What was a circus owner like P.T. Barnum if not a Beastmaster? I played up through the Wind Shrine as always, then made the permanent job switch:
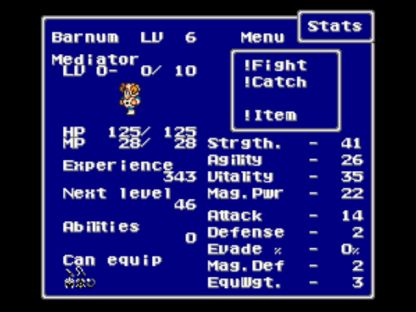
The Beastmaster rates well in the Strength department (anything over 40 is good), reflecting the fact that this class can do melee fighting at an acceptable level. Agility was merely average, but Vitality stacks up well against all but the pure melee jobs. Compared to the horrible Vitality of the Dancer class that I had just played through, Barnum looked excellent in this regard. Magic Power was on the low side, however this was pointless as the Beastmaster doesn't cast spells. You can also see in the lower left corner that the special weapon this class equips are whips, which like bows have the ability to hit for full damage from the back row. For the moment, Barnum was stuck using a lousy Dagger until he could turn up a whip.
Oh, and get a load of that sprite graphic! Is this one of the dumbest-looking characters or what?
The first thing that I had to do was try out the default Catch command. I found that this was rather difficult to pull off with Barnum, as Catch requires you to drop enemies below 1/8 of their health. It was very tough to do this to the starting enemies without killing them! I had to de-equip Barnum's Dagger and use his fists instead. After playing around a bit, Barnum captured his first critter:

Most of the early enemies didn't have any special moves when they were released. The Stray Cat just used "Fight" upon release, which wasn't really worth all the trouble of capturing it in the first place. I knew from looking at the code that things would get more interesting soon enough as I moved forward with the game. The one enemy that did have a special move was the lowly Goblin (Imps from the original Final Fantasy). After I grabbed a few additional levels for Barnum, I Captured a Goblin and headed off to face Karlabos:

Goblin casts Flare upon being released! Talk about a rude surprise for Karlabos. Flare did 1000 damage and the lobster went down instantly. That's the easiest non-GilToss encounter I've ever had with him.
I experimented with the monsters in the Ship Graveyard, trying to see what would pop up when they were released. Naturally I could go and look it up in the code, but it was more fun to play around with trial and error. The Skeletons produced Bolt 2 when released, which was simply bizarre - don't ask me what was going on there. Psychoheads used Charm, which was potentially useful in the future... I would have to remember that. And the Carcursers used an ability called "Hug", which was essentially the petrification spell Break. I made a quick check in the code, found what I was looking for, and then headed off to face Siren:

Carcurser, I choose you!  (Only managed to get through four pictures before making that joke, heh. Just too easy to resist.) Siren is not protected against petrification attacks, since you normally don't have access to them so early in the game, and I took advantage of that to kill her instantly with that "Hug" attack. What an entertaining way to beat the boss! I'm really liking this class so far. It's all about planning ahead of time and setting up the right monster attack for each situation.
On to North Mountain. The enemies there were doing a pretty good job of beating on Barnum, who was somewhat underleveled at this point compared to other solo characters. Despite the awesome special abilities that Catch opens up, I had to keep in mind that those moves required a lot of effort to prepare. Against normal random monsters, Barnum remained a weakish fighter relying on his Dagger to attack. I experimented with Catching some different monsters, and couldn't find any that would defeat Magisa in one go. Rather than use a damage-inducing move, I instead Captured one of the "Blocks" monsters, which cast Flash upon release. You may remember Flash from my Blue Mage playthrough with Strago; it inflicts Darkness status on enemies, and reduces their to-hit chance by 75%. Flash caused Forza to miss 3/4 of his attacks, and that made Barnum's fight against him and Magisa a breeze.
After the battle, Magisa dropped Barnum's first whip:

This is an auto-drop that you always get, so there was no luck factor involved. Whips use the same damage formula as knives (Strength * Level / 128 to derive the multiplier M, then [Attack - Defense] * M) but have the special property of doing full damage from the back row, just like bows. They also have a chance to inflict paralyzation status on enemies, at a straight 50% chance on each successful attack. This was all quite useful indeed! For the moment, Barnum's whip was doing much more damage than his Dagger, and swapping over to the new weapon was a no-brainer.
Barnum had no problems whipping his way through the enemies in Waltz Tower from the safety of the back row. In fact, this is one of the easiest times I can remember going through this area. For the Galura boss at the top, another glance at the code revealed that he lacked immunities to all sorts of status effects. I could have used Flash again to inflict Darkness status, but instead I went for the easy one-hit kill:

"Blaster" inflicts instant death status if it succeeds, and Galura lacks immunity to death attacks. Piece of cake! Interestingly, I saw mention of this very combo (Catching a Bander S. to use Blaster on Galura) multiple times in online guides. Apparently this is such a no-brainer that even the folks at Gamefaqs can figure it out. (I kid, I kid!)
Barnum paused to go and Catch another Goblin from the starting area before moving on to Karnak. He picked up the usual armor upgrades in town and proceeded on to the Steamship. The whip still did the most damage at this point, so Barnum was able to strike from the back row with relative impunity. The enemies in here were not particularly dangerous, although their health was already ramping up and I knew the days of using the whip were rapidly coming to an end. Barnum followed the usual strategy for the Liquid Flame battle, Releasing a Goblin to cast Flare and do ~1000 damage at the outset. This meant that she effectively had 2000 HP instead of 3000, and definitely made things easier.
I managed to pick up the Guardian Dagger and Elf Cape in Karnak Castle before it exploded, using pure melee attacks from Barnum to power through quickly. There simply wasn't enough time to fool around with Catching or Controlling the enemies inside, not if I wanted to get Barnum out in one piece with the important loot. The Guardian was a significant upgrade in damage from the whip, plus it had the always-useful weapon block property, so Barnum moved up to the front row for a while and replicated the path of so many of my other solo characters.
Against Ifrit, I experimented with Catching and Releasing an Ice Soldier (Ice 2), however even with his weakness to ice element that did roughly 500 damage, and Barnum could do better than that with other critters. Rather than exploit the tired option of a Goblin and Flare again, I caught a Zuu (giant bird) enemy and released it to use the ability "Breath Wing", which does 1/4 of max HP in damage. Against Ifrit, that was 1/4 of 3000, or 750 damage. Between Breath Wing and some luck in blocking physical attacks, Barnum managed to get through this boss at a cost of only two Hi Potions, and none of his Elixirs.
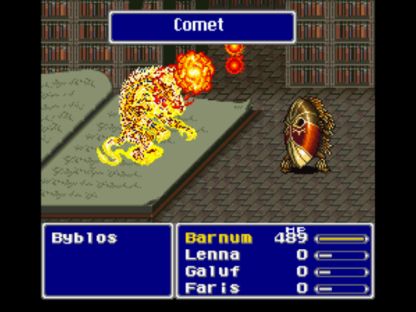
Byblos is almost always a roadblock boss, so Barnum had to build levels for a little while until he was strong enough to take on the book of death. While doing that I looked at what enemies might be a good fit to Catch, and found that the Page 256 enemies would cast the powerful Dimensional magic spell Comet. That sounded like a good plan, only Catching one of these guys was pretty tricky to pull off, as they would cast the Blue spell "Moon Flute" and inflict Berzerk status on Barnum - and once he was Berzerked, I couldn't use the Catch command! Barnum would have to do ~800 damage to the Page 256 on the first attack, and then use the Catch command on his second go. Pulling that off required Catching another enemy (Grass Turtle), Releasing it against the Page 256 to do 800ish damage, and then Catching the Page 256. Whew! But it worked, as the picture above indicates.
The most difficult thing about Byblos is all of the status-affecting spells that he employs, such as Armor, Sonic Wave, Thread (Slow), and so on. Especially bad is when he starts casting Drain and healing himself by sucking life out of your characters, which he starts doing when his life falls into the critical range (below 800 health). Fortunately, this was one situation where the Beastmaster class worked very well indeed. I had Barnum hold his pet in reserve until Byblos was down to his final 1000 HP, then let lose the Page 256 to unload Comet all over his sorry behind! Worked like a charm, and Barnum made it past the boss without too much difficulty. I did have to level Barnum all the way to 31 however, which is on the high side even for solo characters.
The next couple areas flew by very quickly. Barnum went and caught one of Final Fantasy 5's mini-bosses, the Dragon Chimera, in preparation for the Sandworm boss. That particular enemy likes to use the Blue spell Aqua Rake, and when you factor in the insane 8x damage boost that Aqua Rake does against desert opponents...

It makes this boss fight a piece of cake! Just as with Strago, my solo Blue Mage, I found that Aqua Rake ended this battle in a hurry. Barnum's Magic Power stat was much weaker than Strago's had been, so he had to do a little attacking to finish off the Sandworm, but that was hardly a problem.
Barnum made his way across the Quicksand Desert and proceeded through the story sequences to the Lonka Ruins and the airship. I had Barnum load up his monster cannon again while he was in the desert, this time catching a Sand Bear for use against Crayclaw:

Sand Bears are somewhat infamous for being the monster Catch that does the most damage in the first world. When released they execute a normal "Fight", but this is a physical attack that packs quite a whallop! Sand Bears will do 2000+ damage to most enemies, which was enough to kill Crayclaw here in one hit. In fact, because monster attacks using Catch are independent of the Beastmaster's level, one of the standard Low Level variant strategies is to keep catching Sand Bears over and over again for use against many of this game's bosses. ("Release more Sand Bears!") Even though it was somewhat of a cliched move, I would make use of the big furry guys myself on a number of occasions.
I did mix things up a little bit for the Adamantium Turtle battle:

The Mini Dragons located near Istory will use Holy when Released, another excellent option. The toughest part here was catching a Mini Dragon in the first place; these foes are quite difficult, and they are always encountered in groups of five. I had to equip a Flame Ring with Barnum just to stand any chance of surviving long enough to capture one of the little dragons. It worked out well enough, although I did have to try several times before succeeding. Adamantium was pretty tough, requiring the drinking of several Hi Potions and Elixirs. Not a whole lot Barnum could do about that, unfortunately. Once he released his stored up monsters, Barnum had no choice but to slug it out with his opponents.
At this point I realized that I had forgotten about the location of one of Barnum's whips. The Thunder Whip is located in the Cave of Jachol, a place that I skip normally with my solo characters because it contains nothing of value for most of them, and the enemies inside are either worthless for gold/experience (Nut Eaters) or deadly battles (Skull Eaters). The Thunder Whip actually did more damage than the Guardian Dagger (42 damage instead of 36), plus it had a 1/3 chance to cast the spell "Bolt" when an attack successfully landed. While Bolt was already outdated, it came in handy against opponents weak against lightning:

Such as Sol Cannon! After Barnum got past the four Flamegun battles (and they were all Flamegun battles, because Barnum was totally unable to defeat the Rockets when they appeared in the random battles), he settled in for a long struggle against Sol Cannon itself. Now what I wanted to find was a monster that would kill both of the Launchers instantly when Released. Unfortunately, I tried all sorts of enemies and none of them managed to fit the bill! The Dragon Chimera's Aquarake only did ~250 damage to each target, not even close. A Rock Golem performed Titan's Earthshaker move, which was close at ~650 damage each, yet that still didn't get the job done, each Launcher having 800 HP. Then I figured that I should try to get an attack that did 1/4 of max life to each target, since that would do 5000+ damage to Sol Cannon. I captured a Zuu and had it use Breath Wing, only to find nothing happening. What's going on?! Oh, Sol Cannon has an immunity to Air element in the code, darn it! 
None of these solutions were working. After trying four different monsters, I was forced to fall back on the uncreative Sand Bear option, which at least did a good 2200 damage. However, I discovered in this boss battle that the Sand Bear's Fight attack is actually random - you don't get to select the target! So 2/3 of the time that attack would hit one of the two Launchers, and I would have to reset the battle and try again, argh. Even when the attack lined up correctly, Barnum would still have to kill the two Launchers and do another 10,000 damage to Sol Cannon, and with no way to restore life other than Elixirs, that meant drinking bucketfuls of the restorative stuff. Ultimately, Barnum made his way past this encounter at Level 37, at the cost of 10 Elixirs. Ouch! The comparisons were particularly painful to my last two characters, Shadow (Ninja) and Marty (Time Mage), each of whom had enormously better options on hand. Barnum's slow, plodding rate of attack was a study in contrast to their superior speed. I wanted to have the Fast spell at my disposal again!
Barnum was slightly over-leveled for a solo character, and he could dish out a strong melee attack with his whips from the back row, so he had few problems making his way through the Lonka Ruins. Soon enough he came to ArchaeoAvis, which was definitely tougher. Normally I have my solo characters equip the Elf Cape for this boss, as a way of dodging the Confusing "Claw" move that the boss can do in its final form. However Barnum already had a Sand Bear saved up for use against the final form, which would nearly kill it in one hit. I decided that it would make more sense to go with the Flame Ring here, which would allow Barnum to heal up to full life against the third "fire" form, essentially saving an Elixir in the process.

Well, that did work as you see above, but it wasn't quite as easy as I thought! Although I could make it to the final form with ease, and Barnum could indeed kill that last form with one attack after Releasing his stored-up Sand Bear, Barnum unfortunately bit the dust a number of times as ArchaeoAvis hit him with that darned Claw move over and over again. I probably should have stuck with the Elf Cape and burned through some more Elixirs. I also didn't make things easier on myself by swapping to the Guardian Dagger and moving to the front row for the last two forms; I did this because those forms have an immunity to lightning element, but the Lightning Whip actually does NOT deal lightning damage! Huh?!  Yeah, go figure. I guess I should have read the weapons section in the Algorithms Guide more closely...
With the meteor miniboss trio, the interesting fight, as always, was against the Puroboros. The Chimera Brain and Titan were killed with simple melee attacks, nothing to report there. For the sextuplet of little bombs, I had Barnum prep a Rock Golem's Earth Shaker (Quake) attack:

This was the best monster attack I could find that would hit all of the Puroboros at once. And the damage was quite good, knocking out almost half of the life of each of these foes. Now I've seen some online guides suggest using Control to have the Puroboros use Exploder on themselves, however in my experience with Barnum that was not effective at all. The deceased Puroboros simply cast Life 2 and brought their fallen comrades back from the grave at full health! Instead, I junked that plan and had Barnum attack the damaged Purobos to near-death, so that when they used Exploder it wouldn't do much damage. This worked perfectly, as Barnum's melee attack was doing about ~700 damage at this point, dropping each Puroboros down to about ~150 life remaining. Barnum had to use two Hi Potions, yet he managed to avoid gulping any Elixirs, and I won this battle on my first attempt at using the non-Control tactic.
Barnum was low on Elixirs, so I built up his stock again by farming five more of them in the Wind Shrine. (The Wind Mold enemies in there are the best place to get dropped Elixirs in the first world.) I also stocked up on - you guessed it - another Sand Bear for use against Gilgamesh in the battle on the bridge. The drill was pretty simple there, Release the Sand Bear right before Gilgamesh went into his AI change, and that worked out rather well. Gilgamesh still killed Barnum twice though, once even getting off a triple Jump attack that did 1500+ damage before Barnum could even respond! (Moral of the story: a Hasted Gilgamesh is serious bad news!)
Rugor had a superior Chain Whip on sale (damage 52) which upgraded Barnum's damage a bit further. Shortly thereafter, he ventured briefly into Kuzar Castle to experiment a bit more with Control:

The Shield Dragons inside can be Controlled and then forced to use Flame on themselves, which will kill them in five hits. Every single Final Fantasy 5 online guide mentions this, because the Shield Dragons can be defeated for tons of experience points, and heaven knows that the online community zeroes in on the best places to grind experience and ability points like moths to the flame!  I killed a single Shield Dragon for the novelty of it (netting 10,000 XP in the process!) and then moved on.
Barnum would find the "Coronet" helmet a little later on in the second world, which increases the success rate of Control from 40% to 70%. Even though this is one of the signature abilities of the Beastmaster class, I didn't find myself using Control very often. For one thing, the success rate was simply too low to be of much reliability, even with the Coronet equipped. Maybe in a normal game missing isn't so bad, but in a solo game you don't want to waste multiple rounds with the monsters beating away on you! Secondly, Control is a very slow ability to use. First you have to spend a turn taking possession of the enemy, then you have to wait a second round before you can use enemy commands to attack. Furthermore, the Beastmaster gives up his own command window when Controlling a monster; if you look above, you can see from the picture that Barnum couldn't use an item, or change rows, or do any of the normal moves. You can actually get trapped with the monster commands when you'd really like to use some of your own normal ones! And of course Control is useless against nearly all bosses in this game. This meant that the ability was only situationally useful, as opposed to Catch/Release which saw constant preparation and use.

Catching a toad and bringing it to this old man in Kelb village allows you to buy the Corna Jar, an accessory useless to everyone but the Beastmaster. What this equipment does is allow the Beastmaster to Capture enemies when their life is below half, as opposed to below 1/8. In other words, it makes Capture opponents a heck of a lot easier! Since the Corna Jar does nothing to boost stats, it wasn't the sort of thing that Barnum would want to wear in boss fights, but it did come in handy in prepping for said boss encounters ahead of time.
The Hiryuu Valley meant a return to the undead-ness of the Bone Mail, a welcome addition for Barnum. He had no way to heal himself anyway aside from Elixirs, so it didn't post much of a penalty. For the Hiryuu Plant boss at the end, I took advantage of this foe's lack of Heavy status or Death immunity:

Yes, the Hiryuu Plant can be insta-killed with Doom. It's happened to my solo characters many times before, so time for some payback against the game! I can do the cheap kills too. That weird-looking plant thing is called an Aquathone, and Barnum caught and released one to produce the Doom spell. You can't target the monster attack, so the odds were only 1 in 4 of the Doom spell even hitting the Hiryuu Plant and not the little flowers, but I got lucky and the second attempt succeeded here. The little flowers could of course be mopped up with ease from this point. As far as boss strategies go, this was one of my favorite for Barnum thus far.
As I said before, most bosses can't be Controlled. The only exception that I found was Enkidou:

For whatever reason, he lacks both Heavy status and Control immunity in the code. Maybe an oversight there? Anyway, I had Barnum take Control of Enkidu, then use Hurricane (dropping health to less than 10 HP) and kill himself with Fight. That was rather amusing, although in all honesty it would have been simpler to Release another Aquathone and get an instant kill with Doom. At least this made for a better picture. Gilgamesh was defeated through slow melee attacks, using Hi Potions to heal from his occasion Missile attacks. Staying in the back row definitely cut down on the damage from Gilgamesh's melee blows.
Barnum was able to turn up a Wall Ring with a minimum of fuss inside the Barrier Tower. In preparation for Atmos, I sent Barnum all the way back to the Underground Cave next to the Moogle Village, where he was able to Catch a Lopros (miniature dragon) enemy. This monster uses "Breath Wing" upon release, which you may recall does 25% of max hit points in damage. Since Atmos has 20k health, that meant an easy 5000 damage, enormously more than Barnum could do attacking normally. Even with this assistance, Barnum still barely managed to defeat Atmos before his teammates were dragged into the gaping mouth. Barnum's melee attack remained stuck in the ~750 damage range, still stuck using the Chain Whip. Like the Dragoon and his lack of spears, I found Barnum suffering from the paucity of different whips in this game.
Mua had some slightly better armor for sale, and the random enemies in the forest were relatively easy to defeat. The Bone Mail locked out most of the truly dangerous stuff, allowing Barnum to sit in the back row and plink away with his whips in relative safety. For the Crystal bosses at the end, Barnum prepped by going to the Cave of Shoat and catching one of the Iron Dress monsters inside. They dish out tremendous melee damage when Released:

As the picture above indicates. In all honesty this was an unnecessary step for Barnum to take; the combination of the Bone Mail and the Flame Ring locked out physical damage while providing endless free healing from the Fire Crystal. Nevertheless, this was the only time I expected to play as a Beastmaster, and you might as well use what resources you've got, right?
Exdeath's Castle was one place where this job really shined. Barnum could sit in the back row and attack the normal foes with his melee attack, while the truly dangerous foes (like the Red, Blue, and Yellow Dragons) could be Controlled and forced to detroy themselves with their own attacks. Yellow Dragons in particular could use Hurricane on themselves for an easy kill, ha! Only the occasional instant death attack was able to wipe Barnum out.
The Yellow Dragons also will use "Thunder" when Caught and Released; this is an attack that does 1/4 of max health to opponents, just like Breath Wing, only attuned to lightning instead of air element. I would make use of this enemy ability in both of the boss fights in Exdeath's Castle. First, the final Gilgamesh fight was a prime target for the Thunder move, as he is listed in the code as having 55,000 health! Of course the battle actually ends once you drop him under 42k hit points, so in practice Gilgamesh only has 13,000 HP, yet Thunder would nevertheless do the full 9999 damage when Barnum broke out his captured Yellow Dragon! Doing the final 3000 damage was pretty easy after that. And Exdeath was prime bait for the same move:

He has 32768 total hit points, which divides perfectly by four to get 8192 damage. (Yes, I have Exdeath's health total memorized from playing this game so much!) The way to beat Exdeath with most solo characters is to equip a Wall Ring and then try to get his health below 16,000 HP. That triggers an AI change, after which Exdeath stops doing many of his most dangerous moves (Condemn, Hurricane, etc.) and instead starts casting Fire/Ice/Bolt 3 over and over again, which will reflect off of your Wall Ring and damage Exdeath himself. Since Barnum was able to inflict 8192 damage with his Yellow Dragon, he had to dish out a further 8576 damage to initiate that AI change, after which the battle would become relatively easy. Doesn't sound that bad, right?
Unfortunately this was extremely difficult to achieve in practice! Every time that Exdeath proceeded through his list of AI actions, he would get back around to the combat round where he has a 2/3 chance to use Condemn, and that meant almost-certain death for Barnum. I therefore needed to kill Exdeath quickly, before he had a chance to get around to using Condemn again, however that simply wasn't possible with this character. Poor Barnum was still stuck using that musty old Chain Whip, and after subtracting its Attack (52) out from Exdeath's Defense (25), Barnum was only doing 27 base damage. That ain't much, folks! Although he was getting an attack multiplier (M) of 18, this only meant 27 * 18 = ~500 damage per hit. Even in an ideal scenario where every attack hit Exdeath, which they wouldn't because of Exdeath's Evade, it would take approximately 17 attacks to trigger the AI routine change. There was simply no way that Exdeath wouldn't get around to using Condemn by that point, thus poor Barnum was effectively stuck. He had no GilToss, no Double Grip, no X-Fight, no magic bullet to get him out of this situation. What was I going to do here?
My first inclination was to increase Barnum's damage by doing a little bit of leveling. So I left Exdeath's Castle and went back to Kuzar, where Barnum could abuse the Shield Dragons for easy experience points in a hurry. I took Barnum up five levels, from 50 to 55, which gained him two attack multipliers in the process. Returning to Exdeath again, Barnum could now do... 600 damage per attack instead of 500. Ummm... well... that didn't achieve anything worthwhile!  I still needed about 15 rounds of combat to get back the Exdeath AI routine change, and that was barely an improvement. Lesson as always with this game is to play smarter, not harder - "leveling up" rarely achieves much.
Ultimately I hit on another strategy: give up the Chain Whip, move up to the front row, and use the Dancing Dirk, hoping and praying to land some Sword Dances at long (1/8) odds. This was quite random, yet if I kept trying the battle over and over again, I was bound to land two Sword Dances close together (each doing 3500+ damage) and get past Exdeath that way. This actually worked very quickly: Barnum got his Sword Dances, moved into the back row again, and concentrated on using Hi Potions to defend while Exdeath killed himself with spells reflected off Barnum's Wall Ring:

Whew, glad that was out of the way. I actually equipped the Guardian dagger during the second half of the Exdeath fight to block 1/4 of Exdeath's attacks! A good reason why you never sell those old weapons with secondary uses.
Barnum got past the Antlion by Catching/Releasing the Goblin from the Training House in Tule village, which I made sure not to fight at the beginning of the game. (It actually was needed too, after Barnum was hit with Sonic Wave multiple times.) Next he went and grabbed the Chicken Knife as usual from Mua and powered it up by running away from lots of enemies in the desert. To get into the Pyramid, Barnum needed to defeat both of the Gargoyles without allowing them to revive one another, and for that I had to employ another monster attack:

Those little munchkin guys in green have the name "Sleepy", and when Released they naturally cast the spell Sleep. I knew that the Gargoyles are vulnerable to Sleep status, and so Barnum packed the second Gargoyle off to dreamland, killed the first one, and then eliminated the snoozing second one while it was unable to revive its partner. It was a good thing that these Sleepy enemies were easily found outside the Pyramid, as Barnum didn't have any way to multitarget opponents other than using his monster cannon, and there were few good choices available at this point early in the third world.
Barnum went through the Pyramid using a combination of the Chain Whip and Chicken Knife depending on the situation. He also swapped back and forth between the two rows a lot, since the whip got full damage from the back row while the Chicken Knife did not. Interesting stuff, lots of micromanagement here. I had no real strategy for getting past the Machine Head robots, but the Chicken Knife managed to overpower them with brute force. Merugene/Mellusion went down essentially the same way, dying very quickly to the Chicken Knife's raw strength.
The Search for the Three Uber Whips
Unlike most of the other classes, the Beastmaster has three different powerful endgame whips, each of which would see situational use during the final boss run. With the airship in hand, Barnum's first task in the third world (after visiting Mirage Village for Running Shoes purchase) was to go about aquiring this trio of whips. The first of these is one of the Twelve Legendary Weapons sealed in Kuzar Castle, known as the Flame Whip. It does pretty good damage (Attack 82) and offers a minor stat boost to Strength and Agility, but its real value lies in the fact that it can cast Fire 3 in battle:

Unfortunately this isn't something that your character can control: Fire 3 will be cast automatically 1/3 of the time on a successful hit. So while this can be a little bit random, it does kick in quite frequently, and usually doubles the damage of the Beastmaster's attack (roughly 1500 for the normal attack, and another 1500 from the Fire 3). You do have to be careful with enemies that are in Wall Status, however: once Barnum hit one of the monsters, had Fire 3 kick in and reflect off the Wall, then hit him for 3000 damage! Heh. I found that the Flame Whip was the best all-round general purpose weapon to use in the third world, since it allowed Barnum to remain in the back row and didn't bring up the troublesome Flee effect of the Chicken Knife.
The second whip was located in the Solitary Island Shrine, which was where Barnum headed next. The Beastkiller whip is located in a chest about halfway up the tower, and was a welcome addition to Barnum's collection. This weapon has a lower attack value than the Flame Whip (72 base damage), yet it has the special trait of inflicting massive punishment on "Creature" type opponents. Any enemy that has the Creature flag in the code, usually wild animals of some sort, receives a critical hit with every strike of this whip. That means that the attack ignores Defense and deals double normal damage. While Creature foes are relatively rare, there are a couple of bosses that have this exact weakness, so the new whip would see some important situational use a bit later!
That just left the final uber whip, the most powerful and rarest one of all: the Dragon Whip. There are only two ways to turn up this whip, neither of them particularly easy. One way is to get it as a rare steal from Shinryuu (uh, next!) The other way is to get the whip as a rare drop from the Stingray enemies, who themselves are very rare encounters in the seas near the sunken Worus Tower. Stingrays are most famous as the opponents who can teach Blue Mages the Mighty Guard spell, but Barnum had a reason to go after them as well.
So I managed to track down a couple of Stingrays eventually, after fighting lots of random foes trying to find them, only to discover that Barnum was having all kinds of trouble defeating them! The Stingrays have 30,000 health and a pretty strong melee attack, and furthermore they couldn't be Controlled to kill themselves. I could have killed one of them by de-equipping the Bone Mail and using Elixirs, however that was hardly going to work in terms of repeated fights to get a rare item drop. Even Releasing a monster to do Breath Wing and deal 7500 damage wasn't enough, as Barnum still couldn't inflict enough damage to kill the Stingray before being killed himself. And the Chicken Knife was out, as it would simply make Barnum run away. I needed a new plan!
I looked at the code again, and reasoned that I could defeat the Stingrays if I could Poison them successfully; inflict poison status, then Control them and sit around waiting until their life bled away into nothingness. The only problem was the extreme difficulty of inflicting that poison status. The normal monster attack that does this (Spore) has a very low chance of success, too low to be reliable. Now there was also a rare monster attack called Poison Breath that auto-poisons opponents, yet the only enemies that can be Caught and Released to perform that move were the Dragon Zombies, and they could only be found in the Caves section of the Cleft of Dimension. Looks like Barnum was venturing into the endgame dungeon a little ahead of time to stock up on a very special monster! And what better chance to try out that new Beastkiller weapon:

Yep, the boss is flagged as a Creature in the game code. Attacking with the Beastkiller causes a bright flash of light, and then the printout of some major damage. Keep in mind that the ~3000 damage was being done from the safety of the back row, which made it comparable to the weapons of other classes. Soon enough Barnum managed to reach the save point in the Caves section, then fight a lot of random battles until he found the rare Zombie Dragon encounter. Catch the Dragon, walk all the way back out of the Cleft of Dimension, and then prepare to search for more Stingrays again. The rays are very elusive themselves, having only a 1/16 chance to appear as a random encounter, and then the item drop I wanted had itself 1/16 odds of appearing. Urp! Well, this might take a while...

But at least I finally had a way to take out these bastids. Release the Zombie Dragon, inflict Poison status, then Control the Stingray as seen above and sit around waiting until they keeled over dead. Each poison hit did 1/16 of max life, 1875 damage in this case, and eventually the Stingrays simply died without ever getting a chance to attack. This was essentially a reverse application of Marty McFly's Quick/Regen tactic from my Time Mage game, in other words. Anyway, it worked just the way I expected, which was good given the long setup. If each Stingray didn't drop the Dragon Whip, I hit reset and started searching for another one. (Not going all the way back into the Cleft of Dimension again, sorry.) Fortunately, I got the item drop in the eighth battle:

Pretty lucky there, all things considered. Now I had the Dragon Whip, woot!  One of the rarest items in the game to get. The Dragon Whip has the highest Attack (92) of the three endgame uberwhips, and the same trait of inflicting mass damage to "Dragon" type opponents. Just like the Beastkiller, any attack with the Dragon Whip against dragon foes causes a critical hit with double damage that ignores enemy defenses. Thus unlike most every other class in the game, the Beastmaster has a choice of these three different job-specific weapons in the third world, and that's not even counting the possibility of the Chicken Knife! Maybe it's better to have one awesome unbeatable weapon like the Brave Blade at your disposal, but at least the Beastmaster makes for some interesting decisions.
Barnum had a very standard path through the Fork Tower: use normal physical attacks against the Minotaur (the Dragon Whip smoked him from the back row), then rely on the Bone Mail + Wall Ring combo to defeat Omniscient. If only there had been some way to reflect Fire 3 from the Flame Whip onto the boss! Barnum would have killed himself in short order had he tried to attack himself though (remember that the Bone Mail creates a weakness to Fire element). So I did the safe thing and waited around for long minutes on end until Omni ran out of magic points, then took him down with melee attacks.
The Unknown enemies in the Great Trench have some nasty counters to physical attacks, which meant that Barnum had to rely on his job skills to get through:

I had Barnum equip the Coronet helmet again and used Control liberally throughout the dungeon. The skeleton Unknowns could use Condemn as seen above, however I discovered that Barnum did not receive gold or experience for monsters killed with Condemn. What a rip off! I have no idea why that was the case. The blob Unknowns could be forced to use Fusion, which would kill them instantly while restoring Barnum's health to full. Sweet! Only - if Barnum was wearing the Bone Mail, that Fusion move would actually drop him to less than 10 health instead, since it is classified as a healing move. Whoops! I therefore took off the Bone Mail and went with normal gear for most of this area. A pretty weird place, with both the enemies and Barnum's fighting style. The bosses at the end got the usual treatment, weakened with melee and then finished off with a Bahamut summon from the Magic Lamp. I could have Caught a monster instead to finish them off, but I was feeling lazy.
Istory is usually an easy dungeon, and Barnum encountered no real difficulties there either. Some of the normally tough opponents, like the Fall Guards, could be Controlled and used to kill themselves. The Flame Whip and the ability to sit in the back row made due for most everything else. Leviathan was classifed as a Dragon in the code, so you can imagine how not difficult he was, Barnum cracking the Dragon Whip from the back row with a Coral Ring for free healing.
The journey through the third world had taken Barnum from Level 55 to 59 thus far, as he prepared to enter the final dungeon (well, again!) One thing I had learned was to have the Coronet equipped in the first "desert" area, so that Barnum was prepared to Control the Land Crawls:

Normally I hate these guys, with their Maelstrom move and deadly melee attacks, but Barnum could Control them and get them to use "Strong Fight" on themselves, which would always do 9999 damage. Three rounds of combat and they were very quickly dead.
As for the ending boss gauntlet, I'll summarize them very quickly. Barnum could Catch a monster called the Great Dragon in the "caves" section of the Cleft of Dimension, which would almost always do 9999 damage when Released. I would use these enemies in almost all of the ending boss battles. Apanda was another opponent classified as a "Creature", making him easy prey for the Beastkiller. Apocalypse has very high physical and magical defense, yet he never uses melee attacks himself, making the optimum strategy moving into the front row and hacking away with the Chicken Knife. Worked on I think the third try. Catastrophe was actually quite difficult, mostly because I refused to use an Elixir, and opted to redo the battle any time Barnum was killed. Eventually Barnum avoided getting enough "Can't Flee!" messages to win normally with the Chicken Knife. Halicarnassus was taken down with the Dragon Whip and several reflected Holy spells off Barnum's Wall Ring. Finally, Twin Tania was another "Creature" who was nailed with the Beastkiller whip, each attack doing about 3200 damage. Although it took a while to cut down his 50k HP, Barnum managed to get by with only one Elixir used thanks to some timely Tidal Waves for healing (Coral Ring). Barnum's Vitality and Level were high enough that he had 4000+ max health, which greatly lessened the danger of Giga Flare.
And that brought Barnum to Necrophobia, one boss that had me seriously concerned. I knew that Barnum could get past the four Barriers with no real problems (albeit at the cost of drinking tons of Elixirs), however I worried greatly over the second half against Necro himself. The way this works is that Necrophobia has 44,000 hit points to start; Barnum could effectively do 9999 damage by Releasing a Great Dragon, and Gilgamesh would do the final 9999 damage in a cut-scene. The problem was eliminating that remaining 24,000 health before getting killed!
The battle plan was always the same: start in the front row, attack with the Chicken Knife and heal intermittently with Elixirs as needed. The Barriers would cost about 5 Elixirs on average to remove, and that was with me using Hi Potions to heal once there was only a single one remaining. When Barnum was down to the last Barrier, I would use the Magic Lamp to summon Golem, swap into the back row, and only then finish it off. The first thing to do against Necrophobia was to use the Great Dragon monster:

It put up the predictable outstanding damage. Then Barnum had to grind out the remaining 24k damage using the Flame Whip; this was the best weapon to use because it could be used from the back row and had the 1/3 chance to use Fire 3. Necrophobia is extremely strong against physical attacks (Defense 50!), but he is weak to all eight elements, and Fire 3 would do very strong damage, roughly 3500 every time it appeared. Therefore this battle was all about attacking repeatedly, praying for Fire 3 to appear, and hoping against hope that Necrophobia wouldn't pull out his bullshit Hurricane/Fight insta-kill combination. Golem could shield Barnum against that, but only for a few rounds of combat before the Earth Wall protection broke down. Then it was all down to the luck of the dice!
This was a painful, painful battle to do. Every failure meant another long walk all the way back from the last save point in the Dimensional Castle. (No, I don't cheat with save states.) I knew that I had the right tactic to succeed, I just needed the luck factors to line up to get me the victory. And they were very stubborn: I had Barnum attack with the Flame Whip 11 times in a row at one point without getting Fire 3 to appear; the odds of that were under 2%. Come on! Barnum did win out successfully on about the eighth or ninth attempt, drinking nine Elixirs in the process. Good grief!
At least that was out of the way and Barnum had the much-needed final save point in hand. I now had to leave the Cleft of Dimension, in order to recharge the Magic Lamp and Catch another monster that could only be found outside in the normal globe map. Barnum also badly needed to restock his Elixir stash for the last battle, as Necrophobia had taken him down from 16 to 7, and there was simply no way that I could defeat Neo Exdeath without a lot more than that! I had Barnum fight random enemies in the "Lonka ruins" section of the Cleft of Dimension, where he could restore health easily at the magic pot on the floor above. More importantly, the Level Check monsters had a random chance to drop Elixirs, and they were extremely common opponents in this spot. Barnum gained three levels in the process, from 60 to 63, and ended up with 21 Elixirs after burning the remainder of his money at the store in Mirage. Why Level 63? Well, NotDave of Gamefaqs famously completed a solo challenge with every class in the game, and his Beastmaster finished at Level 64. Call me petty, but I wanted to do one better!
So back all the way through the final dungeon to the last save point again. (This all takes a lot of time, which I skip over in my reports.) For the Exdeath "Tree" form, Barnum moved into the front row and prepared to wield the Chicken Knife once more. I had done the math ahead of time, and none of the whips would do enough damage to make them worth using in this fight. The Chicken Knife did 3600 damage with each blow, although the tradeoff was Exdeath's own melee attacks dishing out close to 1500 damage in return, ouch! Still, better to have high damage flying around on both sides so as to get the fight over quicker and lessen the chance of White Hole appearing. I was pretty lucky with that, and Barnum managed to reach the second battle against Neo Exdeath on my third attempt.

Barnum started the battle by summoning Odin from the Magic Lamp, as all my solo characters always do, then he Released his stored-up Giant Bird which I had taken pains to Catch earlier. The avian monster uses Breath Wing as its attack, which always does 1/4 of max hit points. This will apply even to Neo Exdeath, and since each part has 50k or more health, all three parts took an instant 9999 damage. With four Beastmasters, you could easily remove 120k of the 160k hit points that these three parts have, just like that! Even with just the solo Barnum, getting a free 30,000 damage was pretty cool.
Now the greatest danger in this battle is always the Grand Cross produced by Part #1. Fortunately, this part was classified as a "Dragon" in the game code, which meant that Barnum could break out the Dragon Whip and get an endless supply of critical hits from the back row! Each strike did about 4200 damage, and even better was the fact that Part #1 was not immune to Paralyzation status. The Dragon Whip successfully paralyzed this part over and over again, freezing it in place and preventing Grand Cross from coming around in the AI routine. Barnum was really racking up the damage in a hurry, so much so that the first Grand Cross turned him into a frog and Part #1 never managed to get off a second Grand Cross! Impressive stuff. Now you know why I spent all that time and effort turning up the Dragon Whip earlier!
That left the last two parts, Part #2 (Almagest) and Part #3 (melee attacks). I went after the former one first, and Part #2 has the fortunate property of being a "Creature", which meant more use for the Beastkiller. It did a little less damage at roughly 3600 per attack, yet that was still pretty darn good from the back row. I knocked it all the way down to 1331 health remaining, then switched over to the other part.
The last section of Neo Exdeath was a little more tricky. It lacked the weaknesses of the other parts, so I experimented with my weapon options. The Chicken Knife did about 1800 damage per attack (getting halved from being in the back row), the Dragon Whip about 1500, and the Flame Whip about 1300. But wait, keep in mind that a quarter of all Chicken Knife rounds of combat would be wasted, and the Flame Whip would kick in Fire 3 a third of the time and do extra bonus damage. As such it was actually the Flame Whip that did the most damage on average, meaning that all three of the uberwhips saw action against Neo Exdeath! Didn't plan it out that way, but it was the most effective tactic. Barnum set to whittling away at the last part's health, doing fairly modest damage except on the occasions when Fire 3 kicked in.
All the while, Neo Exdeath had been pounding Barnum with Vacuum Waves and Almagests, and that was on top of the damage he had sustained in the earlier Exdeath Tree fight. I knew how to do the battle tactically, and Barnum would never be killed by those moves unless I made some incredible error, yet the Elixir stash was diminishing rapidly as the long encounter continued to stretch on. I soon realized that Barnum was in a serious race: which would run out first, Part #3's remaining health, or Barnum's last few Elixirs? This was going to be real tight. I had four Elixirs left when Part #3 hit 15k health, and Barnum drank his last Elixir when it had a mere 5k health remaining. I needed the Flame Whip to hit on its chance for Fire 3... and it did, two out of my next three attacks! That left Part #3 with less than a thousand health remaining, yet Barnum ALSO had less than 1000 HP, and I had no Elixirs remaining. I had exactly one round of combat left, meaning it was time to pull out the Magic Lamp and pray to the gods that it would deal enough damage to kill the last two parts...
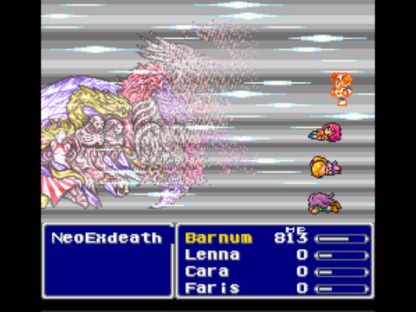
YES!!! SCORE!!!  Part #2 had had 1331 health remaining from earlier, and the Magic Lamp's Syldra summon did 1374 damage. In all honesty, I did not think that was going to work. I thought that Barnum's low Magic Power stat wouldn't be enough to do that much damage. But I had no choice. Barnum had 813 health remaining and ZERO Elixirs remaining in his inventory. Whew! Folks, it does not get any closer than that. 21 Elixirs used in that battle, exactly enough - ha! (OK, I really needed 22, because I didn't want to cut things quite that close.) Barnum needed to use four different weapons, the Magic Lamp, plus a monster attack, and he still pulled it out by the skin of his teeth. I won on the first encounter with Neo Exdeath, the third try at the final battle overall. A nearly flawless ending run, if I do say so. This was possibly the most exciting battle I have ever fought in Final Fantasy 5!

Barnum was a higher level than many of my other solo characters, but that's because his class proved to be more difficult than I anticipated. Yes, a lot of the early bosses could be instantly killed with some status effect that wasn't normally available at that point in time, however later on the power of his job declined a lot, and once Barnum fired off his monster cannon he was just a weakish fighter with those funky whips. I did enjoy playing out Barnum's quest, although at times Catching all those enemies got a bit tedious. I'm going to try to do something a little easier next, probably the Magic Knight. Wait until I get to some of the other Oddball Jobs later on, they're really something!
Thanks for reading Barnum's quest. It's only appropriate to end with the whip smiley: 


