
 |
|
|
WillPower continued Hell difficulty at the start of Act Two at CLVL 74. Act Two is the largest of the five acts if the player takes the time to clear everything out, with the seven Tombs of Tal Rasha in particular taking forever (with the understanding that most players will skip everything but the True Tomb). My hope was that this portion of the game would go a bit smoother than Act One; although Act Two is longer, it doesn't have as many true deathtraps as the first portion of the game. WillPower was continuing to look for amulets and circlets with more than +1 Paladin skills to power up the low base damage of his elemental auras. I was also getting close to CLVL 75 where the numbers said that he'd have good odds to shop for a Marshal's (+3 Paladin offensive skills) scepter at the town vendors that could also have additional points in Holy Shock or Holy Fire.
The first part of Act Two to tackle is almost always the standalone dungeon of the Sewers. I wasn't too concerned heading into this area since the Sewers are known for being heavy on fire resistance, not lightning resistance, and Holy Shock was always the preferred aura of choice for WillPower. Sure enough, there were mummies and Burning Dead that WillPower encountered right away on Sewers 1 which Holy Shock worked quite well against. I was pleased to find that the Burning Dead fared almost as badly as the fallen enemies back in Act One, a good sign since there would be huge numbers of the red skeletons to overcome up ahead in the Tombs. In the interests of full disclosure, WillPower cleared out maybe 10% of the first floor before a second mummy boss pack trapped him against one of the walls. It was a pathing failure on my part, I thought I could squeeze through before the mob of opponents closed and was completely wrong. With no way to escape and a dozen mummies beating on him, WillPower had to Save and Exit his way out of this mess - whoops. Thus he avoided his first death but did have to take the somewhat cheese option of bailing out through the menu screen since there wasn't even room to get a town portal down. It was a good example of how even a routine situation can turn deadly in Hell difficulty when misplayed.
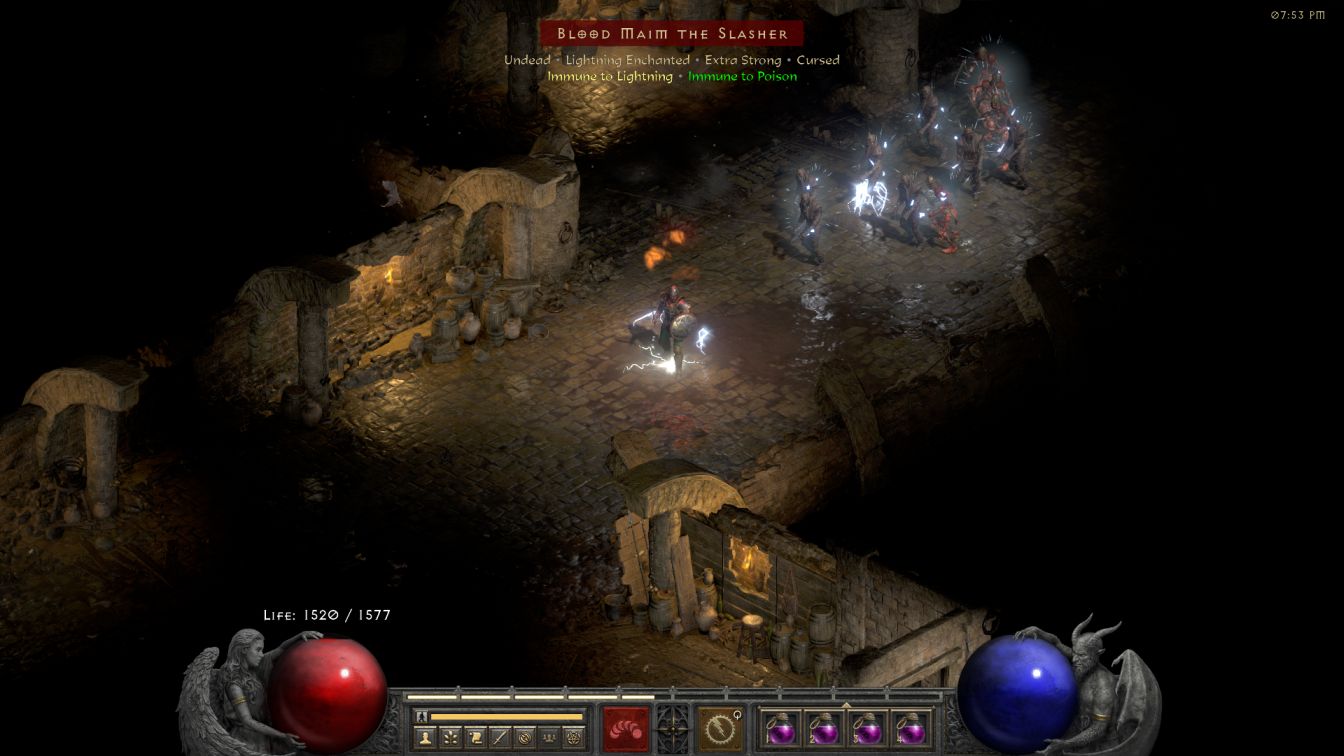
Aside from that mishap though, the Burning Dead skeletons were pretty easy to deal with, both the melee versions and the archer versions. Mummies had more health and 33% lightning resistance to make them noticeably more sturdy although still rather simple to shock to death. The real problems came from a monster type I had never thought much about in the past, the Sand Raider enemies pictured above. They had about double the health of the skeletons and an unfortunate 50% lightning resistance to make them feel even beefier. The Sand Raiders also liked to run away when they dropped low on health which could make it tough to finish them off in a crowded room situation. Normally this would be where I switched over to Holy Fire to deal with an opponent but nope, not an option here, since all of the Sand Raiders were completely Fire Immune. WillPower needed significantly more time to kill these enemies and everything was that much worse when bosses showed up. Sewers 1 didn't have much in the way of Sand Raider bosses but Sewers 2 had them everywhere which dragged out the clear pace of the area in annoying fashion.
An even bigger pain in the rear was when Sand Raider bosses would roll the Lightning Enchanted trait and therefore become Lightning Immune in addition to their innate fire immunity. This actually happened twice on Sewers 2 with one of the pair pictured above (at least both bosses didn't have to be fought at the same time!) WillPower's only option was to zap all of the minions to death with Holy Shock over several long minutes of walking in circles, followed by reviving Durga back in town and then fighting the boss together with Holy Freeze aura running. Was this doable? Yes. Was it an easy process? Definitely not, especially since WillPower had to go through the whole rigamarole twice. At least by rolling mostly defensive traits these bosses weren't especially dangerous and getting into melee range to apply Prevent Monster Heal didn't put WillPower into mortal danger.
Sand Raiders can't spawn on Sewers 3 which was a blessed relief, with WillPower facing much easier Huntress spear cats instead. He was able to clear his way through the bottom floor quickly until encountering Radament in a back corner:
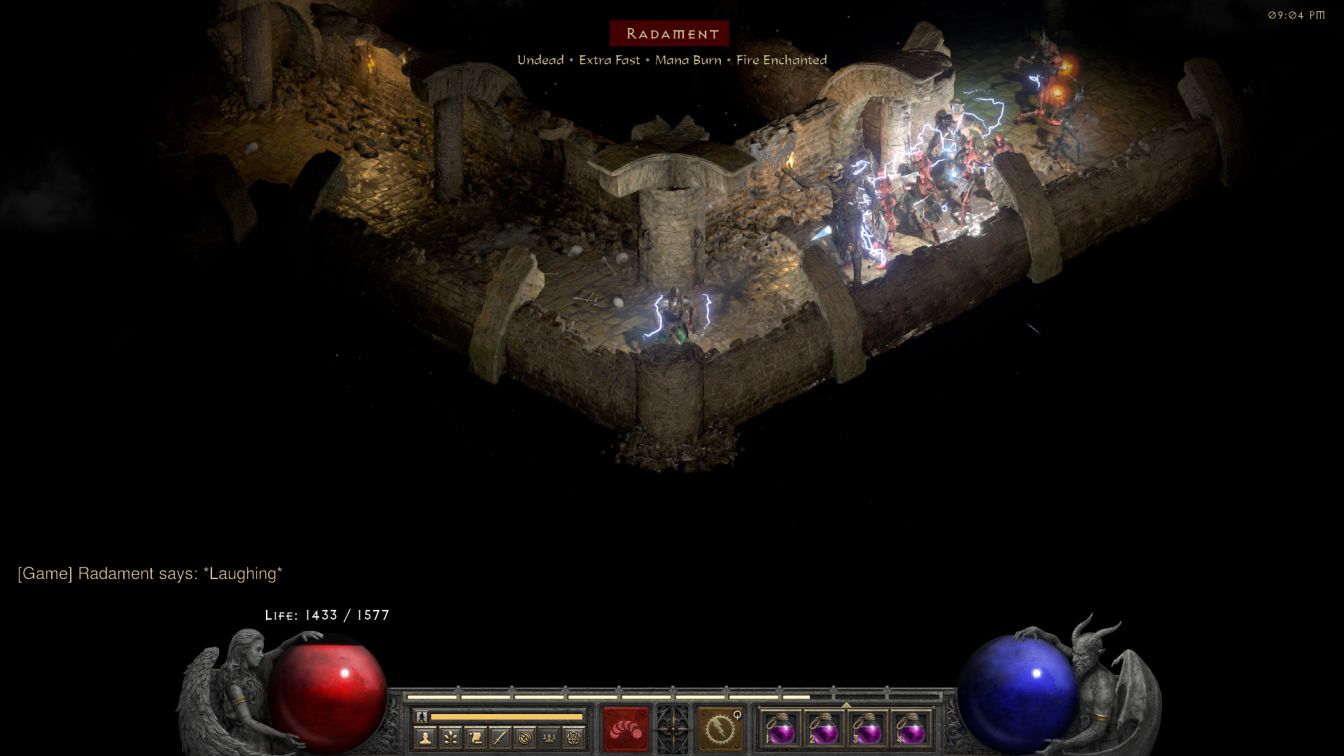
I started out by luring some skeletons a long distance away so that they would be out of resurrection range. The Horror skeletons were Lightning Immune but fortunately only marginally tougher than their Burning Dead cousins, with Holy Fire sufficing to do them in. Then Radament himself popped up in maybe the strangest place I've ever seen him, stuck in this little corridor with the gold chest in a larger room behind him. I quickly realized that this was an excellent tactical situation for WillPower as the tunnel was too narrow for any monsters to squeeze their way past Radament. Therefore WillPower just needed to stand in place and tank the Unholy Bolts shot out by the boss for a minute or two while Holy Shock landed the kill. Radament has a lot of health but no lightning resistance and this worked out brilliantly to defeat the boss without having to worry about him resurrecting his skeleton minions endlessly. It was a good thing that WillPower was able to down the greater mummy right away because the room with the gold chest had a Burning Dead skeleton boss with the Lightning Enchanted trait, therefore gaining the Lightning Immune property to go with its innate fire protection. I had to kill everything else in the room and then bring back Durga one final time to let his physical and poison damage drop this last opponent. Whew, glad to have this over and done with - the Sewers were tougher than I had been expecting.
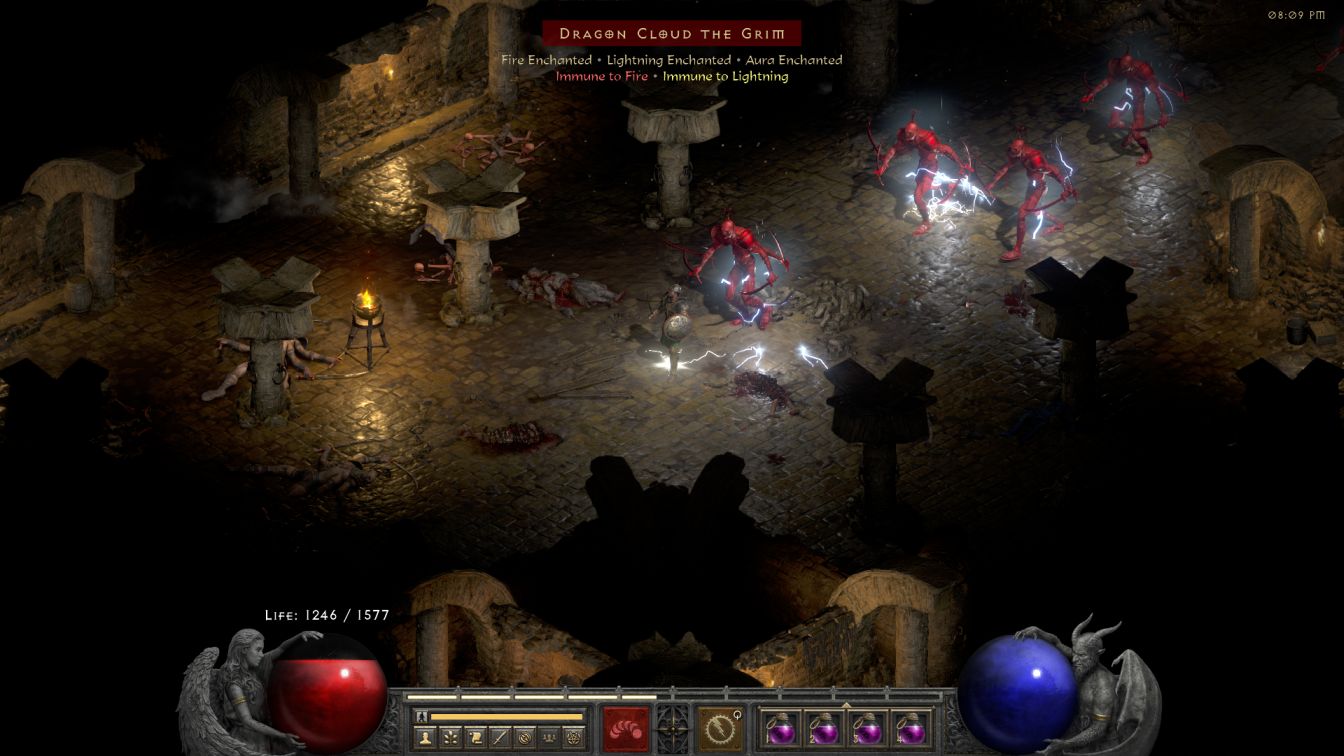
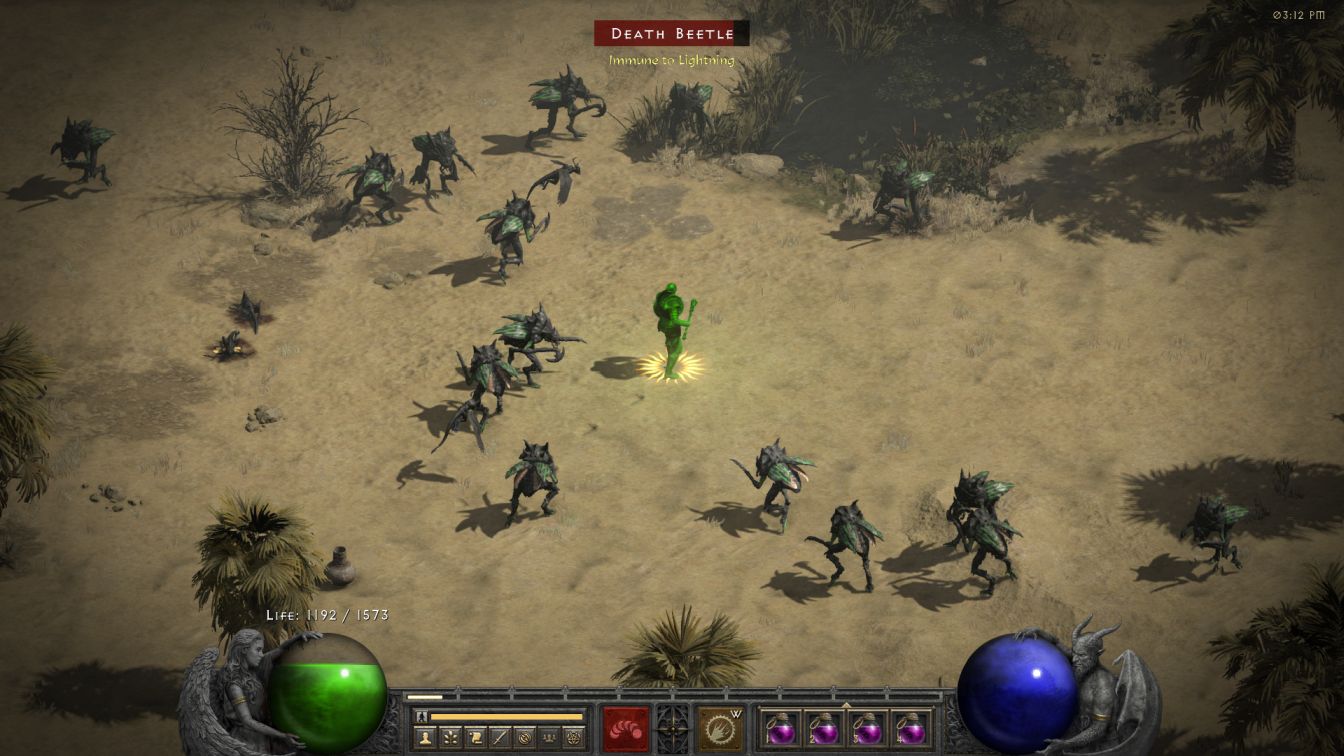
What wasn't tough was the immediate outdoor area beyond the gates of Lut Gholein. The Rocky Waste had plenty of wide open spaces and a friendly monster mix of leapers, beetles, and vultures which was unlikely to cause any serious problems. The leapers in particular fared incredibly badly against Holy Shock with their speed useless for avoiding the strikes of elemental energy. WillPower had to swap between Holy Shock and Holy Fire frequently because the beetles were Lightning Immune while the leapers were Fire Immune. This was actually pretty fun though, especially in mixed mobs where I had to be thinking about which aura to run at which point in time to drop the most immediate threats. There were bosses here, including an Extra Strong / Cursed beetle boss, nothing that rose to the level of a real challenge however.
The Stony Tomb dumped WillPower back into danger again, mostly because of the lack of space to maneuever. The choice of aura was easy here since all three monster types were Lightning Immune: horror skeletons, lightning element skeleton mages, and more beetles again. As I well knew by now, Holy Fire wasn't a fast killer and the entrance to the first floor of the Stony Tomb was overflowing with a double boss pack of skeletons. I usually try to capture the boss abilities in my pictures since it's useful to know what threats WillPower was facing and I wasn't able to do that here because there was too much taking place at once. I narrowly avoided being trapped against the walls several times before Holy Fire managed to burn enough monsters to create some space. The rest of the first floor was equally crowded and at one point I had to revive Durga for help against a Fire Enchanted beetle. That thing had so much fire resistance that WillPower was making no progress at all even after applying Prevent Monster Heal.
The second floor of the Stony Tomb turned out to be even worse than the first floor, argh! There was a double boss pack *AND* a champ pack present in the initial room with enemies absolutely everywhere in the cross-shaped intersection next to the stairs. I had to bail out of a town portal and walk back from town three separate times, on each occasion pulling more monsters away from the staircase in a different direction so that there would be fewer of them present the next time that WillPower came back. This is a heck of a lot easier with an ability like Teleport or Leap but I managed with nothing but base movement here. I have no pictures to share of this because I was too busy keeping my Paladin alive. The remaining corridors were also crammed with monsters and I had to keep pulling them back to the initial entranceway for disposal. The ground became so littered with items over time that it was getting hard to move WillPower with any precision. The Stony Tomb is a very small dungeon and I think that this made it harder to complete; the Amazon Basin says that players will see 6-8 bosses on each floor in Hell difficulty which is pretty wild. Creeping Feature had Spectral Hit / Magic Resistant traits to go along with his always-present Extra Strong / Cold Enchanted and it took four different monster-pulling retreats away from his chamber before WillPower could actually get inside the room and make it to the gold chest.
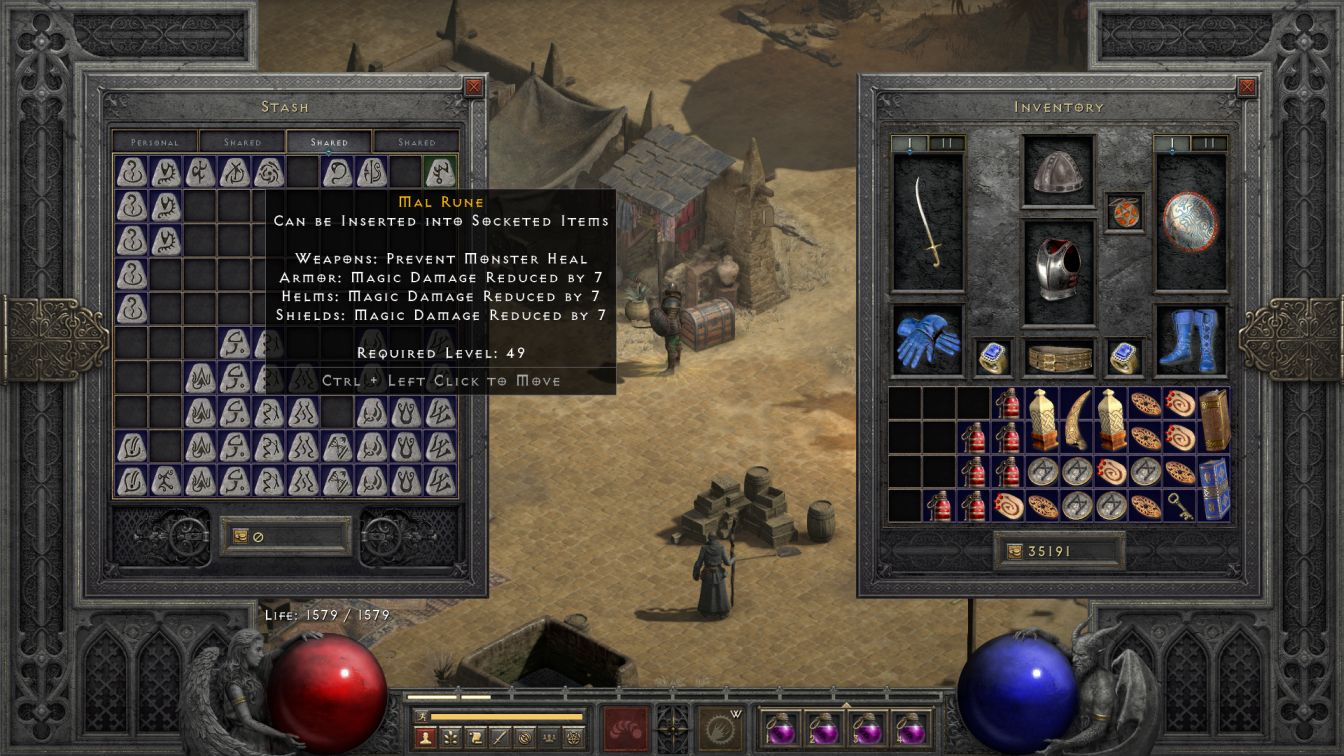
WillPower did have two notable finds while clearing out the Stony Tomb. First, he turned up a Large Charm with 7% resist all present, much better than the Large Charm with 6% poison resistance that he had been carrying around for lack of better options. The other big surprise was a Mal rune that appeared from one of the enemies in that crowded entry room on Stony Tomb 2, very nice! WillPower had everything up to Hel and then Lum and Ko runes plus the Mal. I looked at the rune list and saw that the Prudence runeword (Mal + Tir) is a two-socket armor recipe with some resist all and a big defensive bonus. That would be very nice for Durga if I could find an elite armor with two sockets for the base item, I'd have to keep an eye out for one of them dropping. I could also hold it and make the Rain armor for a future Druid in the same fashion that WillPower's own Principle runeword came from a donation though I do prefer to have each character turn up their own gear.
WillPower picked up with a new session in the Dry Hills which proved to be straightforward due to the open spaces and weak opposing monsters. There were more leapers here who fell quickly due to a lack of fire/lightning resistance along with vultures and potion-throwing cats. I was amused when a boss pack of those cats set up shop behind a little ridge and hurled their exploding potions over the terrain obstacle. Nothing here was too challenging so WillPower was able to move quickly (for him) into the Halls of the Dead. The first floor thankfully did not draw any Hollow Ones with their skeleton companions, instead featuring a very heavy draw of Desert Wing bats plus mummies and spear cats. The main danger here was clearing out enough space to maneuver before waking up too many enemies; WillPower fortunately didn't encounter any bosses or champ packs until he had a hallway cleared out. The scariest boss was an Extra Fast / Cursed bat who put a real hurting on my Paladin on the one or two occasions when it managed to land a blow.
Then WillPower descended the stairs to Hall of the Dead 2 and the real nightmare began:
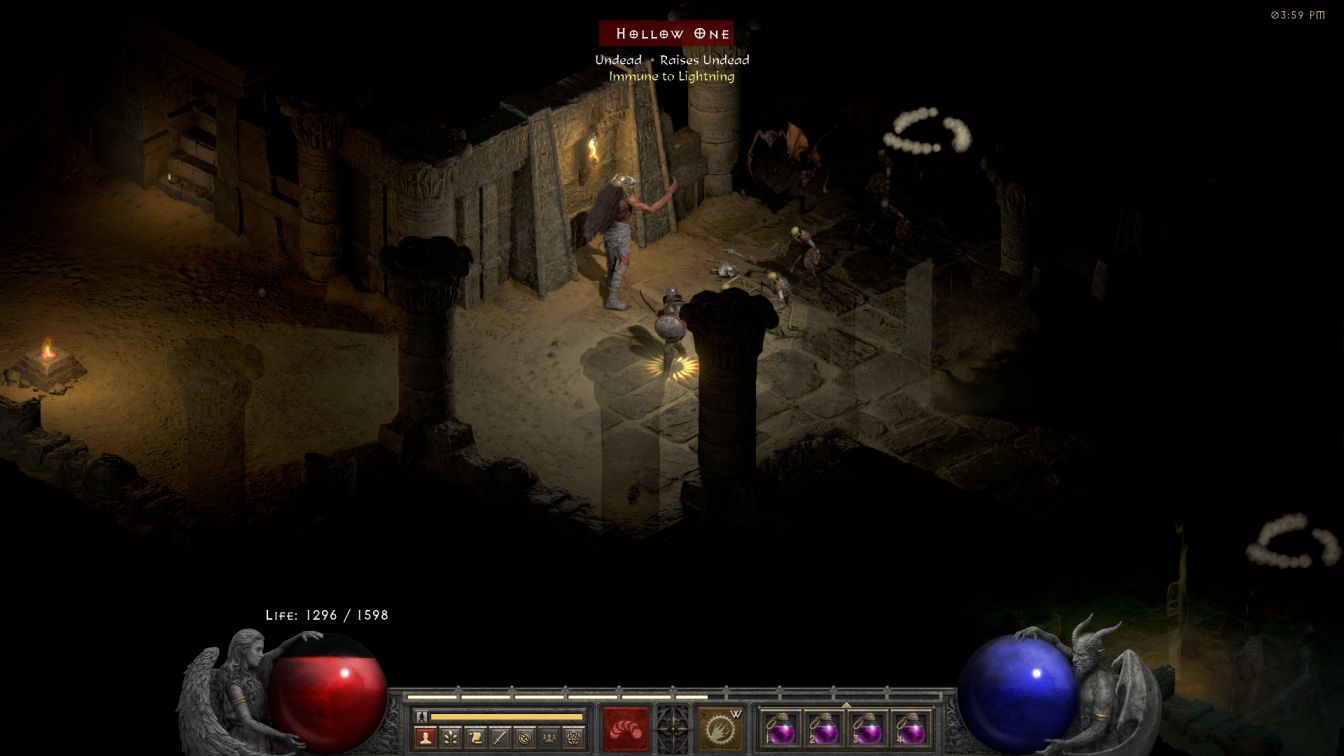
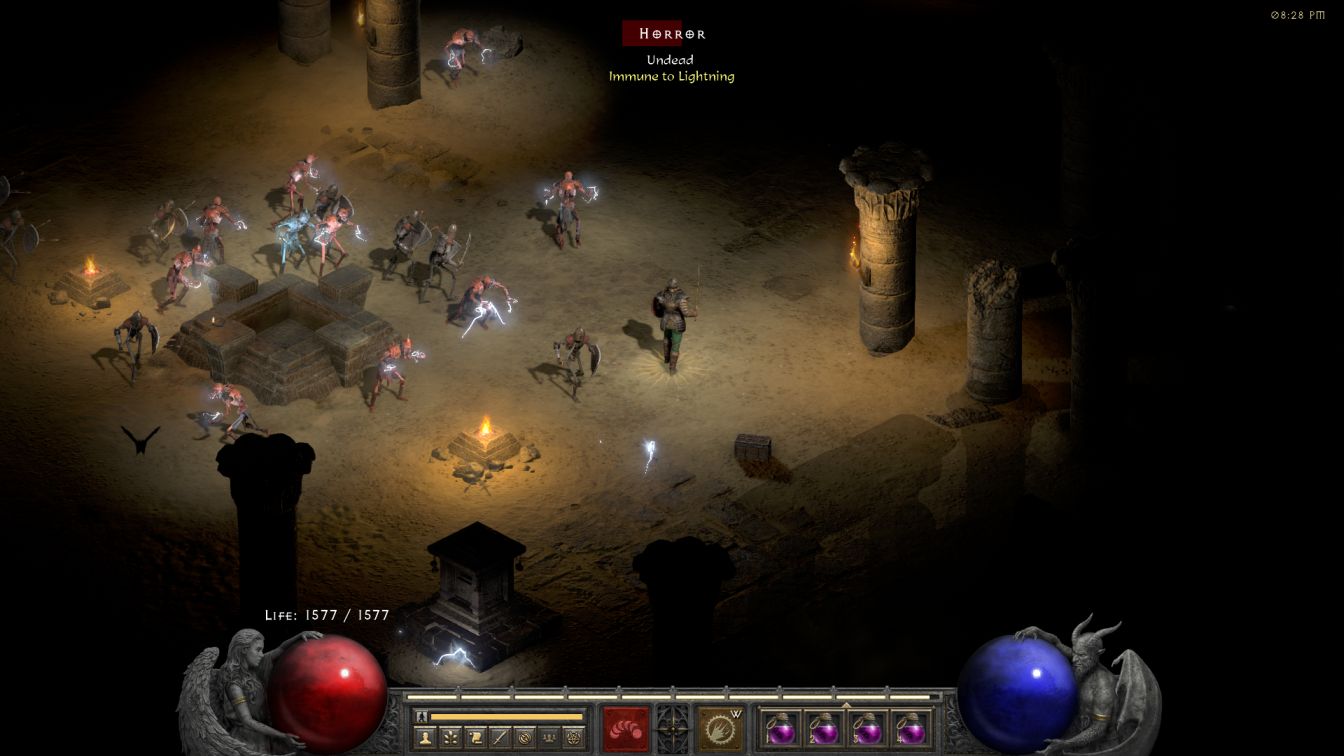
The initial room had drawn a circular formation that almost but didn't quite connect together, with doorways running off to the northwest, northeast, and southeast from the entryway. The stairs were off to the left in that screenshot above and readers will note the immediate problem: Hollow Ones with resurrectable skeletons everywhere. To my horror, I discovered right away that the Hollow Ones were all Lightning Immune (although their skeletons were not) and Holy Fire did not do enough damage to cut through their innate monster regen. In other words, WillPower could not simply run in circles and wait for the greater mummies to keel over, he'd have to tag each one individually with Prevent Monster Heal and somehow do that in a ridiculous sardine can while skeletons were being revived all the time. In fact, Holy Shock and Holy Fire couldn't even inflict any permanent damage on the SKELETONS because the Hollow Ones kept healing them endlessly! The little circular smoke graphic in the picture above shows two different skeletons getting healed and the Hollow Ones were relentless in spamming this ability. So WillPower couldn't damage the greater mummies and he couldn't make progress against the skeletons either - uh, what's the plan again?
I fought down panic and unpleasant thoughts that this whole variant might be completely doomed to focus on the problems at hand. The skeletons were slow-moving and the greater mummies basically stood in place so there wasn't too much danger of WillPower actually dying, only sheer helplessness at his inability to deal damage. The first step was to drop the bats who would not come back to life again; WillPower did his best to avoid the skeleton mobs while Holy Shock zapped the Fire Immune creatures into death. Next I needed to find some way to deal with the skeleton hordes because it was impossible to get close enough to the Hollow Ones with them in the way. Out of the three doorways, monsters had already opened the southeast and northeast doorways with even more Hollow Ones lurking behind each one. The only place where there was any space was the northwest doorway, the one further from the stairs. I patiently lured the skeletons up there, away from the greater mummies, and killed them off in a place that was hopefully out of resurrection range. There was VERY little space to operate and I had to hope the distance was far enough.
As I was working my way through the skeletons, three Hollow Ones wandered through the northwest doorway and began raising the bodies of their undead buddies, argh! I had been swapping to Holy Freeze periodically to tag the skeletons with the chilling aura and surprisingly this resulted in their corpses sometimes shattering when they died. Maybe something like 25% of the time? I didn't know that this was even possible, I thought that a monster had to be chilled or frozen at the time of death to get the shattering effect, but apparently the game somehow remembered that cold damage had been applied at a point in the past and kept the possibility alive. I was also returning to town frequently to buy more potions but also to let the game clean up some of the skeleton corpses on the ground. While that's a true desperation tactic, it actually does work, especially if the player goes to a different part of the level for a few minutes and then returns back. Remember that D2R is still running all of that ancient code from 2000 under the pretty new paint job and I remember Sirian discussing this back in the day for some of his variant characters.
Anyway, the net effect was that WillPower only had two skeletons remaining when these three Hollow Ones wandered into the picture. I knew that the skeletons would never die with triple Hollow Ones healing them and resolved to slay the greater mummies while dodging the melee enemies. The only option was swapping to the Prevent Monster Heal scimitar in weapon slot two and swinging away at the Hollow Ones until landing a hit. It was a bad plan as WillPower had non-existent chances to hit the target (right around the minimum odds of 5%) and the greater mummies would breathe an extremely powerful poison all over my Paladin when he was in close range. I had no other options though and got to work. First one Hollow One was tagged with PMH and slowly burned down to Holy Fire, then a second, then the last one, followed by those darn skeletons who had chased WillPower around for the last ten minutes. The last Hollow One had been a champion which was part of why it took so long to get the kill.
That was the whole problem: Hollow Ones everywhere right at the entryway plus more Hollow One champs on top of them. There were three Hollow Ones in the initial circular room, then a champ pack of Hollow Ones behind the northeast door, then another champ pack of Hollow Ones past the southeast door, then another Hollow One boss a little further back in that same southeast direction. Only the northwest corridor had been empty and thus I fought my way out of that tiny hallway, pulling skeletons back there over and over again to be killed and then returning to clash with the greater mummies. The amount of effort it took to kill each Hollow One was absurd and I decided on some changes to WillPower's item setup going forward based on my experience here. It wasn't unusual to swing 20, 30, 40 times before Prevent Monster Heal landed and WillPower was tanking hits and breathing in poison the whole time. It *WAS* working and WillPower was making progress but yeeeesh, this was Rogue Revival amounts of tedium! 
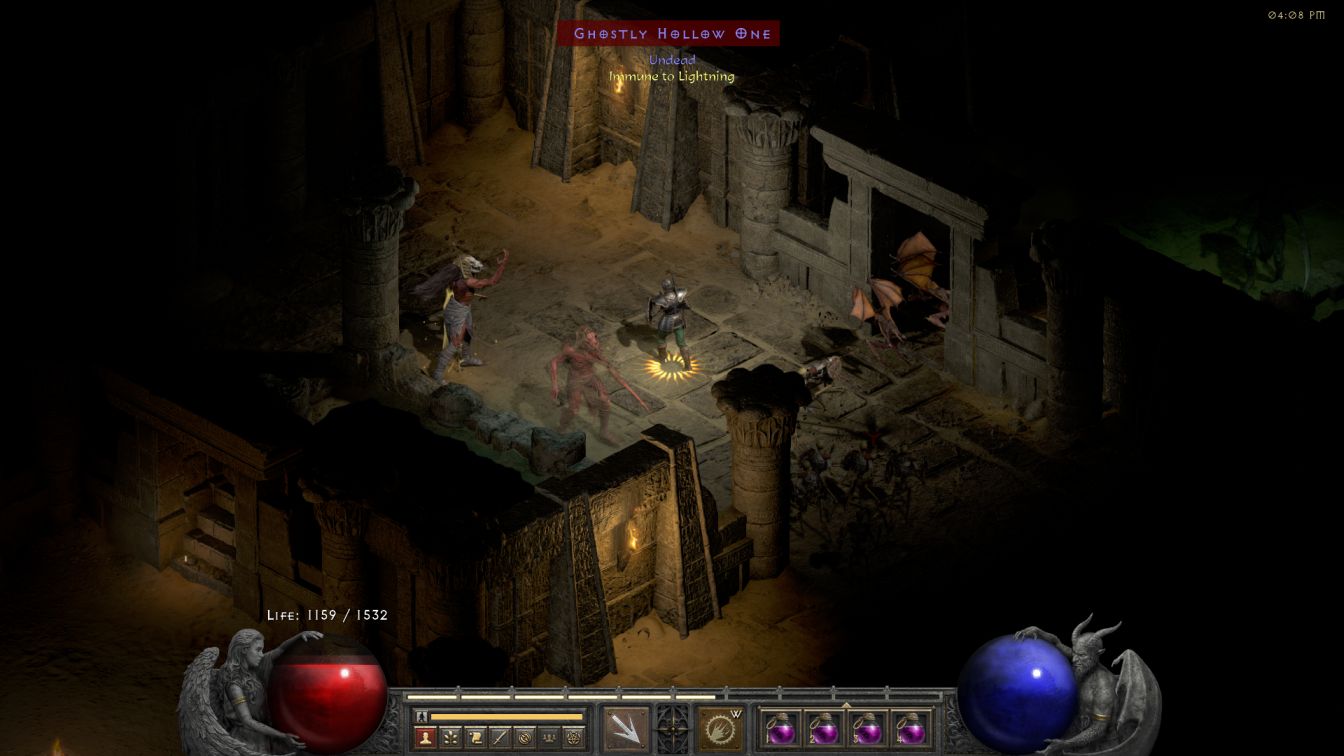
Once the northwest corridor was secured, WillPower spent about 20 minutes tagging and then burning down all of the Hollow One champions in the area around the starting staircase. I think there were seven Hollow One champs total across the double champ pack, all with skeletons in tow, and again that was on top of the non-champion greater mummies also hanging out in this area. After that, WillPower could finally enter the southeast door where he was confronted with another Hollow One boss with Cursed and Holy Freeze traits plus the massive mob pictured above. WillPower zapped the bats into death and then led the skeletons on an exodus to the far northwest corridor, finally returning back to face the Hollow One minions and the boss itself. Here was the map after the situation was finally under control:
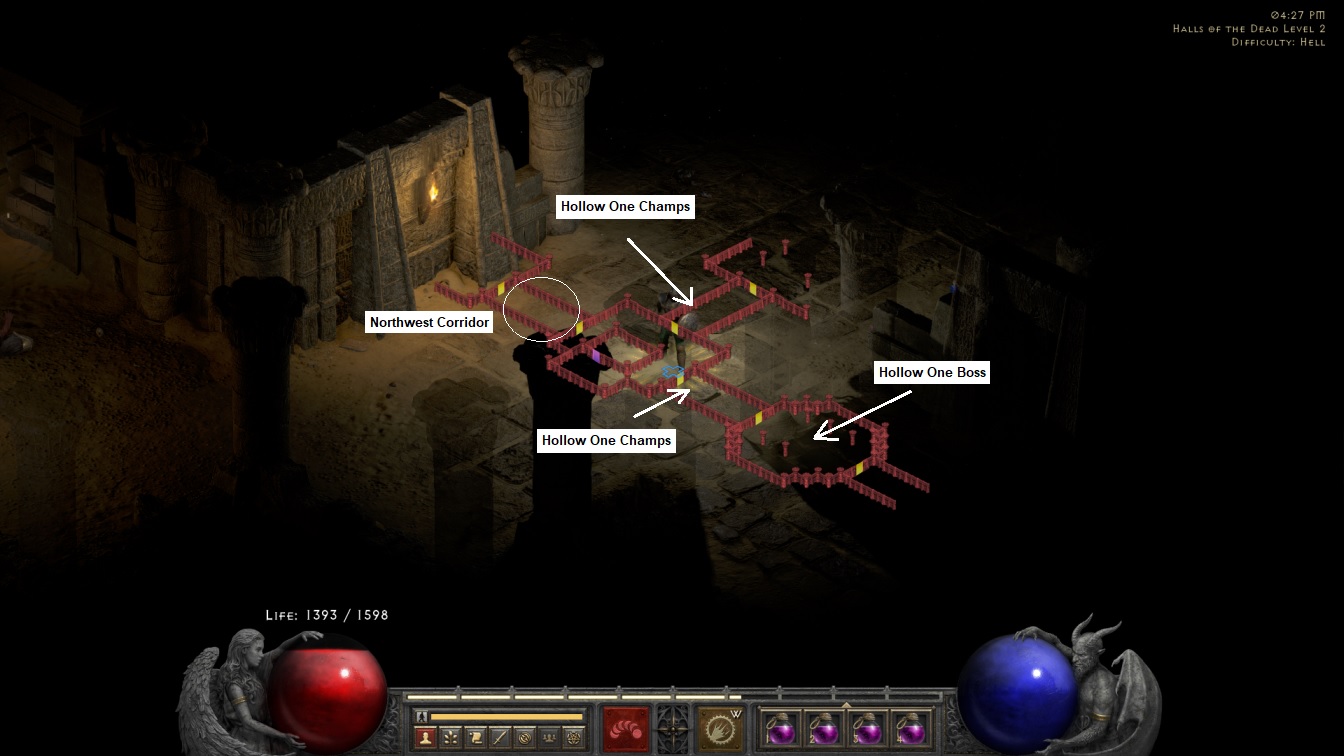
It took well over half an hour to clear out a truly pathetic amount of space. WillPower had control of the initial entryway, three connecting corridors, and then one additional room - that was it! And he still had to clear the rest of the level! This incident was a brutal reminder of the weaknesses of WillPower's character build. With his low offensive setup, he struggled enormously with monsters who had innate healing or resurrection abilities. The fallen and their shamans back in Act One hadn't presented this problem because they all lacked any lightning resistance and their low base HP meant that they died almost immediately to Holy Shock. The Hollow Ones being Lightning Immune and having about triple the health of the fallen shamans flipped the math of the encounter and created the horrid mess that WillPower had been wading through. He actually should have an easier time against the Unravelers in the Tombs though since they lack lightning immunity and Holy Shock works great against the Burning Dead as well.
With plenty of space secured, WillPower was able to clear the remaining three rooms on Halls of the Dead 2 by using the same tactics descibed above: kill the bats first, then pull the skeletons away from the greater mummies, then apply Prevent Monster Heal with melee shenanigans. I thought about reviving Durga but he would only die in mere seconds and cost WillPower another 40k resurrection bill. Unfortunately there was still Halls of the Dead 3 to tackle although I thought I had a better grasp of how to overcome these challenges after clearing Halls of the Dead 2. The bottom floor revealed a true circluar layout this time with hallways leading off to the northeast, southeast, and southwest. There were two Hollow Ones in the initial circular room, neither of them bosses or champs thank goodness, and WillPower led their skeletons away before racing back to apply Prevent Monster Heal to both. I swear he swung 45 times at one of the greater mummies before finally succeeding with a hit. Burn down the Hollow Ones, then kill the skeletons for good - you get the idea.
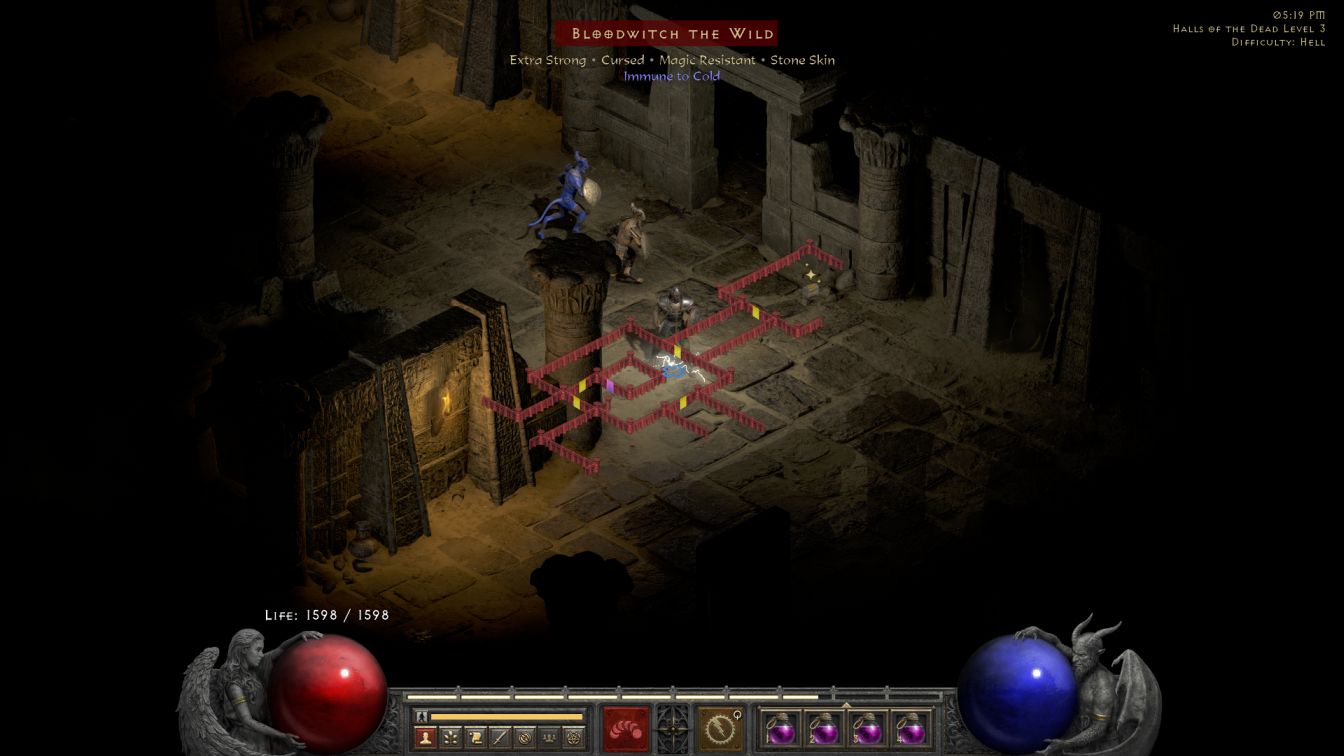
The entryway was now secured, much faster this time around, and I opted to go through the northeast door first. There were four Hollow One champs inside and WillPower had to pull the attendant skeleton horde to the little corner due west of the staircase. That was the further spot away from the greater mummies and hopefully out of their revive range. Then I had to fight the Hollow Ones in the northeast corridor without giving ground; I could not let them pass through the door and start reviving the skeletons who had just dropped! That was more tricky work but WillPower had plenty of practice by now and fortunately one of the Hollow Ones was a Berserker who just burned to death from Holy Fire alone. The next room had the gold chest and, after cutting through another series of non-boss Hollow Ones with their 800 skeletons, Bloodwitch came speeding out. She has extremely dangerous traits with an innate Extra Strong / Cursed but fortunately didn't roll anything offensive for her extra abilities. Bloodwitch also has no base lightning resistance and less health than a normal Hollow One (yes, this is actually true!) so WillPower was able to walk her in the circular loop around the stairs until she dropped 30 seconds later.
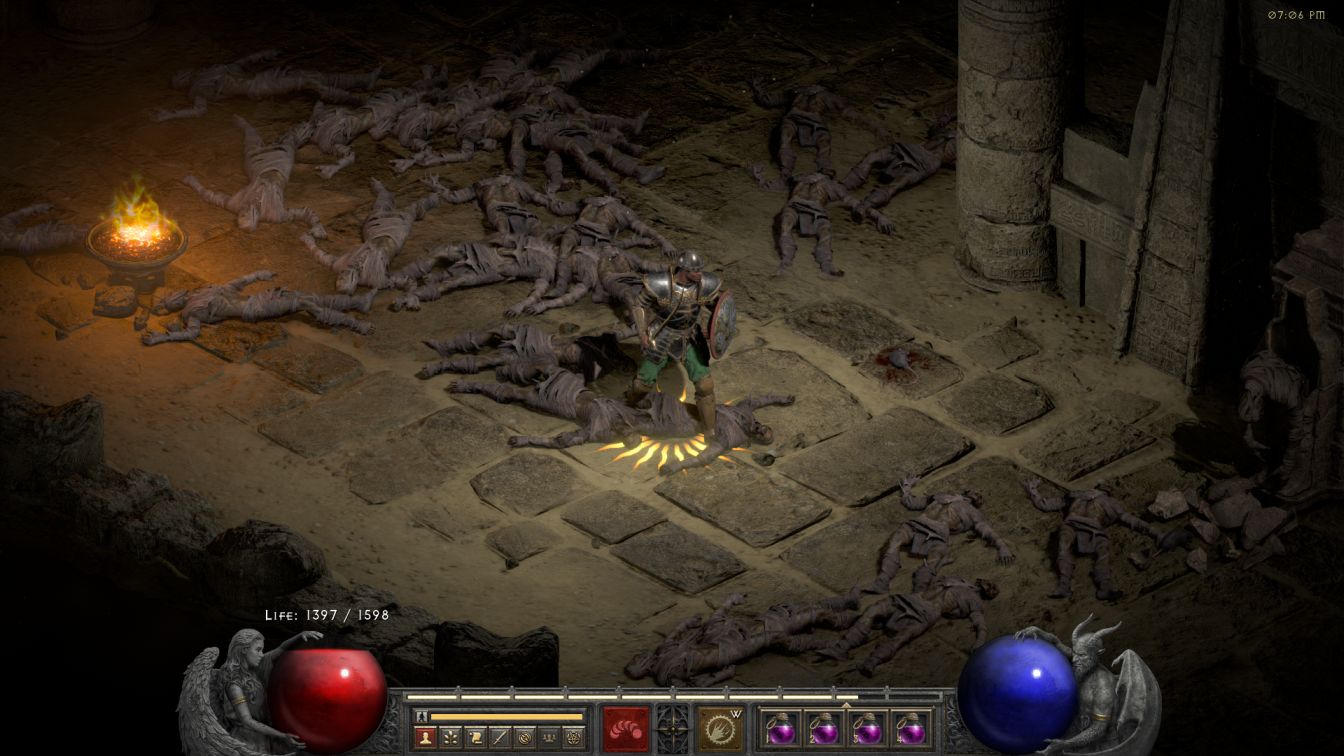
After that, the rest of Halls of the Dead 3 was lengthy but not especially dangerous. WillPower could pull skeletons back into the northeast room with the gold chest where he had an open space to walk in safety outside of Hollow One resurrection range. That was what I had been missing on the previous floor: no place of safety where WillPower could retreat and string out his foes. Everything had been wall-to-wall greater mummies and skeletons; I don't even think there was a third monster type on that floor. Halls of the Dead 3 added mummies who could also be resurrected but overall didn't play much differently than the skeletons. Pull them away and let Holy Fire burn them to death. Unfortunately WillPower's poor offensive output meant that he had to wait for the one mummy maker to breed itself out, leading to this amusing zoomed screenshot.
All told, what an intense and draining experience this had proven to be. WillPower had never really been in that much danger as long as he stayed ahead of the shuffling hordes but it still wore me down over time having him mere feet away from dozens of skeletons. This was really pushing me to my limits as a Diablo player to overcome these challenges with such few resources on hand. And on that note, I was able to make some equipment upgrades at the end of this session:
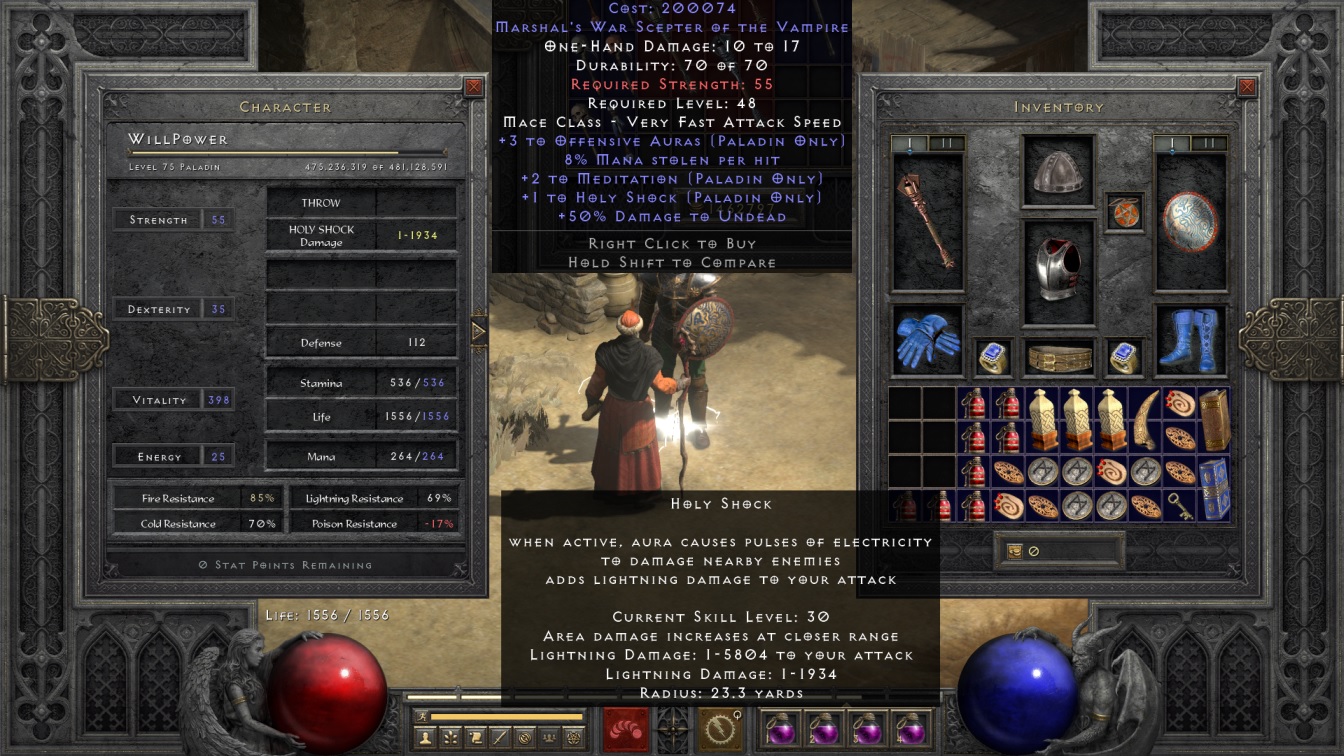
I'd been investing a fair amount of time to refreshing Drognan's shopping screen in hopes of finding a Marshal's sceptre with +skills for Holy Shock or Holy Fire on it. I knew that it was possible because I'd seen the Marshal's prefix appear in Drognan's inventory along with the Priest's prefix (+2 Paladin skills) which might be an upgrade if it rolled along with +3 Holy Shock. After refreshing the inventory several hundred times, WillPower managed to find this sceptre with the Marshal's prefix along with +1 to Holy Shock. I was hoping for +2 or +3 but this was still an upgrade so I snapped the item up. Holy Shock was now SLVL 30 with a range of 23.3 yards and 1-1934 damage, nice. Then to my surprise I happened to see this on sale with Fara and realized it would be a great pickup for WillPower:
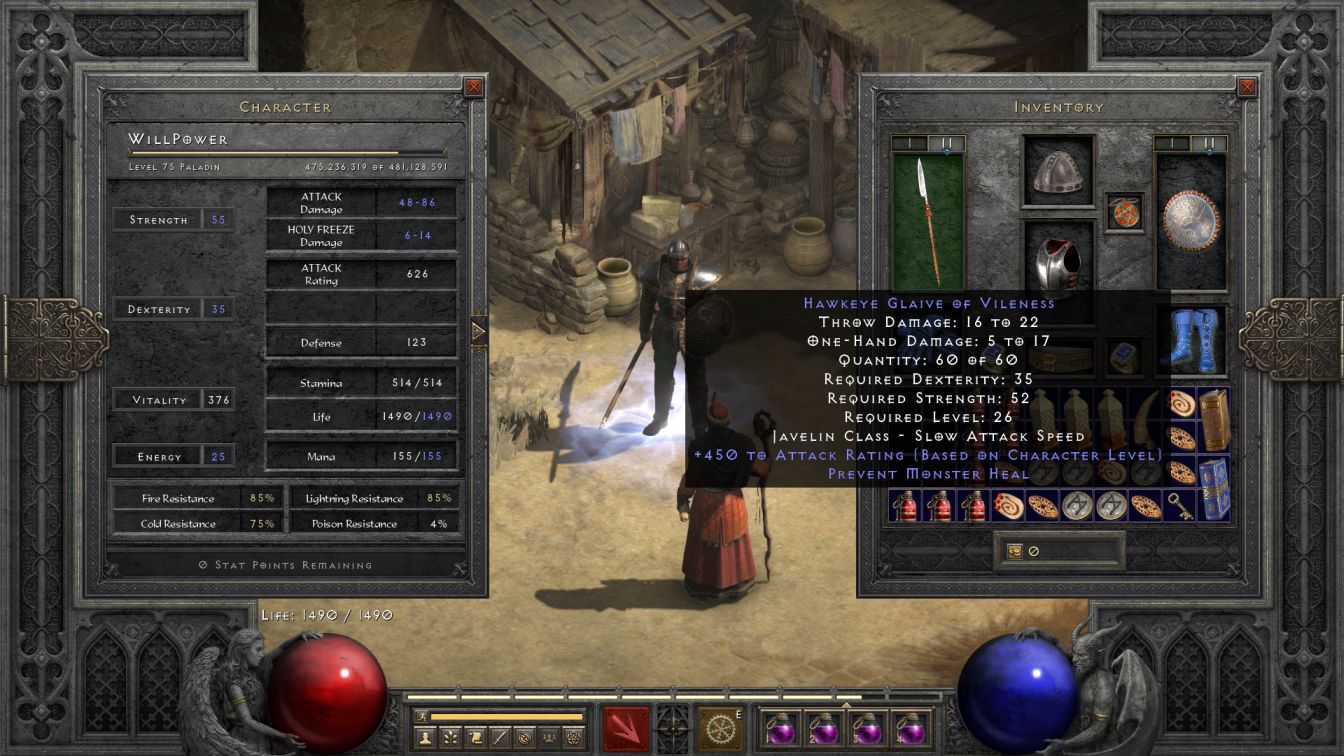
This Hawkeye Glaive of Vileness would provide a ranged way to apply Prevent Monster Heal, something that WillPower desperately needed to add to his character build. I could have cleared out the Halls of the Dead in half the time if he hadn't been returning to town so much to keep cleansing the poison that the Hollow Ones exude up close. But the biggest benefit to this item and the reason why I picked it up from the store was the Hawkeye affix: +450 to Attack Rating and continuing to scale upwards based on character level. WillPower had zero Dexterity and no bonuses to Attack Rating before this item which had given him that abysmal to-hit rate of roughly 5%. When swapping to the new glaive, however, hit Attack Rating quadrupled and took him up to the 30-40% range. This would make it vastly faster and safer when applying Prevent Monster Heal to key targets, tossing roughly 3-5 spears at range instead of needing 20-30 swings with a melee weapon. I can't say that I loved the Slow attack speed on the weapon but it was something that I could live with. One more note: the war scepter required 55 Strength and the Hawkeye Glaive required 35 Dexterity which prompted a third and final respec of WillPower's stats. He traded away about 40 HP in order to equip these two items which felt more than worth it. Hopefully no more stat resets would be needed because WillPower had used them all up!
I started a fresh session by picking up from the Dry Hills waypoint. Because I had sent WillPower into Normal and Nightmare difficulties to do some shopping and grab his last respec, this meant that he had an entirely new map when he returned to Hell difficulty. (One nice thing about playing in Offline mode is that the map stays the same across sessions if the player remains within the same difficulty. This meant that I had no idea where to find the entrance to the Far Oasis and WillPower stirred up a bit of trouble as he was trying to find it:
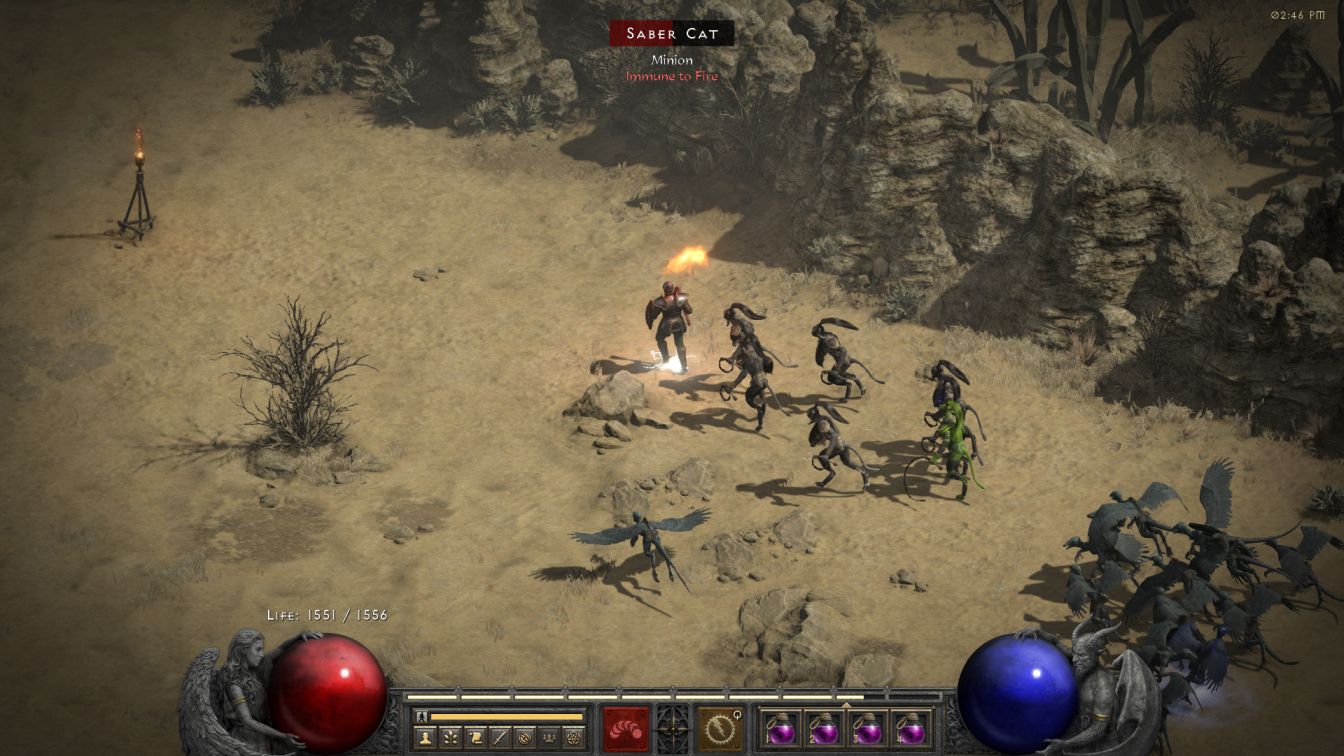
Just a little bit of trouble, heh.  That was a double boss pack with a Saber Cat boss whose traits I didn't manage to see followed by a trailing vulture boss with Cursed and Holy Freeze abilities. This was far too dangerous to leave unresolved and WillPower took a few minutes to wipe out this mess by swapping between Holy Shock and Holy Fire auras. I was also able to test out the Prevent Monster Heal glaive along the way and holy cow, what an improvement it was! WillPower was able to tag the bosses from a safe distance with only a couple of spear tosses which sped up the clear pace dramatically against resistant foes. This was a session which was heavy on Magic Resistant as a boss trait and the ease of applying PMH to these opponents made a real difference. I wound up having to clear much more of the Dry Hills than I wanted before WillPower finally found the entrance to the next area.
The Far Oasis should have been easy as it was another outdoor area with very basic monster types: beetles, crows, and itchies with the last two monster types being among the weakest in the game. However, anything can punish the player in Hell difficulty and WillPower almost suffered his first death here. The problem occurred right at the entrance from the Dry Hills where WillPower ran into not one, not two, but three different bosses stacked atop one another. Beetleburst was there along with a pair of crow bosses, one of them with a Might aura and the other with a Fanaticism aura, yikes! I should have run back into the Dry Hills and pulled out the enemies in small groups for disposal. Instead, I walked deeper into the new area, not knowing how packed it was with Might-enhanced opponents, and had to drink three full rejuvs when cornered before wriggling free to safety. Again, none of these enemies were particularly difficult, I was simply using poor tactics and was nearly punished for it. (No pictures of this as I was very busy not dying!)
The rest of the Far Oasis was nice and routine, the way that I wanted things to play out. I was rounding up the enemies in humongous swarms because the Paladin elemental auras could kill them faster that way; I think I took this a little too far at times when beetles came close to cutting off WillPower from all sides. In any case, the waypoint was right next to the Maggot Lair while being situated on the exact opposite side of the desert from the entrance to the Lost City. Therefore I made the decision to push ahead into the Lost City and save the Maggot Lair for a future session since it was sitting in such an accessible spot.
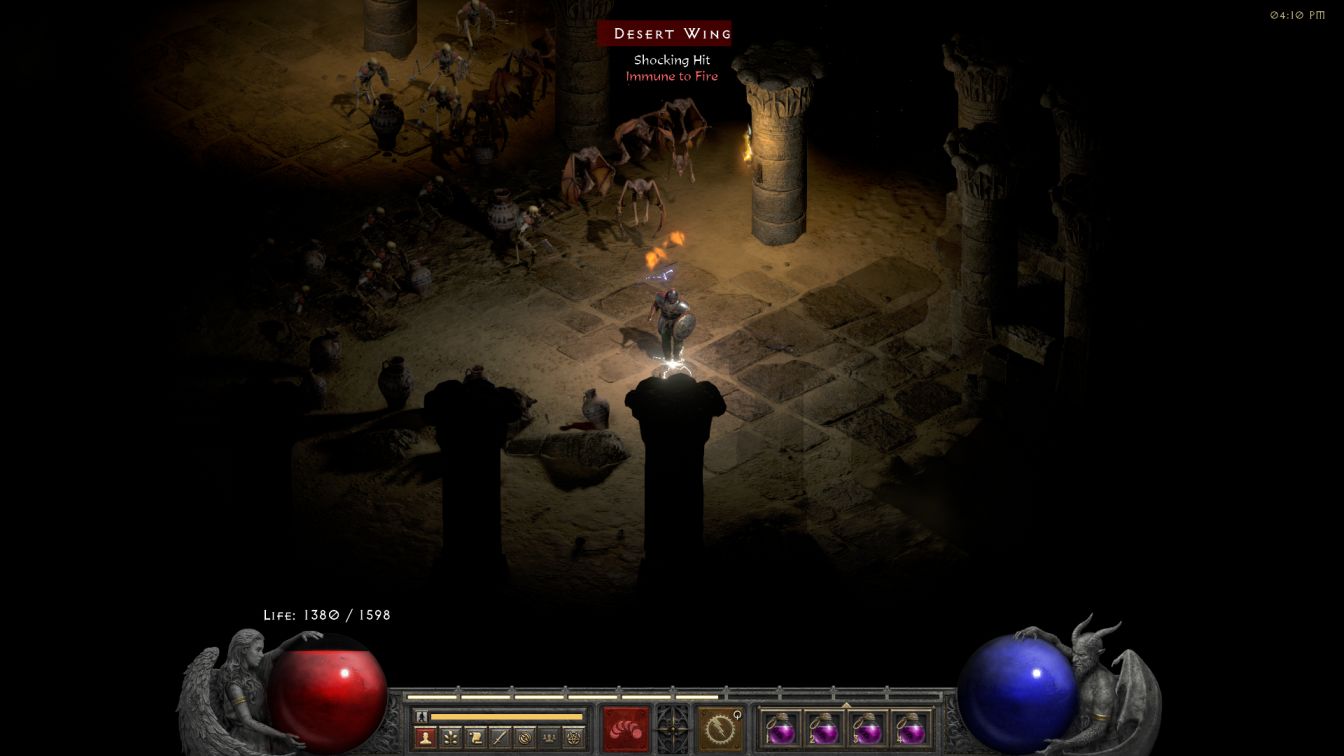
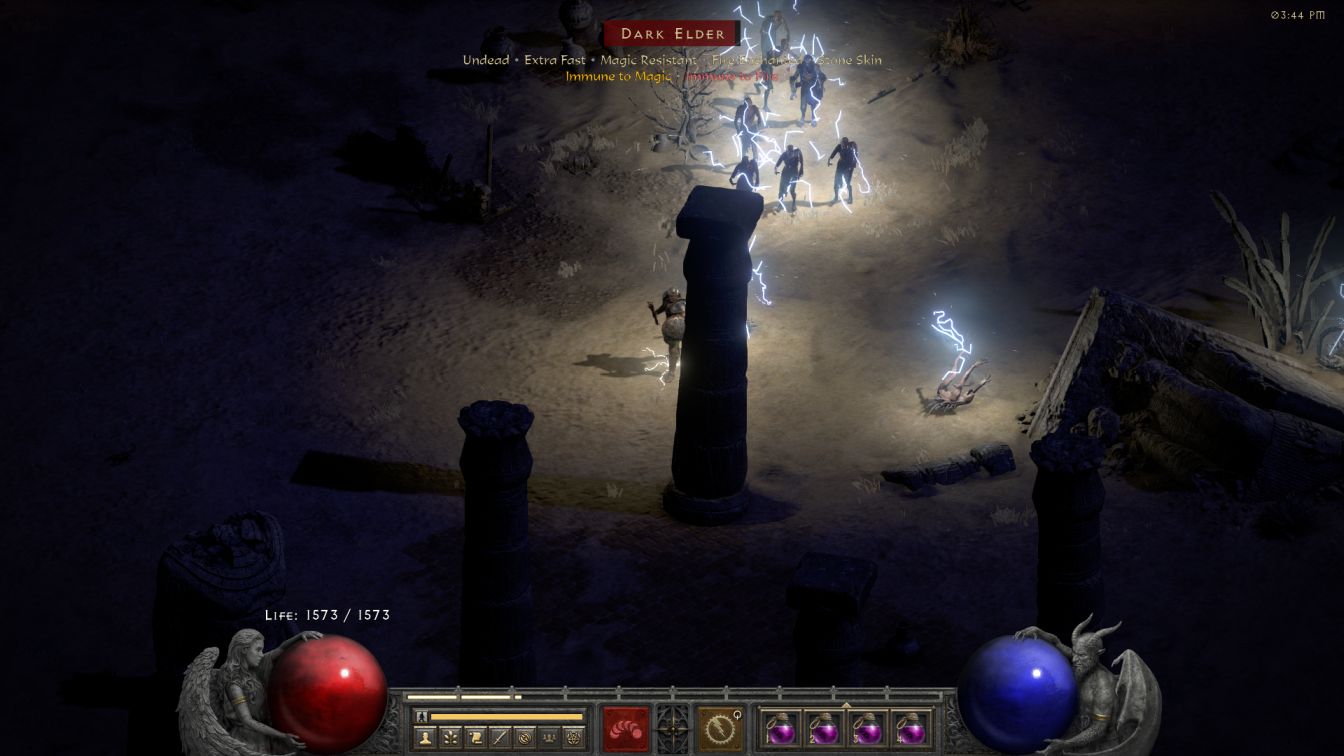
Within said Lost City were more leapers, poison-tossing cats, and Marauders with the last enemy type being the tankiest by a good margin. At least these things lacked the 50% lightning resistance of their Sand Raider cousins from back in the Sewers. The Night Slingers were surprisingly resistant to both fire and lightning elements and their poison was highly annoying while the leapers continued to be a joke. They rely on their speed to avoid attacks and compensate for a low base HP but Holy Shock didn't care about how fast they might be. I will say that all of the buildings in the Lost City were a pain in the rear since they blocked Holy Shock from hitting anything inside unless WillPower had line of sight. You might think that lightning bolts from the sky would hit monsters regardless but nope, I guess WillPower had to see them directly to focus with his mind or something. The darkness was also pretty obnoxious here although it did make for some pretty visuals when Holy Shock's energy lit up the night sky. Dark Elder was another heavily-resistant foe (although he always has Magic Resistant trait) and definitely required Prevent Monster Heal to be downed.
The Ancient Tunnels were also located right next to the Lost City waypoint which prompted me to push onwards again into the Claw Viper Temple while I had a fully cleared map. There were no Fire Towers outside, thank goodness, them and their 81,000 HP and 99% fire resistance. For the Claw Viper Temple itself, I was praying that the first floor wouldn't draw any of the greater mummies with their skeletons. To my delight WillPower rolled both types of snakes along with mummies, the best draw that I could have hoped for. Claw Vipers and Salamanders simply weren't that dangerous; while they hit WillPower pretty frequently with their charge attacks due to being unpredictable (and buggy), attacks that did less than 100 damage just weren't that bad given WillPower's tankiness. The snakes were also quite frail with about 5000 HP and zero lightning resistance which had them falling left and right to Holy Shock. The mummies were tankier but presented even less danger unless I was dumb enough to let WillPower get swarmed.
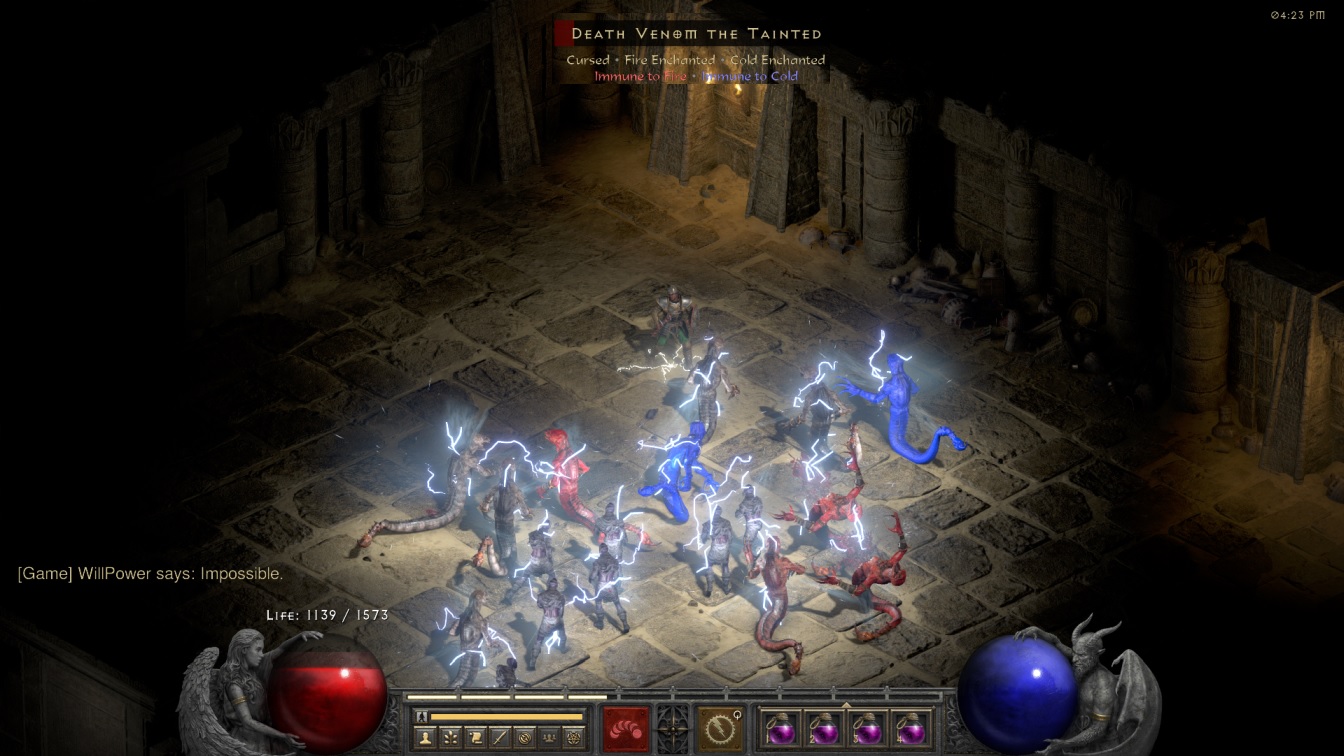
I was able to secure the entry room immediately since it only contained half a dozen snakes and then the rest of the dungeon unfolded from there. The pictured room above had a double viper boss pack, one of them with the pictured traits above to apply Cursed trait and the other one Extra Fast to juice up its charge attacks. That was the most dangerous spot anywhere on the floor; the one other notable spot was a corridor that turned out to have FIVE different snake bosses though WillPower fought them all one at a time and had ample retreat room. Every single boss was either a Claw Viper or a Salamander this time, no mummy bosses for whatever reason. Towards the end of the floor, there was a room with a Mummy Sarcophagus right next to an open doorway with another Mummy Sarcophagus just inside. It took long minutes for them to breed theselves out of fresh mummies as Holy Shock was unable to get the kill even with Prevent Monster Heal applied. Again, not dangerous or anything but definitely tedious to clear out the roughly 50 mummies they spawned.
Claw Viper Temple 1 wasn't what had me concerned though. I was much more worried about the tiny confines of Claw Viper 2 where Fangskin would be lurking along with potential other threats. I paid to bring Durga back to life for the first time this session as I knew any additional tanking that he could provide would be a huge help. I took a deep breath and went down the stairs only to immediately find a real threat:

There were Guardians here with their skeleton minions, three of them hanging out in a group on the north side of the altar. More problematic still was the fact that these Bone Warrior skeletons were Cold Immune: they could never be chilled and therefore their bodies would never shatter on death, ugh. I knew that Fangskin was likely lurking in the southeast corner and therefore tried to stay as much towards the top of the screen as possible to avoid waking up his viper mob. Very carefully, I lured as many skeletons as I could back to the staircase for disposal; it wasn't far enough to be out of resurrection range (that was impossible in this cramped space) but at least the Guardians would have to work a bit to revive them. Once they were down, WillPower and Durga rushed the three Guardians only to find that there was a champ pack of Claw Vipers on the north side of the altar as well - ack! Durga was about to die so I threw down a town portal to keep him alive and barely made it out in time. After healing in town, I returned to find that my portal in the corner of the room had created an unusual tactical advantage:

WillPower was trapped in the corner behind those little cages, not something that I had planned by any means. I've probably cleared Claw Viper 2 fifty different times over the years and never sent a character to this spot before. And yet... it turned out to be a real boon for WillPower, with Durga able to solo tank the Claw Viper champs one at a time instead of getting swarmed. Once they were all dead, I sprung WillPower free of his cubbyhole and began tossing glaives to apply PMH to the three Guardians. I managed to hit two of the three and zapped them to death with Holy Shock, followed by Durga spearing the last one and then the skeletons finally dying for good once they couldn't be revived. There was about 30 seconds here where I was tanking the Unholy Bolts from the Guardians with WillPower, letting my Paladin serve as bait to buy time, drinking one red potion after another, knowing that any movement further south might wake up Fangskin. We had to eliminate the greater mummies right now while they were isolated and exposed - mission accomplished.
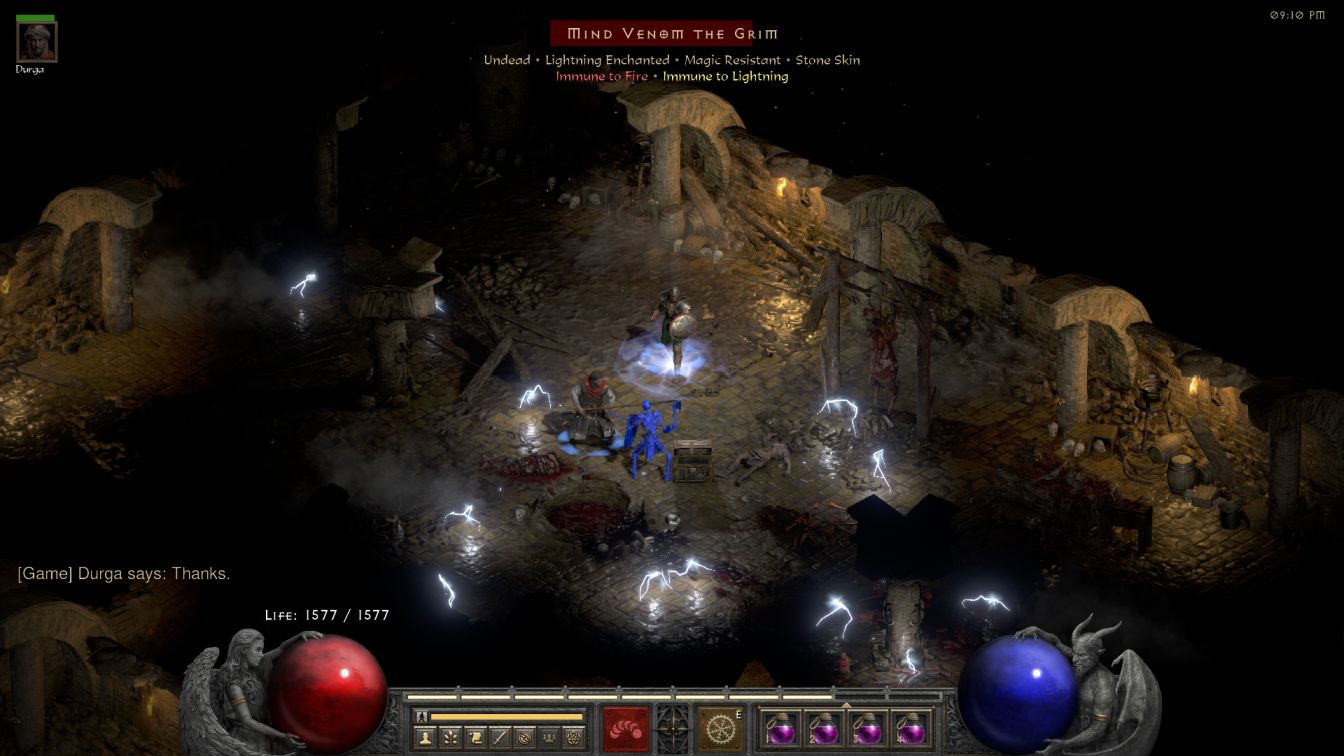
Finally, I knew that Fangskin was about to appear so I raced WillPower up onto the altar, opened a town portal and came back through it to move Durga up onto the altar as well, then pointed and laughed at the helplessness of old Fangy:
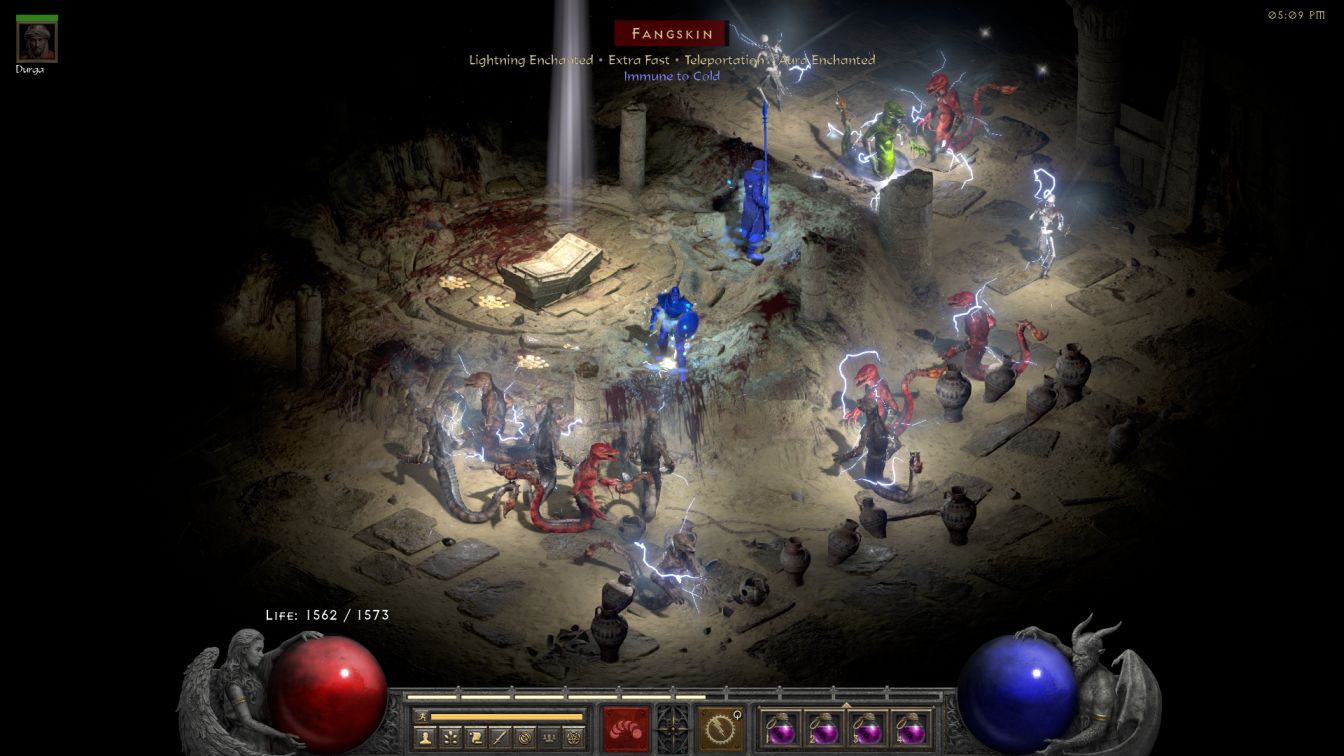
His Holy Freeze aura would have been downright nasty if WillPower had been forced to face the boss while clearing out the top side of the room, whew. I really don't know what I would have done if Fangskin showed up while I was dealing with those greater mummies. Instead Fangskin and his minions were all electrocuted to death via Holy Shock without breaking a sweat. WillPower could even apply Prevent Monster Heal from the altar with his ranged spears, infinitely safer than having to run in there with sword waving. And with Claw Viper Temple 2 complete, another one of the game's worst deathtraps was in the rear view mirror for WillPower. The first half of Act Two proved to be more dangerous / entertaining than I expected and this report is already getting quite long so I'll pause here and continue the second half of Act Two on the next page. I don't know how much longer WillPower can keep this going but I plan to continue the journey as far as he can make it.


