
With the mainline plot completely finished, Sorcerer Ophilia was rapidly reaching the conclusion of her journey. Only the optional endgame content remained, the various super bosses that most of my solo characters don't bother facing since they lack the resources to reach victory. Before heading off to the various secret job shrines, there were still a couple of other unvisited areas for Ophilia to explore. One such location was the Everhold Tunnels which is tied for the highest monster rating in the game:

This isn't actually that tough of an area to complete, there simply hadn't been anything inside that Ophilia needed to prioritize at an earlier date. The Everhold Tunnels is a noteworthy dungeon for my solo characters as it contains this random encounter against three Demon Goats. I believe that this is the random encounter with the highest experience payout in the game (not counting the ultra-rare Caits anyway) at 1960 XP assuming the player can land a shield break and has the Captain's Badge accessory equipped. This is therefore a good place to grind for higher levels if necessary although the benefits of doing so are modest at best (see my solo Cyrus report for more info on that).
Anyway, Ophilia breezed right through this area as she had been doing with all random encounters for a long while now. Boost on the first turn, cast one of her elemental spells, everything dies instantly. I'm really going to miss that when I play another class in the future, the Sorcerer class absolutely wrecks the typical monster encounters at warp speed. There is an optional boss in the Everhold Tunnels, the impressively-named Devourer of Dreams, which Ophilia tagged with Elemental Break and then one-shotted to death with a max boosted Lux Congerere. So much for that guy. I also took the time to clear out the Forest of Purgation and the Forest of No Return which are where two of the endgame superbosses hang out. I skipped over Managarmr for the moment as the hardest non-Galdera opponent in the game, instead focusing on the other boss in the Forest of No Return:

This is the Devourer of Men monster which has a number of nasty abilities but also conveniently can be countered with the proper setup ahead of time. Ophilia needed to bring a Vivifying Stone to stop the instant death cheese ability possessed by this boss, along with a Void Amulet to block its dark element spells and then as much physical evade as she could manage. The Devourer begins the battle with a pair of Deadly Spore minions who deal pretty heavy physical damage and have the chance to inflict confusion with their Exploding Spore move when they drop below half health. The first order of business was removing those minions so I had Ophilia charge up for a max boosted Ventus Saltere into their wind element weakness which I expected would send them packing. This is the difference when it comes to the endgame superbosses, however: even though Ophilia hit the two plant minions for 30k damage apiece, they had enough health to survive and then smack her with their Exploding Spore attacks for a quick game over. Hmmm, that clearly wasn't the answer.
OK, new plan for the two minions: hit them with two unboosted Ventus Saltares to knock off six shields, then break them with a third Ventus Saltere, then use a random final spell for the killing blow. This worked out just fine although Ophilia had to use a Refreshing Jam to heal up from the damage she was taking over these initial rounds. The Deadly Spores were quite a bit more dangerous than the Devourer boss itself, which used a lot of useless dark element spells and a fairly weak physical attack. Once the minions were gone, Ophilia could take her time restoring health with Healing Grapes and spirit points with Inspiriting Plums while chipping away at the boss. The Devourer has a massive 224,000 HP and it took a while to chop the thing down with repeated spellcasts.

I was also deliberately not breaking the Devourer and leaving it with one shield remaining in case Ophilia needed an emergency break later in the fight. The Devourer gains more and more shields each time that it recovers from a break so it made sense to hold off that initial break as long as possible during this non-dangerous portion of the battle. Eventually the Devourer dropped below half health and revived its two Deadly Spore minions which is the scariest portion of the combat. The Devourer also gains its namesake "Devour" ability which is supposed to be an undodgeable one-hit kill, however that was blocked by the Vivifying Stone so Ophilia could safely ignore it. What was more important was dropping those minions as soon as possible which she managed to do with a flurry of Ventus Saltare spells. Then it was back to tapping away at the Devourer until all of its health was finally gone. This was honestly a pretty easy victory since I knew the trick to defanging the Devour ability, only costing that one Refreshing Jam from the start of the battle. The reward for winning was the completely useless Deadly Blade that Ophilia couldn't even equip so hooray for that.
At this point, Ophilia had explored every dungeon outside of the shrines to the four secret jobs. I planned to tackle them in order from easiest to hardest beginning with Ophilia's own Sorcerer job at the Shrine of the Archmagus:

The four secret shrines are all small dungeons that nevertheless have some excellent loot inside, a bunch of Refreshing and Revitalizing Jams tucked away in various treasure chests. There are also some tremendous Steal opportunities from the monsters in these areas, between the Large soulstones held by the various elemental remnants and the Refreshing Jams on the Accursed Armors. I had Therion plunder some more Refreshing Jams any time that the armored opponents popped up and they're a common encounter in these four shrines. Anyway, Dreisang the Archmagus was waiting for Ophilia at the conclusion of his shrine. It was amusing to see how he had all of the same spells that she did and it felt a bit weird to watch Ophilia getting roasted with Ignis Ardere after she had been the one dishing out those elemental attacks for so long. Dreisang doesn't inflict any statuses so this was a battle where Ophilia could equip double Empowering Necklaces for +2000 HP and load up on maxed elemental defense for this duel between mirrored spellcasters.
Dreisang doesn't do anything particularly complicated in terms of his AI script. He simply blasts your party with heavy elemental damage over and over again until everyone drops, nice and simple. Fortunately Ophilia was about the best character possible to fight back against this boss thanks to her having the highest elemental defense stat in the game. Note that the pictured Ignis Ardere did all of 235 x 3 = 705 damage and that simply was't going to get the job done against a solo character with 6700 health. I had the cheat sheet to know what elemental weaknesses Dreisang had (which he changes after recoverig from each break) and Ophilia kept pounding away at him, working her way through his 171,000 HP lifebar. Every time that she used a max boosted spell it was dealing close to 30,000 damage so progress was reasonably fast even given the opponent.

Of course it wasn't quite that simple as Dreisang does have various buffs and debuffs that he applies to amplify his damage. He liked to use Divine Majesty which decreased Ophilia's elemental attack and dropped her damage output by 50% which slowed the pace of the battle. The Archmage could also use Elemental Break to debuff Ophilia's elemental defenses, plus he had Might of the Archmagus to increase his own elemental attack. After dropping below half health, Dreisang broke out his "Extreme Elemental Augmentation" which changed the names of his spells and caused them to deal more damage. In the screeshot above, his "Glacies Maximus" was hitting for 1000 x 3 = 3000 damage with all those various buffs and debuffs in place which was a lot more serious. Even Sorcerer Ophilia couldn't stand up to that kind of punishment for long.
The solution here was the awesome shield-breaking capabilities of the Sorcerer class once again. Ophilia might have been taking a lot of damage but she was dishing it out as well and popping the boss' shields in the process. Dreisang was down to one shield remaining in the above screenshot and Ophilia was able to break it with a casting of Lux Congerere. This dispelled away his Extreme Elemental Augmentation and note that Dreisang's various buffs and debuffs were all set to time out by the turn that he recovered from his shield break. The enemy Archmage would have to reapply all of that stuff and Ophilia didn't give him time enough to do so, finishing off the boss before he could recreate his setup. This wound up being a fairly straightforward battle, with several Refreshing Jams needed for health recovery but otherwise quite smooth and straightforward. Now Ophilia was legitimately a Sorcerer in her own right and not simply because I had hacked the initial starting save file. 

I anticipated that Dreisang would be readily doable for Sorcerer Ophilia and my hunch was that Balogar in the Shrine of the Runeblade wouldn't be too tough either. Balogar is a bit of a weird opponent in the sense that his rune attacks deal elemental damage but they can be dodged like physical attacks. This necessitated bringing an oddball mixture of evasion and elemental defense gear along with a Conscious Stone to stop the stunning chance on Balogar's frequent Rune of Thunder attack. Balogar had most of his weaknesses locked out at the start of the boss fight but neglected to block a dark element vulnerability which made Tenebrae Operire the offensive weapon of choice. Two such castings landed the break into a max boosted Ventus Saltare for 30,000 damage as Ophilia eased her way into the battle proper. I found that Balogar's rune attacks were hitting for right around 1000 damage apiece, not negligible while also not rising to the level of dire peril either. It helped that Balogar only had two actions per round instead of the three actions that many of the Chapter 4 bosses had been sporting.
Balogar's big new ability upon dropping under half health is that his rune attacks hit the entire party, fortunately completely irrelevant for a solo game. He also unlocks the use of Runelord's Resolve which is effectively a version of the Runelord job's Divine skill that hits six times with every element. Runelord's Resolve was a bit toothless in practice though, with each of the six strikes hitting for about 500 damage and several of them missing completely as captured in the screeshot. For the big chargeup attack of the Runelord god, this was pretty underwhelming. I kept healing as needed with Refreshing Jams and hitting with Lux Congerere until Balogar perished. Victory on the first attempt and this really wasn't very hard for Ophilia.

Two down, two to go when it came to the superbosses in the secret job shrines. Unfortunately it was now going to get a lot harder as I genuinely didn't know if the Sorcerer class would be able to defeat either of its remaining foes. I gauged that Winnehild in the Shrine of the Warmaster would be slightly easier and headed there next to face the game's strongest physical damaging class. Winnehild was an extraordinarily deadly opponent for Ophilia, with even her three abilities available at the start of the battle representing a dire threat. In addition to a basic attack and a fortunately irrelevant Counter Strike that responded to physical damage, Winnehild could break out Yatagarasu (two hits that could inflict poison), Phoenix Storm (hits up to six times), and Tiger Rage (one massive hit for roughly 3000 damage). All of these were bad options, between Yatagarasu's poison or Phoenix Storm potentially doing as much as 900 x 6 = 5400 damage or Tiger Rage landing at all. You might think that Ophilia would want an Antidote Stone for this battle to counter the poison, but nope, she absolutely needed to bring Empowering Necklaces for additional health to increase survivability. I started out by bringing one such necklace along with a Conscious Stone because Winnehild does have a stunning ability later in the fight. That was the wrong choice though and soon I swapped over to double Empowering Necklaces for the +2000 HP. I just had to cross my fingers and hope that the bad status ailments missed with friendly RNG.
Speaking of randomness, this boss fight was so difficult that I had to rely on luck factors breaking Ophilia's way. She had enough evasion to dodge about 40% of Winnehild's blows, a noticeably lower chance than the roughly 60% odds that she had been getting against Werner and Simeon back in the Chapter 4 stories, and a poor string of combat luck could end many of these battles in a real hurry. There were a bunch of attempts where Phoenix Storm hit four or five times into a Tiger Rage landing for 3000 damage and that was simply it. Conversely, however, sometimes Ophilia would get lucky with a bunch of dodges and she could make it a long way into the boss fight. This was highly unusual in gameplay terms since Octopath Traveler seems to have deterministic combat for the most part. Either your characters are strong enough to win or they aren't, rarely with much in between. Ophilia's duel with Winnehild was more reminiscent of characters that I've played in the original Final Fantasy or Final Fantasy 5 where there's much more randomness to the individual battles.

Although she was wiped out frequently, on occasions where Ophilia enjoyed good dodging RNG she could make it to the second half of the boss fight. At this point Winnehild went up to three actions per round and gained three new abilities: Guardian Liondog which hit the whole party and therefore wasn't too bad, Qilin's Horn which debuffed Ophilia's physical defenses (very bad!), and Fox Spirit which had a chance to inflict unconsciousness. I don't think that Fox Spirit ever landed the stun because the move appeared so rarely but the other stuff was worrying enough. My response with Ophilia was to go hog-wild on the item consumption, using Revitalizing Jams over and over again to hang in the fight longer. Revitalizing Jams restore all HP and SP while also maxing out boost points to full; essentially, I wanted to spend every turn either healing back to full or hitting with a max boosted elemental spell. There simply wasn't time to be doing anything else, not when Winnehild was getting three actions per round and dishing out such deadly punishment nonstop.
If Ophilia could manage to get Winnehild down into the "red" portion of her lifebar with less than 25% HP remaining, the boss would launch her War Cry supermove that hit six consecutive times in a row. This is a much deadlier version of Balogar's Runelord's Resolve, with the screenshot above demonstrating how any one of the six blows could hit for more than a thousand damage. There was almost no chance to survive this when it popped up, not unless Ophilia was already at full health or she had fantastic luck at dodging the attacks. What I needed was the randomness of the turn order to have Ophilia line up a shield break just before War Cry was about to go off. There was no way to plan this ahead of time, not with Ophilia clinging to life with Revitalizing Jam usage; I could only keep re-running the boss fight over and over again until all of the random factors lined up correctly. I had one attempt where Ophilia was a single Tiger Rage away from winning and failed to dodge the killing blow so I knew that it was possible if everything lined up correctly. It finally all worked perfectly on about the 25th total attempt:

That's the victorious Lux Congerere landing above, you can tell that Ophilia has won because Winnehild's portrait has grayed out on the turn order at the top of the screen. This was a tough, tough boss to defeat that required a lot of luck factors to work in my favor, both in terms of dodging incoming attacks and also having the turn order play out correctly. I'd like to say that I had some incredible strategy at work here but much of it really did come down to "go crazy with Revitalizing Jams and pray that Ophilia dodges these attacks." In any case, it did work and she finished off another of the game's toughest opponents.

That left Steorra, guardian of the Shrine of the Starseer, who I had judged would be more difficult than Winnehild if you can believe it. The Starseer class is the king of buffs and debuffs in Octopath Traveler, one that I'm interested in exploring further when I get around to doing its own solo playthrough. Leaving that aside for now though, I had to try and find a way to get Sorcerer Ophilia through this boss fight. My notes on Steorra stated that almost all of her elemental abilities were attuned to either light element or dark element, and I thought that I'd try equipping a Gleaming Amulet and Void Amulet to block their damage. This was a total failure, however: the Internet was wrong and Steorra's abilities don't appear to be attuned to any of the six elements as Ophilia continued to take damage regardless. This sent me back to the drawing board where I equipped my solo character with a Clarity Stone to block the confusion status effect which shows up frequently in this boss fight along with maxing out the elemental defense meter at the 999 cap. Steorra is all elemental damage and if I couldn't neutralize it with Gleaming/Void Amulets, at the very least I wanted Ophilia to have as much defense as the game allowed.
Steorra's attacks are all named after stars in some form: Wandering Star, Lost Star, Baleful Star, Shooting Star, and so on. Most of these abilities hit for around 1000 damage and they weren't too bad on their own. The real problem came from Steorra mixing in her many, many buffs along with these direct damaging attacks. For example, Steorra liked to use her Song of the Starseer ability which granted her four turns of the physical and elemental defense buff, something that lowered Ophilia's damage output and dragged out the length of the boss combat. At least I didn't have to worry about Steorra's Physical Reflection which counterattacks against physical damage but her other abilities were plenty bad enough. When she dropped under 50% health remaining, Steorra would go up to three actions per round and invoke Heavenly Protection: 25% chance for any damage taken to be nullified. That was a huge RNG element that I had to work around which could wreck havoc on my tactics. When Steorra hit 25% health remaining, she would add Ethereal Healing which restored about 25k HP instantly and then continued regenerating about 3000 health per round. None of these various abilities were too bad on their own but when they were all combined together it made for a nearly unkillable opponent.

There wasn't too much that Ophilia could do other than follow the standard Sorcerer playbook: keep hitting Steorra's elemental weakness of the moment as hard and as fast as possible. This meant falling back on the Winnehild strategy of doing one of two things each turn, either casting a max boosted Sorcerer spell or drinking a Refreshing/Revitalizing Jam for health and boost point restoration. There wasn't enough time to do anything else due to the immense danger level of the battle. While the first half of the combat wasn't too bad, things tended to nosedive in a hurry when Steorra dropped below half health and started getting three actions plus invoking her additional buffs. Heavenly Protection was incredibly annoying because damage blocked in this fashion DID NOT BREAK SHIELDS, very frequently leaving Steorra on one shield remaining when I was counting on a particular spell to land the break. Or it could turn a 9999 damage hit into a 0 damage hit as captured in the screenshot above. What was particularly scary about this boss fight was the fact that elemental damage can't be dodged in Octopath Traveler. I could play "dodge the attack" RNG against Winnehild and keep trying until I got lucky, however there were no such tricks available against Steorra's spells which would always hit Ophilia. As my failed attempts climbed over a dozen in number, then two dozen, I began to wonder if this battle was possible to win at all.
Eventually I keyed in on an aspect of the combat that I hadn't anticipated: Steorra didn't always recover from a shield break in the same fashion. She always began the battle with seven shields and weaknesses to fire/ice/lightning elements, but after recovering from her initial shield break, she could swap to any of three different shield and weakness patterns. One of them had four shields and was only weak to dark element, one of them had eight shields and was weak to lightning and wind, and the final option had a whopping twelve shields and was weak to fire and ice. I realized through trial and error that the ideal setup was getting the eight shield pattern second followed by the four shield pattern third. It was vastly easier to break Steorra against the four shield pattern than the twelve shield pattern, and if it popped up as the third such pattern, it would appear just as she was dropping into the critical zone on health and buffing up like crazy. This finally lined up perfectly on about the fifteenth attempt at the boss: initial break, eight shield pattern into a second break as Steorra fell under 50% health, then Revitalizing Jam into a third break against the easy four shield pattern to spike another 50,000 damage in rapid succession and land the kill. This was hard, hard stuff and Sorcerer Ophilia managed to squeeze out the victory by the absolute skin of her teeth.

Thus Ophilia was able to equal the feat of the Runelord and Warmaster jobs by defeating all four of the superbosses guarding the secret job shrines. This was a MUCH more difficult task for the Sorcerer class as compared with its other endgame peers, however, as the Sorcerer lacks the defensive protection of their passive skills and the overwhelming offense of their Divine abilities. It also led to this amusing screenshot of the job screen where Ophilia had all four secret jobs unlocked... and none of the eight normal jobs!  That isn't possible in normal gameplay and only showed up here because I had debugged in the Sorcerer job at the outset. I doubt the designers intended this, heh.

Defeating the guardians of the secret job shrines had the side effect of draining Ophilia's stash of recovery items. In particular, she was down to a mere five Revitalizing Jams from a starting point of a dozen going into those boss encounters. I needed to restock before proceeding any further and the only place to get these ultra-rare items is from a Steal against the Revenant monsters along the Grimsand Path. These monsters are supposedly also found in Dragonsong Fane and the Forest of Purgation but I've had much better odds to come across them in the desert where they appear to be roughly a 1 in 16 encounter. I had earlier taken the time to get enough job points on Therion to unlock his Snatch passive support skill which doubles the quantity of whatever he's stealing. This meant that each successful Steal against a Revenant would grant two Revitalizing Jams and speed up the process of doing this grind. It took about 20 minutes running the gameplay at my normal triple speed to add an additional nine Revitalizing Jams and get back to 14 total (4 x 2 Steals plus another Revitalizing Jam dropping as a post-battle reward from one Revenant). Along with about 50 Refreshing Jams and maxed out quantities of all the buyable recovery items, Ophilia had everything that she needed on hand.
I didn't think that Ophilia had any chance against Managarmr and a quick test of that optional boss fight quickly confirmed that my intuition was correct. The giant wolf is by far the most difficult of the endgame superbosses and Warmaster Olberic was the only solo character who had any chance to defeat the thing. Poor Ophilia was crushed instantly; she took way too much physical damage to survive for any length of time with each attack from Managarmr hitting for almost 2000 damage even before it started debuffing her defense. She couldn't last against even one Direwolf minion, much less the three of them that Managarmr will summon throughout the battle! This was an opponent that the Sorcerer class simply couldn't handle.

The one remaining challenge was therefore to pass beyond the Gate of Finis and take on the ending boss rush gauntlet. For those unfamiliar with the Octopath endgame, it presents the player with eight boss refights against either the Chapter 3 or Chapter 4 boss of each individual character, before the final ultimate boss of Galdera afterwards. The eight boss refights all have higher stats than their initial incarnations while retaining the identical AI scripting from the first time around. I've found that these boss refights generally aren't that interesting because the enemies don't do anything different here at the Gate of Finish, they just hit harder and have more health to work through. The big gimmick to the Gate of Finis is that there is no save point inside: all eight bosses must be fought in succession, one after the other, followed by Galdera. One mistake and the player must start all over again from the beginning. I've never made a serious attempt to defeat Galdera with a non-variant party because it's too annoying having to go through all eight of the boss refights on each new attempt. For a solo character like Ophilia, the challenge would be making it to Galdera at all - could she defeat all eight bosses in a row without me screwing up?
Unsurprisingly, Darius was the hardest of the boss refights by a wide, wide margin. He had effectively double health here as compared to facing him at the end of Therion's Chapter 4 story, 188k HP instead of 96k HP, and this was a massive problem because Ophilia's damage output certainly hadn't doubled to keep pace. The first time around, Ophilia could largely ignore Therion's Call Comrade insta-kill cheese because she could burst through his final 30,000 health in a single spellcast. Now Therion would be pulling out that move with 47,000 health remaining which was outside the range of what Ophilia could do with a single elemental spellcasting. She would have to break him at the right moment to dodge Call Comrade which was going to be a dicey prospect. And wait, it was much worse than that! Darius had a weakness to wind element for his initial break, and that remained for his second break, but he would lock out that wind element weakness afterwards which left Ophilia with no way to break his shields. And Darius also starts the battle by stealing your items so he has to be broken immediately which would use up that initial shield break. Thus Ophilia had to break Darius right away, then NOT break him for as long as possible, then trigger the second break at exactly the right moment to spike him for 50,000 damage and rush past the ending Call Comrade so it never showed up. This exact sequence also had to take place while Darius was using various deadly moves that could easily kill Ophilia. If that sounds extremely difficult, well, no one said this was going to be easy.
I had to make many, many attempts at defeating Darius because the window for Ophilia to earn a victory was so narrow. Much of this was left to the pure luck of whether she could dodge a bunch of Darius' attacks, especially Steal SP which was an instant game over if Ophilia couldn't dodge it at the correct moments. But I had to play fast and loose here because time was not on Ophilia's side: Darius would eventually steal her items away again, which would force her to break him, which would then mean that Call Comrade would appear and cause an instant defeat. Numerous times I had to launch attacks and hope for dodges afterwards because there wasn't sufficient time to pause and heal Ophilia. All of this led to a whole lot of dead Sorcerers, often within the first 15 seconds of trying the boss refight. Still, I knew that it was possible to win if everything lined up in the proper order and it finally did happen on about Attempt #30: Ophilia dodged attack after attack which allowed me to spend almost every turn launching offensive spells and the turn order lined up correctly to prevent Call Comrade from ever appearing. This was a massive headache of a boss refight but Ophilia did manage to win.

OK, Darius was out of the way - great! Now Ophilia only needed to win seven additional boss refights in a row without being defeated and having to start all over again - yay?  I started with the most difficult of the remaining bosses which I judged to be Werner. The need for Calming and Conscious Stone accessories left Ophilia with only 4800 max HP which definitely didn't feel safe; one bad streak of poor dodges could easily spell her demise. My strategy here was to hold off on breaking Werner for the first half of the battle as I judged that he couldn't kill Ophilia while only having two actions per round. When Werner dropped below half health, I would initiate the first break with a double boosted Lux Congerere into a max boosted Lux Congerere on his broken turn for a 50,000 damage spike, then try to race through his remaining lifebar ASAP before Ophilia perished. The Werner refight has 168k health so I could minimize the more dangerous second half of the battle by dropping Werner from half health (84k) immediately down to about 35k health remaining, then eat a Revitalizing Jam as pictured into two more Lux Congereres for the victory. This was dangerous stuff and a really bad streak of failed evasions absolutely could have meant death for Ophilia. She was lucky enough to get the kill though before disaster could strike, whew.

Simeon was basically the same thing as Werner, I had to try to shorten the second half of the battle as much as possible since the boss becomes so much more deadly after going up to three actions per round. Simeon didn't pose the same kind of offensive threat as Werner, with only his Act of Impulse move presenting any real danger to Ophilia. The difference here was that Ophilia could never hit an elemental weakness on Simeon and therefore could never break him. A max boosted Lux Congerere could hit 5600 x 3 = 16,800 damage which was about the best she could do unless there was space to set up Elemental Break ahead of time - which usually there wasn't. Simeon has 176,000 HP in this refight and getting through the second half of that healthbar (88k HP) at 15k damage per pop wasn't the fastest process. I was sweating bullets the whole time since Ophilia usually but not always dodged Simeon's Act of Impulse strikes and they were doing as much as 3000 damage when they landed after he had buffed himself up and debuffed Ophilia. She dodged two different Act of Impulses that would have killed her before I could accumulate enough damage to finish off Simeon. Sheesh this was nervous stuff!

Now I was starting to get to the easier of the remaining boss refights but Ophilia was still far from being in the clear. Although Mattias is usually a joke of a boss fight, his Infernal Flame ability that locked out Ophilia's spellcasting meant that I had to take this opponent seriously. With her Sorcerer abilities out of the picture, Ophilia fell back on breaking various Large soulstones for damage. This was like the budget version of the Sorcerer class, stuck relying on these weak options instead of Ophilia's usual powerful elemental spells. Fortunately Mattias couldn't do too much that was dangerous, not with Void and Tempest Amulets equipped, though this battle did take some time to work through. The Venomtooth Tiger refight was much easier as the creature couldn't do enough damage to kill Ophilia before she had a chance to eat a Refreshing Jam for full health restoration, and then Yvon was an utter joke. Even in this boss refight, Yvon still doesn't get more than ONE action per round. Compared to the ridiculous hoops that Ophilia had been jumping through against Darius, it wasn't even a contest as she roasted the evil headmaster without blinking.
And then it all came crashing down: I underestimated Miguel and he killed Ophilia when a whole bunch of his spears landed at once during the tail end of the fight.  I was so surprised that I didn't even capture the screenshot before it advanced to the game over screen. This was a critical error on my part: I had equipped Ophilia with her usual evasion gear instead of maxing out physical defense at the cap of 999. Miguel has high accuracy but low base damage so the best approach is stacking very high physical defense rather than trying to dodge his spears. I chose the wrong setup at the worst time possible and now I was going to have to start all over again. Did I really want to put in the time to do this again given that I already knew Ophilia could beat all of these boss refights? Well... I knew I was never going to be satisfied with myself if I left this last bit of her quest unfinished. I guess we are indeed going to do this again, sigh.
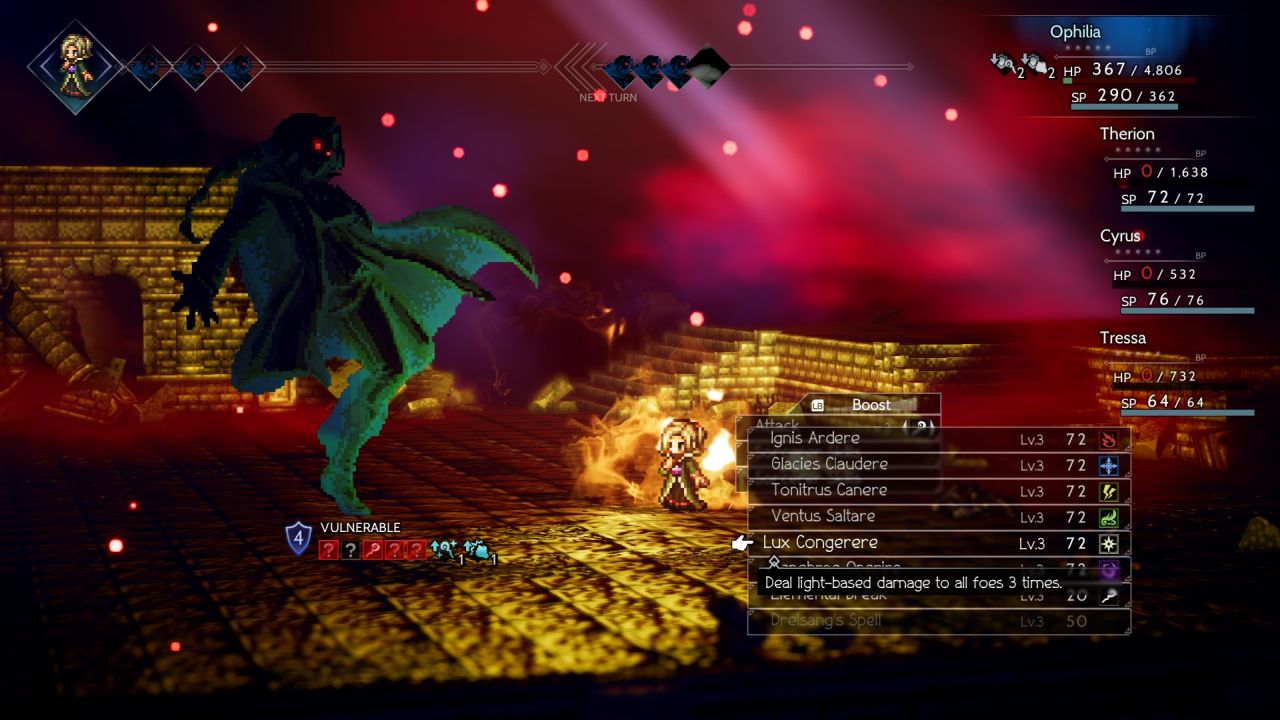
Once again, Darius was the whole problem with his item-stealing and Call Comrade nonsense. I already knew that Ophilia could beat him, she just had to keep retrying the battle over and over again until getting all the RNG factors to line up perfectly a second time. I had to sit there with the gameplay running at triple speed for a half hour until it finally happened again. I don't know how many attempts that required, something around two dozen at a rough guess? Now it was time to get serious against the remaining seven boss refights. No more Mr. Nice Guy, I took the time to get out the calculator on my phone and started tracking the health of each boss so that I knew exactly how much HP they had at all times. Werner was actually pretty easy with this proper setup in mind, it wasn't too tough to work him down to just over the halfway point and then spike him with massive damage for a fast kill afterwards. I managed the Simeon battle afterwards in absolutely perfect fashion, even setting up an extended Elemental Break that lasted for seven additional turns after he hit the half-health point. Even so, look at the slim margin for error in the screenshot above: Ophilia was sitting at a mere 367 out of 4806 HP as she lined up the killing Lux Congerere spell!  I could have easily lost here despite playing the fight perfectly; a tiny bit worse luck at dodging Simeon's attacks and she would have been a goner. Thankfully I knew from HP tracking that this Lux Congerere would finish off Simeon so I didn't waste time trying to heal further - get me out of this deadly boss battle!
I moved up Miguel to next in the queue and made sure to bring the Crystal Helm and Crystal Armor for 999 physical defense. This worked exactly as I'd hoped with Miguel's damage greatly reduced. Even when Ophilia's physical defense had been debuffed, his spears were still only hitting for about 350 damage apiece. Given that as many as seven of them could land at once, this was still no joke but the danger had been dialed down into the survivable range. Ophilia blasted him away with wind and light element spells depending on whatever he was weak to at the moment. Then I nearly died to Mattias because Ophilia actually did TOO MUCH damage at the start of the fight, knocking him all the way under 25% HP before he summoned his minions for the first time. This unlocked Mattias' stunning spell, Black Thunder, which he used three separate times as Ophilia slowly whittled through his remaining health with soulstone usage. She dropped as low as 500 HP at once point before I could get off a healing Refreshing Jam, yikes! Can we just get this boss refight sequence over with?! The only remaining opponents were then the Venomtooth Tiger again and the Dragon refight, neither of which could deal enough damage to kill Ophilia even if they had four actions in a row, and then finally the joke boss fight against Yvon. I did not do any pants-on-head stupidity in these remaining boss refights and that meant Ophilia did in fact make it to the end of her quest:

Where she could be brutally slaughtered by the dark god Galdera, of course. This is not a winnable battle for a solo character, as even if they could somehow defeat the first form of Galdera, they would then lose to the second phase which requires using four different characters. Warmaster Olberic came about as close as possible though and would have beaten the first form if it didn't possess a petrification instant-kill move when it drops low on health. Sorcerer Ophilia was considerably short of Olberic's performance, however to my surprise she actually held her own for some time against the final boss. The Sorcerer class was really good at breaking through the three shields on the Raging Soul part, which is only weak against Light element and blocks all damage to the main part so long as it's alive. I think that a non-variant party would probably want a Sorcerer here for exactly this reason as no other class would be as good at breaking that enemy. Eventually though, having only one character instead of four proved to be too much of a restriction to overcome and Ophilia was finally defeated:

Yes, that's actually what the screen looks like at times during the Galdera fight, some of the visual effects are pretty wild. Anyway, I have to say in conclusion that the Sorcerer class more than held its own and made me proud of Ophilia over the course of this journey. While this is almost certainly the weakest of the four secret endgame classes, the Sorcerer still proved capable of defeating everything other than Managarmr and Galdera, if with considerably more difficulty than its peers. The class is absolutely incredible when it comes to shield-breaking against enemies with any kind of elemental weakness, and considering that the Sorcerer doesn't really have a Divine skill worth mentioning, the damage output is outstanding. Only Brand's Thunder, Balogar's Blade, and Winnehild's Battle Cry noticeably outpace the Sorcerer's elemental spells in damage, and they would probably be comparable to Brand's Thunder if the class could grab the Warrior's Surpassing Power support skill to exceed the 9999 damage cap. The tradeoff is that the Sorcerer class needs absurd amounts of spirit points to fuel their spellcasting and they have next to nothing in terms of defense - the glass cannon setup extraordinare. Readers should note that this class is much better when paired with tank and support characters instead of being a solo character that gets pounded with every single incoming attack. I don't think the designers ever intended someone to try this solo variant!
I'll take a break from Octopath Traveler for a bit and then hopefully come back for H'aanit and the Starseer class at a later date. Until then, thanks as always for reading and following along.


