
The first page of this report was largely focused on the clash with neighboring AI leader Agamemnon which had been inevitable as soon as I rolled his empire near my starting position. With that aggressive nutcase now out of the way, I could either sit back and tech my way into space or continue conquering further to the west against weaker AI empires. I decided that it would make for a faster and more entertaining game to keep the military train chugging along and began making preparations to attack the Mayans. In the meantime, I wanted to highlight another mechanic that I haven't discussed in previous reports: religious spread.
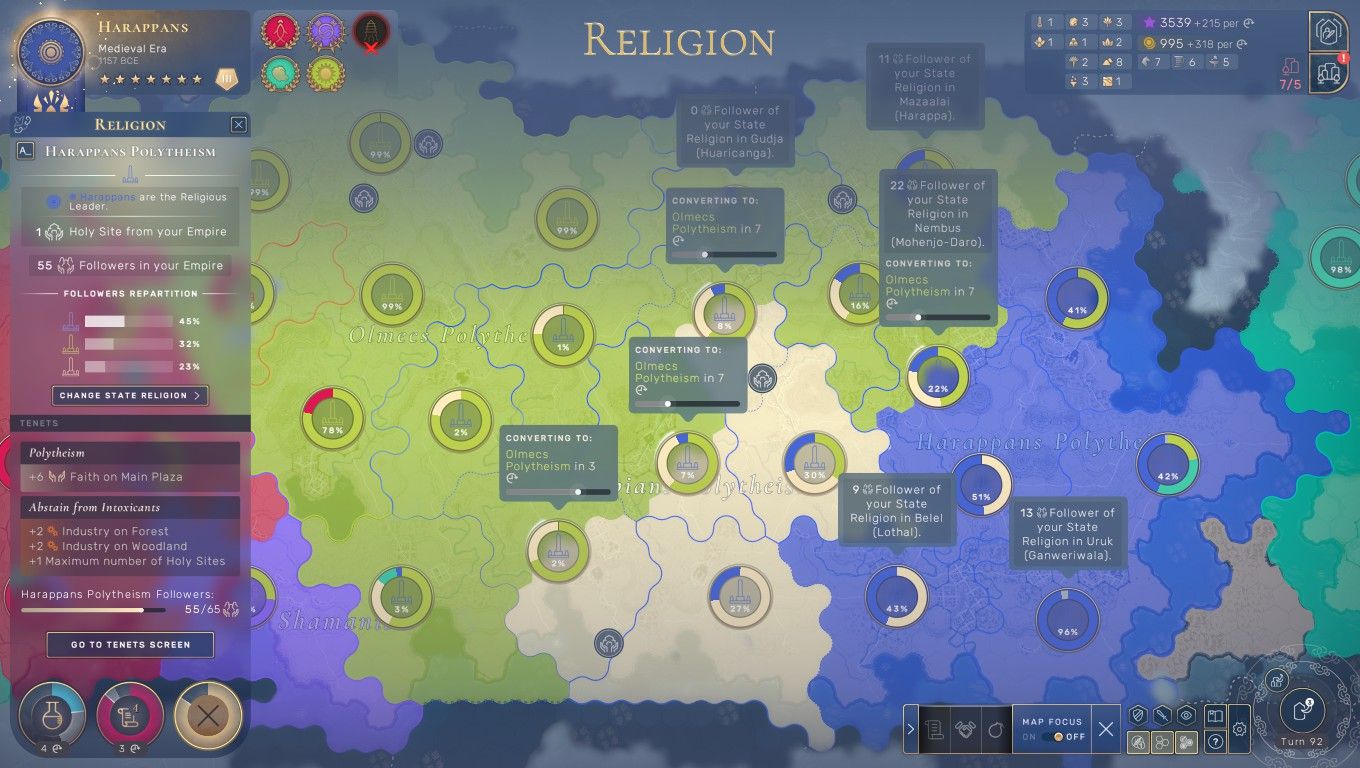
This is the religious overlay screen for the wider map view. It indicates how much support there is for each competing religion in each territory on the map, with my own Harappan Polytheism colored in the same blue as my nation's banners. Each empire always founds their own local religion at an early date in Humankind and then where it goes from there is up to each leader. The religions do absolutely nothing on their own and must attract a certain number of followers to start gaining tenets with their own benefits; the first tenet arrives at 25 followers and the second one comes at 65 followers. I had chosen Polytheism for my religion which provides 6 faith on each main plaza (i.e. each city center tile). That faith can be increased further through building Holy Sites, each of which provides 20 faith and which are built collectively like the world wonders. Holy Sites tend to be pretty expensive in the early game and I rarely devote production to them since it can be better spent elsewhere. The amount of followers for each religion is based on the amount of faith in each territory: if a city has 20 population and two religious have a 50/50 split on faith then each of the two religions would have 10 followers in that region. Tallying up all of the followers in each region produces the total number of followers for the religion and unlocks those tenets.
The problem I was having in this game was the fact that Olmec Polytheism was way too strong and there didn't seem to be anything that I could do about it. My own religion picked up the Tier 1 tenet without much trouble (I picked "Abstain from Intoxicants" for +2 production on forest tiles) and then I found myself getting stuck right around 50 followers, below the 65 followers needed for the second tenet. Olmec Polytheism was Makeda's religion and she had invested heavily in early Holy Sites, even building the Stonehenge wonder which counts as a Holy Site. This caused her faith to explode outwards and convert one region after another across the map. Once her religion started converting my territories, I found that there was little that I could do to stop the cascade from continuing because my own cities that had already flipped into Olmec Polytheism were further converting my other cities! I built several Holy Sites to try and stem the tide but they didn't seem to have much of an effect. Olmec Polytheism seemed to have passed a tipping point and had become unstoppable. I badly wanted some kind of option to start removing the foreign religion from my cities; if there was some kind of civic that provides this option, I couldn't find it.
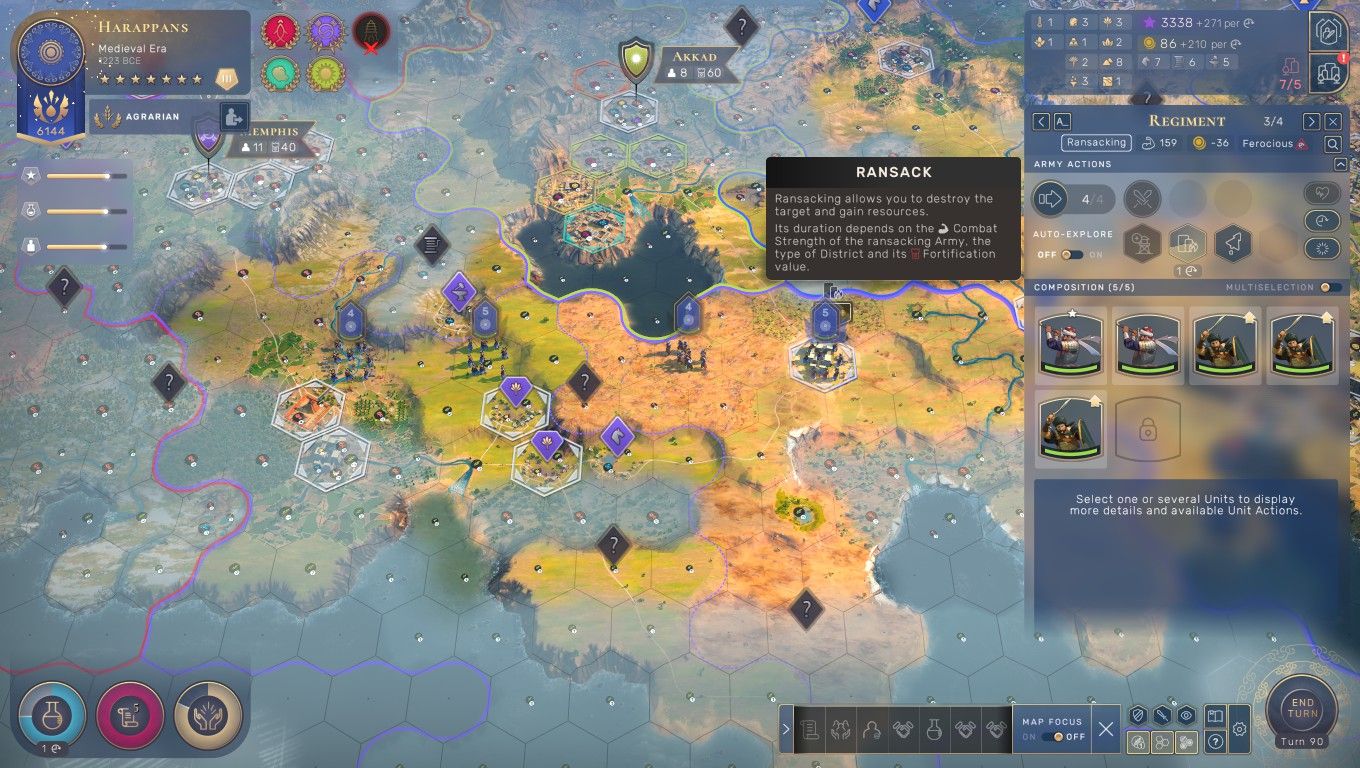
Elsewhere, the core of my military spent only four turns healing and repositioning before invading Mama Ocllo's Mayans in the southwest. This was the purple empire which had been the game's weakling ever since the early stages of history; I still don't know what exactly happened to put them so far behind everyone else. I didn't have that much war support built up against the Mayans before launching my invasion and that meant the need to ransack Mama Ocllo's outposts so that I didn't have to spend war score to gain them on the surrender screen. This is suprisingly easy to do and this strategy of razing and replacing enemy outposts looks like it should be standard operating procedure for Humankind. Of course this is all based on the assumption that your military has possession of the field and can burn down the enemy's outposts with impunity; the AI doesn't exactly love it when you trash their stuff and will launch its own attacks to stop the pillagers if at all possible. Mama Ocllo was weak enough that she couldn't contest my units as they ransacked both of her outposts attached to the capital city of Memphis.
I thought that there wouldn't be any fighting until I reached the Mayan capital but to my surprise Mama Ocllo sent out her forces as I approached Memphis. That was a brave and foolish decision as the Mayans were fielding swords and archers which were no match for my greatswords. I had mostly upgraded the older swords into their Medieval counterparts and kept spending gold to keep the army up to date. These purple units were slaughtered with ease and then it was a simple matter to take the Mayan capital. I made sure to avoid capturing Mama Ocllo's only city until both of her outposts had been razed since I knew that the surrender screen would trigger immediately afterwards. Although I only had a finishing war score of 137, that was more than enough to spend 80 war score to formally take control of Memphis and eliminate Mama Ocllo from the game. I had to wait a few turns for the game to acknowledge that she was dead as Humankind has this weird habit of letting empires with no cities stick around until their remaining units lose all of their health and die. Ghost empires notwithstanding, this was a short and easy war that handed me control of one more city and three more regions.

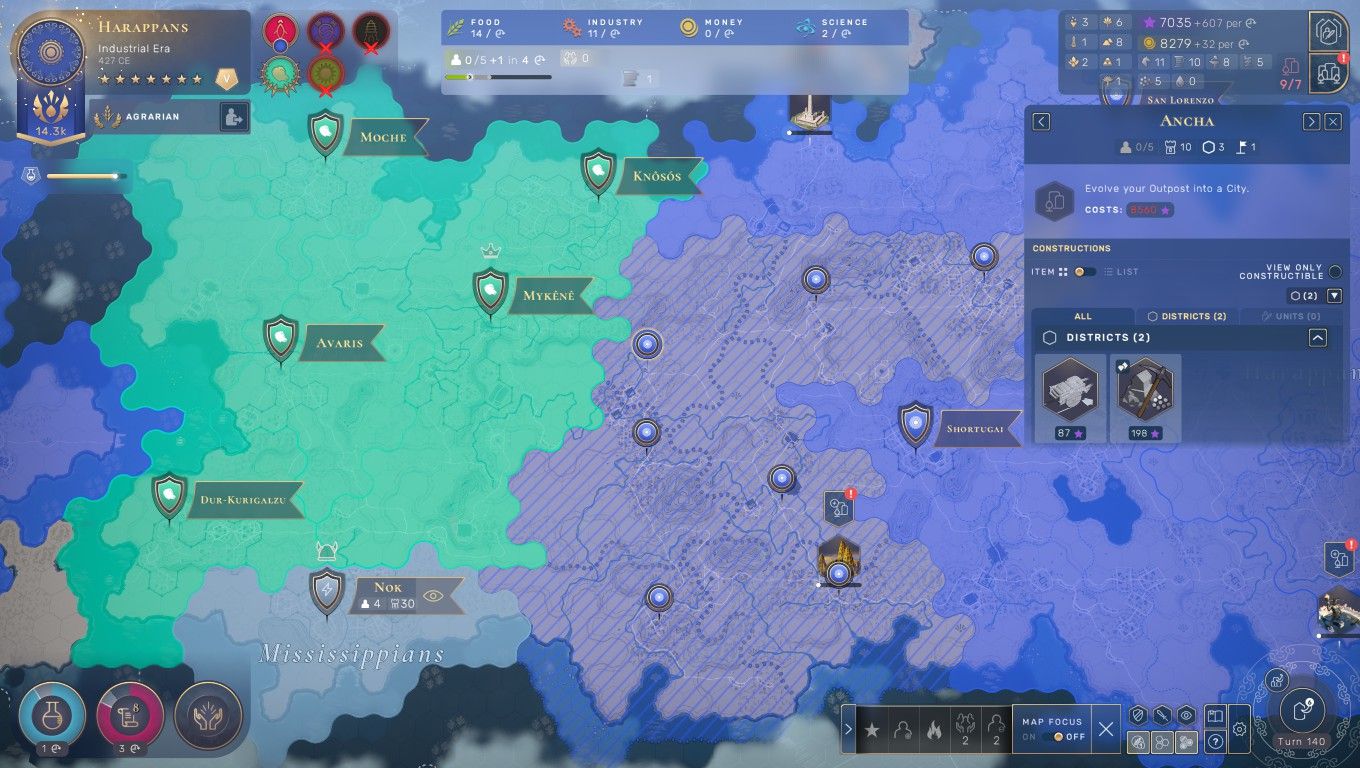
The updated overview map indicated the Mayan acquisitions since they were all outposts for the moment which hadn't been attached to a formal city. Memphis had been so lacking in infrastructure that I decided to raze and replace it with a new city which would start with all of the buildings from the first few eras. It was going to cost about 5000 influence to do that which would take about half a dozen more turns. Note that I was well over the city limit and losing 110 influence/turn for being two cities over the cap. This was only going to get worse before it got better too. At least my Transcendent Harappans were continuing to dominate in the fame department; I had recently entered the Early Modern era at which point in time my empire stood at just over 7000 fame. Makeda was the closest at about 4200 fame for her yellow empire. My lead was only growing in this area since I was continuing to get another 10% bonus on every star with each new era.
I mentioned on the previous page of the report how Makeda had been my friend and best trading partner since the early stages of the game. Her religion was a pain in the rear but the science-based luxury resources that I was importing had been a huge boon at keeping research racing along. Unfortunately relations had been dropping in recent turns and plummeted completely with my conquest of the Mayans. Makeda had been allied with Mama Ocllo and suddenly hated my guts for the admittedly brutal invasion of her southern neighbor. Harappan borders now wrapped around Makeda's Frankish empire on three sides and it didn't take a genius to see who was the likely next target. Makeda responded to the situation by further poisoning the diplomatic well between our nations, launching endless demands to hand over the territories that had recently been conquered. In the screenshot above, the bottom of the image indicates the enormous number of demands that I had received. There must have been at least a dozen different requests from Makeda alone!
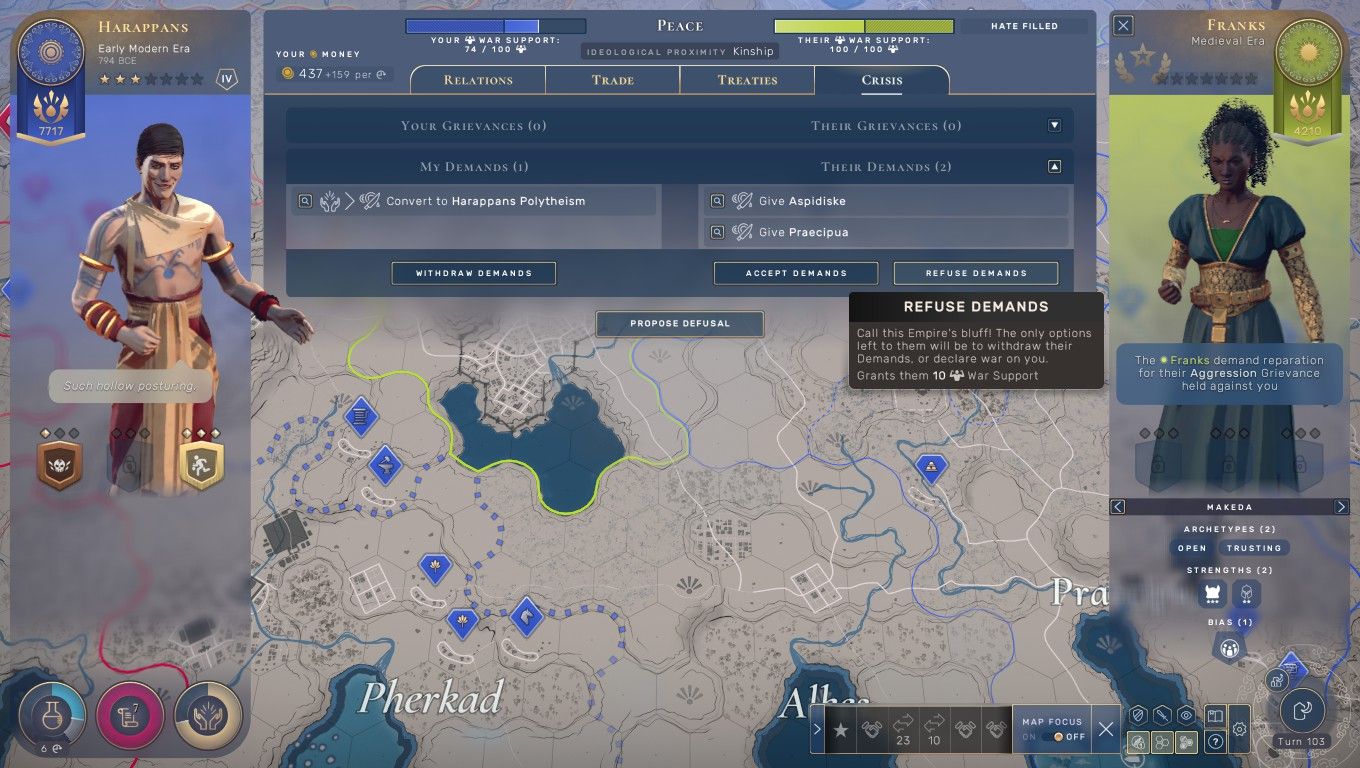
I spent a fair amount of time on the diplomatic screen each turn refusing her demands. She would issue these angry statements at the start of every turn, our resource trades would be temporarily interrupted, then I would refuse the demands and suddenly the resource trades would be active once again. We repeated this process for almost 10 turns to allow time for my war support to build up against the Franks. Every time that I refused one of Makeda's demands she gained 10 war support against me... but she was already at the max 100/100 war support so this was completely pointless. Meanwhile my own war score was steadily climbing as I refused her demands and that was exactly what I wanted. I had also teched to Centralized Power in the Early Modern era where Halberdier units unlock and then trained five of them out of my core cities. Halberdiers are the next tier up from pikes and serve as sturdy frontline units with 41 strength. Once I had time to build these units and march them over to the Frankish border, I declared a formal war against Makeda and began the invasion.

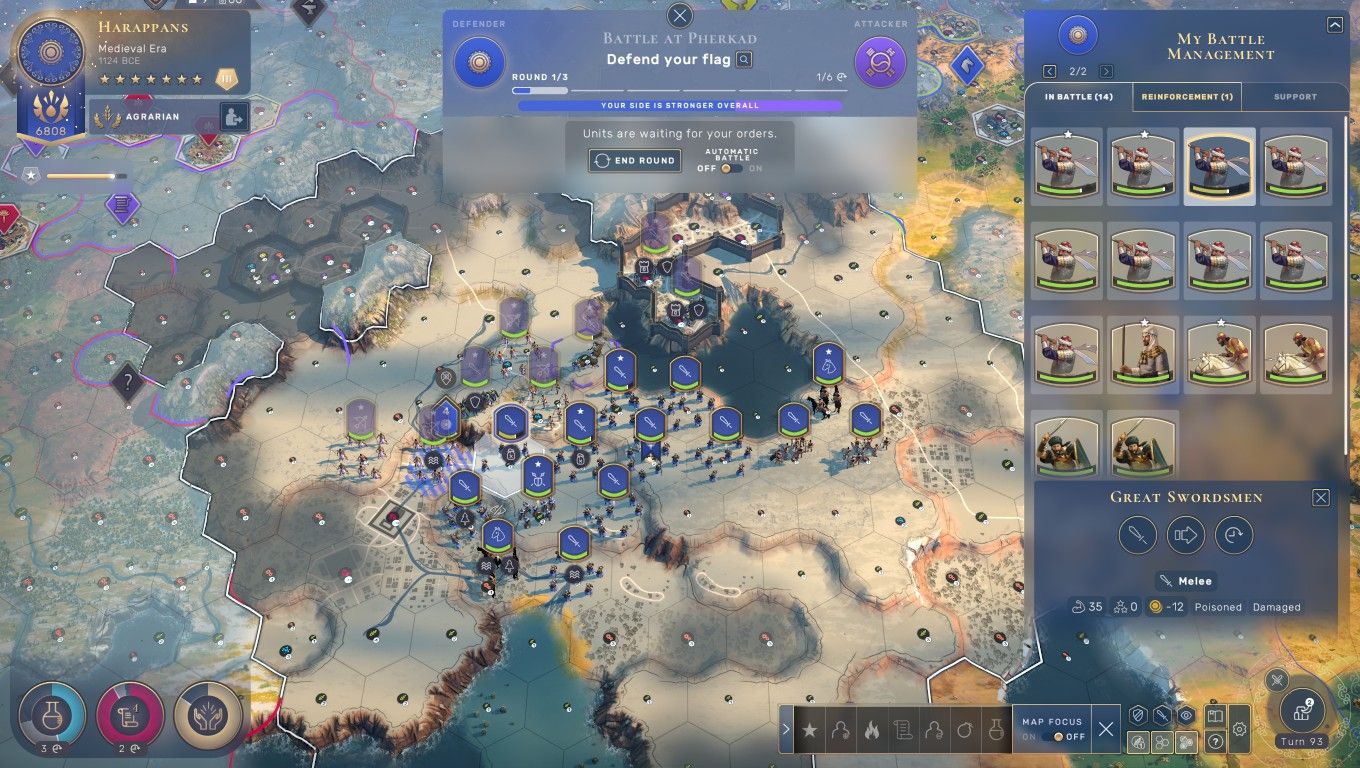
The largest battle took place at Akkad which made sense since it was the first location that I targeted. Makeda was in the Medieval era but fortunately she didn't appear to have reached greatswords yet or the Frankish unique unit Franci Milites which are effectively an improved form of knight. (This was a major reason why I wanted halberdiers available before attacking though I never ended up seeing the Frankish unique unit on the battlefield.) Akkad was another place where the mountains formed a series of choke points and I had to fight my way through the fortifications. This battle wound up taking two turns to resolve since it was so difficult to get through that little one-tile choke at the northern edge of the city. Makeda did her best on the tactical level by sticking within the fortified defenses of Akkad and making me fight my way inside, turning this into a reprise of the situation at Agamemnon's capital city of Kerma earlier in the game. Ultimately there wasn't a lot that she could do as I kept rotating my units and eventually bashed through the defensive terrain. Halberdiers were extremely useful here and this attack would have been tough without their higher combat strength.
That was pretty much the only interesting part of the war with Makeda. She had correctly sent all of her military units to Akkad in an attempt to stop my army from breaking through and when that failed there wasn't much left to stop me from doing anything that I wanted. I took my time and carefully razed both Akkad and La Venta, replacing both of them with new outposts, as well as razing the outpost in the region east of La Venta which I immediately attached to my own city of Huaricanga. There was another outpost far off to the west attached to the Frankish capital of San Lorenzo and I signed Open Borders with the red empire of Midas to send a detachment of units over there to raze the thing. However, Midas responded by attacking my units as they attempted to pass through his territory - what the heck? I've mentioned a bunch of times how the AI can be rabidly aggressive in this game and will attack your units on sight in neutral territory or in their own territory. The net result was that I killed Midas' units and retreated that stack back to my territory for healing. It looked like the next target had already identified itself.
There isn't much I can say to make the rest of the war sound dramatic. I wasn't able to raze that Frankish outpost in the far west but I had more than enough war score (240 points) to have it formally ceded to me on the surrender screen when San Lorenzo was captured. Another leader bit the dust and I was one step closer to conquest. (This also resolved the religious situation as razing and capturing Makeda's cities removed the intruding presence of Olmec Polytheism and allowed my own Harappan religion to reassume dominance. I wasn't sure whether to be impressed by the realism or thoroughly depressed that violence was the answer to my religious quandary from earlier.)
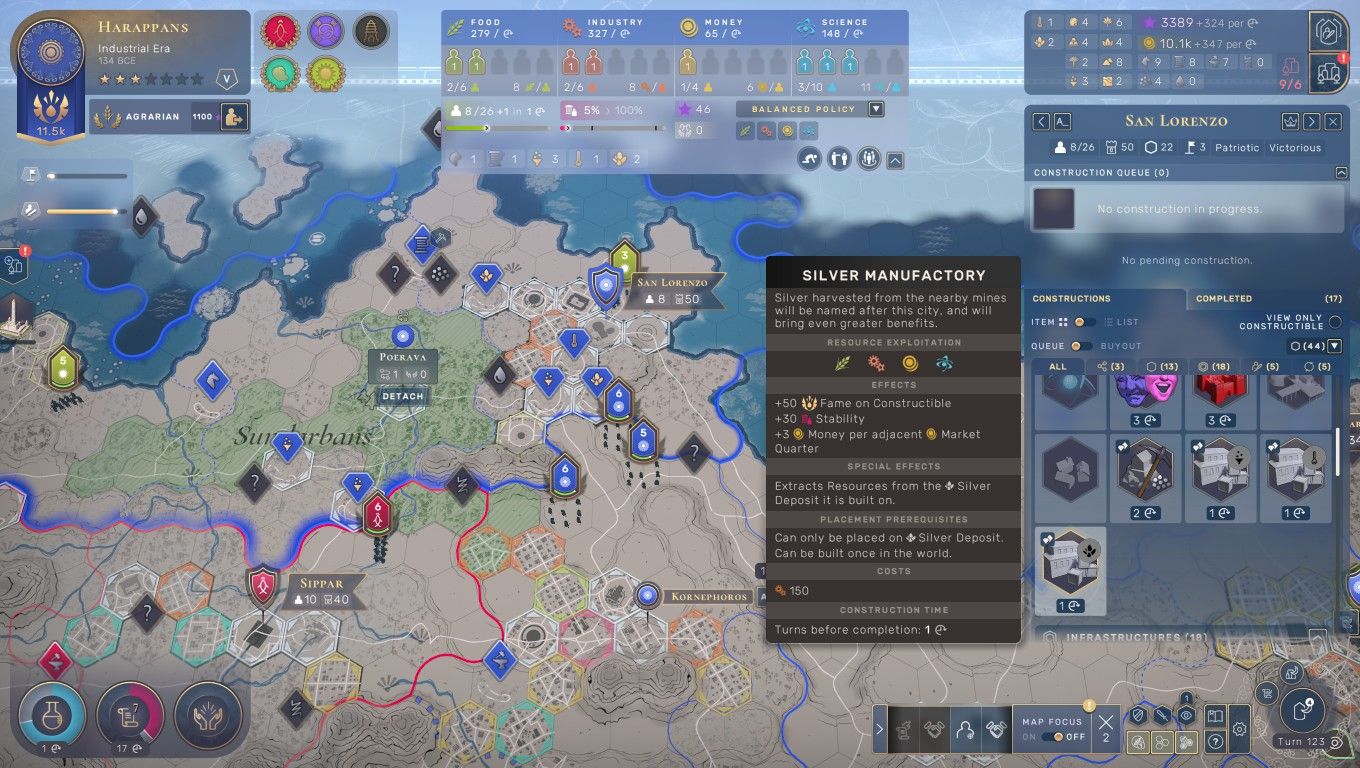
This image showcases the reason why I wanted so badly to control the territory surrounding San Lorenzo. These two regions were packed full of valuable science-based resources, with multiple sources of silver (+2 beakers per Research Quarter), lead (+1 beaker per Scientist specialist), and a single mercury luxury (+2% science on all cities). My research in the Early Modern era had been directed towards Patronage technology to unlock the extremely overpowered luxury manufactories and my control over San Lorenzo allowed me to gain the wondrous effect from all of these resources. The science luxuries all share the same effect from manufactories: +5% science and +10 stability in all cities per copy of the resources. With 6 resources that meant 30% extra science and 60 stability everywhere - not too shabby! These were extremely valuable commodities and I like how Humankind drives conflict between the different empires over control of resources. More resources are always beneficial so players feel a constant pull to gain access to more of them via trade or conquest.
San Lorenzo was an excellent city and I didn't try to raze it and replace it with a new settlement. I didn't really have the influence to spend on doing this anyway as the next city would have cost close to 10,000 influence since I was so far over the city cap. I was losing more than 380 influence/turn for being three cities over the cap which limited my options a fair bit. That wasn't as bad as it sounds though since I didn't particularly need to adopt any more civics and I still had enough influence to keep razing enemy outposts and replacing them with my own. I even had an event pop up called "The Combine" which gave me a choice between increasing the city cap or gaining, ummm, 21 fame. That might have been the easiest decision of my life as I happily took +1 city cap for free and dropped down to a loss of "only" 120 influence/turn for being two cities over the limit.
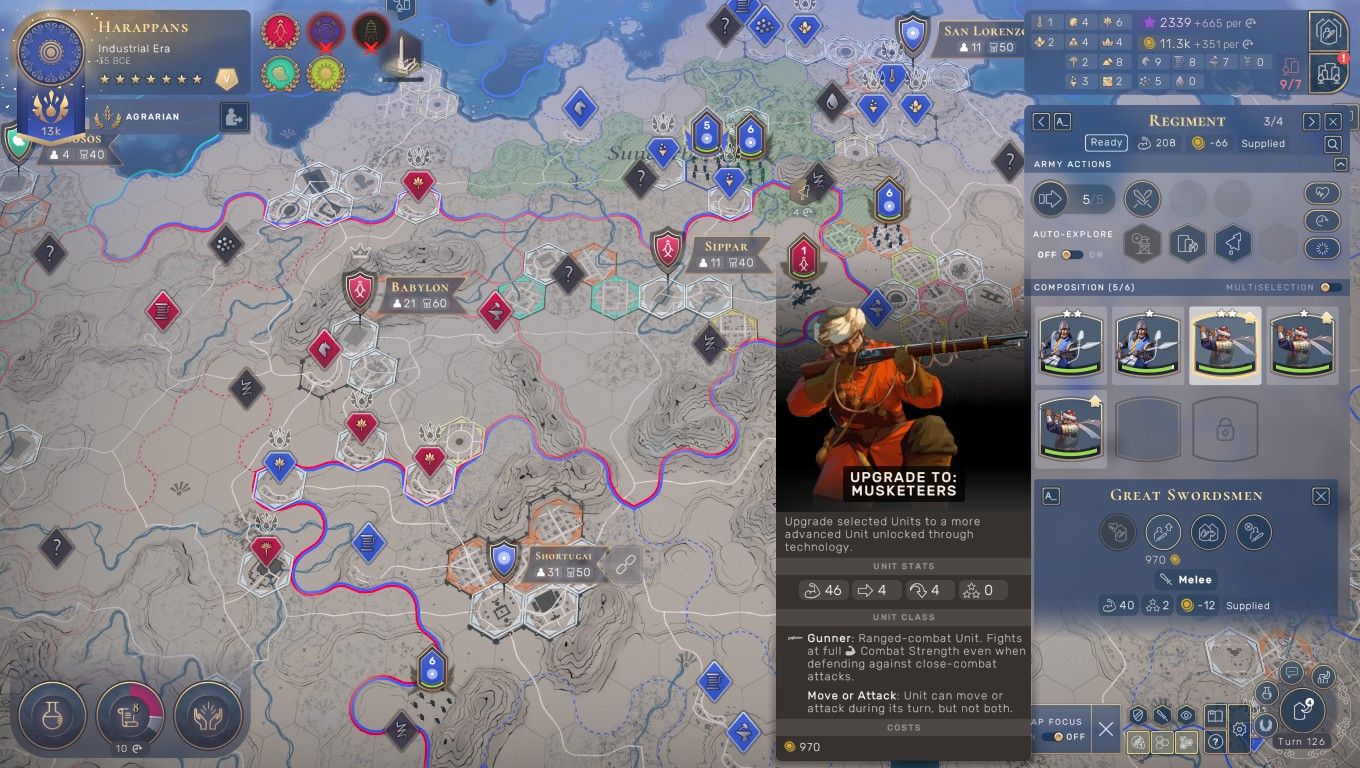
The drill was becoming familiar by now as I took a few turns to reposition my units and prepare for the next attack. After unlocking the luxury manufactories at Patronage technology, my next target had been the bottom of the tech tree so that I could start upgrading my greatswords into musketeers. These are one of the first gunpowder units which can either move or attack but not do both; interestingly, musketeers are frontline units and not intended to hide behind protection like the earlier archers and crossbows. They can be a bit of a pain to use due to the inability to move and attack simultaneously but capture the dynamics of real life Early Modern warfare reasonably well. Note that I had 11,000+ gold in the bank which probably looked excessive only to wind up not being enough to upgrade all of my greatswords. At 900 gold apiece these unit upgrades were not cheap and I think that I fell short of having enough cash for about the final 1/3 of my greatswords. I'm getting better at balancing how much gold is needed to keep the military up to date; you have to devote at least a few cities to gold generation or there won't be enough to support the army.
Relations with Midas had been conveniently tanking during the tail end of my war against Makeda and continued plummeting thereafter. I was happy to further the process by making a series of demands and refusing the counter demands of Midas which gave both of us lots of war support against one another. Anything to increase the starting war support value up closer to 100 for use on the later surrender screen. Economically, I was trading with Midas for his three sage resources which were worth 15% additional food in all of my cities (via the luxury manufactory that I had already built for sage). I knew that declaring war on Midas would cut off all of those resources and drive many of my cities into starvation. How bad did it prove to be?
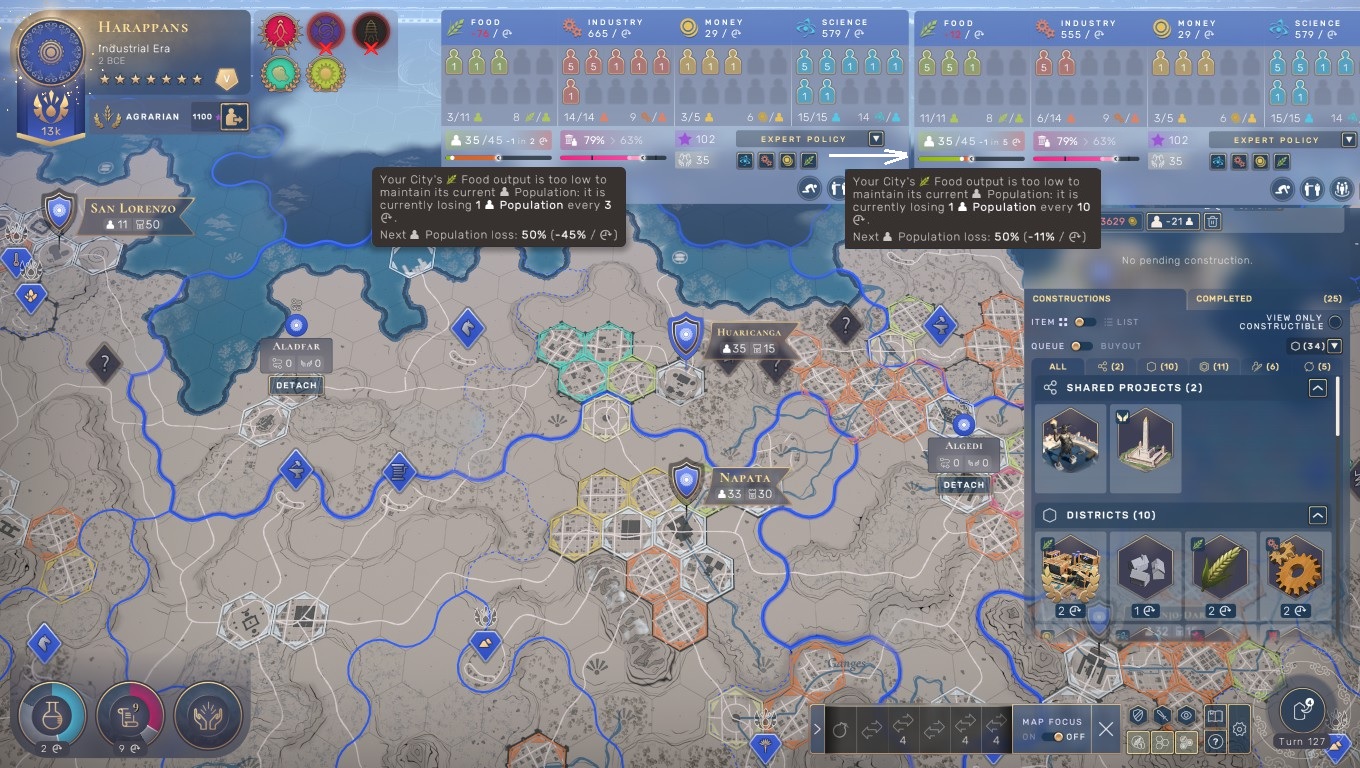
The answer turned out to be "pretty bad but survivable" when the imported food luxuries were cut off. I was able to switch large numbers of specialists over to Farmers and pick up enough food to stabilize for the time being; Huaricanga went from instant starvation down to starvation in 11 turns and that was more than enough time to capture those food luxuries from Midas. Losing 100 industry/turn was a temporary price that I had to pay until the situation resolved itself through military conflict. Humankind also does an excellent job in this regard by demonstrating how warfare hurts everyone involved economically by cutting off the flow of resource trades. There have been many times where I avoided fighting another AI empire because my economy was heavily dependent on resources that I was importing from them. There wasn't much of a choice in this conquest-oriented game other than to buckle down and try to overrun the enemy as fast as possible.
By the way, I haven't talked too much about the city-building in this report because I covered that in much more detail in the initial Tutorial game. I want to reemphasize the point though that Humankind does a fantastic job in this regard and I constantly found myself trying to balance food versus production versus money/science in all of my cities throughout the game. The fact that the districts are implemented on a mass scale makes them so much better than the districts in Civ6; you can build one Research Quarter, or five of them, or fifty of them, and thinking about what to build and where to build them makes for fascinating puzzles with no easy answer. I also need to stress that the *PACE* of the city building is infinitely better than Civ6 as well. Cities in Humankind are constantly adding new infrastructure and new districts every 2-3 turns which means that they're always getting stronger and having to balance the choice of another district versus some new type of infrastructure versus more units for the army. Because cities can never build more than one district and one building of each type in Civ6, they constantly get stuck with 10-15 turn build times and the gameplay just drags in the worst way. Ditto for units which have to become insanely expensive due to the One Unit Per Tile ruleset. I cannot emphasize enough how much better the "feel" of Humankind is in comparison to its older rival. I don't know if I can ever go back and play another game of Civ6 at this point, it feels like an outdated dinosaur in terms of the city building. Yes, despite its own issues Humankind really is that much better!

As for the fighting itself, well, it wasn't any more of a genuine struggle than the last few conflicts had been. Midas was still in the Medieval era while I was roughly halfway through the Industrial period which made for badly mismatched combat results. When I attacked the city of Sippar, Midas chose to sally outside of the walls on the initial turn of the combat. The AI knows that sitting back behind the walls doesn't work against musketeers who will simply shoot the defenders while taking no damage themselves. Midas moved first in the opening round of fighting and he had already lost EIGHT units before I even had control of my army - yikes! Six different city levies along with a pike and a horseman unit had suicided themselves trying and failing to kill one of my musketeers. If there was any drawback to the fighting it was the ridiculous line of sight rules which seemed to make no logical sense about what could and could not be fired upon. How in the world did the musketeer not have vision in the screenshot above?!  There's still some wonky stuff in this game's combat model.
Midas only had two cities although he did have a good number of attached territories controlled by outposts. He had more cities earlier in the game but had lost some of them to the westernmost green AI (Beowulf) and in fact the two of them were still at war during my own conflict. In other words, I was kicking poor Midas when he was down and he was likely already on his way out of the game even before my invasion. To the credit of the Humankind AI, they actually can conquer territory from one another and won't hesitate to engage in warfare rather than remaining eternally locked in stasis as in Civ5 or Civ6. This wound up causing problems for me in this situation as I watched Beowulf capture the capital city of Babylon away from Midas - ack! I had been waiting for a separate army to complete the razing of an outpost in the south and would have taken Babylon myself on the very next turn. Since Babylon was the final city controlled by Midas, I was instantly forced to the surrender table and found myself unable to take a single territory. I could only ask for reparations and pick up some additional cash; I forced Midas to become my vassal for fun which wound up being irrelevant when he died a few turns later thanks to having no cities.
This left Beowulf as the only remaining AI leader in the game. He was piloting the Aztecs at the moment after having spent time as the Huns earlier in the Classical era. These cultures had evidently served Beowulf quite well since he controlled five cities and almost a dozen total territories at the western edge of the Pangaea continent. I was highly annoyed at Beowulf for denying me control over Babylon and the food-based luxury resources located there. I needed to get them under control to stop my cities from starving! Thus I didn't wait any longer and immediately declared war on the Aztecs on the very same turn that Midas exited the game. We were fully engaged in a squabble over the spoils but my forces were vastly stronger in both numbers and technology. I captured Babylon instantly and began the process of razing and replacing it.

The next few turns were a weird way to start a new conflict. Beowulf apparently didn't have any units over on his eastern border and my army was confronted with no resistance as I began the methodical process of capturing and ransacking everything in sight. I had to raze everything and replace it with my own outposts since there was far too much Aztec territory to rely on cessations on the surrender screen. These repeated ransacks generated quite a bit of gold as a side benefit, handy for continuing to upgrade my units as new technologies were discovered. In the picture above, I had the city of Babylon and three additional outposts in the process of burning to the ground. Now of course it's dangerous to split up your army like this where it can be attacked in piecemeal fashion by inviting defeat in detail. However, I was so far ahead at this point that I wasn't facing much of a risk by splitting up my units in order to ransack their way across the map further. Heck, Beowulf's army was mostly still comprised of Hunnic Horde units which didn't exactly fare well against halberdiers and musketeers.
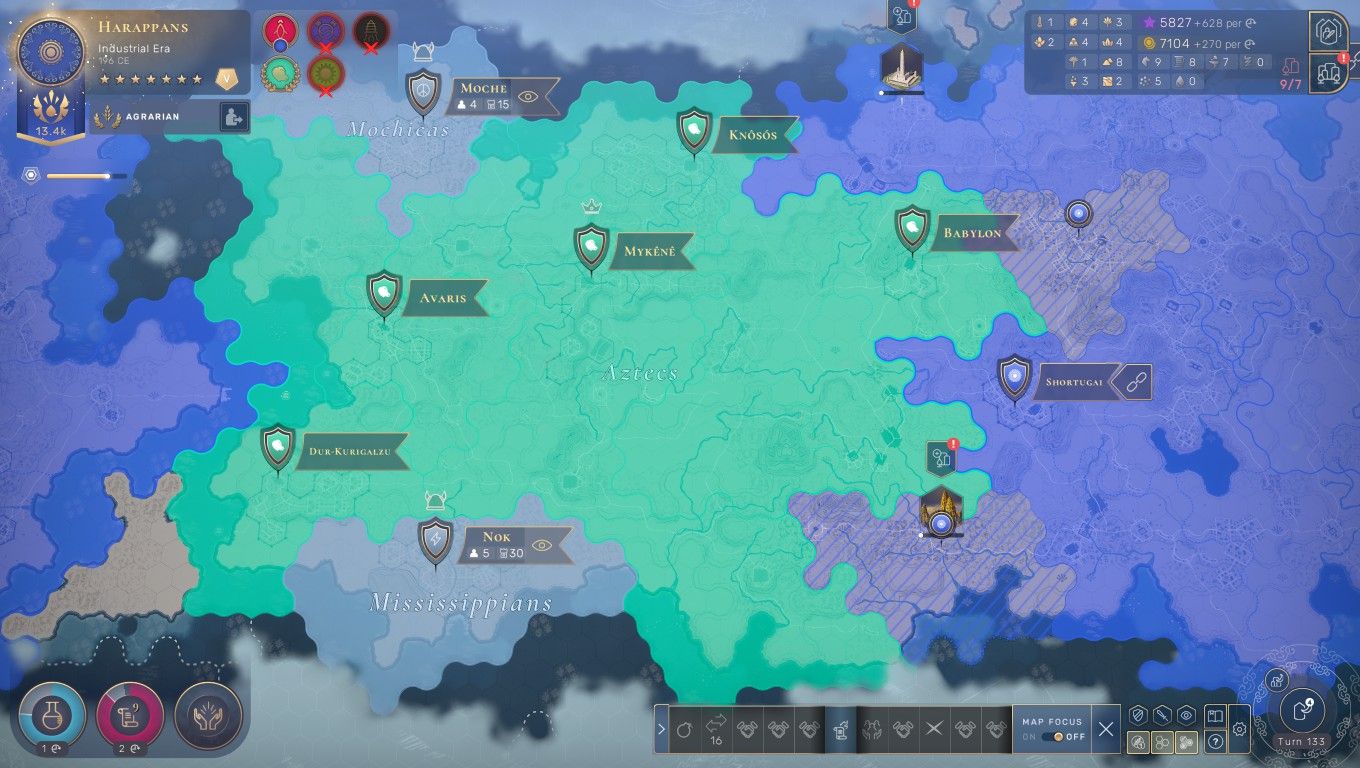
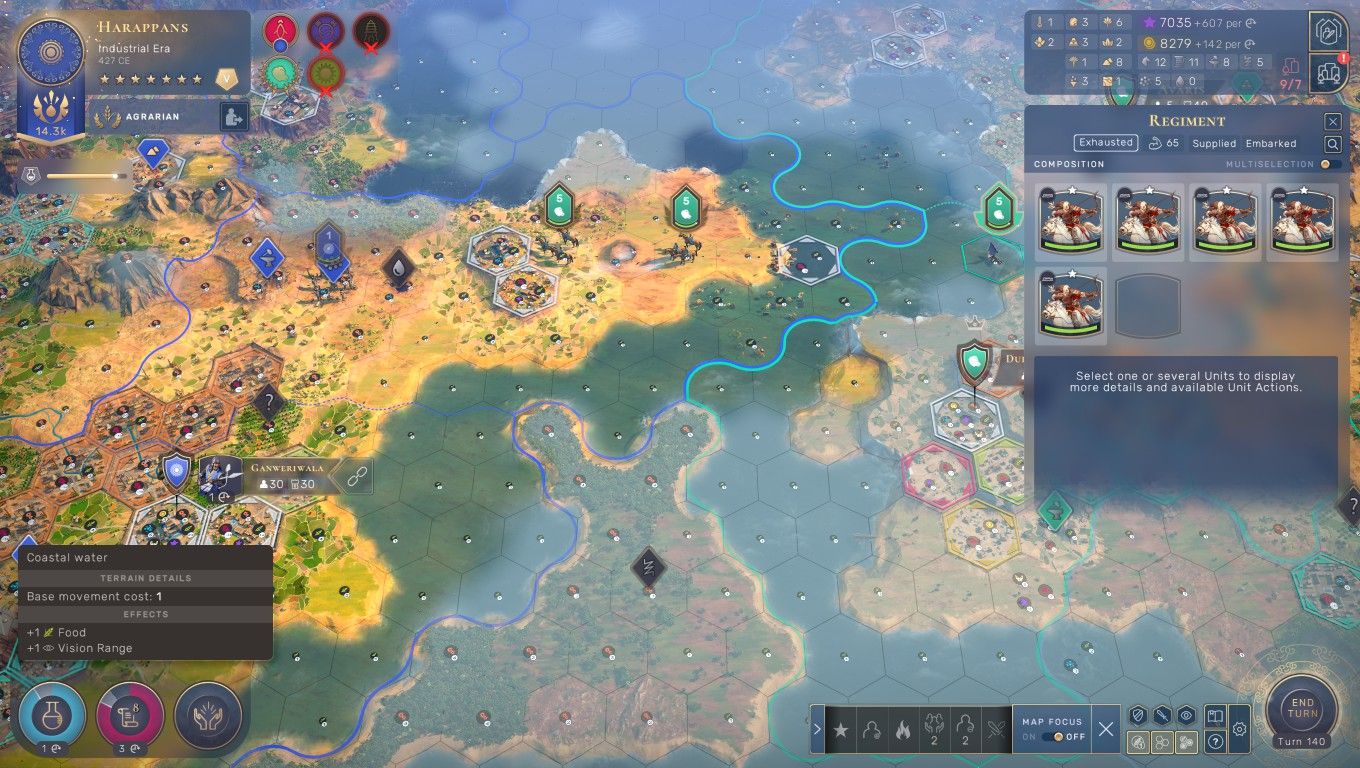
I posted an overview map above at the moment when Beowulf sniped the last Midas city. This was the situation half a dozen turns later:
Almost half of the Aztec territory had passed over into Harappan control as the cities and outposts present had been ransacked and replaced with my own outposts. Note that the horizontal slashes indicated that these regions weren't attached to any of my own cities and therefore weren't contributing any districts or population to the wider empire. However, we were far enough into the game that I didn't need more cities or districts over here in the far west. I just wanted access to the resources present in these regions and to get them out of the hands of Beowulf; outposts were plenty good enough in that regard. Our conflict began with both sides having a war support around 100 and we both stayed near the top of the scale throughout these turns. I gained war support from winning battles while Beowulf kept getting +10 war support every time that I razed one of his cities or outposts. That was great as I didn't want to be forced to the surrender screen, I wanted the war to continue for as long as possible to keep removing more Aztec territory from the map. It turns out that it's readily possible to keep wars going indefinitely if the player keeps razing AI outposts to artificially increase their opponent's war support. One territory at a time, my army marched its way westward like a plague of locusts stripping the countryside bare.
This was the first time that I had active combat still taking place this deep into the tech tree. My past non-variant games would have picked France or Japan in the later eras and then turned on Collective Minds everywhere to shoot up to 25,000 beakers/turn and fly right through the last few eras. That wasn't a possibility here as the Harappans were an Agrarian culture which would never have the option of using Collective Minds at all. I can confirm that the game balance is about a hundred times better without Collective Minds present as I actually had to build Research Quarters for science generation and the pace of tech discovery remained steady instead of exploding upwards in comical fashion. (If anyone from Amplitude Studios would ever read this, please just strip Collective Minds out of the game entirely. Give the Scientific cultures some other new ability, that thing is toxic and annihilates the lategame balancing.)
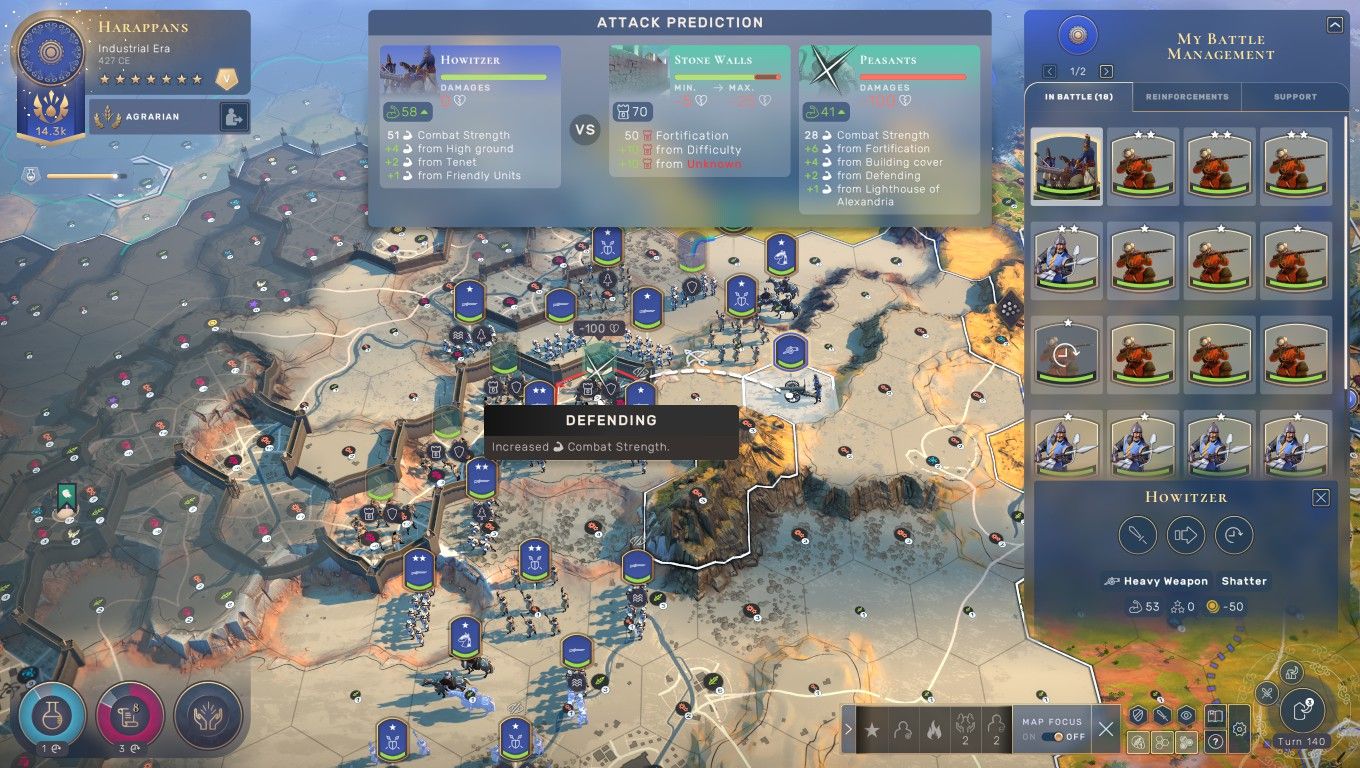
One such lategame unit that I hadn't seen before was the mortar unit, or in the case of this screenshot its upgraded version the howitzer unit. These siege units have extreme range that stretchs out to 8 tiles and have the same ability to break down fortifications that I mentioned on the last page with battering rams. It was a lot of fun to fire at the walls of a city and blast them out of the way so that my infantry units could race inside without being slowed. The one downside that I found with the howitzers was their reliance on the same nonsensical line of sight rules that apply to all of the other ranged units. These units are best positioned well behind the front lines up on top of hills where they can fire over the heads of your own units. With 8 range they can reach pretty much anything so long as they can actually see to fire.
As my main army continued its inexorable march through the Aztec heartland, Beowulf sent a bunch of his old Hunnic Horde units across the narrow sea to make a landing at the eastern edge of the continent. He landed 15 units in three groups of five and this would have been a dangerous invasion if the Aztecs hadn't been so comically far behind in technology. These units would never be able to capture a city since I was up to Draftees as my levied units which boasted 43 strength, more than enough to deal with the 22 strength on Hunnic Horde units. Just to be on the safe side, I trained four or five halberdiers and used them to push back this attack before it could pillage any of my outposts. Even though Beowulf was too far behind for this attack to succeed, I was impressed at how the AI was still trying to find weaknesses in my defense and how it could launch an overseas invasion with a large number of units. The Civ6 AI would never be able to do anything this competent.
Despite the best efforts of Beowulf, I made steady progress at devouring Aztec territory turn by turn. I caught a few stacks of Hunnic Hordes out in the open field and forced them into battle (getting them to retreat and then hitting them again when they couldn't run further) but for the most part the war was little more than burning down cities and outposts unopposed. Beowulf's war support stayed somewhere between 50 and 100 the whole time, never falling low enough that he would be forced to the surrender screen for a premature end to the conflict. Eventually the Aztecs were down to a single city:
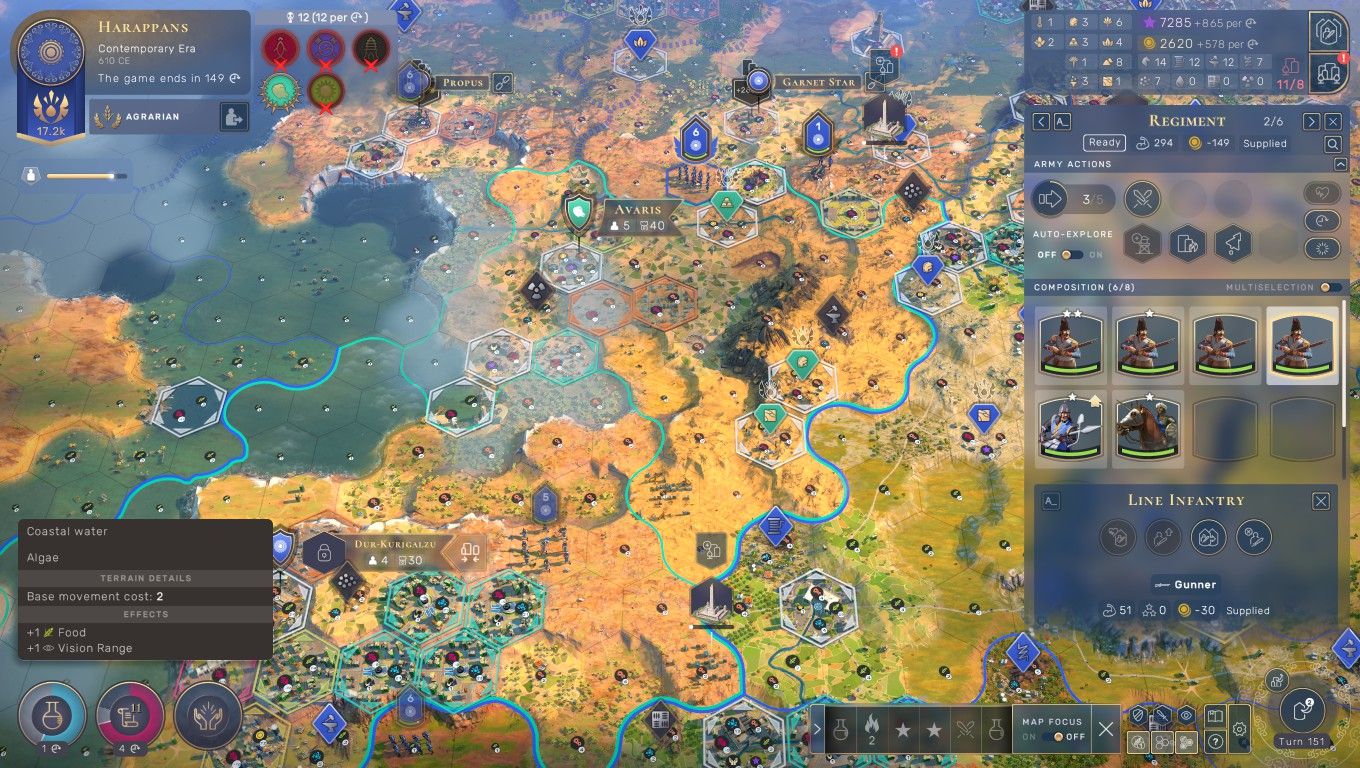
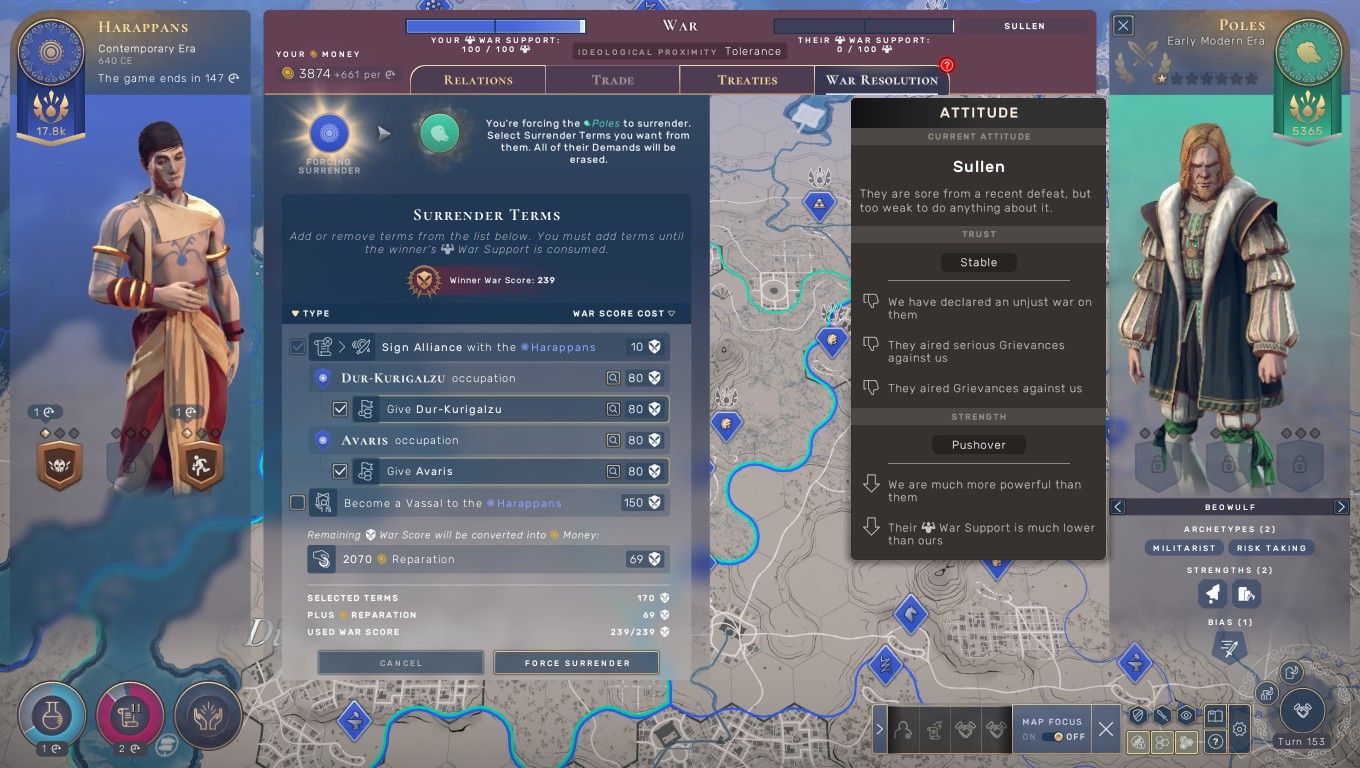
I could have captured Dur-Kurigalzu and Avaris simultaneously but opted to leave the latter city standing for one extra turn just to be on the safe side. I wanted to be absolutely certain that capturing the last city would eliminate Beowulf so that I didn't have to go through the farce of fighting another conflict. By the way, note that I had made it up to line infantry on the tech tree which aren't much stronger in terms of combat strength as compared to their musketeer forebearers but can actually move and shoot on the same turn. They were much more fun to use in battle even though they barely saw combat before this game was over. In any case, I captured Avaris on Turn 152 which prompted the surrender screen with Beowulf on the following Turn 153. I had more than enough war support to demand the formal cessation of his two remaining cities and that was all she wrote for the final AI leader.

Beowulf had adopted the Polish culture for the Early Modern era during the final turns of the game and thus I received this message about how the Poles had fallen. The beautiful blue banners of the Harappans now spread uncontested across the full continent with only a pair of useless offshore islands lacking an outpost. I was so far over the city cap that I was actually losing culture, not that this particularly mattered (I would have razed some of the final cities if the game wasn't about to come to a close). I stopped building new districts in my core cities during the final turns to speed up the last few conquests but I still wound up just short of 10,000 beakers/turn despite lacking access to Collective Minds. The city building feels very solid at the moment once that ridiculous ability gets taken out of the equation, the minor tweaks to district cost scaling seem to be helping a bit. Industry is always going to be the most important of the yields but if the player excludes Collective Minds then they really do have to balance everything else in their cities. I even constructed a few Commons Quarters since this map had a low number of luxuries and I occasionally needed the extra stability.
I was highly pleased at how the warring played out in this game, both in terms of the tactical battles and then navigating the surrender screen. The vast majority of my gripes with Humankind have revolved around these two mechanics and I felt as though I had finally reached the point where I understood them and could work around their worst aspects. The surrender mechanic remains a terrible idea but now I can make it work in my favor through stuff like mass razings and manipulating war support on the diplomatic screen. Once the worst parts of these mechanics are mitigated, Humankind turns into an excellent empire-building strategy game. I need to experiment further on the highest difficulty level since the AI doesn't seem to be competitive enough here on the Civilization setting.

For some reason, Humankind makes the player run one additional turn after achieving a victory condition. Beowulf surrenderedd on Turn 153, I received the "Poles eliminated" message on Turn 154, and then I won a Conquest victory at the end of Turn 155. Sticking with the Harappans for the whole game resulted in an absolutely massive amount of fame at the displayed 18,633 which was almost 50% higher than anything I had scored in a previous effort. Note that fame is not scaled by difficulty level or finishing date which makes this an awkward fit for comparisons across games. Nonetheless, I was very happy with this result which absolutely blew away all of the competing AI empires. They were able to keep pace in the first two eras and then my Harappans simply snowballed out of control. I think that the fame bonus for sticking with the same culture the whole game is more dangerous in the hands of the AI than it is for a human player; there's frequently one or two AI leaders who opt to stick with the same culture and it can be legitimately tough to match their fame as they keep getting a higher and higher multiplier in later eras. This is a pretty neat mechanic that makes sticking with the same culture more than just a silly variant.
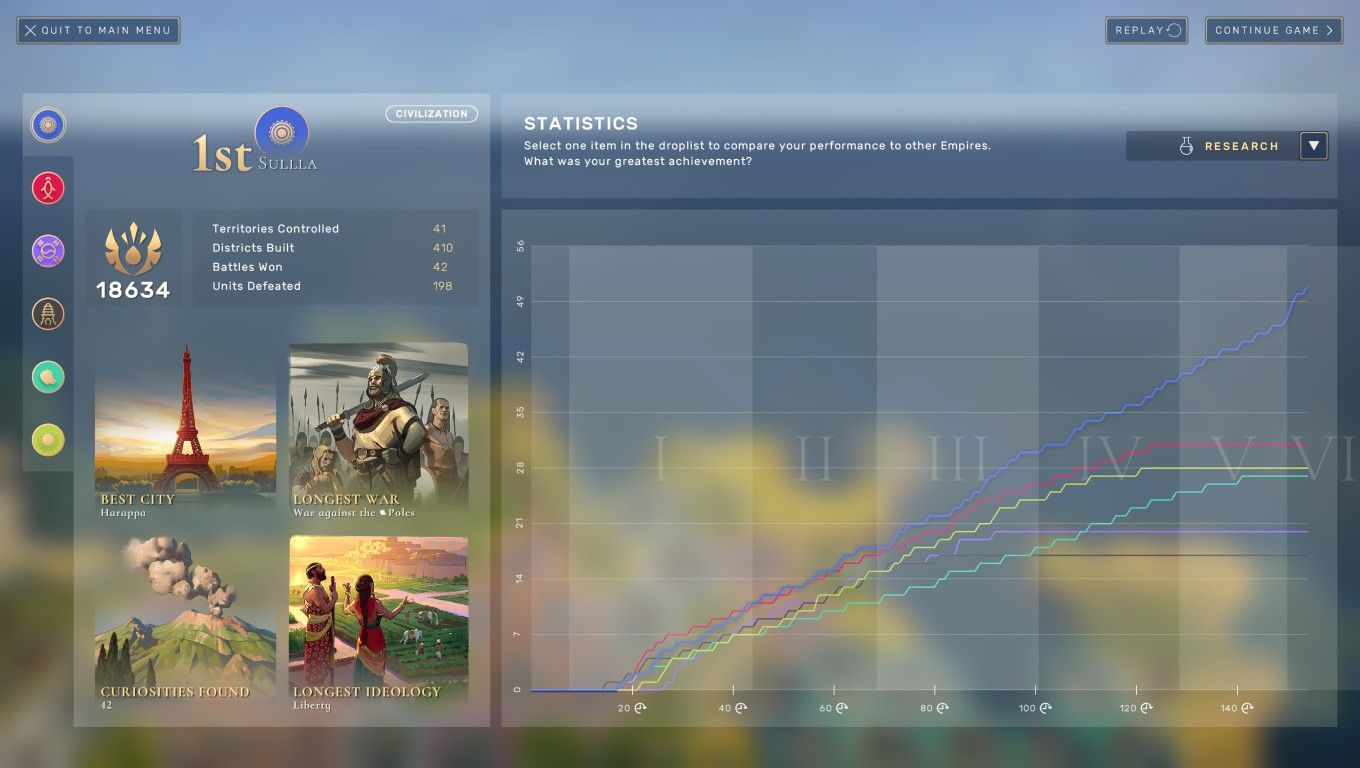
The postgame graphs mostly showed my Harappans pulling away from the field and then growing exponentially upwards as everyone else died. I'm highlighting the Research graph here which tracks the number of techs researched over the course of the game; the AI empires were very competitive in this regard up to about Turn 90 when I completed overrunning Agamemnon's empire. The AI leaders are pretty solid when it comes to the economic side of the game after being loaded up with bonuses on the higher difficulty levels. Again, it's hard for me not to compare them to the Civ6 AI leaders who are laughably bad at both fighting and teching, thereby being unable to pose any challenge at all aside from the early game cheese rush. If anything, I'd like to see another difficulty level added to Humankind that cranks up the AI bonuses further to make for a truly punishing experience.
This was a fun game to play and helped me get a better feel for how to pull off mass conquest after reaching a leading position. Thanks as always for reading and best of luck in your own games!


