
Picking things up in the third world, the Antlion miniboss managed to hit Nelson with Sonic Wave and cut his damage significantly, but it didn't matter because the creature couldn't get through Nelson's physical defenses, and Open Fire worked just fine even at a reduced level. I picked up the Chicken Knife as usual and then had to run away from a lot of battles to power it up. Nelson had been so strong that there had been virtually no retreats up to this point in time in the game. I think the Chicken Knife started with a power of 3, and it took a lot of running away in the desert to get it up to full strength. The Gargoyles outside the Pyramid were a bit tricky, with no multi-targeted abilities for Nelson to employ. I ended up using the poison ability of the Purple shot to get around this issue, damaging both of the enemies to near-death status and letting one expire via poison tick followed by immediately killing the other one with Open Fire. A better solution would have been breaking out the old Slumber Sword to put both of them to sleep. Whoops, forgot about that easy answer to this problem. At least the following Gargolyes outside the other dungeons wouldn't be an issue.
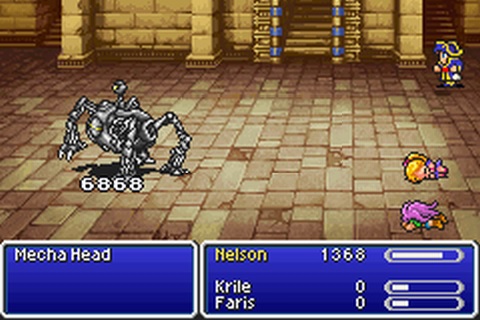
Inside the Pyramid, Nelson continued using Open Fire as usual, and once again ran into few problems. The group of three mummies guarding the save point on the upper floors turned him into a zombie once despite my best efforts, and that was the only real setback. Nelson spent a lot of time fighting that one encounter with four Cursed Ones, with a payout of almost 6000 experience points. For once, the Dark Matter in those chests would be useful thanks to Combine. I also got a kick out of the random stuff that occurred when Red shot would successfully confuse some of the monsters in the Pyramid. The Machine Head robots were fully susceptible to this, and while they normally would attack themselves weakly for about 400 damage, occasionally they would turn the pictured "Strong Fight" against their own programming for a crazy 6000 damage. None of the half dozen robots running around on that one level of the Pyramid were able to defeat Nelson. Red shot also managed to confuse Sekmet when he appeared, leading to the amusing result where Sekmet killed himself and never spouted off his usual line about his brother (the Minotaur) in Fork Tower. There was even a Bandel Kuar in a trapped chest that used the Blaster instant death attack on itself, with the little gray projectile firing off in a wild direction instead of heading for the player like it normally does. I would have screenshotted that if I had been expecting it - too fast for me to capture, heh.

Merugene was also vulnerable to the confusion effect coming out of Red shot. She is the gimmicky "change the weak point" boss in this game, where the player is supposed to test and figure out if she is weak against fire, ice, or lightning in any one particular form, and then use that type of elemental damage. Nelson ignored all that and pounded away with the non-elemental magic damage of Open Fire, helped by Merugene's own confusion. She spent most of the battle sitting there, doing nothing, facing the opposite way in charmed status. This can be a genuinely tough boss for a normal party setup, but for a solo character with the right defensive equipment in place, Merugene is often kind of a joke.
There was little of interest to report in the Solitary Island Temple, as Nelson murdered his way through the defenders with more cannon fire. The most dangerous opponents were the Ixecrators with their various level-based spells. Nelson was able to do most of this dungeon at Level 53, although he had to be wary before and after hitting that particular level. Everything else just didn't pose much of a threat, including the boss. Stalker (Wendigo) occasionally fired off a weak Mind Blast but mostly did nothing while Nelson played whack-a-mole with the fake clones. I think part of the reason why this was so easy was the addition of the Running Shoes, granting permanent Haste status to Nelson. I had given him the Chicken Knife for the +5 Agility, and along with the topline "medium" armor that grants some stat boosts, his Agility was sitting at just under 40 points. That's fast, very fast indeed when combined with Haste status. Nelson could typically get off two rounds of action before the enemies moved once, and four or even five actions before the enemies moved a second time. With Open Fire still mowing down pretty much everything in one or two shots, random encounters couldn't provide much of a threat.
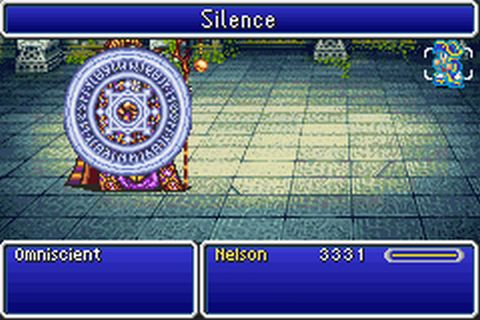
The Minotaur posed no threat, not even forcing Nelson to use a healing item. Omniscient was the more interesting battle as usual, with Nelson having to use some strategy to find his way clear to a victory. I wondered if Open Fire would trigger a use of Reset from the boss, since the Cannoneer job is not supposed to be unlocked at this point in the game, and yes, it did. Omniscient must be coded *NOT* to use Reset if hit by certain spells, but to restart the battle under any other conditions. That meant falling back on the usual strategy of trying to Mute/Silence him and then attacking in the interval while Omniscient was blocked from casting Reset. The combination of the Bone Mail and a Wall Ring left Nelson impervious to damage, so the whole battle was focused on working around that Reset spell.
I found that Omniscient would fall into certain patterns of spells, proving that the random number generator (RNG) was not perfectly random here. If Nelson stood in place and took no actions, Omniscient would cast the same eight spells in a row, over and over again, in the same sequence every time. There was one point where Omniscient was using Mute as one of those spells, and Nelson could get in a shot with Open Fire immediately afterwards. We repeated this dance about half a dozen times in a row, with Nelson pulling a Black shot that did exactly 889 damage every single time, and I was thinking that we could do this until the fight was over. Then the RNG sequence broke somehow and Nelson pulled out an X shot instead, followed by Omniscient using Reset. Perhaps I waited too long to input the command? In any case, that plan was out.
That meant returning once again to reflecting a Mute spell out of the Mage Masher dagger off of Nelson's own Wall Ring, then attacking while the status still applied to the boss. In order for this to work, Nelson had to be in Haste status and Omniscient had to be in Slow status. I've noticed the same combination with other solo characters, and there isn't enough speed to pull this off unless those specific buffs are in place. Nelson could attack himself endlessly with the Mage Masher and take no damage thanks to the Bone Mail, which meant this was just a matter of having the patience to keep self-attacking until the spell reflected correctly. Then I would get in exactly one Open Fire shot before returning to the same process again. I soon realized that attacking with the Chicken Knife from the front row was a better option, as that did over 2000 damage, and even with the Flee effect kicking in occasionally it was a higher overall DPS output. I typically had to self-attack with Nelson about five or six times in order to get a Mute spell to land correctly, then swap to the Chicken Knife, attack once, swap weapons back again... it was tedious.  That cursed Regen status on Omniscient was ticking back 175 HP every few seconds, and it dragged this out enormously. I often felt like Nelson was walking on a treadmill, his damage being canceled out entirely by the boss regeneration. (Where was my Prevent Monster Heal javelin from Diablo 2?) Finally, Omniscient started casting Fire/Ice/Bolt 3 spells, and I knew that he was almost dead. Nelson even managed to Mute the boss and get the kill with the Chicken Knife, blocking Omniscient's final Flare spell from going off. Ha! This all could have been done much more easily by simply running the emulator on Fast Forward for a little while until Omniscient blew through all his magic points, but I always prefer to get the "real" kill if possible with solo characters. Much more satisfying to do it the hard way.

The Underground Trench was the first place where Open Fire felt like it was falling behind the curve on damage. Oh, it still worked perfectly fine, and Nelson took very little damage aside from the lava floor tiles. However, with all the monsters in Shell status the Black/Purple shots were only doing about 900 damage apiece, and that meant three or more shots needed to kill each enemy. The enemies were also immune to almost all of the status effects, with the one exception of the Worm Unknowns being susceptible to confusion. Battles were long, grinding affairs where Nelson might have to use Open Fire a dozen times to achieve victory. They were still worth fighting since the payout was often 4000-5000 experience points. All of it just took a while to play out. The ending boss trio couldn't hurt Nelson thanks to the combination of the Aegis Shield, Flame Ring, and Bone Mail. I was feeling tired and just Odined them to death with the Magic Lamp rather than wear them down individually.

Istory Falls was back to the normal pace of the third world, a healthy and safe wrecking ball crashing through all obstacles. Nelson's fast leveling pace had the Open Fire shots continuing to increase in damage, now with the common Black and Purple shots finally reaching about 2000 damage apiece. It was remarkable how they had continued to scale throughout this whole run, obviously falling behind as compared to the scaling up of monster health but still remaining completely viable. 2000 damage from the safety of the back row, with Aegis protection, is more than enough to finish the entire game. Nelson only had to use five or six Hi Potions to make it through the whole area. My favorite moment was the one captured above, when an Aquagel was confused from a Red shot and decided to hit all of the enemies with an Aqua Rake spell. Very colorful, if not exactly deadly. As for Leviathan, Nelson selected his equipment specifically to counter the enemy's threats, taking the Coral Ring over the Running Shoes and the Ice Shield for greater physical evade. I specifically did not want Nelson blocking any Tidal Waves with the Aegis Shield, since they would now be healing Nelson instead of damaging him. The first Open Fire attack came out as a Black shot and immediately put Leviathan in Darkness status, granting Nelson something like 90% physical evade. That stopped Leviathan from landing any melee blows, and his Tidal Wave damage was also neutralized. That left the boss with... nothing, really. He could use a weak Aqua Rake for about 250 damage on occasion, and try to Entangle Nelson, which also never successfully hit due to being stopped by permanent Haste status. It was amazing how Leviathan was completely helpless here, and a series of Open Fire shots soon hung the big fish out to dry.
With all four dungeons completed in the third world, Nelson could finally acquire the actual Cannoneer crystal shard. In order to do this, he had to claim all 12 Legendary Weapons from Kuzar Castle, as that's the trigger that causes the underground shrine to appear, the place that only exists in the GBA remake. Nelson went ahead and did this, grabbed the three new jobs in the crystal shards, and then searched out the most important thing: the merchant who sells ammunition.
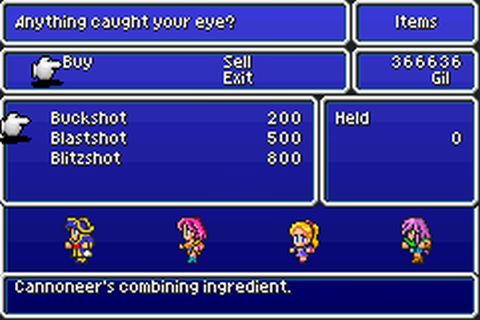
Hey, remember that Combine ability? The signature move of the Cannoneer class? Nelson had unlocked it early in the third world, and been unable to use it due to a lack of the relevant ammunition types. Finally, Nelson would be able to use his Combine attacks for the last dungeon. Time to have some fun.  I immediately loaded up on 99 ammunition of all three types, followed by traveling around the world to purchase 99 of the various Chemist-only drinks and Ninja scrolls that are also sold in stores. The only Combine materials that I was missing afterwards were the ones that drop from enemies, Turtle Shells and Dragon Fangs and Dark Matter. I did a little bit of fighting to pick up some of them as well, enough to ensure that I could get through the final dungeon without running out. Dragon Fangs in particular would be highly useful for some of the battles that were yet to come. Here's the appreviated list of Combine attacks; I'll save space by posting only the "Blitzshot" versions. Use of the other two types of shot generally does the same thing, only dealing less damage in the process.
| Attack Name | Combine Materials | Attack Value | Element/Status |
|---|---|---|---|
| Flame Cannon | Blitzshot + Flame Scroll | 220 | Fire |
| Water Cannon | Blitzshot + Water Scroll | 220 | Water |
| Spark Cannon | Blitzshot + Lightning Scroll | 220 | Lightning |
| Dark Cannon | Blitzshot + Ash | 200 | Darkness |
| Normal Cannon | Blitzshot + Shuriken | 210 | Darkness |
| Killer Cannon | Blitzshot + Fuma Shuriken | 215 | M = M*2 if Human |
| Slow Cannon | Blitzshot + Turtle Shell | 200 | Slow |
| Dragon Cannon | Blitzshot + Dragon Fang | 215 | M = M*2 if Dragon |
| Dark Cannon | Blitzshot + Dark Matter | 185 | Death |
| Quake Cannon | Blitzshot + Goliath Tonic | 215 | Earth |
| Power Cannon | Blitzshot + Power Drink | 200 | Berserk |
| Vulner Cannon | Blitzshot + Iron Draft | 200 | Def+M.Def/2 |
| Silver Cannon | Blitzshot + Speed Shake | 200 | Old |
| Divine Cannon | Blitzshot + Hero Cocktail | 225 | Holy |
| Needle Cannon | Blitzshot + Gold Needle | 3000 damage | |
| Mini Cannon | Blitzshot + Mallet | 175 | Mini |
The general pattern should be pretty clear from the table. Each shot has a base attack value roughly around 200, comparable to the 215 attack value of the rare X shots from Open Fire, and each one has some other elemental property or status effect that it can inflict. The multiplier formula is exactly the same as the one used by Open Fire, M = (Level * Level) / 256 + 4, and the damage from Combine is also treated as magic in nature. Combine would give Nelson much more flexibility than Open Shot, allowing him to pull an effective X shot in terms of damage every time, while choosing between many different effects from the projectiles as needed for that particular battle. The one downside was the need to manage the ammunition; even with 99 shots, that would go fairly quickly if used with reckless abandon. I also quickly realized that Combine had a long animation of the cannon firing each time that Nelson used it. That was awesome on the first shot, and then quickly started to grow tedious thereafter. The designers should have reigned themselves in here a bit.
Since Nelson was in little danger from random encounters, I continued to use the Experience Up ability and relied on Open Fire to deal damage. Then when he reached boss battles, I would swap over to Combine to get all of the various special effects. This saved ammunition and kept the XP gravy train rolling in - bosses never provide gold and experience in Final Fantasy 5, only ability points. I also took a lot of pictures during the endgame boss rush to try and show off the various Combine attacks. Here was the first token boss:

Calofisteri was classified as a Human in the game's coding, and that meant the use of Killer Cannon by using one of my rare Pinwheels (Fuma Shurikens). There would be a few more of them in the upcoming Void section of the final dungeon to claim. When using Combine, the little cannon fires followed by a huge series of colored fireworks, and then the spell effect itself followed by a damage printout. The fireworks are paired to the color of the attack being used, and this Killer Cannon shot produced white explosions. As for the damage output, dealing close to 8000 points was far more than Nelson needed here. He could have won easily with Open Shot, which I went back to using after this picture to save Blitzshot ammunition. Heck, he probably could have won by using his fists and holding down Fast Forward on the emulator. Calofisteri was never going to kill Nelson so long as he wore the Bone Mail. This was more of a test run for Nelson's new ability than anything else.

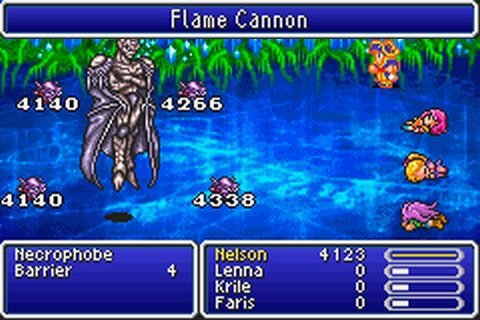
Next up was Apanda, where Flame Cannon was the order of the day to make use of his well known weakness to fire. The revamped Byblos fell extremely easily, with three shots doing him in. Well that was fast. Monsters with some kind of elemental weakness were little more than roadkill in the face of Combine's power. Those who lacked easily exploitable weaknesses would be more difficult, but only slightly so. Nelson had nearly 4000 HP, permanent Haste status, the Aegis shield, and back row protection. There wasn't a lot that could put him in real danger.

The elemental weakness of Apocalypse is poison, which wasn't an option for Nelson here. Instead, I fell back on the shot that had the highest base damage output, the Divine Cannon's holy element damage from combining a Blizshot with a Hero Cocktail. This time the fireworks were a whiteish blue color, and they predictably did almost exactly half the damage that I had seen earlier when targeting elemental weaknesses on the last bosses. It was too bad that Nelson couldn't equip any Rods or Staves and get the Magic Up property for some of the elements. Apocalypse was trickier that poor Apanda, and he killed Nelson on the first attempt by landing a Condemn spell. No such event occurred in the second battle, and that was enough to achieve a victory. I considered trying the Vulner Cannon to try and cut his high magic defense, but the Vulner Cannon didn't seem to do anything when I tested it earlier. Is this bugged (?) There isn't enough information in the new Algorithms Guide to say. The Divine Cannon shots ended up working well enough.

Apocalypse was protected against both Slow and Aging statuses. Catastrophe was not, and Nelson took full advantage of this by plugging him with both Slow Cannon and Silver Cannon shots. The ability to inflict Slow status is one of the best possible aspects of the Combine skill, and Nelson would have killed for that earlier in this solo run. By now, most of the bosses had immunity to it. In the cases where they lacked it though, Nelson could grind their movement to a halt and get the 4x movement speed edge by combining Haste and Slow together. My solo Time Mage proved that you can do the whole game on little more than those two spells. The other nice thing about the Combine shots is that they do damage at the same time that they inflict status ailments. Slow Cannon not only put the brakes on Catastrophe, it also dealt 3500 damage at the same time. For an opponent with 20k health, that was a pretty good blow in and of itself. Catastrophe only managed to get off one Earth Shaker before dying, and that was easily handled even without Float status.

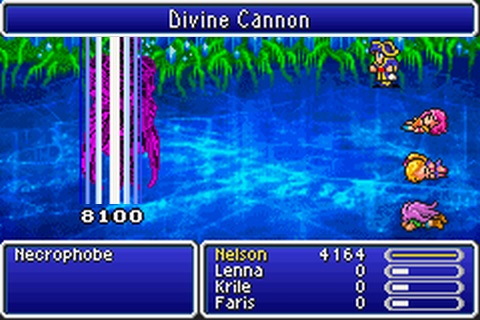
Halicarnassus could turn Nelson into a frog, but that wasn't enough to stop him from using Combine. The mechanics here are not consistent at all; Toad status blocks the damage from Open Fire, and yet it doesn't do anything to affect Combine. How the heck were these two abilities programmed?! I wonder if that was a mistake. In any case, Nelson did the whole battle as a frog without issue, first Slowing the boss and then following it up with a bunch of Divine Cannon shots to pile on the damage.
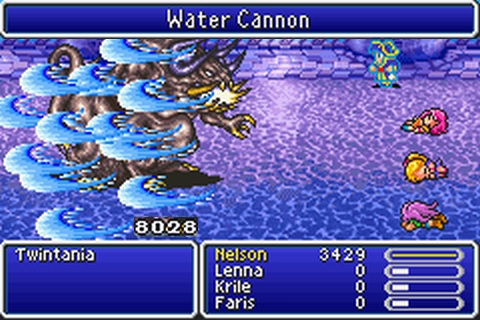
Twin Tania has a weakness to both Water and Holy elements, the two associated with Leviathan and Bahamut. This makes a kind of sense because Twin Tania is supposed to be a combination of their respective powers. Nelson had to go into this encounter with a Wall Ring instead of his usual Running Shoes because magic damage has a chance to trigger a Mega Flare counter attack from the boss. Fortunately Nelson could immediately put Twin Tania into Slow status, and that essentially restored the speed dynamics back to normal. The Water Cannon shots exploded in blue fireworks, and then played the same animation used for Leviathan's Tidal Wave. These attacks dealt double damage by taking advantage of the elemental weakness, and Nelson was right back to those lovely 8000+ numbers once again. I was planning on using a Dark Cannon shot to deal instant death when Twin Tania reached his "Charging up for Giga Flare" form (which is vulnerable to pretty much every instant death move in the game), only to find that Nelson never reached that point. His Water Cannon shots banged out the required 50k damage to kill Twin Tania before reaching that point, and it wasn't especially close. Very nice.
I did go ahead and steal the Genji Shield from Gilgamesh in the Void in case Nelson would want to use it. The Aegis Shield would be mandatory for the final Exdeath duel, but who knows, I could swap in the new shield in the second half of the Necrophobia battle for potential extra physical evade. Better to have it than not have it. The enemies in the Void section never provide experience, only gold and ability points, which meant that Nelson was back to using Combine again on a permanent basis. It was still better to run from most battles though in order to save ammunition.
Nelson broke out the elemental cannon shots again to deal with the four Barriers, and the damage that they put up was quite impressive. This is something that I haven't done a good job of highlighting thus far, because I was only using Combine against bosses and most of them were single targets. The Combine shots will hit everything on the battlefield, in contrast to Open Fire which is single target only. That makes this ability much stronger, and similar to Summon magic by hitting all targets without losing any strength. Despite the pretty picture above, I actually screwed up a bit here. I should have been using Divine Cannon, which has just slightly more attack power than the Fire/Water/Lightning Cannon shots at 225 to 220. This mattered because the Barriers have 8800 HP apiece, and two Divine Cannon shots likely would have killed them instead of leaving them alive in near-death status. All of them managed to get off an initial spellcast against Nelson, and those four Flare/Holy spells from the Barriers left him alive with 31 health left. 31 points out of 4123 total HP!  I guess fighting all those random battles throughout the game and keeping Experience Up in place had a purpose after all, heh. Nelson was Level 61 and would have died if he had even one less level due to a lower max HP pool. This was still the wrong answer, however, and I should have been using the slightly stronger cannon shot to get the two hit kill on these enemies. Shell status would have been really nice here. Anyway, an Elixir followed by another cannon shot polished off the Barriers and triggered the second half of this battle:
Necrophobia is weak against all eight elements, and it was a matter of picking whichever one I wanted to employ. Divine Cannon's holy element did the most damage, and Nelson only needed four shots to trigger Gilgamesh's appearance and conclude the battle. This was nice and easy, with no appearance of the Maelstrom/Vaccuum Wave insta-kill combo. Nelson did try to steal the Genji Armor from Gilgamesh, without success. He couldn't have equipped it though, and it didn't particularly matter.
That left only the final battle itself. I had been thinking about how to play this one while traveling through the last dungeon, and I thought that I had a strategy here to get it right on the first try. Nelson prepared himself for the climactic struggle by equipping the Chicken Knife (purely for +5 Agility), the Aegis Shield (White Hole defense), the Running Shoes, and one more particularly special item. I had made it up to the Apocalpyse save point in the Dimensional Castle when I suddenly realized there was one piece of equipment that the Cannoneer could wear that had a Magic Up property on it. I walked all the way out to buy it, then returned to the rest of the boss rush. That was the Gaia Gear armor, part of the "light" armor set that the Cannoneer can also use, and now it was about to pay off:

Boosted by the Gaia Gear, Nelson's Quake Cannon went from doing about 4000 damage to dealing about 6000 damage, and it made a real difference. (This would have been real nice against the Barriers if they weren't in permanent Float status, rendering them immune to earth element damage.) Quake Cannon had the longest animation sequence I had seen yet, first blowing up a series of brown fireworks, followed by the same animation used by the Geomancer's "Cave-In" move that occasionally appears from their Terrain ability, and then eventually the damage printout. Dealing this much damage allowed Nelson to cycle quickly through Exdeath's three AI sequences, avoiding the Condemn spell that can appear in the second AI sequence and never letting Exdeath get a chance to act in the third sequence where he can pull out the Meteor spell. With White Hole blocked by the Aegis Shield, that neutered most of the threat in this first part of the battle. Nelson used one Elixir to restore health from the Flare spell that opened Exdeath's second AI routine, and otherwise fired Quake Cannon shots until the big tree wilted.

I had planned out a series of attacks that would remove most of the threats from the Neo Exdeath fight as well. Nelson first used the Magic Lamp to pull out a prearranged Odin spell, instantly killing off Part #4 as all of my solo characters will do. Then he used one of the two Soot/Ash particles in his inventory to fire off a Dark Cannon shot. The animation here had a dark gray puff of smoke appear, which I did manage to capture in the screenshot above, if you look closely. The Dark Cannon appropriately inflicts Darkness status on the target, and Neo Exdeath Part #3 (the physical attacking part) is vulnerable to this status. It worked like a charm, and Nelson immediately had about 85% physical evade that couldn't be Dispelled away for the rest of the battle. Along with being in the back row, this completely removed all danger from the physical part; it would land a single hit during the rest of the struggle while missing everything else. One threat neutralized.
With Nelson's robust health pool, the occasional Almagests were also easy to plan around. A 1600 damage attack that can be seen coming a mile away doesn't matter when your character has more than double that amount of HP. That left the Grand Crosses out of Part #1 as the only remaining danger, and Nelson had an answer there too:

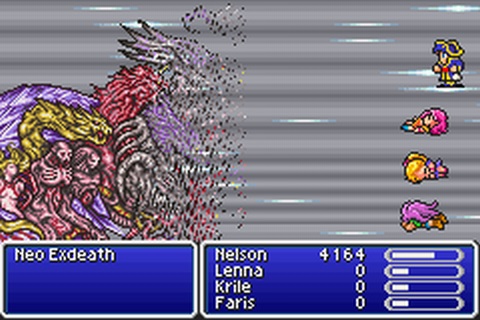
This part is classified as a Dragon in the game's coding, and that meant double damage from Dragon Cannon shots. Longtime readers might remember that my solo Dragoon was able to use the Dragoon Spear to achieve much the same thing. Even better, Dragon Cannon also hit the other two Neo Exdeath parts at the same time, albeit for normal damage as opposed to double damage. Part #1 does nothing other than use Grand Cross, but it actually has three separate AI scripts whereby it starts using Grand Cross more frequently as it decreases in health. By dealing a lot of damage in a hurry, however, the player can keep triggering the new AI sequences and forcing the part to start over again each time, delaying the appearance of that first Grand Cross. Because Nelson was smashing this part so badly with his repeated Dragon Cannon shots, he managed to kill it off before it ever used Grand Cross. Ha! Such much for the big dice roll. The only remaining challenge was defeating the last two parts at the same time to avoid any potential Meteor appearances, so I had Nelson attack Part #2 a couple times to even it out with Part #3. The Almagest part has 55k health as opposed to 50k on the physical part, making this easy to do. Then it was a series of Gaia Gear-boosted Quake Cannon shots for the maximum damage possible, with a very wide margin for error. Both parts dropped at the same time on a 6000 damage shot, for a perfect victory on the first attempt:
Just as planned. 

Overall then, the Cannoneer is a very, very strong class indeed. I wouldn't put this in the highest tier along with the Samurai or Ninja, but it definitely ranks just below them, on par with powerful classes like the Mystic Knight or Hunter. Open Fire is easily strong enough to be used to clear the entire game, and Combine adds a lot of lategame power and flexibility on top of that. One of the few weaknesses of this job is the lack of multi-targeted damage from Open Fire, and Combine solves that issue splendidly. If there's a problem with this class, it's the necessity of being tied to a limited quantity of ammunition, and the lower raw damage potential as compared to some other classes. Opponents that lack an exploitable elemental or status weakness don't take as much damage from the Cannoneer as from other classes. Now again, the 4k damage those Combine shots were doing as a base value are more than enough to beat the game. More than enough. I'm only comparing this to the game's other best classes, like the Ninja who was throwing 8000 damage Pinwheels in my solo game despite being 7 levels lower than Nelson, or the Samurai who can GilToss and Slash everything into instant death without even thinking about it. The Cannoneer isn't quite in that league, but it's not far from it. (The Cannoneer is the best of four new GBA jobs though. Yes, this one is stronger than the Gladiator.)
The only other place where this class falls short is in comparison to the Chemist, and that's not really a fair comparison. The Chemist Mix ability is ludicriously broken in practice, allowing the player to access all sorts of normally forbidden abilities and make the Chemist an invulnerable god of battle. Free Haste/Armor/Shell status? Check. Double your max HP? Check. Protection against every element and every kind of instant death spell? Check. Increase your level in battle, up beyond Level 99, to a theoretical Level 255? Yep, that's allowed. No, the Cannoneer can't do any of that stuff, but frankly the Chemist shouldn't be able to do so either. FF5 was a game created in the pre-Internet era, and the power of the Chemist class was supposed to be reigned in by the fact that players would have to figure out the Mixes themselves through trial and error. At the time, no one expected that players could grab every Mix off an Internet FAQ and immediately torch the rest of the game. The Cannoneer's Combine is basically a do-over of the Chemist's Mix, what the ability should have been if the designers had been able to anticipate the future. It's powerful without breaking the game apart, right where it should be.
Despite my best efforts at brevity, these reports always seem to be getting longer. Apparently I enjoy writing about these games a little too much. As always, thanks for reading to the end. 


