
 |
|
|
A Fal rune unexpectedly dropped from Nihlathak when he collapsed into defeat. That gave WillPower a pair of Fal runes which meant that he was only missing a single additional rune of that type from being able to Cube them into a Lem rune and then combine it with one of his two Ko runes to upgrade Durga's unique armor to its elite item equivalent. The odds of another Fal rune (or the Lem rune itself) appearing in the small remainder of Act Five yet to go were pretty small, however I saw that my previous character Corvus did have an extra Fal rune sitting around in stash. Hmmm.... well, I always wanted to get a chance to use that Cube recipe and Corvus had already donated the Gul rune for WillPower's Principle runeword armor. I might as well take advantage of this opportunity and see how it went:

There was the Cube recipe in action, Ko + Lem + Perfect Diamond to upgrade Shaftstop from a mesh armor into a boneweave. The defensive rating more than doubled in the process and Durga's overall defensive rating increased to just under 10,000 when he had his Defiance aura running outside of town. I had a chance to test the effectiveness of this new armor upgrade back in the Halls of Pain where WillPower still needed to clear out that missing top portion of the minimap. My verdict was that the upgraded armor was definitely an improvement in terms of Durga's tankiness, enough to be noticeable in a number of places, but still nowhere near enough to make him truly sturdy. The damage from monsters in Hell is simply too high in this game for anything to tank for very long; even my werebear character Bearlin_Wall with 4000+ health from Oak Sage couldn't stand in a fight for more than a handful of seconds. There are also tons of attacks in Diablo 2 that ignore Defensive Rating completely which is a huge reason why this stat is generally pointless to itemize. This made me feel a bit better about making the upgrade for Durga as it had been a fairly modest improvement to the larger situation.
As far as the remainder of the Halls of Pain went, the first map that I rolled had minotaurs and grotesques and zealot/hierophant pairs. Those were literally all of the worst monsters possible to draw there - no thanks! The second map had a much more reasonable combination of zealot/hierophant groups, Blood Clan goats, and Infidels. Everything other than the goats liked to run away from WillPower when they dropped low on health although fortunately I found that the many dead end spaces in the Halls of Pain made it relatively easy to corner the zealots and prevent them from running back to their hierophant protectors for healing. Durga was able to tank against as many as half a dozen goats without issue as this was one place where Defensive Rating actually did something. There were a couple of lively fights in here, including one against an Extra Strong / Cursed goat who packed a real punch, but these monsters weren't too bad overall and WillPower cleared out the remainder of the floor without facing any truly dangerous battles.

I started up a new session to tackle the last outdoor area of the act in the Frozen Tundra. This tends to be an easier section due to the big open spaces and the enemy mix proved to be highly accomodating as well. The Tundra had Demon Rascal imps, Carrion Bird vultures, and Death Berserkers like the Extra Strong / Fire Enchanted / Magic Resistant customer pictured above. Everything here was an easy customer to kill with low health and little lightning resistance to stop the damage from Holy Shock. I've mentioned this before but the imps were a true joke with only 3000 health and 25% lightning resistance, they would die in as few as four or five pulses of Holy Shock which was nothing short of incredible by now. This was a great opportunity to clear out the Frozen Tundra and WillPower blazed right through the place as if he were back in Nightmare difficulty again.
That luck continued in the Infernal Pit subdungeon where WillPower was lucky enough to fight against more imps, vampires, and Salamanders with fire element Bone Spears. Once again everything was weak to Holy Shock's lightning damage and I managed to dodge the minotaurs and balrogs and oblivion knights that can all spawn as opponents in this little subdungeon. Maybe this was karma paying WillPower back for the brutal opposition he had faced in some of the previous parts of Act Five. In any case, I certainly wasn't complaining and quickly cleared out the Infernal Pit in something like 20 minutes of real world time, blazingly fast by WillPower's standards.
Now he had to make it to the Ancients Way waypoint to secure his progress for the night, and unfortunately WillPower's luck ran out at this point:

My Paladin came down the entry stairs and turned to follow the corridor on the right. At the very first intersection, he ran into a clump of Spike Fiend quill rats packed together, and immediately the Cursed aura went off upon being hit. It was a boss pack, sure enough, with the traits being Fire Enchanted / Multishot / Cursed for a truly nasty combination. Durga died before I even knew what was happening and it seemed like a good idea to retreat backwards for now and try taking the south path instead. Well that sounded like a good plan, except that mere steps to the south brought out a pair of minotaurs, both of them minions, which meant that there had to be a boss nearby in that direction as well. There was absolutely no room to maneuver whatsoever as I was terrified of waking up more enemies and thus WillPower and Durga were forced to fight right next to the entry staircase. Two minotaur minions might not sound that bad but they repeatedly killed Durga and nearly got WillPower himself on several occasions! Their damage output was completely nuts, treating Durga's 10,000 Defense rating as if it were tissue paper, and the mercenary could only tank for a few seconds before we had to flee back to town for healing. Back and forth, back and forth, through the portal and back again, trying to last for as long as possible before pulling Durga to safety. It took about a dozen repetitions before one of the two minotaurs was finally gone, then the other could be killed much more safely thereafter. Sheesh, can we enter the level safely now?!
These minotaurs were specifically Hell Lords: almost 16,000 health on average, Lightning Immune, 50% fire resistant, plus insane damage when they had their Frenzy attacks charged up. I tested and Durga could not tank them even 1 vs 1, he would slowly bleed out his health unless I fed him red potions. He could handle two normal enemies at once but that was the absolute limit; trying to face two minotaur minions with their higher stats really wasn't something that he could do but WillPower willed him to get these initial kills anyway. In terms of clearing the dungeon, there was no chance to move further south because whatever minotaur boss was over there would surely be worse than its minions. The only option was going back to the east again, running PAST the Cursed / Multishot quill rat boss, and hoping for something easier on the other side. The quill rats are largely stationary opponents and the boss didn't chase me, allowing WillPower to head further east and find...

Another quill rat boss, are you kidding me?!  At least this one had less dangerous traits but still, come on dude! It turned out that the Ancients Way was packed with these Spike Fiends from end to end, always appearing in big packs to turn their encounters into veritable firing ranges. With absolutely no ranged attacks outside of his Paladin auras, WillPower could only stand around waiting for the things to wear down from Holy Shock damage and toss potions Durga's way when he tried to melee them. Most of the fights became wild suicide charges as Durga ran up into their faces and I shoved red potions at him, followed by a retreat back to town for healing, then back again in endless waves. There was no other way to make progress since the quill rats kept inflicting poison with their shots and Durga couldn't survive more than a handful of seconds at a time. The tactic did work and I did slowly clear out the cavern of these things even as the number of trips back to town bordered on the absurd. At least the third monster type was cold skeleton mages who were completely feeble and died in mere seconds thanks to having no protection against Holy Shock.
WillPower fought three Spike Fiend bosses in succession, and a champion pack, before making it to the end of the hallway where the entrance to the Icy Cellar was located. Then I began working my way clockwise along the edge of the cavern, filling in parts of the map to avoid being flanked while still looking for the waypoint since it always appears at one of the edges of the area. I uncovered more and more of the Ancients Way without finding anything and eventually came back to the entry area again. I finally found that original minotaur boss who turned out to be Extra Strong / Extra Fast / Fire Enchanted - holy cow! Thank goodness WillPower didn't wake him up earlier because that would have been a game over situation, abandoning the whole level being the only solution. Even with most of the floor available for safe retreat room, Durga died in a split second and then WillPower was running for his life. The Fire Enchanted property made this guy Fire Immune + Lightning Immune, plus he was unbelievably fast and strong. Since he was immune to Holy Shock and Holy Fire, and waaaaaaaaaay too deadly for Durga to fight, the only option was portal parking him over by the Icy Cellar entrance. That was one boss WillPower wasn't going to be able to kill.
For the remainder of the level, WillPower finally made it back to the Cursed / Multishot quill rat boss and killed its minions by flanking from a side tunnel, then took down the blasted thing itself in isolation. It was simply not possible to kill that boss with a frontal assault, the damage was too great and it had to be defeated via a sneaky side approach. There was only a small southern area yet to be completed and shortly thereafter WillPower had the full map clear:

That is, aside from that minotaur boss who was never going to see the light of day again. I didn't find the waypoint until the very last room of the Ancient Way, which figured, as otherwise I could have stopped and potentially rerolled another map with an easier monster assortment to clear the remainder. The timestamps indicated that it took about 90 minutes to full clear this area and WillPower was very fortunate that there were no other minotaur bosses or champions outside of that initial one. This is a good example of how a bad set of monsters, combined with bosses rolling unfavorable traits and placed by the map generator into spots right next to the entrance, can work to create a truly deadly situation. This was about as ugly as Diablo 2 gets outside of outright stairs traps and I was pleased that WillPower managed to navigate a path through it at the cost of only a few full rejuv potions and a growing pile of Durga resurrection bills.
I would have liked to finish the Icy Cellar in this same session since the Ancients Way was fully cleared, however it was simply getting too late and would have to wait for another day. On the minimap above, the Arreat Summit was the staircase just a short hop from the waypoint while the Icy Cellar was the one all the way up at the top of the screen. On the return trip, WillPower found that the Ancients War was populated by Afflicted with their lightning shots, Dark Lancer corrupted rogues, and the cold-tossing bone mages back again. No more minotaurs, no more quill rats - hooray! That made it an easy task to fight back to the Icy Cellar entrance again, helped by knowing exactly where it was located on the map.

Like the Drifter Cavern, the Icy Cellar is always dangerous because of its cramped nature and the numerous bosses contained within. WillPower and Durga slowly crept forward upon entry, not wanting to wake up too many monsters at once, and immediately found an Abominable yeti boss located on the other side of one of the ice flows. The big creature couldn't touch my Paladin from over there and I was content to burn it and its minions to death with Holy Fire before taking any further steps into the cavern. I headed to the north side of the Icy Cellar from there since it tends to be less crowded with enemies, discovering that the other two opponents were Frozen Terrors and Hell Temptress witches. That was great news as there were no minotaurs present, and yes, they can spawn down here too. I had WillPower clear out the narrow pathway that runs along the top of the cavern, defeating a bunch of witches in the process while working over to the gold chest defended by Snapchip Shatter (who had the amusing Multishot trait for triple Arctic Blasts). Once that was a secure retreat area, I edged WillPower down to the south side of the cave which was indeed the most tightly congested area, with three different bosses in the region. That screenshot above captured some of the chaos and I was happy to be able to retreat northwards when things got a little out of hand. Fortunately the yetis and ice monsters were enemies that Durga could tank against without much trouble and finishing up the rest of the subdungeon wasn't too bad. This could have gone much, much worse. (I have had games where there are double minotaur bosses attacking your character at the staircase while witches drop their Amplify Damage curse on you - good luck with that!)
There was time enough remaining that I thought I'd try to face the Ancients as well in this session. This was the remaining boss that was causing me the most consternation due to WillPower's weak offensive setup. Generally speaking, the weaker the character in Diablo 2, the more they have to return to town by using it as a crutch for health restoration. And as anyone reading this report knows by now, WillPower went back to town a lot. Like - A LOT. That would be off limits for the Ancients as any trip back to town resets the encounter and forces the player to start all over again. I also knew that Durga would kick the bucket almost immediately and then WillPower would be on his own, needing to defeat all three of the barbarians with only the resources he had on hand. I did my best to prepare the Arreat Summit with dozens and dozens of red potions on the ground along with filling up WillPower's inventory. I had a plan in mind for how to tackle these foes, now it was time to see if I could execute it properly.

First I needed to check the boss affixes on the Ancients to see if it was necessary to reset the battle. If they spawned with Cursed or a Might aura or had double fire/lightning immunities then WillPower would need to open a town portal right away and start over again. That turned out not to be necessary as this was a playable draw: Madawc had the pictured Spectral Hit / Cold Enchanted while Korlic had Spectral Hit and a useless Blessed Aim aura and Talic had Extra Strong / Cold Enchanted traits. Durga bought me enough time to confirm that these were viable boss traits and then he hit the dirt leaving WillPower alone to face his opponents. My strategy was to focus on defeating Madawc first; the axe-tossing barbarian has the only ranged attack among the three and I thought it would simplify matters to get him out of the way quickly. The one problem there was the fact that Madawc is always Lightning Immune to rule out Holy Shock, and he had further rolled Spectral Hit trait which grants some additional resistances. Madawc has a base 50% fire resistance which was boosted further by that trait along with the 115,000 HP shared by all three of the Ancients. With Holy Fire hitting for roughly 500 damage on average before resistances were applied, this was clearly going to take a while.
So off we went running in endless circles around the pillars of the Arreat Summit. The Ancients will chase your character mindlessly while spamming their respective abilities and the whole thing looks pretty silly to watch. It was no laughing matter for WillPower though as he could not go back to town for healing and had to rely on his saved up red and purple potions if he took damage. I quickly discovered that the Cold Enchanted trait on Madawc was extremely dangerous because it caused his axes to slow on hit. Getting chilled meant that Talic could catch up to WillPower and start Whirlwind spinning on top of him which was extremely bad news; I had to drink two full rejuvs when that happened the first time and it was a close call on avoiding outright death. Then there was the matter of pathfinding around the crowded Arreat Summit for long minutes on end without ever misclicking or bumping into one of the terrain features by accident. I know, it SOUNDS simple, just keep running in circles while Holy Fire kills everything. But can you keep doing that perfectly for 5 minutes, 10 minutes, 20 minutes, without ever making a mistake? My hand started cramping up after a while and there was one point where I mismoved WillPower only to eat another Talic Whirlwind and have to drink two more full rejuvs to avoid death. Trust me, doing this for long minutes on end was harder than it sounded.
Fortunately the Ancients do not regenerate health so I knew that I was making progress at a snail's pace. I started at 3:11 PM on the clock and by 3:30 PM Madawc was finally getting low on health. He collapsed into a statue at 3:37 PM after 25 full minutes and I could finally swap over to Holy Shock:

Korlic had been very slowly taking damage from Holy Fire that whole time, though his healthbar barely moved thanks to having 70% base fire resistance and then Spectral Hit trait adding even more fire protection on top of that. Talic had taken no damage at all by virtue of being Fire Immune, however he had only 50% lightning resistance and started taking much more damage once WillPower swapped over to Holy Shock. In fact, I realized about this point that I had approached this battle the wrong way: Talic did the most damage thanks to his Extra Strong trait and also had the least elemental protection. I should have used Holy Shock at the outset and eliminated him first before going after the other two. Oh well, too late now. I was very careful on my pathing of WillPower and I didn't let Talic get into range for another deadly Whirlwind. This was also easier with Madawc eliminated as I didn't have to dodge chilling axe tosses. In contrast to needing 25 minutes to defeat Madawc, Talic required a mere 9 minutes before becoming a gold statue once again.
Now I could let out a sigh of relif. Korlic was the only remaining Ancient and he was by far the least dangerous, jumping around with his Leap Attack which was never going to do anything to WillPower. I paused for a second to stretch the fingers on my right hand, Korlic jumped next to WillPower, and...

This happened. Somehow Korlic landed on top of WillPower who was also on top of the statue of Madawc. The result was that WillPower was frozen in place and COULD NOT MOVE!!!  I've been playing this game for 25 years and I've never run into this particular bug before, are you kidding me?! I was confident that WillPower could escape through a town portal to become unstuck - except that leaving the Arreat Summit would reset the battle back to square one again, argh! Interestingly enough, Korlic apparently couldn't move either and that meant that he was unable to use his Leap Attack. He could use his melee attack though and proceeded to begin stabbing WillPower with his spear. And yet... Korlic was down to about 15% of his remaining health and WillPower still had a full inventory of red potions. Could I drink enough of them to buy the necessary time for Holy Shock to get the kill? This was the most ridiculous ending to this boss fight imaginable and yet I did *NOT* want to have to restart from scratch all over again. Drink... drink... drink... It was a weirdly heart-pumping moment watching Korlic keep hitting WillPower and trying to stretch out the health restoration from each red potion to the maximum extent. Korlic's Spectral Hit trait also kept inflicting poison which sapped away more of that precious HP, argh!
It was a close race and I had to drink two more full rejuvs when WillPower's health dropped dangerously low. However, I could see that the resources I had on hand were barely enough - WillPower was going to last long enough for Holy Shock to get the job done. After three full minutes of tanking Korlic's attacks, he emerged victorious:

I was completely out of red potions - aside from the dozens still on the ground which were uselessly out of reach! - and had six full rejuvs remaining on belt. I would have been willing to use all of them if it was enough to finish this quest and avoid the need to restart. According to the timestamps in these screenshots, the Ancients had taken almost 40 full minutes to defeat and it was a thoroughly exhausting ordeal. WillPower was still stuck on that blasted statue but I was able to escape through a town portal as I'd suspected. I revived Durga back in town and went back to the Arreat Summit to walk through the gates of the Worldstone Keep just to ensure that the quest had been recorded successfully. The remaining few areas would have to wait for another session as I was too tired to continue after this ordeal.
Later that evening, I picked back up again at the Ancients Way waypoint and quickly returned to the Worldstone Keep with the goal of making it to the next waypoint. There's a wide range of monster types that can appear here in Hell difficulty and I was pleased to find an easy set of opponents: Black Lancer corrupted rogues and two types of fetishes along with their shamans. None of these enemies rose to the level of being a major threat and WillPower was long accustomed to the need to flip between his auras to deal with the Fire Immune fetishes and the Lightning Immune rogues. I could only hope that the other remaining floors would be as friendly.

Worldstone 2 basically lived up to that hope. It had more fetishes (without their shamans this time) along with Black Soul gloams and Serpent Magus claw vipers. These were again easy foes and there were oddly few snakes to be found, with most of the level full of the fetishes and nearly-invisible ghosts. Holy Shock cut right through everything except the Black Souls and Holy Fire worked well enough again them. I cleared out the whole floor without much trouble and secured the waypoint, which of course was about as far from the stairs down to Worldstone 3 as possible. I knew that the push against the final bosses was going to take a long time so I stopped here after clearing the floor and picked up again in another session. On the return trip to Worldstone 2, WillPower found that he still had Black Soul gloams as an opponent along with Fiend bats and Horadrim Ancients. The bats were a joke and the wispy gloams still died quickly to Holy Fire, however now they could be revived by the Horadrim Ancients by virtue of being undead and that was highly annoying. It was completely impossible to keep Durga alive here so I left him dead for the moment, concentrating on hitting the greater mummies with Prevent Monster Heal to kill them first in any fight. This was a bit tricky and I had to pull some retreats to lure the gloams away from the revivers but ultimately made it back to the stairs down after about 45 minutes of real world time.
Durga was back for Worldstone 3 and this floor unexpectedly turned into a complete cakewalk. WillPower found that he had drawn Demon Sprite imps, even more Soul Killer fetishes, and then Rancid Defilers as the last enemy. I've never understood that monster type which puts a curse effect on other monsters to turn them into little worm enemies when they die. Like, is that supposed to be threatening, one additional weak monster to fight? The Grotesques spawn dozens and dozens of those same worm pups and are about a hundred times more dangerous. Anyway, the whole floor had these low health, non-threatening, easy to defeat monsters that WillPower and Durga tore right through. The Rancid Defilers literally just stood around doing nothing or ran away to hide in corners, sheesh! At one point there were like eight of them all running away simultaneously which made quite a spectacle. Given what I knew was coming on the bottom floor of the Worldstone Keep, I was content to take this easy victory.

The Throne of Destruction stairs were trapped, of course, but not too badly with only half a dozen Dark Lord vampires. I've seen multiple bosses right there upon entry which is incredibly unfair when it happens. These vampires were tricky to defeat because WillPower had no room to maneuver and couldn't walk anywhere else in the level out of fear of waking up more opponents. He had to portal back to town several times to heal Durga (who was taking an utter pounding from their meteor spells) but Prevent Monster Heal along with Holy Shock and a lot of determination got the job done. Then the remainder of the Throne of Destruction turned out to be vampire central as there were FOUR vampire bosses that had to be defeated, all of them tough stuff because they had so much lifesteal between their physical attacks and natural monster health regen. The only way to make progress was to tag everything with Prevent Monster Heal and then position WillPower so that they retreated back into cleared areas instead of running deeper into the level. The other two enemies were Hell Witches who liked to toss Amplify Damage curse on WillPower and then Undead Soul Killer exploding dolls, although there were very few of them as it turned out. The dolls were actually pretty easy to defeat, I just had to make sure that they were tied up on Durga before exploding, and I kind of wish that WillPower had seen more of them. It took quite a while to fight through all those vampires, close to an hour for this small floor even before facing the boss rush at the end.
Once the whole place was cleared for safety, WillPower could head after those bosses. Colenzo is always first and this time he spawned with the Extra Fast trait which had him and his little minions zipping around like they were on acid. Durga was able to tank against them which allowed WillPower to get the PMH tag on the boss and then zap him to death with Holy Shock. The following Achmel was a much, much worse reprise of the same fight:

This guy was really tough. His skeleton minions were all Immune to Cold which meant that their bodies could not be shattered with Holy Freeze and there was no way to clean up the corpses. I did my best to lure the skeletons away from the greater mummies but I wasn't able to get all of them, only about half. All of the greater mummies had heavy poison damage, including Achmel who has an undocumented "Poison Enchanted" trait, which sent WillPower and Durga retreating back to town frequently to clear the green stuff. I did my best to pick off the greater mummy minions one at a time, slowly culling the herd of opponents over long minutes of fighting until Achmel was the only one remaining. This finally allowed WillPower to hit him with Prevent Monster Heal and then get the slow kill with Holy Shock. This was a long and tedious process because the PMH status kept resetting every time WillPower went back to town and the poison meant that he had to do that often. I spent nearly 20 minutes tangling with this boss and I was really tired of his resurrecting minions by the time that it was over.
Bartuc and Ventar were both more dangerous in the sense that they might actually kill WillPower, while also being easier to kill themselves if that makes sense. Neither one was difficult to defeat on their own, simply a matter of getting them to chase WillPower and chip away at them with Holy Fire (Bartuc) and Holy Shock (Ventar) respectively. What made them threatening was their pack of minions as each had about ten followers that spawned along with the bosses. Durga perished in about 0.2 seconds against Bartuc's mob and I left him dead for the moment as WillPower drew the Council members back into the maze of tunnels towards the entry staircase. This is the reason why it's so important to clear the rest of the Throne of Destruction, as those hallways are needed for retreat space against the bosses. Bartuc's minions were a little bit more tricky because they could heal each other and had to be killed in solo fashion while Ventar's minions were faster but still could never catch WillPower. Ventar himself had a Holy Freeze aura which made it tough to get the Prevent Monster Heal tag (that javelin throwing animation was sloooooow when chilled) but once he was hit, it was only a matter of time until Holy Shock finished him off.

Lister was just like the previous two bosses, maybe even a bit easier since he's a little slower in terms of movement speed. WillPower pulled out three of Lister's minions at first and tagged each one to stop their regeneration, then walked in slow circles around the staircase until they were all dead. Then he pulled Lister and two more minions on the next trip and repeated the same dance again. These things all have a tremendous amount of health and Lister was highly resistant between his natural lightning protection plus Spectral Hit trait on top of that. And yet... there was really no danger here at all, no chance that the melee-only Lister was ever going to hit WillPower. Once Prevent Monster Heal status was applied, it was only a matter of time until the ticking doom clock of Holy Shock landed the finishing blow. Things were safe enough that I could even zoom in and capture this great screenshot of Lister which showed his Holy Fire aura going off at the same time as WillPower's Holy Shock aura. This almost felt like a moment of catharsis: I had invested so much time playing this character and despite all of the various obstacles along the way, here he was, burning down the endgame bosses with nothing but these pathetic Paladin elemental auras. Sirian's old Flammicus character would have been proud.
All told, it took a little over 90 minutes to clear the Throne of Destruction and then complete the full boss rush. Now the true fun part could begin: Baal.

I brought Durga for the start of the battle, knowing that he would only last for a matter of seconds, still wanting him to be present for the outset of the fight against the final boss. He was shortly dead and then the real tedium could begin. There's no way around this: Baal is a terribly designed final boss encounter, rarely a dangerous foe but always someone that takes a while to kill. For unknown reasons the Blizzard developers gave him 493,000 HP along with 50% resistance to all elements - that's almost FIVE TIMES the health of Diablo! WillPower was using Holy Shock for this showdown which hit for approximately 1000 damage on average. Cut that in half due to Baal's lightning resistance and then apply that 500 damage on two second intervals and... yeah. The math said that WillPower was looking at something like 1000 pulses of Holy Shock needed to get the kill; assuming they all hit (which they wouldn't) and not counting trips back to town to refresh potions, that would take, uh, 30-40 minutes at a bare minimum. At least Baal doesn't regenerate health but geeze, this was going to take a while.
Baal summoned his clone instantly upon WillPower's arrival, literally not even three seconds passing before he had the thing out. He would proceed to resummon the clone over and over again during the course of the battle, never giving WillPower more than a brief reprieve. There was one time where the clone died and Baal brought it back within two seconds - what was the point of killing the thing then? Of course Holy Shock hit both of them simultaneously on its pulses but it contributed to the wider feeling of frustration that ran through this battle. Baal is simply not a fun opponent to face as all of his various moves feel cheap and unfair. There's the clone for starters, then his frost wave which is so wide as to be almost undodgeable, then his nova projectiles that hit the whole screen. He also likes to teleport next to your character followed by using his signature orange shot which is about the cheapest telekill move possible. Thankfully the damage is way lower than it was on the expansion's release but there's still nothing fun about this setup.

For WillPower, the biggest issue was the Festering Appendages that Baal and his clone liked to summon. The little tentacles would pop up out of thin air and immediately begin attacking my Paladin, often before he knew they were there and could react. Sometimes I would start moving out of the way of the tentacles, only to click on a part of the map where another one would pop out of nothingness and cause WillPower to stand in place with an "I can't" response. At other times, long stretches would pass with no Festering Appendages appearing at all, only to have two dozen of them on the field seconds later. It was all completely random and impossible to predict, the very embodiment of a poorly designed boss fight. (And if you're curious, that was of course the clone's health bar in the picture above. Baal still had a lot more left in the tank.)
This was therefore an exceedingly boring boss encounter as WillPower spent most of the time walking away from Festering Appendages and drinking red potions as Holy Shock dealt infinitesimal damage to Baal's monstrous health total. Very rarely, WillPower would get swarmed by the tentacles and have to drink a full rejuv for safety as I was absolutely not going to let this jerk kill him. Ten minutes passed, then twenty minutes. Thirty minutes. I was buying 15 red potions on every trip back to town and still having to return to Malah over and over again to restock. By the 45 minute mark, Baal was down to the "B" on his healthbar and I knew that I was starting to get close. He was still spamming the clone though, even as the thing started to die repeatedly (it always starts with Baal's current health total). As I approached the hour mark, the clone started dying as soon as it was summoned but Baal never stopped bringing more of them out. I think the longest break where it wasn't on the field was about 30 seconds over the course of an hour-long fight, absolutely ridiculous.

I revived Durga for the very end of the battle, he deserved to be there for the final victory. Just die already, you ridiculous boss! 

Exactly one hour and one minute after starting, it was all finished. Baal keeled over dead and WillPower received the quest pop-up indicator notifying him that it was done. I talked to Tyrael and hopped through the red portion to get the official notification that he had achieved Patriarch status, though he never died at any point in time so this would have qualified for Guardian rank if I had been playing him as a Hardcore character. Maybe someday I'll trust Blizzard's servers enough to create a Hardcore character for real, but that day is not today.

Here are some of the final stats for WillPower and his character build. WillPower made it completely through all three difficulties, every area full cleared, all monsters slain (save one portal parked minotaur boss), zero deaths incurred. I can't prove that and you'll have to take my word for it, but I did take ElectricTsunami through the whole Low Rent Legion run without dying and that was played entirely on Livestream. Also, given the difficulty of playing this character, I can also tell readers that I would have stopped playng WillPower if he had died somewhere along the way. It wasn't worth the herculean effort that I was undertaking to make it through these areas if I couldn't claim the deathless full game clear in the process. I would not have spent five full hours in Nihlathak's stupid temple doing that kind of painstaking work, believe me! What an amazing ride this character had been, from the easy wiping of the monsters in Normal difficulty to the seemingly impossible challenges in Hell difficulty. I remembered the staircase battle in the Pit Level Two, the torturous fight against the Burning Dead and Unravelers in the Tombs of Tal Rasha, the endless healing of the Hierophants in Travincal, the absurdly unkillable Venom Lords throughout Act Four, and then the struggles all across the final act covered on these last two pages. It was quite a journey to make it to this point.
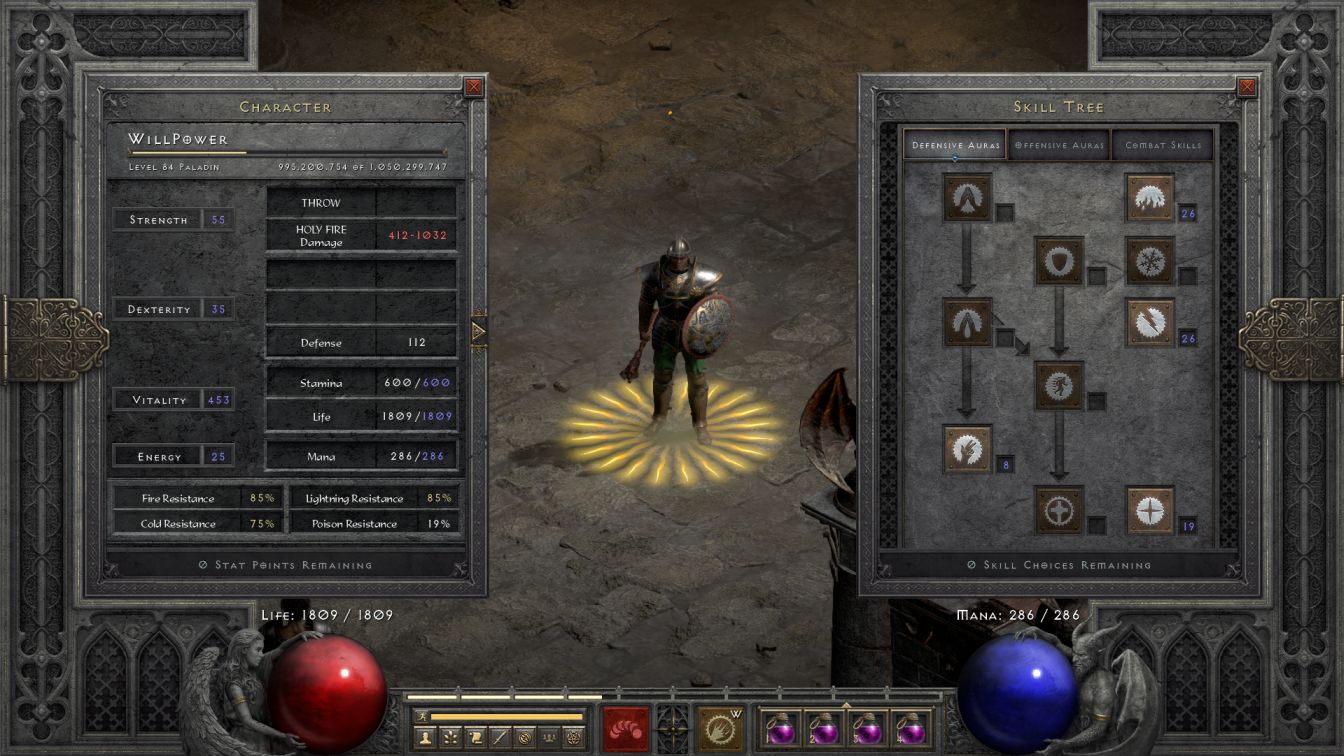
And the remaining stats for Holy Fire and the Defensive Auras skill tree. As far as the verdict on the Paladin's elemental aura skills: they were legitimately awesome for Normal difficulty and most of Nightmare, better than I could have imagined. However, the truth is that these auras really are not viable as the only source of damage for Hell difficulty, the general consensus is completely correct in that regard. The enemies in Hell simply have too much health, too many resistances, and too much innate HP regen to make Holy Fire or Holy Shock practical. As always, splitting up damage over a wide variety of targets is inherently inferior to concentrating it on one opponent at a time. The fact that I could still carry WillPower over the finish line with this variant setup was more of a testament to extreme patience on my part than an endorsement of these skills. I was leaning way too hard on Prevent Monster Heal to make any progress at all, and even Durga's pathetic spear with 50 poison damage over 5 seconds was dealing a disproportionate amount of the team's offensive output. This was roughly on the level of Rogue Revival in terms of being a crippling variant and I'm not eager to do anything quite this crazy again.
I mentioned that I do have at least one more idea for another Paladin character build in the future though I plan to take a break from Diablo 2 for a while first. In the meantime, this character was dedicated to our son William who turned 20 months old today as I write this. I don't know if he'll ever read this report, but if he does, he should know that I stuck with WillPower through thick and thin because I couldn't bear to let the real William down. We love you kid! 


