

Game Three Alternate Histories Spreadsheet
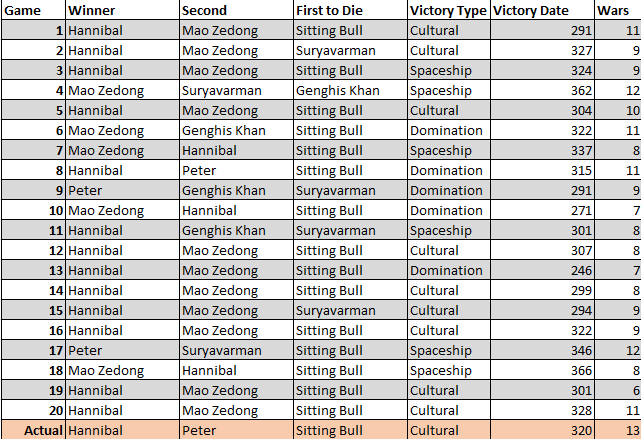
One of the recurring features of past seasons of AI Survivor have been our "alternate histories", running additional iterations on the same maps to see if the same events would play out again. Season Three Game Three saw a rampaging Hannibal devour half the map, while Peter managed to stay out of the way and sneak in a second place. Was that something which would unfold in each game? This was a topic that called for more investigation with alternate history scenarios. Following the conclusion of previous seasons of AI Survivor, I had gone back and investigated some of the completed games and found that they tended to play out in the same patterns over and over again. While there was definitely some variation from game to game, and occasionally an unlikely outcome took place, for the most part the games were fairly predictable based on the personality of the AI leaders and the terrain of each particular map. Would we see the same patterns play out again and again on this particular map?

The original inspiration to run these alternate histories came from Wyatan. He decided to rerun the Season Four games 20 times each and publish the results. The objective in his words was twofold:
- See how random the prediction game actually is. There's a natural tendency when your predictions come true to go "See! Told you!", and on the contrary to dismiss the result as a mere fluke when things don't go the way you expected them to (pleading guilty there, Your Honour). Hopefully, with 20 iterations, we'll get a sense of how flukey the actual result was, and of how actually predictable each game was.
- Get a more accurate idea of each leader's performance. Over 6 seasons, we'll have a 75 game sample. That might seem a lot, but it's actually a very small sample, with each leader appearing 5-10 times only. With this much larger sample, we'll be able able to better gauge each leader's performance, in the specific context of each game. So if an AI is given a dud start, or really tough neighbours, it won't perform well. Which will only be an indication about the balance of that map, and not really about that AI's general performance. But conversely, by running the game 20 times, we'll get dumb luck out of the equation.
Wyatan did a fantastic job of putting together data for the Season Four games and I decided to use the same general format. First I'll post the resulting data and then discuss some of the findings in more detail. Keep in mind that everything we discuss in these alternate histories is map-specific: it pertains to these leaders with these starting positions in this game. As Wyatan mentioned, an AI leader could be a powerful figure on this particular map while still being a weak leader in more general terms. Now on to the results as run by Amicalola:
Game One | Game Two | Game Three | Game Four | Game Five
Game Six | Game Seven | Game Eight | Game Nine | Game Ten
Game Eleven | Game Twelve | Game Thirteen | Game Fourteen | Game Fifteen
Game Sixteen | Game Seventeen | Game Eighteen | Game Nineteen | Game Twenty


(Note : "A" column tracks the number of war declarations initiated by the AI, "D" the number of times the AI is declared upon, "F" the points for finish ranking, and "K" the number of kills.)
Amicalola: Um, yes, Real Game Three was quite close to the results of this Alternate History set! Hannibal totally dominated these games, which was especially impressive considering he usually wasn't able to claim much land, stuck at 6-7 cities after the landgrab (for comparison, Mao Zedong would usually be hovering around 10). Instead, Hannibal's strength here was technology, where he leveraged his strong capital into an early tech lead, usually beelining Construction and using catapults to dismantle a neighbour early on. That neighbour was usually Sitting Bull, whose inevitable demise was the other big story of this game. Sitting Bull was totally screwed by the map and the diplomacy, never looking like much of a contender even before he was invariably dogpiled into oblivion - he was first to die in three quarters (!!) of the games, and couldn't even come close to surviving until the end. It was usually Hannibal, Mao, or Peter who claimed most of Sitting Bull's territory, and it was no coincidence that these were the three leaders competing for the wins. Anyway, once Hannibal had killed Sitting Bull (or less frequently Suryavarman), he was typically Pleased-locked with his opponents due to peaceweight and mutual war bonuses, and simply teched up to an early spaceship or culture win, with there being little the other leaders could do to stop him. The other strong leader here, and the exception to these games following the livestream result, was Mao Zedong. He always claimed the most land peacefully, and tended to gradually roll over the eastern half of the map. He usually equaled or bettered Hannibal in Food and Production, but Hannibal's GNP was usually miles ahead of Mao's, and that tended to give Hannibal the edge in the games that were competitive (though not always - for example, in Game 4 Mao snuck in a spaceship win by <10 turns). When something went wrong for the Carthaginians though, or when Mao could conquer Peter/Sitting Bull unusually efficiently, he was also a strong contender for the win.

The dark horse here was Peter, who won two games and was consistently strong in the midgame. Peter's wins were similar to many warmongers', whereby he would roll over a neighbour unusually early for whatever reason, and could snowball that on. Peter's problem was diplomacy, where his central position made him likely to get embroiled in two-front wars after Sitting Bull was gone, but in the rare games that he could avoid that, he was highly capable. The other two leaders here, Genghis Khan and Suryavarman, basically sucked, but for different reasons. Genghis had an unfortunate tendency to start suicidal wars, and in the rare games where he avoided this he was terrible at building an economy, which disqualified him from ever contending for a gold medal. Suryavarman on the other hand had a very tenuous metals situation, which meant that he was very vulnerable to getting gut-punched by Hannibal or Genghis Khan. Either of these leaders could quickly take Sury's only copper/iron source, and then consume him at leisure. Suryavarman also suffered from founding the other religion to Hannibal, which meant that he was often the only viable candidate for Hannibal's programming to attack - that never ended well for the Khmer. Either of these leaders would have been very lucky to advance from this game, and were clearly several tiers below the top three in overall strength. Overall, it was a game dominated by diplomacy and starting positions, where the winners in both (Hannibal, and Mao) crushed the losers (Suryavarman, Genghis Khan, and especially poor Sitting Bull), with Peter somewhere in between.
Now for a look at the individual leaders:

Hannibal of Carthage
Wars Declared: 28
Wars Declared Upon: 36
Survival Percentage: 90%
Finishes: 13 Firsts, 3 Seconds (71 points)
Kills: 23
Overall Score: 94 points
Even if he didn't quite get to the 100 points benchmark, Hannibal took advantage of a starting location that perfectly suited his starting techs (fish + gold tiles) to become an absolute MONSTER on this map. He won two thirds of the time by spaceship, culture, and domination, averaged over a kill per game, and was never even close to dying first. He expanded the fastest (if not the most), had the best economy, and the highest power in basically every game, barring something wacky happening elsewhere. Hannibal was especially notable for his penchant to rush Construction tech before Turn 100, and only attack a neighbour after he'd begun building catapults. This made Hannibal's early wars far more efficient than we normally see, as he could actually take cities immediately. The target was usually Sitting Bull, and occasionally Suryavarman (who also attacked the Carthaginians a surprising amount due to religious and cultural tension). Hannibal was easily capable of solo-conquering either leader, although he often didn't need to as allies could be found in both scenarios. After this initial war, Hannibal was often Pleased-locked with everyone, which meant that barring someone else stupidly attacking him (usually Sury, but occasionally Mao/Genghis/Peter), he would rocket through the tech tree en route to very early cultural or spaceship victories. This was responsible for his shockingly low offensive war count. Alternatively, if someone did attack him, he could react very effectively, most notably in Game 13 which saw Hannibal score two kills and a domination win, while declaring zero wars himself (in Game 5, Hannibal also took Mongolian cities defended by longbowmen with tanks, in a war that Genghis started!). Hannibal's bad games came in two varieties, neither of which is unusual for AI Survivor. Either another AI would snowball out of control and wipe him out in the lategame (usually Mao, but sometimes Peter), or Hannibal's initial war would fizzle out (most notably in Game 4) and he would be left without enough land to compete with Mao Zedong. But these were both rare occurrences, and this was a dominant performance indeed.

Mao Zedong of China
Wars Declared: 42
Wars Declared Upon: 15
Survival Percentage: 80%
Finishes: 5 Firsts, 11 Seconds (47 points)
Kills: 17
Overall Score: 64 points
Well, I guess we can't all be Hannibal. Mao Zedong was the clear second-place leader on this map, advancing as often as Hannibal did but with a lot more silver medals instead of gold. Mao typically settled the most land, could often claim more from the inevitable Sitting Bull dogpile, and performed adequately (but not impressively) in every Civ4 category. His tech was fine, his power was fine, he was just generally competent, which is exactly what we've come to expect. After Sitting Bull was dead, Mao typically went after Peter, and could usually kill him too due to his advantage in land and hammers. From there, he was clearly the second-strongest leader in most games, but also clearly a step (or three) behind Hannibal. Mao's wins came either from the rare games where Hannibal and Peter knocked each other out of contention (Games 4 and 7), or the games where he could eat Peter more efficiently than usual (Games 6, 10, and 18). In a sense, Mao was even more consistent than Hannibal; the Carthaginians had the occasional stinker, where Mao was a strong force in basically all of them. However, Mao also had by far the best starting position on the map, in terms of both quantity (where he could easily settle 10 uncontested cities; Hannibal could usually get 6-7) and quality, with an absurd number of resource tiles. In that context, this performance is almost disappointing, and I would be very interested in the results if we were to swap their positions. As such, Mao was definitely unlucky not to advance on livestream, but it's hard to know whether his good odds were the result of a strong personality, or the quirks of this particular map.

Peter of Russia
Wars Declared: 40
Wars Declared Upon: 27
Survival Percentage: 50%
Finishes: 2 Firsts, 1 Second (12 points)
Kills: 7
Overall Score: 19 points
Peter was surprisingly effective on this map, even though his stats don't really show it. He was usually the only leader that could compete with the Mao/Hannibal duopoly, even if his final stats show him to be much weaker. His good games were standard for warmongers - they saw Peter snowball off an early conquest and run over the other main competitors before they could catch up. In Game 9 he killed Suryavarman before the Khmer connected metals, and in Game 17 he lucked out and got most of the Native American cities. However, while Peter was typically competitive with those two until the mid- or late-game, in most games he had a couple of things holding him back at that point. For starters, he had a worse diplomacy situation, due mostly to being in the central part of the map; Peter was the only leader to consistently fight with all four of the others, and he consistently found himself in two-front wars that the AI struggles to handle. In particular, Peter was often the second- or third-strongest leader on the map, but would get ground down by the strongest in Mao or Hannibal. Almost all his deaths were to these two leaders, as they gradually ground him down from an initial position of strength. Additionally, Peter's snowball was often pre-emptively stopped by pointless early war declarations from Genghis Khan, which was always a lose-lose situation. Basically, Peter's game revolved entirely on whether he could get the snowball rolling fast enough to escape Death-By-China/Carthage; most of the time he couldn't, but unlike the remaining trio, he at least had a shot.

Genghis Khan Temujin of the Mongols
Wars Declared: 44
Wars Declared Upon: 22
Survival Percentage: 45%
Finishes: 0 Firsts, 3 Seconds (6 points)
Kills: 11
Overall Score: 17 points
Genghis was an interesting leader here. He had a strong starting location, with food resources and luxuries available. Unfortunately, he shared with Suryavarman a unique weakness to this map - low access to Sitting Bull. When Peter, Hannibal and Mao attacked the Native Americans, they inevitably took a few cities that bordered their existing cores. Meanwhile, when Genghis Khan did so, his new holdings would be cut off and isolated from his territory, culturally pressured and easily lost. Combine this with a penchant for picking stupid wars with stronger leaders (Hannibal and Peter especially, and sometimes Mao) in the lategame and Genghis often found himself eliminated from a position of mediocrity, where better (read: less insane) leaders would have at least gone to the wildcard game. Genghis' avenue to success was attacking Suryavarman, where he could sometimes solo-conquer the Khmer if he sniped Sury's metal city (e.g. Games 11 and 16), or work together with Hannibal. This would give Genghis Khan enough land to compete economically with the non-Hannibal leaders, but even then he never really looked like winning - he just had some games that were semi-competitive, and more games that were not.

Suryavarman of the Khmer
Wars Declared: 27
Wars Declared Upon: 23
Survival Percentage: 20%
Finishes: 0 Firsts, 2 Seconds (4 points)
Kills: 5
Overall Score: 9 points
Suryavarman was the victim of a grim situation that we've seen a few times in AI Survivor - his access to metals was flimsy at best, which led to a lot of early eliminations from initial positions of strength. Sury had two potential metals towards Hannibal and Genghis Khan, however he typically settled 0-1 of them per game, and they were often the first city taken in any potential wars. This meant that Suryavarman would come out of the landgrab roughly on par with the other leaders, but collapse very quickly if he got into a fight. For example, in Game 9 Peter killed a metal-less Sury basically for free (leading to a rare non-Hannibal or Mao win), and in Game 11 Genghis Khan sniped his metal city with a very early war declaration, leading to another quick death. If he could manage to settle one of these and avoid losing it for the whole game, Suryavarman still struggled because he was stuck next to strongman Hannibal, and was typically a different religion to him - this often meant that Suryavarman was the only leader Hannibal was NOT pleased with after Sitting Bull's death, and vice versa, leading to a lot of midgame eliminations too. It was reflected in a poor survival rate for the Khmer, and a low number of defensive wars for a high number of deaths shows Suryavarman was very vulnerable to collapsing when he was attacked. This was a poor performance, adding to the growing pile of evidence that Suryavarman tends to do very well, or very poorly, with little in between.

Sitting Bull of the Native Americans
Wars Declared: 3
Wars Declared Upon: 61
Survival Percentage: 0%
Finishes: 0 Firsts, 0 Seconds (0 points)
Kills: 0
Overall Score: 0 points
I mean yeah, this one was tough to watch. Sitting Bull had absolutely no chance diplomatically here, the only 'good' leader in a cesspit of violence. He was the first leader attacked in virtually every game, often by two or three leaders within the first 80-100 turns. He only made it to Turn 200 thrice, and never got past around Turn 250. Sitting Bull's diplomatic problems were compounded by easily having the worst start on the map, surrounded by jungle and with a weak capital to boot - even Huayna Capac would have likely struggled from here! As such, it's hard to see what a successful game could have plausibly looked like for Sitting Bull, because I'm confident you could run this game 100 times and he wouldn't survive once. In that sense, I wouldn't draw many conclusions about his AI personality from this one - the game was just rigged against Sitting Bull from the start.

In conclusion, this game went partially as expected, and partially not. Hannibal certainly was the deserving winner, backing up his performance with one of the more dominant AH results I've seen. He even won by culture most of the time (9/13 wins), reinforcing that surprise as well. However, Mao Zedong was very unlucky to be eliminated, and should very likely have advanced with Hannibal. At least Peter was probably the most deserving of that, once Mao had been taken out. Otherwise, things went roughly to plan, with Sitting Bull clearly a deserving first-to-die, and Suryavarman just a little lucky to survive instead of Genghis. This game is one of many in Season Three that had a clearly correct prediction for all three 'positions,' so well done if you picked up on that back in the day. Although the games often lacked much drama after the first 150 turns, it was fun watching Hannibal stomp all over everyone. I hope we'll get to see it again sometime.
This was a shorter Alternate History, but I hope it still brought something interesting to your day!
Cheers ~ Amicalola 


